The main purpose of the ASUS RT-N13u router is the repeater function. What does this mean, which means the router picks up the signal wifi hotspot, connects to it (for this you need to know the key to the wireless network) and transmits it further, thus expanding the zone wifi action... Most often, repeaters are used in large areas, such as shopping malls or large stores. And also in private homes to cover the entire home or even outside of it. And so you purchased an ASUS RT-N13u router or are just going to purchase it, the question arises of how to configure it so that this router distributes the existing wi-fi network over long distances. In general, everything is simple.
You need to turn on the router, wait for it to boot.
Then connect it to your computer through the wire that comes with this router. (it doesn't matter a stationary computer or a laptop).
Then open a browser (opera, firefox, chrome) and write in the address bar 192.168.1.1 the router will ask for a login password, enter "admin" as a login and "admin" as a password.
This window will open for you. Select the repiter operating mode. By clicking on the item operating mode.

There is a switch at the bottom of the rotuter, you need to put it in the middle on the repiter. The picture below shows how to do this.

Then go to the network map. At the bottom right there is a "GO" button in the AP search item

ASUS RT-N13 will search for all wi-fi access points in the field of view and display them on the screen. You need to select your wi-fi network from the list and connect to it. I only had one network visible, here it is. Click on it and then the connect button.

Enter the key from the wi-fi access point. After that, the repeater will connect to it.

After that, it will display such a window.

Now the coverage of the wi-fi network has expanded significantly. Most likely, the name of the network has not changed and remains the same as on your router. You can change it if you want.
Read 3593 once
The new ASUS router is designed for those who value value for money. It is suitable for a typical home 100Mbps network. In addition, it supports wireless connection the printer and its use by several users at once. Convenient, isn't it? But how to set up an asus router? We will definitely answer this question a little later, but now let's talk a little about something else.
Completion and appearance
The asus rt n13u wifi router is rather poor in its configuration, but it doesn't matter! The contents of the box are enough to work with this device. The kit includes a power adapter, network cable, CD with software, installation instructions in several languages (Russian is included in this list). This device is intended for vertical installation only. You cannot hang it on the wall, put it horizontally. A very dubious move of the designers, given that when full connection all the necessary wires and cables, they will not very aesthetically stick out of the device.
There are two buttons on the bottom of the device.
One of them is responsible for resetting the settings to factory settings, but the other is very interesting. This is a switch that can switch the asus 13 router into one of three operating modes without the help of software.
The device can be:
- classic router,
- a wireless repeater,
- work in a mode when the device is used as a second router in the network.

Configuring the asus rt n13u router
For quick setup router, the EZSetup / WPS utility, which is supplied with the device on optical disc... With it, you can quickly set up a wireless secure network, it does not require any special knowledge. Here you can find presets for many Russian Internet providers. There is also a button for configuring via Wi-Fi.
The first step is to install the utility. Click Setup in the appropriate folder on the disk. Next, I follow simple instructions on the screen, set software to your computer.
Now take an asus rt n13u router and connect the power cord to it, the provider's cable in WAN port... It is necessary to make sure that the computer "sees" the device. Run the program and click Next. Then, on the router, hold down the Reset button until the power indicator blinks. On the computer, click "Next" again, enter the name of the network, which will be seen by other people who want to connect to you.
Next, you need to come up with and specify a security key that is needed to encrypt traffic, which will protect you from unauthorized access to the network by other users. Go to the next dialog box, specify the city, Internet provider and connection type. If the data you need is not in the list, use the "Advanced Internet settings connection ". Now you only need to find the created connection in the list of wireless networks.
Congratulations! You have successfully completed the setup and now you can open your favorite browser and start browsing the Internet!
Detailed setting

But what about advanced users who don't want to limit themselves to such a simplified setup? What is the most complete and how to properly configure an asus router? For this, an extremely convenient and intuitive web interface was created. Access there is conservative and is carried out through address bar browser where you need to enter the IP address. The factory IP is on the bottom of the case, near the "Reset" button. There is special utility Device Discovery, with which you can find out the IP address and subnet mask.
The router's web interface is fairly standard. We immediately see the map network connections... You can customize right from here various parameters, which will be a significant help for a beginner and a convenience for more sophisticated users. Here you can see tips in pop-up windows in Russian everywhere. In addition, if any device is connected to the network, it will be immediately detected and displayed on the screen.
In addition to all this, there is standard menu, which consists of twelve points. The developers did a good job on the interface, which makes it easy to configure the asus rt n13u router. The procedure for connecting to the Internet is automated and the QIS function is used for this. We will not dwell on the standard, commonplace router settings, but consider the proprietary "chips" of the device.
AiDisk function

Let's note the AiDisk function. There is a separate section for it. With it, you can quickly and easily organize an FTP server at home to save data. Thanks to Dynamic DNS the server address will be memorable.
Setting up the rt n13u router can be interesting and memorable thanks to its unique functions and "chips".
Let's take a look at connecting the printer to the device
To do this, there is a device on the device USB port 2.0. The router can act as a print server. What does it mean? You connect the printer to the router, make the appropriate settings, and please! It will be possible to remotely print documents and photos. Convenient, isn't it? There is a special printer for setting up the printer. ASUS utility Network Printer Setup. It is easy to use. When starting up, just follow its instructions.
We connect the hard drive to the router
The USB 2.0 port can also be used for an FTP server. Need to connect external storage and use the data taken from there on your network. You can download information from the Internet to it. When connected similar device into the router port, the rt n13u router itself supplies disk drive which is extremely practical.

It should be recalled proprietary function, which allows you to control the bandwidth of the router using simple interface... We're talking about the EZQoS feature that can be useful when connected to a network a large number users. Traffic is divided into classes and priorities are assigned accordingly. For this there is a menu item "EzQoS Bandwidth Control". You can prioritize game traffic and enjoy the products of the computer entertainment industry. You can give priority to online video viewing, calls and conversations with one click of the mouse on the corresponding icon. Detailed setting the above function can be done using the item " Additional settings"In the QoS attachment. Here you can set priorities for specific applications.
Additional settings

Menu item "Additional settings"
The menu item "Additional settings" contains many functions. Let's take a look at the most interesting ones.
In General, you can configure the default settings for your wireless network. The peculiarity is that if you choose the corporate method of checking the connected user, you will need to additionally configure it to work with the RADIUS server.
Opening the menu item "Professional", you can see a number of interesting settings such as enabling / disabling the module wireless and work on schedule. That is, you can set the days and hours when the router needs to work.

Resetting the router to factory settings
And now you have played enough with the settings of your new router, but that's bad luck! The operation of the device has become unstable due to the fact that you missed something in the settings, set the wrong parameter! No wonder, because ASUS routers allow any user to fine-tune the network parameters, for which there are many different settings that even a professional can get confused about. What to do in such a situation? How to reset your asus router? The answer is simple - there is a factory reset button at the bottom of the device. It is recessed into the body, which protects against accidental pressing. You need to hold it for a few seconds and the router will behave as if you just got it out of the box and just plugged it in.
Repair of asus routers
Despite all the advantages of the router in question, there are some unpleasant properties that I would like to talk about. Nobody is safe from this kind of incidents, but if something like that happens, you will know how to solve the problem. If the router suddenly stops distributing wi-fi, check the power supply. ASUS devices will work even with a barely-pulling power supply, but some functions will be unavailable and most often the wireless network signal stops being given.
Also, from prolonged work, capacitors can burn out. Knowledgeable people can immediately identify the problem by "walking" the probe through the elements of the board and replacing the damaged element. If you are an inexperienced person in this matter, such actions should not be performed, you can completely ruin the board by exposing sensitive chips to overheating. But if you nevertheless decide on this business, a blowtorch or a soldering iron with a thin tip is best suited here. As a rule, a failed capacitor becomes "swollen" and is not difficult to detect.
No, we don't want to scare you. Such cases are very rare and mainly due to misuse devices.
For example, do not put the router near a battery or heater, or expose it to mechanical stress.
Let it just stand on the floor or on the table and you will enjoy its stable performance.
In conclusion, I would like to say:
I hope that after reading this article, you figured out how to configure the rt n13u router, how to fix it, and how to use it. Finally, I would like to say that this is one of best devices intended for home use... In terms of price / quality ratio this device leaves its competitors far behind.
Hey! Not so long ago, I wrote an article that my TP-Link router TL-MR3220 through which I distributed the Internet via Wi-Fi from the Novatel U720 3G modem broke down and I decided to buy another one, this time from Asus (here's the article). I bought it means new router Asus RT-N13U(so wait for a number of articles on setting up Asus routers, otherwise you have already written everything about TP-Link :)).
In this article I want to tell you a little about this router, I will do small overview, and then I will write how to connect and configure Asus RT-N13U. I will show you using an example of setting up for your 3G modem Novatel U720 from the provider Intertelecom. But this is not very important, since this instruction is also useful for configuring for other modems and providers. Yes, and setting up this router for a normal cable internet should not seem difficult to you.
Perhaps running a little ahead of myself, I will say that Asus routers have a very cool and well-thought-out control panel. It is much easier to understand it than in the same routers from TP-Link. The network map is cool. And the router itself is very good. I connected and configured it in two minutes, everything is very simple.
For a long time I chose to replace the TL-MR3220. There are not so many routers with support for 3G modems. I decided to buy from Asus. The firm seems to be good, the functionality of the RT-N13U model is also good, and the price is not high either. I did not dare to buy TP-Link again, although I also like the company.
It immediately seems that the design is not stable and the router will fall all the time, but in practice everything is fine, the device is stable.

On the front panel, you can see indicators: power, wireless, connections WAN cable, and 4 LAN indicators. And another WPS power button.

There is nothing interesting on the sides. And on the back there are 4 LAN connectors, 1 WAN, 1 USB and a power connector. As for the USB connector, here, in comparison with the TP-Link TL-MR3220, it is used not only for connecting 3G modems, but also for flash drives, printers, etc. general access to the contents of the flash drive, or to the printer.

Below you can see the mode switch of the router and the button for resetting the settings (you need to hold it for a few seconds).
There are three options for how the router works:
- Router – normal mode, when we connect the Internet to the router, and he distributes it.
- Repeater- repeater mode. Can use Asus RT-N13U to amplify Wifi signal.
- AP- access point mode (connecting to wireless router by cable).
The bottom of the device has a very helpful information- this is the address for entering the settings of the router and a login with a password that is used by default.

As you probably already noticed, external antennas not on this router, they are built-in. But the signal quality did not suffer from this. If we compare it with the TL-MR3220 again, the Asus router has a larger coverage area.
I also forgot to write about the bundle. It is standard. In the box you will find the router itself, a power supply, a small network cable, disk and a few pieces of paper.
Connecting and configuring the Asus RT-N13U router
Let's get down to setting up the Asus RT-N13U and try to make friends with our 3G modem.
Connect the router to the mains and connect it with the network cable (supplied) to the computer.

You can also immediately connect a 3G modem. I advise you to connect the modem through a small USB extension cable... But I connected it through a three meter extension cord (I just need to lift the modem high) and everything works fine.

Two tips:
At the time of setup, I recommend connecting the router via a network cable. It is not advisable to configure via Wi-Fi. And sometimes it is dangerous (to update the firmware). After the configuration, the network cable can be disconnected and the Asus RT-N13U will work by itself.
The modem must be located within the network coverage area and the Internet must be paid for. Whatever happens, that the router simply cannot establish a connection due to the fault of the provider, or the modem.
Are you all connected? Let's start setting up.
Open your browser and type in the address 192.168.1.1 ... You should be prompted to enter a password and login to access the settings. Introduce admin and admin... This data is set by default (you can see it from the bottom of the router). If you cannot enter the router settings, then see the article Does not enter the router settings (to the address 192.168.0.1, 192.168.1.1).

The configuration wizard should appear. If we want to set up a connection via 3G, then it will not be useful to us. But for setting up a regular cable WAN connections this is what you need, just follow the instructions.
But we are configuring Asus RT-N13U (Rev.B1) to work with a 3G modem. Therefore, in the wizard, press the button "To Home Page".

Setting up the modem and provider
I hope you have already connected the modem. If yes, then on home page go to menu item USB application and select the tab at the top USB Modem... Against Enable USB Modem? install Yes.

Provider settings will open. Choose your location and provider. 3G / 3.5G USB adapter can leave on AUTO... I didn't enter any more settings. Don't forget to press the button Apply.

The router will reboot and should already be connected to the internet.
But after restarting the router, you need to wait a little while it establishes a connection via a modem. In the control panel, go to the tab Network map.
You should have something like this:

Click the icon "Connected"(if you have one). On the right you will see the connection status. This means that everything is working and the router can distribute the Internet.
In order to view the status of the modem, just click on it and on the right you will see information about it (there is not a lot of information, only the name :)).

We still only need to set a password for wireless network and change the password to enter the settings. You can do without this, but it's better to take care of the security of your wireless network right away.
And one moment. If you are not very good connection, then I advise you to connect the modem to your computer and using the program AxesstelPst EvDO configure the modem to best welcome... I wrote about this in the article How to set up 3G Internet using the AxesstelPst EvDO program. When you find (guided by the indicators from the program) an excellent position of the modem, then fix it and connect it to the router.
Than the best and stable signal, the faster and more stable the Internet will be.
Setting a password for a wireless network
In the control panel, on the left, go to the tab "Wireless network"... Now let's take a look at the parameters we need, point by point:
- SSID: this is the name of your Wi-Fi network. You can write any name.
- Wireless network mode: let it be Auto.
- Channel width: I personally set it to 20 / 40MHz.
- Channel: if your devices find a lot of wireless networks in your house, then it is better to install Auto... Read more about channels here.
- Authentication method: I advise you to install WPA2 Personal.
- WPA Preshared Key: create and write down a key for your wireless network. If you forget it, then the article How to find out the password for your Wi-Fi network will come in handy?
Click the button Apply.

If you have already connected devices to this router, before setting the password, then most likely you will have problems with their reconnecting... You need to remove the connection on the device (read more in this article), and reconnect to the network by entering the password that we just set.
Change the password to enter the Asus RT-N13U settings
Go to the tab Administration... In field New password: enter the password that you want to use to log into the control panel of the router (instead of admin). In the field below, enter this password again for confirmation. Click the button Apply.

On the same page, you can change your time zone.
Conclusion
Nice router, good price and a great control panel. Stable work with a 3G modem (thu thu thu :)).
Asus RT-N13U with Novatel U720 modem from Intertelecom works fine. I set everything up in a couple of minutes.
If we compare this router with TP-Link TL-MR3220, then Asus is better(I wrote about configuring the TL-MR3220 in this article).
And not because TP-Link broke down after a couple of months of painful work (maybe it's just a marriage, anything can happen). Asus has the same control panel that is much simpler and clearer. And a simple user can easily set up a connection and a wireless network in a few minutes.
If you need a good and not very expensive router to distribute 3G Internet via Wi-Fi, then router Asus RT-N13U copes with this task perfectly.
And my instructions will help you quickly configure this router. Best wishes!
Hello readers of the blog of the ComService company (Naberezhnye Chelny)! Not so long ago, I wrote an article that my TP-Link TL-MR3220 router through which I distributed the Internet from the Novatel U720 3G modem via Wi-Fi broke down and I decided to buy another one, this time from Asus (article). I bought it means a new router Asus RT-N13U(so wait for a number of articles on setting up Asus routers, otherwise you have already written everything about TP-Link :)).
In this article, I want to tell you a little about this router, I will make a small overview, and then I will write how to connect and configure the Asus RT-N13U. I will show you using an example of setting up for your 3G modem Novatel U720 from the provider Intertelecom. But this is not very important, since this instruction is also useful for configuring for other modems and providers. And setting up this router for a regular cable Internet should not seem difficult to you. Perhaps running a little ahead of myself, I will say that Asus routers have a very cool and well-thought-out control panel. It is much easier to understand it than in the same routers from TP-Link. The network map is cool. And the router itself is very good. I connected and configured it in two minutes, everything is very simple.
A little about Asus RT-N13U
For a long time I chose to replace the TL-MR3220. There are not so many routers with support for 3G modems. I decided to buy from Asus. The firm seems to be good, the functionality of the RT-N13U model is also good, and the price is not high either. I did not dare to buy TP-Link again, although I also like the company.
It immediately seems that the design is not stable and the router will fall all the time, but in practice everything is fine, the device is stable.

On the front panel, you can see indicators: power, wireless, WAN connections cable, and 4 LAN indicators. And another WPS power button.

There is nothing interesting on the sides. And on the back there are 4 LAN connectors, 1 WAN, 1 USB and a power connector. As for the USB connector, here, in comparison with TP-Link TL-MR3220, it is used not only for connecting 3G modems, but also for flash drives, printers, etc. You can organize shared access to the contents of a flash drive, or to a printer.

Below you can see the mode switch of the router and the button for resetting the settings (you need to hold it for a few seconds).
There are three options for how the router works:
Router- the usual mode, when we connect the Internet to the router, and he distributes it. Repeater- repeater mode. Can use Asus RT-N13U for enhance wifi signal. AP- access point mode (connecting to a wireless router via cable).
There is very useful information on the bottom of the device - this is the address for entering the settings of the router and a login with a password that is used by default.

As you probably already noticed, there are no external antennas on this router, they are built-in. But the signal quality did not suffer from this. If we compare it with the TL-MR3220 again, the Asus router has a larger coverage area.
I also forgot to write about the bundle. It is standard. In the box you will find the router itself, a power supply, a small network cable, a disk and a few pieces of paper.
Connecting and configuring the Asus RT-N13U router
Let's get down to setting up the Asus RT-N13U and try to make friends with our 3G modem.
Connect the router to the mains and connect it with the network cable (supplied) to the computer.

You can also immediately connect a 3G modem. I recommend connecting the modem through a small USB extension cable. But I connected it through a three meter extension cord (I just need to lift the modem high) and everything works fine.

Two tips:
At the time of setup, I recommend connecting the router via a network cable. It is not advisable to configure via Wi-Fi. And sometimes it is dangerous (to update the firmware). After the configuration, the network cable can be disconnected and the Asus RT-N13U will work by itself.
The modem must be located within the network coverage area and the Internet must be paid for. Whatever happens, that the router simply cannot establish a connection due to the fault of the provider, or the modem.
Are you all connected? Let's start setting up.

The configuration wizard should appear. If we want to set up a connection via 3G, then it will not be useful to us. But for setting up a regular WAN cable connection, this is what you need, just follow the instructions.
But we are configuring Asus RT-N13U (Rev. B1) to work with a 3G modem. Therefore, in the wizard, press the button "To Home Page".

Setting up the modem and provider
I hope you have already connected the modem. If yes, then on the main page go to the menu item USB application and select the tab at the top USB Modem... Against Enable USB Modem? install Yes.

Provider settings will open. Choose your location and provider. 3G / 3.5G USB adapter can leave on AUTO... I didn't enter any more settings. Don't forget to press the button Apply.

The router will reboot and should already be connected to the internet.
But after restarting the router, you need to wait a little while it establishes a connection via a modem. In the control panel, go to the tab Network map.
You should have something like this:

Click the icon "Connected"(if you have one). On the right you will see the connection status. This means that everything is working and the router can distribute the Internet.
In order to view the status of the modem, just click on it and on the right you will see information about it (there is not a lot of information, only the name :)).

We only need to set a password for the wireless network and change the password to enter the settings. You can do without this, but it's better to take care of the security of your wireless network right away.
And one moment. If your connection is not very good, then I advise you to connect the modem to your computer and use AxesstelPst EvDO tune the modem for the best reception. I wrote about this in the article. When you find (guided by the indicators from the program) an excellent position of the modem, then fix it and connect it to the router.
The better and more stable the signal, the faster and more stable the Internet will work.
Setting a password for a wireless network
In the control panel, on the left, go to the tab "Wireless network"... Now let's take a look at the parameters we need, point by point:
- SSID: this is the name of your Wi-Fi network. You can write any name. Wireless network mode: let it be Auto. Channel width: I personally set it to 20 / 40MHz. Channel: if your devices find a lot of wireless networks in your house, then it is better to install Auto... Read more about channels. Authentication method: I advise you to install WPA2 Personal. WPA Preshared Key: create and write down a key for your wireless network. If you forget it, then the article will be useful to you.
Click the button Apply.

If you have already connected devices to this router before setting the password, then most likely you will have problems with reconnecting them. You need to delete the connection on the device (read more in the article), and reconnect to the network by entering the password that we just set.
Change the password for entering the Asus RT-N13U settings
Go to the tab Administration... In field New password: enter the password that you want to use to log into the control panel of the router (instead of admin). In the field below, enter this password again for confirmation. Click the button Apply.

On the same page, you can change your time zone.
Conclusion
Nice router, good price and great control panel. Stable work with a 3G modem (thu thu thu :)).
Asus RT-N13U with Novatel U720 modem from Intertelecom works fine. I set everything up in a couple of minutes.
If we compare this router with the TP-Link TL-MR3220, then Asus is better (I wrote about configuring the TL-MR3220 in the article).
And not because TP-Link broke down after a couple of months of painful work (maybe it's just a marriage, anything can happen). Asus has the same control panel that is much simpler and clearer. And a simple user can easily set up a connection and a wireless network in a few minutes.
If you need a good and not very expensive router in order to distribute 3G Internet via Wi-Fi, then the Asus RT-N13U router will cope with this task perfectly.
And my instructions will help you quickly configure this router. Best wishes!
ASUS RT N13U is a Wi-Fi router. It is able, without any difficulty, to provide Internet access to almost any gadget that has a Wi-Fi component to its design. Due to its simplicity and versatility, this model has become one of the most popular today among ordinary users... It has many other advantages. RT N13U finds without any difficulty mutual language with any provider.
During the installation process, there is no need to perform "dancing with a tambourine" and other obscure actions. The device is working in a standard way, its connection is carried out literally within a few minutes. Such famous provider how Beeline works great with RT N13U.
Completion and appearance
This gadget is originally made of light plastic and has a modern, stylish body.
If necessary, it can be installed on any surface:
- horizontal;
- vertical.
There are special devices for this. When it is necessary to place the router on the table, it is enough to use a special stand. If you want to fix it to a vertical surface, you can use special holes located on the side of the case.
Overall dimensions of the router:
- width, mm -165;
- height, mm - 30;
- length, mm - 125 mm.
The weight is only 265g.
The set with RT N13U includes:
- Supporting documentation;
- CD with software;
- signal amplifier antenna;
- power unit;
- cable for connecting to a personal computer.
We connect the PC to the router
For a router of this type to work, you must first connect to it Personal Computer.
This action includes the steps:
- we connect the device to a 220 V household power supply using a special power supply;
- we connect the data cable with one end to the PC (insert it into the socket of the network card), the other end to the router;
- press the "Power" button present on the router case.
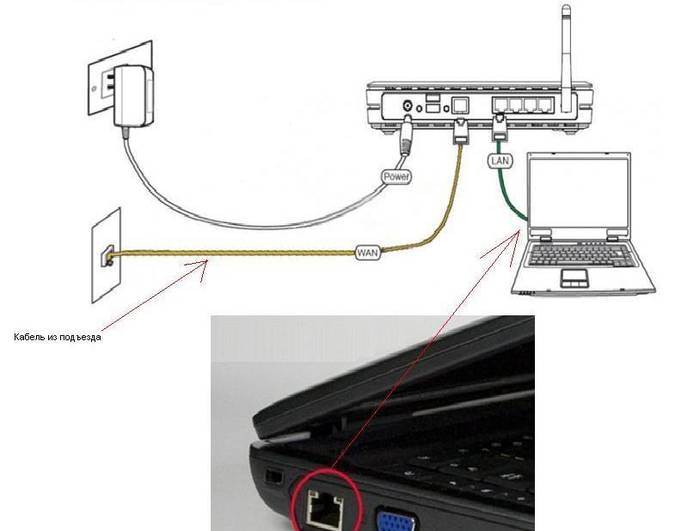
After completing all of the above steps in strict order, the device will be connected to desktop computer or a laptop. It is important to do everything as carefully as possible, and also not to forget to turn it on network card for the operation of the device. Otherwise, the Internet will simply not work.
Login to the interface
To work with this model, you need to use a special interface.
To do this, just connect RT N13U to your computer and then:

- Username;
- password;
- by default, in the first field (username) we enter admin, in the second field (password) we also write admin.
When all the above steps are completed, click on the "Send" button.

Sometimes, various kinds of third-party firmware are installed on devices of this type.
In such cases, the following character sets can be used as a password:
- password;
- 1234;
- 0000;
- "empty field".
Also, in many cases, the login and password are registered on a special decal glued to the bottom of the device. There is also the IP-address, which must be entered into the address bar of the browser. It often happens that for some reason 192.168.0.1 is not suitable, it is then that you need to pay attention to lower part the case of the router.
Video: Asus RT N13U WiFi router
Configuring the Internet
To work with Beeline, setting up an Asus RT N13U router is quite simple.
In Moscow, the considered device model works with the following parameters:

The installation process itself looks like this:
- on the left side of the WEB-interface, select the section called WAN;
- at the top of the page, click on the "Internet connection" item;
- in the "Type of WAN connection" field, set the PPTP value;
- in the field “Obtain WAN IP-address automatically” set the checkbox to “YES”;
- set a check mark in the "connect to the DNS server automatically" box to the "NO" position;
- write the username and password in the appropriate fields;
- in the item called "Server Heart-Beat or PPTP / L2TP (VPN)" write tp.intenet.beeline.ru.
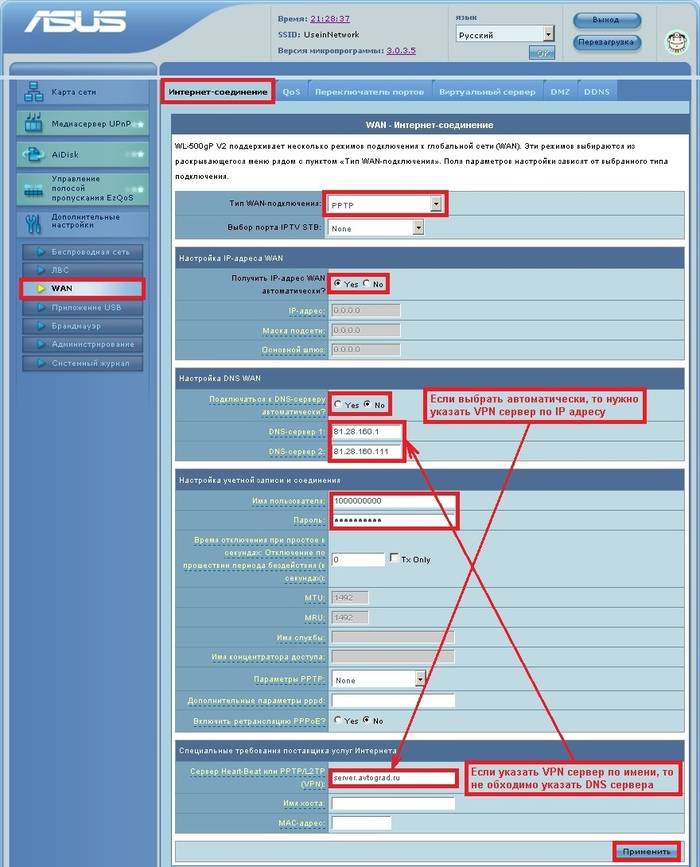
After completing all the steps, you just need to click on the "apply" button. The router will be rebooted, the work on setting up the Internet is completely finished.
Installing Wi-Fi
Despite the fact that this device works quite successfully through the usual wire connection(there are corresponding connectors), first of all, most users purchase it because of the ability to work on the Internet without using wires.
Router ZYXEL KEENETIC LITE 2 - configure the Internet for Dom ru? More details here.
Setting up Wi-Fi on this device is carried out as follows:
- go to the tab called " Extra options"(It is located on the left side of the interface);
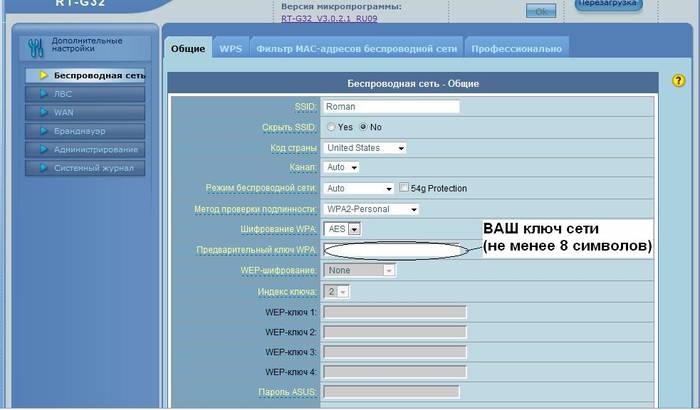
- click on "Wireless network";
- write the name of the wireless network in the SSID field;
- "Authentication method" - select WPA-Auto-Personal;
- WPA Encryption - TKIP;
- WPA pre-shared key - you must enter a set of numbers and symbols, the password length must be at least 8 and no more than 63 (it is advisable to choose a hard-to-guess password);

When the adjustment by the considered method is carried out, it is advisable to restart the personal computer. After completing this operation, you can safely connect via Wi-Fi to this device.
How to reset the Asus RT N13U router
Often there are situations when it is necessary to reset the device parameters to the default settings.
This can be done in two ways:
- programmatically;
- hardware.

To return the device parameters to factory condition mechanically, just press the small button located at the back of the case. It is slightly recessed into the plastic, so you have to use a thin and blunt object. To reset, press the button and hold it in this position for 10 seconds. After that, the router needs to be rebooted.
If necessary, you can restore the factory settings using the Web interface:
- open any browser and enter the address 192.168.0.1;
- go to the tab called "Additional settings";
- open the "Administration" menu;
- select the "Restore / save / load settings" section.

In the window that opens, there is a button called "Restore". To return to the factory settings and reset, just click on it and restart the router. Change the login password Password to login Wi-Fi network can be changed at any time when using the device.
To do this, open the Web interface and do the following:
- go to the "Wireless network" section;
- erase everything that is written in the "WPA Trust Key" field and enter a new password there;
- click on the "Apply" button.
It is important to choose an arbitrary password for entering in order to exclude the possibility of guessing. Thus, it is possible to avoid the use of the Wi-Fi network by fraudsters and unauthorized persons.
AiDisk function
The Asus RT N13U is equipped with the AiDisk function.
Thanks to it, the following functions become available:
- simplified FTP server setup;
- working with the Dynamic DNS service.

Thanks to the above functions, if necessary, you can easily and quickly share with your friends various information, regardless of their location. In the presence of portable hard a disk connected to the Asus RT N13U, the user can create a miniature FTP at home.
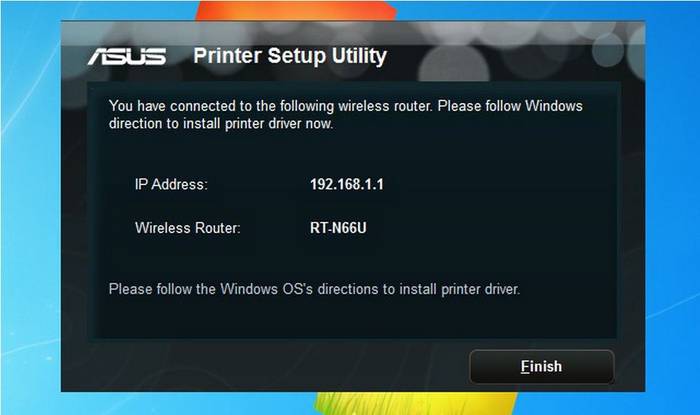
Printer connection
To connect the printer to Asus RT, you need to connect them together using a special USB cable and run the utility under Asus name Network Printer Setup.
Then perform the following steps:

Connect the hard drive
To use the router with a portable hard disk you need to do the following:
- to execute physical connection using a USB cable;
- open the web interface;
- select the AiDisk section on the right side of the screen;
- choose a way to access the disk;
- register a link to FTP;
- click on the "Finish" button.
Power is supplied to the USB disk via a cable, which is extremely convenient. The Asus RT N13U is a versatile network hardware... It has many different useful features.
Setting it up is extremely simple and electronic components reliable. A router of this type is perfect for both home and office use. It has enormous bandwidth.


