Make sure you are using a Windows computer. Technically, the hard drive can be replaced on a Mac computer, but it is very difficult and fraught with consequences (breakdowns). But working with computer components running Windows is much easier.
Buy a hard drive that is compatible with your computer. Find and buy a hard drive that will work on your computer model.
Turn off your computer and unplug it from the electrical outlet. If possible, turn off the computer using the power supply button on the back of the case; Also unplug the computer from the electrical outlet.
Remove the side panels of the computer case. You can use a Phillips screwdriver to do this, but most new cases have thumbscrews. Remove both panels to secure the hard drive with screws on both sides.
Remove the old disk. To do this, disconnect the data and power cables from it, unscrew the screws on both sides of the hard drive, and then pull it out of the case.
- You may have to unplug cables from other devices and/or remove some cards to get to the hard drive.
Install a new drive. Remove the drive from the packaging and insert it into the special compartment in the computer case. The holes on the sides of the drive enclosure must line up with the holes on the sides of the bay.
- If possible, insert the drive into a larger bay - this will keep the drive cooler.
Secure the hard drive. After inserting the hard drive into the bay, secure it with screws. We recommend tightening two screws on both sides of the drive. If you do not secure the hard drive, it will move and become hotter, causing damage.
- Tighten the screws, but not excessively, to avoid damaging the drive.
Connect the drive to the motherboard. Newer hard drives use narrow SATA cables to connect the drives to the motherboard. For connection, use any of the two plugs of the SATA cable.
- If you are connecting a primary hard drive, the SATA cable must be connected to the first SATA connector. Typically, this connector on the motherboard is labeled "SATA0" or "SATA1". For detailed information, see the instructions for the motherboard.
Connect the hard drive to the power supply. Most new power supplies have SATA plugs; Old power supplies have Molex plugs (4-pin) - in this case, buy a Molex-to-SATA adapter.
- Make sure the cables are connected securely.
Unfortunately, not every user, when purchasing a new hard drive, imagines that after installing it in the system unit, it will be immediately impossible to work with the hard drive, believing that it is enough to insert the appropriate cables into it and secure it with screws, and the system itself will determine the device. First of all, after installing the equipment, the hard drive must be initialized. Windows systems will not do this automatically, so you will have to carry out all operations yourself.
Installing a new hard drive
Before directly dealing with the problem of how to initialize a hard drive, you should deal with its correct installation in a system unit with a connection, following some rules and precautions.
To do this, with the computer turned off and the power supply disconnected, you need to remove the side cover. Then, which is very important, before installing the hard drive in the slot, you should definitely remove the electrostatic charge from your body, in the simplest case - simply by touching the spout of a regular water tap with both hands or the chassis of a disconnected system unit. After this, the hard drive is secured with screws and connected to the motherboard with the appropriate cable and jumpers in compliance with the Master/Slave rule (main or dependent drive), after which the side cover of the case is installed in place.
Initializing the hard drive in BIOS settings
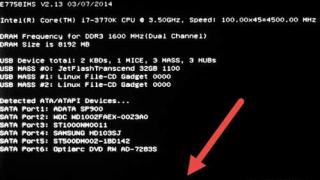
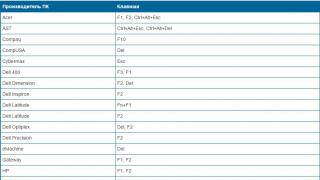
Now you can begin the initial setup of the installed hard drive. First, you will need to turn on the computer and go to the primary input/output system settings section of the BIOS. Typically, the keys Del, F2 or some combinations are used for this, which will be shown on the monitor screen at the time of start.

Here in the main section, where all devices currently connected to the motherboard are shown, find your hard drive, taking into account its or IDE). If the hard drive is detected, you can proceed with the basic setup using exit from the BIOS followed by an automatic reboot. Otherwise, if the device is not in the list or the Not Detected line is present, after exiting and turning off the PC, you need to recheck the correct connection.
How to Initialize a Hard Drive: Windows Basic Tool
We assume that the hard drive is defined in the BIOS. Now you need to initialize the disk. After a full boot, Windows will automatically recognize the new device and install the appropriate drivers for it (you can verify their presence by looking at the drivers folder in the System32 directory, where the disk.sys and partmgr.sys files will be present). At this stage, the disk itself is not visible in Explorer, although it is physically present in the system.

The disk is initialized using the system's own tool in the section. You can call this section from the “Control Panel” through the administration system by selecting the computer management menu or from the right-click menu on the computer icon, but it looks simpler and faster to use the “Run” console, in the line which the command diskmgmt.msc is prescribed.
and setting the boot entry type
The disk is now initializing. First, select your hard drive from the list of available devices (it can be marked as “Disk 1”, “Disk 2”, etc.), then right-click to call up the menu and use the initialization line in it.


If the hard drive has a capacity of more than 2 TB, you will need to set the GPT attribute (otherwise it will be impossible to use a larger capacity). If an error occurs during disk initialization, you will need to take appropriate measures to resolve it. This will be discussed separately.
Volume creation process
At the next stage, disk initialization involves creating a partition. This is done so that the computer system can “see” the disk.

On the selected disk, right-click again, and from the context menu, select the line to create a simple volume, after which the corresponding “Wizard” will open, in which the continue button is clicked.
Next, disk initialization involves indicating the size of the partition to be created in megabytes (recalculate immediately, since 1 GB contains not a thousand, but 1024 MB). Typically this is not necessary because the system specifies the volume size automatically.
At the next stage, you need to assign a letter to the section by which it will be identified by the system. Here you need to be very careful not to assign a disk ID that is already occupied, which may correspond to other removable media (CD/DVD-ROM, USB devices, etc.), since in the future they may seem inoperable due to the fact that the system simply does not recognize them.
Selecting a file system and formatting
Finally, disk initialization is approaching the final stage, at which it will be necessary to format the created partition.

Here, it is better to specify NTFS as the file system (it is considered more stable than FAT32, and can save files larger than 4 GB), leave it at the default value of 512 bytes (this will allow more economical distribution and use of the resources of the created partition), as a label The volume should be entered into a name that will be displayed in the system (file manager and context menus) and uncheck quick formatting (for the first time, it is strongly recommended to perform a full formatting, which will avoid problems in the future). You should not use directory compression, since this can only lead to a slowdown of the disk due to the speed of reading or writing information to it.

Next, go to the completion window and, if all parameters are set correctly, click the start formatting button (Finish). If some parameters need to be changed, the return to previous menu button is used. At the end of the process, the system will display a message on the screen in the form of an autorun window, if it is enabled. But sometimes a warning may appear that the disk is not initialized.
What to do if initialization errors occur?
Such problems usually do not happen with new hard drives. But if the system displays a message that the disk is not initialized, you can use the command line (cmd in the Run console) to fix it.

It first uses list disk to view and select the disk you need, and clean to clean the partition table. After this, you can format it manually using a sequence of commands create partition primary, select partition 1, active and format fs=ntfs, which are entered without punctuation and press the enter key after each of them.
In other cases, you can use specialized programs like Partition Magic, but if none of the tools help, you will have to recheck the connections or look for malfunctions in the hard drive itself (perhaps physical damage). For these cases, you can try to apply the program and then perform all the above operations again.
The problem of data storage occurs over time for every user, and many solve it by purchasing an additional hard drive. HDDs are inexpensive and are great for storing large amounts of information. You can easily install multiple hard drives into a computer case to increase the available space, but you not only need to insert a new solid-state drive, but also configure it correctly. The computer does not see the hard drive immediately after it is connected by wires to the motherboard, and in the Windows operating system you need to take several steps to correct this situation.
Why doesn't my computer see the new hard drive?

The Windows 10 operating system does not allow you to install a new hard drive into your computer and immediately start working with it. Before you start using a new drive, you need to check whether it works and is detected by the system. There are several reasons why the computer does not see the new hard drive:
- The disk is not installed correctly or is incorrectly connected to the motherboard and power supply;
- The hard drive does not work due to mechanical damage;
- There were problems detecting the device by the operating system.
Making sure that the Windows 10 operating system sees the hard drive and you can start setting it up is quite simple. To do this, right-click on the start button in the lower left corner and select the “Device Manager” line. Next, a menu will open in which you need to double-click with the left mouse button on the “Disk devices” section. 
Find the new one that was connected to the computer in the list of available disks and check its status:
- If it is not displayed, you should check that the HDD wires are connected correctly to other computer components;
- If there is a red or yellow exclamation mark next to it, it means that there are problems with media identification and you should fix them (most often in this situation you will need to download separate drivers for your hard drive model);
- If there are no extra icons next to the new hard drive, it means that it is connected normally and no problems have been identified.
When the hard drive is connected normally and information about it is available in Device Manager, you should proceed to setting it up.
How to set up a new hard drive in Windows 10
Setting up a new hard drive in the Windows 10 operating system is quite simple. If it is detected correctly, you must do the following to make the drive available for data storage:

If you plan to regularly use the new hard drive, be sure to do so during operation, otherwise the drive will quickly become unusable. If you wish, after the initial settings, you can always return to the Disk Management menu and create a new volume on your hard drive, format it for a different file system, or change the drive letter.
In this article, we will look at the fastest ways to install hard drives, learn the basics of partitioning, partition types, their hierarchy, the basics of working with the FDISK utility, and much more.
ATTENTION
This material provides examples of creating partitions, images and formatting disks. Executing them can lead to complete destruction of data on the specified disk.
Installing a new hard drive
The main component of a personal computer that stores system files and user data is the hard drive. It can be compared to a wallet or handbag - it stores what you should always have at hand. The new drive that comes from the manufacturer is most likely low-level formatted and does not contain any data. For that,
In order to store data on it, after installation and connection it is necessary to “partition” the disk into partitions and format these partitions.
Creating partitions
The very first step in working with a new hard drive is identifying partitions. Partitioning is the act of dividing a disk into logical sections, allowing one physical disk to represent multiple disks. When partitions are defined, a master boot record (MBR) is created in the first physical sector of the hard disk. When the computer is turned on, it calls procedures stored in the Basic Input/Output System (BIOS). These procedures address the system's major hardware devices (hard drive, floppy drive, keyboard, video card). After these procedures are completed, the BIOS reads and executes the instructions found in the master boot record. In addition to these commands, the MBR contains a partition table. The content of its four elements corresponds to different types of sections.
Types of Partitions
When creating partitioning scripts, you must know the type of partition and its features in advance. There are three different types of partitions: primary, extended, and logical. Each physical disk can have up to four primary partitions, and only one of them can be active, that is, bootable. The active partition is automatically assigned the letter C.
Each primary partition can contain only one secondary partition, in which you can create up to 24 logical partitions (or 23 logical partitions if the containing primary partition is active). Each logical drive is assigned a drive letter (the letters A and B are reserved for floppy drives).
Section Hierarchy
Hierarchy of sections: primary, secondary and logical. They can only be created in this order. And deleting partitions is done in reverse order. In order to create scripts that perform partition detection, you must become familiar with the FDISK utility developed by Microsoft Corporation.
FDISK
The FDISK (Fixed DISK) utility is a program that an experienced administrator should know very well. If I had 5 cents every time I used this utility, I would be very rich. FDISK is the most common utility that allows you to make any changes to hard drive partitions, but despite its popularity, most of its capabilities are not documented. Microsoft includes the FDISK utility in all versions of DOS and Windows. It allows you to create, delete and view the contents of a partition table. If you've ever used FDISK to manually install a new hard drive, you know what a tedious and time-consuming process it can be while waiting for the drive's integrity to be verified. Additionally, FDISK provides limited support for command line scripts.
Limitations when creating scripts
Creating scripts when using the FDISK utility is like playing roulette: you may get lucky, but usually you will lose. The FDISK utility does not support most command line options and does not always understand input redirection commands (such as FDISK< COMMANDS.TXT). И хотя интерфейсная часть программы, основанная на использовании меню, позволяет удалять разделы, это невозможно сделать из командной строки. Подобно тому, как вы это делаете в казино, где вы должны знать, когда пора забирать свои фишки и перейти на следующий стол. В нашем случае - это переход на использование утилиты Free FDISK.
Free FDISK
If the FDISK was a used car, you could just stick a new engine in it and ride on. This is exactly what the Free FDISK utility does. It is the official version of FDISK for FreeDOS (http://www.freedos.org) and provides additional features. Free FDISK has the same standard interface and command line options, but it has additional options that allow you to write scripts as a batch file. Once the partitions on your hard drive are defined, they must be formatted.
Formatting
Formatting is the process of preparing a disk for writing and reading. To format both floppy and hard drives, use the F0RMAT.COM utility. Formatting creates a file allocation table (FAT) and a new root directory to allow files to be stored and retrieved. In essence, a file system is created.
FAT represents the disk in clusters consisting of 512-byte sectors. A cluster is the smallest unit of volume used to store data. Its size is determined by the file system. Starting with Windows 95 OSR2, Windows 9x/2000 operating systems support two types of file systems: FAT16 and FAT32. FAT16 is a 16-bit file system in which, depending on the size of the partition, a cluster can reach a size of 32 KB. FAT32 is a 32-bit file system that makes better use of disk space by using 4 KB clusters. You need to choose a file system that will be compatible with various operating systems, as well as ensure data security and storage efficiency.
NOTE
The Windows NT operating system does not natively support FAT32. Instead, Windows NT/2000 uses the NTFS (New Technology File System) file system.
After the hard drive is formatted, you can install the operating system on it.
Creating a disk image
Disk imaging is the process of creating an exact copy of the hard drive of the computer in question and storing it in a disk image file, usually a compressed file. The disk image can be stored on any medium (hard drive, CD-ROM, ZIP) and can be recreated on any computer. This allows you to “copy” the Disk after installing standardized software and configuring the operating system, which significantly saves time. The basic principles of creating a disk image are very similar to simply copying a disk.
Tools
Preparing new computers for use can take up the lion's share of an administrator's time. Finding a way to simplify the imaging process when replacing old computers with new ones can save you hours of work time. And with a large number of computers, automation of this process is not only desirable, but simply necessary.
Using utilities such as PowerQuest's Drive Image Pro or Symantec's Norton Ghost, an administrator can "capture" a disk image in just a few minutes.
In the next issue we will talk about directly creating partitions and formatting disks.
To be continued…
How to install a hard drive yourself?
Before you decide to purchase and install a hard drive, new or additional, I advise you to read the Computer76 blog articles “” and “Is your hard drive faulty? " In the first, you will learn how to choose a hard drive, in the second, how to determine whether your hard drive has really died completely or whether it can be revived. The last article will also be useful if you have suspicions that the on-call master is deceiving you (or not deceiving you on occasion), forcing you to buy an expensive device with all the ensuing expenses.
So, the question of the need to buy a hard drive is no longer raised, let's start the installation.
To install a hard drive yourself to replace one that has become unusable, you will have to think through a plan for installing the operating system. Before purchasing, you will have to decide on the interface of the connected drive. More on this below.
For laptops, the installation scheme is simplified, although it all depends on the model. Often the HDD replacement scheme is very simple, since manufacturers do not hide the disk far away; it can be removed and installed in a few movements using a small Phillips screwdriver. Installing an additional HDD in a laptop is rarely possible, so we have little choice.
With desktop computers, those on or under tables, in principle, everything is not difficult. And we will consider exactly the option when, I repeat, you have finally made the decision to purchase and install the disk.
For software diagnostics of existing equipment and the possibility of installing additional equipment, there are free utilities that you can confidently use before mechanical work on your computer and laptop. I will focus on exactly what awaits us inside.
Desktop computer.
STRAIGHTAWAY. I will show and explain using my fingers. Just read carefully.
REFERENCE
Desktop users often have questions about how to orientation hard disk affects work and life expectancy. I was able to collect information in the form of direct answers to a direct question to various hard drive manufacturers. You can read them in the blog article ““.
Let's divide the process of installing a hard drive yourself into several stages:
- Removing the cover and visual inspection.
- Checking the necessary connectors and cables (purchase if necessary)
- Setting priority for BIOS(if you install an additional hard drive)
- Installing (replacing) a disk
To install the hard drive yourself, we need:
- Connection cables to the motherboard (more on this below)
- crosshead screwdriver
- fastening screws (where you buy the hard drive, feel free to ask; 4 pieces are enough).
How to install a hard drive yourself. Removing the cover and visual inspection.
Before purchasing, open the side cover of your computer. You need to remove the one that blocks access to the insides of the computer. The second side cover often simply serves as a symmetrical counterpart. The ventilation hole on the lid will serve as your guide. Where the grill is, we’ll remove that cover.
Unfasten the clips. Usually there are two.
Unscrew the fastening bolts. Move the cover slightly towards the locks and fastening screws and remove it to the side.


As you can see in the photo, two disks are already installed in the system (in the dust). I'll increase them:

But upon closer inspection, you can see which one was installed upon purchase, and which one appeared later. It (the one below) was clearly installed as an additional one. And it's not a matter of order. Take a closer look at the interface:

sorry, it came out blurry
Take a closer look at the photo as much as possible. The top of the drives is connected to the motherboard with a narrow red cord, the bottom is connected to a wide one. gray with blue connector.
Let's start from this point in more detail. What do we need to know about this.
How to install a hard drive yourself. Checking the necessary connectors and cables.
How are hard drives connected in general?
Hard drives are connected by different cables and wires to:
Motherboard
Power supply
motherboards Available for two types of hard drives. That is, these cards have two types of connectors. These are already familiar to you IDE(old) and SATA(new). The IDE connector began to disappear from both motherboards and hard drives. But it may happen...
Let's look at a specific example. Namely on our board. I clicked its name:

I found a beautiful photo of the board online. Let's look at him.

Do you recognize? Yes, it is on the computer. You have your own, but the meaning will be clear. To connect drives on the board we are interested in:
Red connectors (small), for SATA:

Wide with two rows of connectors for IDE(there may be two connectors on older boards).

The color and location may not match what is on your board, but there are not so many of them on the motherboard... You are unlikely to go wrong.
Accordingly, there are different cables for connecting different drives. In the first photos, I repeat, they are clearly visible. And here's what they look like in the store:

For SATA drives

For IDE drives.
Before purchasing, decide which cable you might need. They cost pennies, but inserting them correctly is not difficult.
Once you have decided on the cables, you need to study how the drives are connected to the power supply.
Everything is already ready here and you hardly need to buy anything. There are many connectors coming from the computer power supply, but we are interested in:

For SATA and for IDE
Attention! If you are going to add a new hard drive rather than change it, make sure that:
The cable from the power supply to the new hard drive is long enough
There is a free power connector from the unit to the future hard drive
The second problem, by the way, can be easily solved using adapters like:


Attention! If you are installing an additional hard drive, you will have to set the priority jacks (shorts) on the additional drive. Otherwise, the system may not understand which disk it should boot from and will generate an error. So that everything is fine...
How to install a hard drive yourself. Setting priority for BIOS
This is what you need to do, and it’s very simple. If you lay the hard drive flat on a table, you will see a picture that explains how to short...

...so that the disks in the computer do not interfere with each other. See:

We are interested in the diagram for installing a jumper at the end of the hard drive, where its connectors are located. The jumper is shown as solid black. I'll enlarge the picture:

3 connection options are shown. In this case, we are interested in only two:
Slave– “submits”, as additional (jumper second from bottom)
Master– “main”, main, with the system (you don’t have to install a jumper at all)
Since we are installing a hard drive in addition to the existing one, we select the option Slave and put a short as in the picture. This is what happened:

That's all. Just take your time and don't try too hard. Insert the drive into the 3.5″ connector so that the mounting slots match the screw slots on the hard drive itself:

Tighten the screws tighter. Now you can make an effort:

And alternately insert the connectors for the motherboard and the power supply, as in the photo:

The hard drive, as you remember, has an IDE interface. So there are connectors for it. You may have your own (for SATA).

So it’s easy to install a hard drive yourself!
Read: 196