Instruction
To get started, examine the capabilities of the video card installed in your computer or. Make sure the adapter is designed to carry both types of signals.
If you are using an ATI (Radeon) video adapter, it may not have exit HDMI. In this situation, it is recommended to use the DVI channel in conjunction with a special adapter. Make sure you are using an original DVI-HDMI connector that is capable of transmitting audio.
Check the specifications of the TV you are using. Make sure its HDMI port is designed to receive audio. suitable HDMI-DHMI cable.
Connect your computer's graphics card to the correct port on your TV. If you want to use both the monitor and the TV at the same time, please set the two devices to work in sync. To do this, open the "Screen Resolution" menu and select the appropriate mode.
Use the Duplicate Screen feature if you want to share the same image on all connected devices. In a situation where you need to use both displays independently of each other, activate the Extend Screen mode. In this situation, you must first assign the computer display as the main device.
Proceed with setting up the audio signal transmission. Open the Control Panel and select the Hardware and Sound menu. Click on the "Manage audio devices" link.
Go to the Playback tab and find the ADM (Nvidia) HDMI Output hardware. Select its icon with the left mouse button. Click the "Default" button.
Now click the "Apply" button and close the dialog menu. Play a custom video clip and make sure your HDMI- exit works stably. When the cable is disconnected from the port, the standard audio port located on the corresponding board will automatically turn on.
Sources:
- hdmi output on tv
Incorrect video card settings and monitor can not only affect the quality of the image, but also adversely affect the vision and general well-being of the user. Before working on the computer, it is necessary to adjust all the settings of the video system as much as possible.
Instruction
Open the main "Start" menu and select "Control Panel", in the window that opens, double-click on the "Display" icon. The "Properties: Display" window will be launched, go to the "Settings" tab. Here you can configure, to do this, drag the “Screen Resolution” slider to the desired position, select the value that is most comfortable for work, as a rule, the higher the screen diagonal, the higher the resolution is selected.
In the same tab, you can adjust the color palette of the screen (color quality), this parameter sets the number of colors and shades reproduced on the screen, usually, the choice is between the values "Medium" and "Highest". For most users, "Medium" is enough, "Highest" makes sense when working with high-quality images.
Click on the "Advanced" button. In the window that opens, go to the "Monitor" tab. Here the most important setting of the video system is performed - the screen, this parameter sets the flickering speed or the number of image redraws on the monitor screen. The higher this value, the less tired your eyes will be when working. It should be remembered that the overestimated values of the "Screen resolution" and "Color quality" parameters lower the maximum value of the "Refresh rate" parameter, and this parameter is a priority. Set the refresh rate to 85Hz for a CRT monitor or 70Hz for an LCD monitor, and set the remaining parameters based on these values.
The drivers for the video card and monitor must be installed, otherwise, Windows will automatically set the refresh rate to 60 Hz, this frequency is quite enough for the stable operation of the computer, but it is not acceptable for a person to work on it for a long time.
It is a high-definition multimedia interface that allows the transmission of high-resolution digital information as well as digital audio signals that are copy-protected.

You will need
- - computer;
- - TV;
- - HDMI adapter;
- - drivers.
Instruction
Check the following points before HDMI. Conclusion sound only HD2000 cards and above can be implemented through this interface. The sound will be output only if you have a proprietary ATI adapter. If the card contains an HDMI output, then the chip is soldered. On some cards, the chip can be soldered into the card itself, and one of the DVI connectors of this card is yellow, then connect the adapter to it. If you do not have a proprietary ATI adapter that matches the series of the card, then output the sound with a separate cable, through the output of the sound card to the input. For many, a separate video input is made for and sound, when it is turned on and sound input.
Use the following types of adapters for different cards to customize sound on HDMI it turned out the first time: for HD2000 series cards, use a black adapter with the code 6141054300G and the inscription Rev.A. For HD3000 series cards, take a gray adapter, its code is 6140063500G and the inscription Rev.B. For HD4000 cards - a gray adapter, code 6140063501G and the inscription Rev.A (or B).
Adjust the sound after connection. If, after you installed the video card sound chip drivers, there is sound, then this means that the sound chip has been installed as the default sound device. Set Primary as the default device. To distribute the output sound to different cards, such as music and games on the main card, and movies using the HDMI output, set the output setting on the player to HDMI Audio. After that, to improve the HDMI sound, restart your computer and install the realtek 2.09 audio drivers, you can download them from the website http://www.realtek.com.tw/Downloads/downloadsCheck.aspx?Langid=1&PNid=14...
Sources:
- how to set sound via hdmi
When connecting a TV to a computer (using the latter to output video on a larger screen), permission desktop is installed automatically. To change the resolution to more appropriate settings, use the standard Windows tools.

Instruction
Access to customize display settings depends on the operating system you are using. To find out what operating system is installed on your computer, right-click on the "My Computer" shortcut and select "Properties". It is here that the name of the operating system and other parameters will be displayed.
For the Windows XP operating system, the algorithm for setting values is as follows. Launch the "Control Panel" from the "Start" menu. Go to the "Properties" section. Next, go to the "Display" tab. Select the "Options" tab, where you will see a slider to set the screen resolution. Use recommended values.
For the operating system Windows Vista or Windows 7, you need to perform the following steps. Right-click on an empty area of the desktop. Click on the inscription "Personalization", and then "Display settings". In the Resolution section, move the slider left or right to adjust the TV's screen resolution.
If your video adapter has its own display settings utility, use its functionality. In the display properties, click the "Advanced" button, and then select the "Adapter" tab. Click on the List of all modes button. Here you can choose permission, color setting, and screen refresh rate.
If you set the wrong values and the TV cannot display the system desktop, don't be alarmed. In any case, a message will appear on the screen, which, without user confirmation, will return the screen settings to the previous values. Wait 15 seconds and don't click on anything.
The TV set has less stringent requirements for image quality than the monitor. Therefore, a computer monitor, the parameters of which you are no longer satisfied with, can be used as a TV. To do this, you need to connect an external TV tuner to it.

You will need
- - monitor;
- - external TV tuner;
- - digital television decoder;
- - active computer speakers;
- - cables;
- - extension cord with multiple sockets;
- - TV antenna.
Instruction
Check your monitor. Connect it to a computer with a suitable video card, display any video in full screen, at least from YouTube. Move away from the monitor at a distance where you are going to watch TV. Make sure the image quality is to your liking.
Choose the right TV tuner. Its output type (VGA, DVI or HDMI) must match the input type of the monitor. The tuner must be designed to work. Please note that devices with VGA outputs can most often only accept analog. If analog has already been discontinued in your region, or its imminent termination is planned, you will have to add an external set-top box decoder of the appropriate standard to such a tuner.
Connect the tuner with a cable (VGA, DVI or HDMI) to . If the tuner can only receive analogue TV broadcasts and only digital broadcasts in your area, use an RCA cable to connect a digital decoder to the tuner. Nests for this use yellow. Connect the antenna to the device that will receive transmissions - a tuner or decoder. Turn on all appliances. When linking a digital decoder with an analog tuner, switch the second one to AV (low frequency input) mode. Take the remote control from the device to which the antenna is connected, and perform an automatic or manual search for TV channels according to the instructions.
You have already received the image, but most likely there is no sound yet. The sound will appear only under a combination of three conditions: the connection is made via HDMI, all devices and the cable support audio transmission via HDMI, the monitor has built-in speakers. If at least one of these conditions is not met, add one more component to the system - active
If you are about to purchase or have already purchased an HD TV, then you will certainly be faced with the need to choose an HDMI cable. How to connect an HDMI cable to a TV is an interesting question, but first you need to purchase a cable. This is not a very complicated procedure, but it is necessary to familiarize yourself with some of its nuances beforehand.
Brief specifications of the HDMI cable
Before connecting an HDMI cable to a TV, it is important to understand their main characteristics. HDMI is a high definition multimedia interface. There are two types of HDMI cables: HDMI Standard and HDMI High Speed. Using HDMI Standard cables, TV receivers of all categories are connected: cable, terrestrial, satellite, including 3D, as well as conventional non-(3D) Blue-Ray players and most HD camcorders. Cables of this category may have different markings, except for High Speed. Game consoles, computers, Blue-Ray 3D players. Game consoles, computers, Blue-Ray 3D players are advisable, but not necessary, to be connected with a High Speed cable.
One of the main subtleties of choosing a cable is the requirement for its length, which should not exceed 5 m, otherwise the image quality may deteriorate sharply. Also, the cable must not be kinked. Before purchasing a cable, you need to decide what connectors are on your device. Relatively old models of TVs and other equipment usually have two types of connectors - RCA (otherwise called "tulip", cable with triple wiring) and S-video, a round output with 4 or 9 pins. Newer device models are equipped with an HDMI interface.
To connect the most efficient connection, you need to purchase a cable, which - on the one hand - has a connector on the device panel, and on the other hand - HDMI. Finding such a cable is quite problematic, and if this fails, you need to use adapters that can have two or more connectors of various types.
How to connect HDMI cable to TV
How to connect HDMI cable to TV? The TV must be turned off before connecting the cable. If the TV device has S-video, then the cable is connected with the S-video connector to the TV, and HDMI to the computer.
It is undesirable to connect an HDMI TV to the DVI connector of a computer. Such a connection will result in a significant reduction in picture and audio quality.
After connecting the TV and the computer with an HDMI cable, the TV turns on first, and then the computer. When the operating system is loaded on the computer, the TV screen flashes, indicating that it is connected to an external source. The TV must be switched to AVI mode, in which the signal to it will come not from an external antenna, but from a computer.
How to connect the HDMI cable to the TV if the TV is connected to the computer with the HDMI cable for the first time? A mandatory procedure is to configure the video card. To do this, you need to find the properties of the video card. When you enter the "Advanced" tab, you will find the instructions, following which you will get the image of the computer on the TV. In Windows 7, you need to go to the desktop in "Permission" - "Find". The TV device will be detected in the system and it will remain to mark it as the main monitor. If the TV is not detected, then you need to enter the properties of the video card again and repeat all the steps again.
In the properties of the video card, it is possible to adjust the resolution, desktop size, adjust the color and other settings.
If you experience image problems, it can be caused by both the HDMI cable and problems in the connected devices, which is most often caused by a software error.
An urgent problem for many users today is the expansion of the image from a personal computer to a home plasma display. “We connect the TV to the computer via HDMI, but there is no image,” - this is exactly what the negative sounds from the lips of the owners of computer equipment.
In this article, the reader will get acquainted not only with the method of connecting an additional display to a PC or laptop, but also learn about the correct hardware settings. He will also be interested in the recommendations of experts in the field of IT technologies.
About the goals pursued
The larger the diagonal of the LCD screen, the more comfortable viewing of multimedia and better image detail in games and software. A movie on a TV from a computer will allow you to see the smallest details, and a fan of a dynamic toy will feel the reality of the events taking place on the plasma screen. In fact, the advantages of using such a symbiosis are many, and all of them relate to the comfortable work or leisure of the user.
In recent years, many users have become interested in Internet TV. Why pay money to the provider if you can watch your favorite channels for free from the official website of the TV company? Therefore, the question: “How to bring a computer to a TV?” is being heard more and more in the media. That's just with ready-made solutions while things are bad.
Capabilities of computer hardware
It is better to start with the technical capabilities of a personal computer or laptop. The fact is that it is not enough to buy an HDMI cable for a computer. You can only connect to a TV if you have the appropriate digital video output on your PC. Therefore, the user needs to familiarize himself with all the outputs of the system unit and find the right port. It can be located on a video card or on the motherboard of a computer and on one of the ends of a mobile laptop.

There are devices that do not have an HDMI connector. It is quite possible to find on the old video output VGA (D-Sub) or DVI digital ports with DisplayPort. Here everything already depends to a greater extent on the TV, in which similar inputs should be present. Having picked up the right cable for the TV, you will always find the opportunity to display the image from the computer.
TV availability
But modern liquid crystal devices with HDMI ports have no problems - all manufacturers provide their equipment with a popular interface. Often, the factory is not limited to one port and provides the user with the opportunity to connect several sources to output an image via HDMI.
Large LCD displays have a slightly different problem. We are talking about the resolution of the reproduced picture and the frame rate. Before connecting a computer and a TV via HDMI, the user needs to familiarize themselves with the technical characteristics of both devices, compare their video signal transmission capabilities and find a parameter that will be supported by both the plasma and the PC. Often, all equipment manufacturers strive to ensure that equipment supports FullHD resolution (1920x1080) at 60 Hz. True, there are exceptions that create problems for users.
Operation of devices of different generations
In situations involving connecting two devices with different interfaces (HDMI, VGA), users often wonder why the computer does not see the TV via HDMI. Everything is explained simply - it is impossible to connect equipment of different generations by combining an analog and digital signal with one cable. In such situations, no adapter will solve the problem - you need a converter that can decode the signal at the hardware level.

Fortunately, there are ready-made solutions at foreign auctions that can solve all the problems of users with video signal transmission between devices of different generations. The cost of one converter is in the range of 20-30 USD. That is what attracts potential buyers. All the necessary cables for video transmission are always included with the converter, so the algorithm for solving the problem is simple: we buy a converter and connect the TV to the computer via HDMI.
When there is no required interface
Not all computers and TVs have an HDMI port - that's a fact. But you should not get upset ahead of time, since with obsolete devices the problem can always be solved. The fact is that the old equipment is focused on the transmission of an analog signal. Although this technology lags behind in image quality, however, it has an order of magnitude fewer problems with the compatibility of different standards. Combining S-Vidio, VGA or RCA interfaces is much easier than converting to digital.
The user only needs to buy a cable for the TV and connect both devices. There are many inconveniences that users will have to face. First, you cannot transmit sound over an interface cable. Accordingly, you need to buy another cable. Secondly, during operation, the sound card of a computer or laptop will not be able to create an individual audio stream for the TV. Accordingly, you can forget about the convenience of sharing a computer and TV.
The right way to buy cable
Users can also experience problems when choosing the wrong HDMI cable. The fact is that a digital video signal is not capable of being transmitted over long distances over a cable without loss of quality. Therefore, the future owner needs to decide on the length before buying an HDMI cable for a computer to a TV.

The main thing is to always remember that the longer the quality cable, the higher its cost. It is necessary to measure the distance between the PC and the liquid crystal display (naturally, not in line of sight, but taking into account the laying) and find a cable of the appropriate length on the market. Yes, it is customary to purchase wires from buyers with a margin, but it should be small, since often the surplus is rarely in demand - more often they simply collect dust at the TV or at the computer. The main thing here is to find the golden mean in terms of the ratio "cost - cable length".
Real offers from manufacturers
It is not easy to choose a cable for a HDMI-HDMI TV on the market. Any buyer can verify this on their own, just look at the prices and assortment. It is logical to assume that expensive accessories have a high price only because they are made by serious brands. There is truth in this, but, as practice shows, the more expensive the HDMI cable, the less likely it is that the video signal will deteriorate over a long distance. In fact, you have to pay for quality. Chinese consumer goods have no place in the domestic market.
IT experts recommend paying attention to the brand name (for example, Prolink, Cablexpert, Viewcon, Belkin), as well as focusing on the quality of the winding and the presence of ferrite filters near the connectors (barrels near the contacts). If an HDMI cable is required, the length of which exceeds 30 meters, then the user cannot do without a signal amplifier. The device is expensive, but it copes with the tasks at 100%.
Physical connection of two devices
This article is not about the potential difference from the school physics course, but the user still needs to know that there is a small electric charge on the video ports when the equipment is connected to the mains. Naturally, when connecting two devices, a technician with a large charge will transfer energy through the cable to the port of the connected device. Often, a TV turns out to be more powerful, which, when connected, burns the output on the computer's video card. Therefore, before connecting the computer to the TV via HDMI, you need to de-energize one of the devices (remove the plug from the outlet). Naturally, this problem bypasses all users who have grounding in the house.
Another trouble that the buyer may encounter is the lack of a video signal when connecting the cable, or the transmission of an image with noise. No need to touch the settings of the TV or computer - in 99% the problem is in a low-quality cable. Need to replace it. In general, experts recommend checking the HDMI cable directly in the store to avoid connection problems.
TV settings
It will not be difficult for the owner of the liquid crystal display to press the “Source” button on the remote control of the device and select the desired signal source. All ports on the TV panel are registered and numbered, so it remains only to combine the software with the hardware. You don't have to wait for the PC image to appear on the screen right away. The main thing here is to bring the display into readiness for receiving a video signal. This completes the setup for connecting the TV to a computer via HDMI. It remains only to configure the video output of a PC or laptop.

Many users own home theaters and other video and audio equipment that is connected to an LCD TV. Naturally, a situation may arise when all HDMI ports are busy. Many users are unlikely to want to physically swap the HDMI cable when working with a computer, so another solution is proposed. The video signal from the laptop can be sent to a tuner or receiver. In fact, there is no difference, since manufacturers use a single standard for transmitting images via HDMI.
Modern Platforms
When it comes to Windows 10 or MacOS operating systems, there are practically no configuration issues. The user only needs to restart the computer for the device to detect and connect the new display. The more modern the technology, the more effective the automatic tuning is - often the signal is transmitted via HDMI from a computer to a TV in FullHD format with a frequency of 60-65 Hz.
But there are exceptions, and they are primarily related to the video device driver. Therefore, you do not need to try to get the TV to work correctly from the remote control, only fine-tuning the video card will help here. The main thing is to always remember that you need to change the parameters not global, but only one port, otherwise, by negligence, you can destroy the signal to the PC monitor, which will be very difficult to restore.
Working with drivers
Making the TV work like a computer monitor via HDMI, although difficult, is quite realistic. There are many ways to do this, which the reader will have to get acquainted with. Owners of the Windows operating system versions 7.8 and 10 need to go to the control panel and select the "Screen" item.
By going to the “Screen Settings” tab, the user will find that the operating system has already detected the connected TV, but the image has not yet been transmitted to it. The Multiple Displays option allows you to connect your TV as an additional monitor to your computer. The list contains several options, from which the user is prompted to choose:
- Duplicate these screens. The contents of the computer desktop will be displayed on the TV screen, and all actions performed by the user will be visible on both displays.
- Expand these screens. The most interesting setting that allows you to virtually increase the desktop area (both vertically and horizontally).
- Show on screen no. Manual port assignment for video output is not required by users.
Features of driver settings
Sending a signal to a TV is easy, but adjusting the picture quality and transmitting sound from a computer to a TV is not so easy. First, you need to decide on the extension of the desktop - diagonally or vertically. Experts recommend that you navigate by the physical location of the TV in the room relative to the PC monitor. On the control panel, in the "Screen Resolution" menu, you need to place the icon No. 2 with the mouse relative to the icon No. 1 so that it is convenient to move desktop objects between displays.

The second step is to adjust the resolution of the TV screen. The main thing here is to choose a parameter that is supported by the connected display, otherwise a failure will occur and the video output port will turn off. By clicking the "Advanced Options" button, the user can select the refresh rate of the display, however, IT experts do not recommend changing the frequency unless the video card and TV support the 4K (144 Hz) standard. After making all the settings, you need to save the changes and exit the control panel.
Tricks with sound transmission
All users know that an HDMI cable transmits not only a high-quality image, but also sound, only there is no corresponding setting in the display resolution settings. With the transfer of audio, everything is simple - at the hardware level, the sound goes to the additional screen along with the video. That is, it is enough for the user to move the video player window to the TV display with the mouse. The computer speakers will be muted and the TV speakers will be activated.
It is worth noting that a mobile device or computer is capable of supporting several video devices connected via HDMI at the hardware level, transmitting different images to them and providing them with sound. True, there are exceptions, and they depend on the video adapter and sound card. Low-performance devices sometimes fail, they simply do not have enough power to process digital video and high-quality sound.
Alternate Driver Setting
Not only Windows tools can set up video transmission to the TV screen. Owners are given the opportunity to ensure high-quality transmission through the video adapter driver (Nvidia or Radeon). The setup algorithm is still the same: we connect the TV to the computer via HDMI and set the HDMI signal source from the remote control.
But then the proprietary software of the video card manufacturer is used. Going to the control panel of the Nvidia Geforce Experience or AMD Catalyst Control Center application, you need to find the "Display" tab. One of the sub-items of this menu is responsible for setting up multiple displays.
Feedback from users
Often, when connecting a TV to a computer or laptop, device owners have problems that they try to solve together in the media. Most of the negativity that is found in the reviews is associated with a low-quality HDMI cable, which was purchased at foreign auctions, or in stores at a low price. A greedy person pays twice - all users who decide to save money on buying an HDMI cable should know about this.

After adjusting the display settings and saving, the image on the main monitor disappeared? This is the second problem that users often have to face. The reason is quite simple - the parameters of the main monitor have changed. There is only one recommendation - connecting the TV to the computer, you need to control your actions. Number 1 in the system is always the main monitor - its settings cannot be changed. With the rest of the numbers (2,3,4) you can do whatever you want.
Finally
Yes, in order to create convenience for themselves, the user needs a little time and investment. It simply cannot be done without it. There is an instruction in which all the actions are prescribed, they must be clearly followed:
- buy an HDMI cable;
- configure the video adapter driver;
- enjoy watching.
The algorithm is simple, but there is a lot of work to be done. In fact, there is nothing complicated, the main thing is to follow the recommendations of experts and perform strictly specified actions. Only after receiving an image from a computer or laptop on the TV screen and making sure that there is sound transmission, you can go into additional parameters and fine-tune.
I answer all questions in detail.Friends! Everything that you do on your computer, watch movies, cartoons, chat on Skype, play games, view photos, slides or Internet pages in a browser, all this will be shown on your TV screen if the TV is connected to the computer via an HDMI cable. Now, almost every TV has an HDMI input, and most of the video cards produced have an HDMI output.
The HDMI interface was invented in order to connect two high-tech digital devices (they are undoubtedly your computer and TV) and transfer information from device to device without loss of quality. Such transmitted information can be an image and multi-channel high-quality sound. If you have a movie or cartoon on your computer, in any HD, Blu-ray or AVI, MOV, MPG, MP4 format, then you can watch all this on your TV. There are slides or pictures, please see. I'm not talking about games, because I'm not a supporter of them, they take a lot of time from young people, which can be spent on studying. We connect the TV to the computer via HDMI with a second monitor To connect the computer to the TV, we will use an HDMI cable, it looks like this and can be up to 20 meters long, choose the cable of the length you need.

For example, let's take a Samsung TV, not quite a new 4 series (LED type), bought a few years ago, but it already has two connectors for connecting HDMI devices.

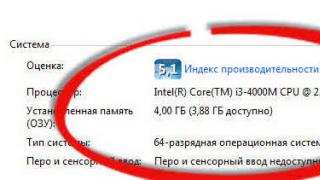
The computer that we will use to connect to the TV was also purchased about three years ago, it has an Nvidia video card installed and also with an HDMI connector.

As I said, our TV has two HDMI connectors. On the TV turned off, connect the HDMI cable to the HDMI 2 connector,

We connect the reverse end of the cable to the HDMI connector of the video card of a desktop computer. The computer, in turn, is already connected to the monitor (also Samsung SyncMaster 971P) with a DVI cable.

We turn on the computer and TV. There may not be an image on the TV right away, instead we see such a message “Cable is not connected” “Check the cable connection and source parameter” or “Weak signal or no signal”

On Samsung TVs, to display a list of all available video sources, you need to press the Source button on the remote control (Source).

A menu appears on the TV, in this menu, using the remote control, select the HDMI 2 connector,


Now, on our TV, an exact copy of the desktop of our computer should appear. But again there is nothing, the same error appears on a black screen. So we go to the "Screen Resolution" settings. Right-click on the desktop and select Screen Resolution.

As you can see in the window that appears, we have the second (2) Samsung SyncMaster 971P monitor set as the main screen, and in the “Multiple screens” parameter we have set “Display the desktop only on 2 monitors”, which is why the image is present only on the screen of the computer monitor, but it's not on TV

We bring everything in this window to this state. Choose an option
Multiple screens: "Duplicate these screens"
In the "Screen" parameter, "Multiple monitors" is automatically set, click Apply and OK.

The desktop of our computer appears on the TV.
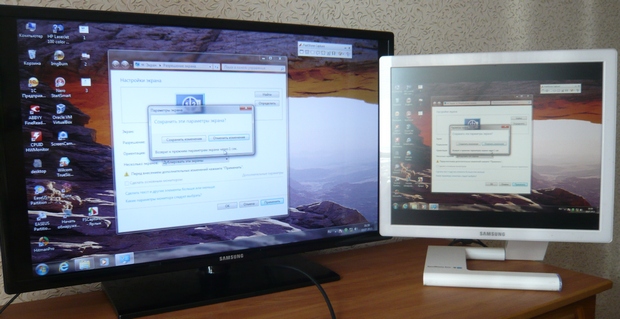
The resolution of our small Samsung TV is 1366 x 768. If your computer monitor supports this resolution, then it will be set to the same resolution of 1366 x 768 automatically. If not, then either the TV or the monitor will have the wrong resolution. For example, my Samsung SyncMaster 971P monitor has a maximum resolution of 1280x1024. When using a TV and a computer monitor at the same time, the main thing for me is to correctly set the resolution on the TV, otherwise why did I connect it then. I set the resolution to 1366 x 768 on the Samsung TV, the picture is perfect.

And on a computer monitor, this resolution of 1366 x 768 looks like this.

And nothing can be done here. If you want a perfect picture on a TV and a computer monitor, then they must support the same screen resolution, that is, they must have the same characteristics. No sound on TV after connecting TV to computer via HDMI Friends! Do not forget that the HDMI interface transmits video and sound over a single cable, and we can specify in the operating system settings to use the TV's built-in speakers for sound output.
Let's fix the problem by using a TV instead of a monitor. Go Start->Control Panel->

Hardware and Sound->Sound

If you don’t have anything in this field, right-click on an empty spot and in the menu that appears, check the items “Show disabled devices”. "Show connected devices"
Now we look at the name of our TV, in my case it is Samsung, you need to turn it on, and turn off the rest. Right click on Realtek and select Disable.

Turn off the speakers too.
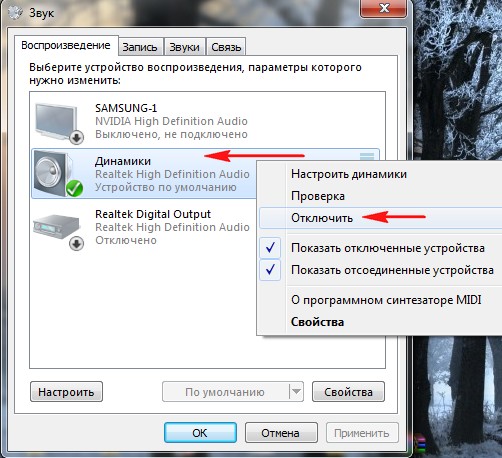
Samsung - Enable, Apply and OK.
“What progress has come to ...”, - I want to sing, looking at the shelves of modern digital technology supermarkets. The age of new technologies is constantly changing everyday life, and today you can watch your favorite movie not with a nasal pirated translation, but in high quality HD or Blu-Ray. All you need is HDMI outputs on your TV and computer.
The first thing you need is an HDMI cable. Often it comes with a TV set. If not, you can buy a cable at any audio/video store. Consider in advance how long the cable you need. On the latest generation TVs, there are several HDMI connectors on the back. Connect one end of the cable to HDMI 2 and the other end to the HDMI connector on your computer or laptop. Don't worry if instead of the picture you want, you see a warning on the TV screen that the cable was not connected or there is no signal. How to proceed in this case is shown on the example of Samsung TVs. Find the Source button on the TV remote control and select HDMI 2 from the list provided. Perhaps at this stage the issue will be resolved, and the image will appear on the TV screen. If nothing has changed, go to the settings of the computer (laptop) - right-click on the free field of the desktop. A window will appear in which you need to select "Screen Resolution". Pay attention to the line "Multiple screens". If it has the option "Display desktop on 1 (2) monitors only", change it to "Duplicate these screens". In the "Screen" item, the inscription "Multiple monitors" should appear.