(3
votes, average: 4,67
out of 5)

It often happens that the user thinks about the state of the hard drive only when he already understands that the hard drive has begun to crumble or has completely failed. In order to protect yourself from losing important data stored on your hard drive, you should periodically check its status. Checking and restoring a hard drive is a long process, so stock up on a couple of hours of free time and go ahead.
I propose to consider a free program to check the status and restore the hard drive Victoria.
Victoria has the following features:
- providing complete information about the state of the hard drive;
- allows you to view S.M.A.R.T. hard disk settings;
- has several levels of HDD verification - verification, writing, reading, with a summary display of addresses of defective blocks;
- is able to check the surface of the hard;
- the utility is able to diagnose the disk memory and interface for failures and damage to information during reception and transmission;
- it is possible to change the speed of rotation of the shaft;
- closing bad sectors from access and reassignment;
- low-level media formatting;
- the possibility of erasing information without the possibility of recovery;
- Setting and removing the password to access the HDD.
Let's get started with the program
It was not possible to download the utility from the official site, to download go to this
Victoria starts and runs under Windows 7, 8 and 10 - 64 and 32 bits - tested.
Download and unpack the archive with the program. Start Victoria. 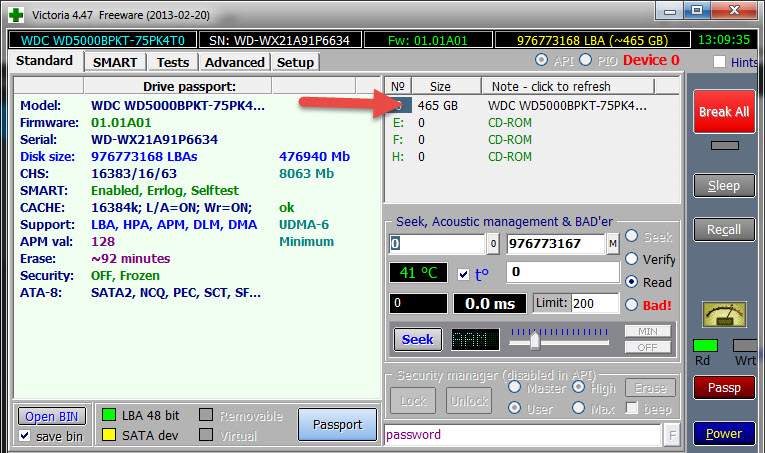
The main program window will open. We are interested in two tabs.
SMART tab
All information about the hard disk is displayed here. Displays test results for reading and writing, hard drive health and responsiveness
We press the button, "GetSMART" and the program will give you information about the state of the HDD.
Here we will stop in more detail.
This function allows you to test the hard drive for errors and then correct them.
When testing a disk, the program graphically shows problem sectors and marks them with rectangles of different colors. Each cluster will be designated by certain colors depending on its state.
- Gray - well readable sectors.
- Greens - respond a little longer than grays, but they are also in good condition.
- Orange - these sectors are being read for a very long time. As a rule, it is they who create the braking of the hard drive. When testing, there should be no more than 50 of them. They are working, but will soon fail. They cannot be restored.
- Red - sectors are damaged or cannot be read. Can't be restored. The presence of such sectors indicates that you need to think about changing the disk.
- Blue with a cross - sectors whose reading causes a failure. Information from them cannot be recovered. It is necessary to re-partition such sectors so that the hard drive does not write to or read data from them. This is done using the “Remap” option, which you will read about below.
Test options: Ignore, Erase, Remap, Restore
- Ignore - this option indicates that you just need to check the disk, and do not perform any recovery actions with it.
- Erase - when this function is enabled, unreadable sectors will be overwritten during the scan.
- Remap - allows you to remap sectors with errors. If an unreadable sector is found on the disk, the program replaces this sector with a readable one.
- Restore - this feature works only in the paid version. Allows you to restore non-working sectors.
After you have decided on the settings for testing the program, click on the Start button, thereby starting the test and you can go drink coffee. Verification can take quite a long time, so please be patient.
The victoria hdd utility was created to solve problems and test various types of hard drives with the ability to apply different parameters. The software has advanced functionality that allows you to solve various problems with hard drives that arise under the circumstances.
Utility Features
This utility can be downloaded from 
Download the archive, unpack it and run the executable file vcr446f.exe
The utility interface opens. 
This free software is endowed with a logical and simple interface, where there are various additional software modules for examining hard drives. Even an ordinary inexperienced user can understand the program, because all the points are written in an understandable language, and even at the first start you can understand the basic and most important functions.
The victoria hdd utility (Victoria) will help the user perform a thorough check of the hard drive, as a result, information about the state of the hard drive will be provided. In addition, you can carry out self-diagnosis in the "S.M.A.R.T." which allows you to determine the period of disk health.
Victoria hdd software has the function of checking the surface of the hdd disk for possible damage and other problems. The utility can perform a full check of the hard drive for defective sectors, after the analysis, information about the state of the media as a whole is provided. If victoria hdd finds bad sectors, they will be reassigned so that the drive can be used in the future without losing data.
The Victoria disk utility can be used by both professional repairmen and ordinary users. Depending on the skill and skills, the user can configure the victoria hdd software to suit their needs, which will change the hard drive analysis algorithm.
What is included in the functionality of the Victoria utility:
The utility is able to give a detailed report on the operation of the hard drive and its technical characteristics;
Allows you to determine the connected media via sata / ide channel;
Has the ability to detect flaws on the surface of the hard drive;
Able to eliminate the shortcomings of the hard drive caused during operation, such as encryption of a broken sector and others;
Equipped with a practical and comfortable smart-monitor that clearly shows the important vital signs of the disc;
It has an integrated explorer for working with the file system;
Detailed help system for using and configuring the victoria hdd utility;
The Victoria utility is absolutely free;
The victoria hdd utility is designed to perform various tests of hard drives, it is more suitable for people with an above-average level of computer use. If you are running the victoria hdd utility for the first time, it is best not to change the preset settings if you have no idea about their purpose.
In general, the Victoria utility is very useful and relevant in tracking down hard drive problems and successfully repairing most breakdowns. This software has already been able to restore more than one practically “dead” hard drive, and if you are faced with a hard drive-related problem, the victoria hdd utility will come in handy.
Checking the hard drive
We open the program, and on the "Standart" tab we see the disk passport, which is listed on the right. 
Go to the "Tests" tab. Select the check mode "Ignore" (Ignore). In this mode, the program will make requests to the sectors of the hard drive, and if they are faulty or faulty, then it will skip them. 
Recover the hard drive using special programs. They allow you to test the hard drive, as well as fix minor malfunctions. Often, this is quite enough to continue fruitful work. From the article you will learn about one of them called Victoria.
What is the utility capable of?
Checking the Victoria HDD is completely free. Also, the program has many functions and is designed not only for professionals, but also for inexperienced users. So, now you will learn how to check the hard drive with Victoria.
Modes
In its work, the utility can use the standard Windows toolkit (API) or work in standalone mode through ports. Offline mode provides more reliable data, features additional recovery tools, and allows you to test not only internal but also external drives.
What is the use of the utility?
The Victoria program allows you to:
- speed up your computer;
- ensure the stability of both programs and the operating system itself.
This allows such features:
- repair of faulty sections of the hard disk;
- replacement of bad sectors with spare ones;
- overwriting bad sectors.
Is it necessary to use Victoria?
Experienced users will note that it is possible to fix bad sectors of the drive by replacing them with backup ones using the means of the OS itself (operating system). Correct, but for this you need to check the volume of the hard disk. However, this method has some drawbacks, for example, working with the active partition occurs exclusively in DOS mode, there is no detailed information, and there is no possibility of choosing a method for treating a malfunction. Therefore, it is better to perform hard disk recovery using victoria hdd, which is devoid of these shortcomings.
Working with the program
If you decide to use the program in question, it is best to look for the most recent version. After all, it has already corrected the errors that were in the previous ones. You don't need to install the utility. It is distributed in archival form. Unzip the resulting archive and go inside. There you will find only one executable file vcr447.exe. To make it easier to use, make a shortcut to it on the screen.
If your PC is running Windows 7 or higher, then you need to run the file only as an administrator. By right-clicking on the shortcut, select the entry "Run as administrator" in the context menu and click on it.

Before opening the Victoria program window, several pop-up windows will appear in front of you in turn:
- unknown error.
- Invalid handle.
- PortTalk driver not installed.

This warns specialists that there is not yet a driver in the system to work with ports. Click OK and that's it.
Getting Started
The graphical interface of the utility opens on the Standard tab. In its right part, specify the disk to be scanned. Even if it is the only one, it is still necessary to point to it. Then his data will appear on the left.

Important! It is strictly forbidden to enter any passwords. This option is for professionals only. Next, go to the Smart tab and on the right side click on Get Smart. The table will display 242 parameters of your hard disk.

The system removes this data from the disk immediately after installing it on the PC, and Victoria takes it from the system. You can look through them, but pay the most attention to the fifth item, the Health column. It contains the information for which you launched the utility. What does the color of these circles mean?
- green - HDD sectors feel great;
- yellow - there are problems;
- red - parameter values are invalid.
The Raw column shows how many bad sectors of the disk were found.
Test tab
Move to the Test tab. The scanning process is based on measuring the length of time elapsed from sending a request to returning a response from each of the sectors of the drive. When scanning a disk, the utility evaluates the sectors being scanned and sorts them by color and state (to the left of the coloring of the sectors, the maximum allowable response time in milliseconds is indicated):
- three gray - fine;
- green - not bad;
- orange - satisfactory;
- blue or red - bad.

Actions, according to the selected modes, will be applied to the HDD sectors that you mark.
Operating modes
The utility has four modes of operation:
- Ignore - check without trying to treat bad sectors;
- Remap - replacement of bad sectors with spare ones;
- Restore - an attempt to restore bad sectors programmatically;
- Erase - remove bad blocks from disk memory using low-level formatting. You can’t just try the mode, as there is a possibility of damage to areas that can still work in the future. The first three will suffice.

Reserve sectors, what is it?
The operating system separates a spare area on the hard disk. Most often, it is the slowest of all and is located closer to the center of the HDD. Its size is approximately equal to 10% of the total volume. When bad sectors appear, the OS moves data from them to this spare area. True, she does not do this herself, but during the launch of disk checks for errors using Windows tools or using external programs.
Diagnostics
If you have already selected the mode and marked the sectors for treatment, then press Start.

Attention! If after clicking on Start the diagnostics did not start, then most likely you did not mark your drive on the Standard tab with the mouse. You need to go back, do this, and run the test again.
The testing process can be observed on the screen. In earlier versions of Victoria, the tested sectors were displayed in a grid.

However, such a graphical display gave a significant load on the processor with large volumes of hard drives. As a result, in the latest version 4.47, the developers have replaced the grid with a graph that appears within a few minutes after the start of the scan.

Visualization is disabled if the Grid checkbox is unchecked.
Meaning of buttons
After starting the test, the name of the Start button changes to Stop, which allows you to stop the process by pressing it.

If you click on the Pause button, it will change the name to Continue, scanning will pause. Click on it and everything will continue where it left off.
Attention! Terminate all programs that may access the hard drive being checked. If they are not removed from memory, then the readings will lose accuracy, and the number of orange sectors will increase significantly. This will happen due to the fact that some of them will use open source programs.
Will the life of the hard drive last, thanks to Victoria?
You can programmatically cure up to 10% of bad sectors, as well as restore the operation of any of the sectors on the active volume if this was the result of system failures. Victoria does not fix physical damage.
However, if the bad sectors are restored, and the remaining ones are moved to the spare area, then the disk will still serve. True, it is better not to use it to install the system, but only as an additional one.
Good afternoon! Continuing the series of articles about the tools necessary for both a simple user who wants to figure everything out on his own and maybe fix something, and for a person for whom this is a job. Today we will consider the simplest option primary, inspection of your hard drive HDD. .
If you have a suspicion that the computer has begun to slow down, or errors are pouring in during recording, the OS often crashes, or something else that prompts you to check your friend's HDD, you should pay attention to the Victoria program.
There are two types of this program and they differ noticeably for the user. There is an option to use victoria from under DOS and an option running under Windows. In the first case, there are many nuances of both starting from a bootable media type and working from the program itself, it will be difficult for an unprepared user to perceive all this. Therefore, today let's look at the work of the second option, namely Victoria 4.47, which is designed to run from under the OS.
I’ll try to explain right away that working with a hard drive requires caution, especially if the data on it is important to you. Using automatic scanning and fixing HDD sectors in Victoria may result in the loss of any information. Be extremely careful, and it is better to contact specialists if problems are identified with the help of Victoria. Self-treatment of this kind of technique ends badly.
In this case, the article is advisory in nature, as verify hard drive and hold primary diagnostics, or to make sure that everything is in order. On a system with only one physical disk, scanning and repairing the sectors of the same disk from which you booted the OS is generally something prohibitively unprofessional. Therefore, we will only learn two things with you now, this is how to start Victoria in order to get SMART information, and how to start a surface scan.
Checking the hard drive with victoria. S.M.A.R.T.
First, let's download the program, below from the attachment version 4.47 with support for win7/8/10 x64. Or from the official website of the developer. But the version there is 4.46b and it works poorly with 64-bit systems. After downloading the archive, unpack it to any convenient place. And run the vcr447.exe file. The interface of the program, of course, is overloaded with information, but don't be afraid, in fact, almost all of this is really used and fixed during work. We will now, through some manipulations, obtain information about the state of the selected HDD, otherwise called SMART.
S.M.A.R.T. monitors the main characteristics of the drive, each of which is evaluated. Characteristics can be divided into two groups:
- parameters reflecting the process of natural aging of the hard disk (the number of spindle revolutions, the number of head movements, the number of on-off cycles);
- current drive parameters (height of heads above the disk surface, number of reassigned sectors, track search time and number of search errors).
To do this, in the upper right part of the program, we are looking for the hard drive that we want to check in the list. Well, or if it is one, then select it there and press the Passport button in order to read the disk data.

Reallocated Sectors Count:
The number of sector remapping operations. When the drive detects a read/write error, it marks the sector as "remapped" and transfers the data to a dedicated area. reserve region. This is why bad blocks cannot be seen on modern hard drives - they are all hidden in remapped sectors. This process is called remapping, and the remapped sector is called remap. The higher the value, the worse the surface condition of the discs. The raw value field contains the total number of reassigned sectors.
An increase in the value of this attribute may indicate a deterioration in the state of the disk pancake surface.
As a matter of fact, these same bad blocks are there, only they are hidden in the reassigned sectors. Accordingly, with a value other than zero, it is already worth thinking about the safety of your data and stability in work. If there is no important data on such a carrier, operation can be continued, but here everything depends on the number of these sectors, the dynamics of their formation, and the greed of the user :). The second parameter that you should pay special attention to is:
Current Pending Sectorcount:
The number of sectors that are candidates for replacement. They have not yet been identified as bad, but reading from them is different from reading a stable sector, these are the so-called suspicious or unstable sectors. In the case of a successful subsequent reading of the sector, it is excluded from the list of candidates. In case of repeated erroneous reads, the drive tries to recover it and performs a remapping operation.
An increase in the value of this attribute may indicate the physical degradation of the hard disk.
Such friends do not mean that everything is bad, you can still try to return them to the ranks. For this, there is a surface scan with the correction of bad sectors. They appear very often when the power is unexpectedly turned off from the HDD (the light blinked), when the power supply is faulty, the OS shuts down incorrectly, again, accompanied by an unexpected power outage. With a successful remap or erase of sectors hanging in uncertainty, we will see a decrease in their number in the SMART table. Another parameter that you should pay attention to is:
UltraDMA CRC Error Count:
The number of errors that occurred when transmitting data over the external interface in UltraDMA mode (packet integrity violations, etc.). The growth of this attribute indicates a bad (wrinkled, twisted) cable and bad contacts. Also, such errors appear when overclocking the PCI bus, power failures, strong electromagnetic interference, and sometimes through the fault of the driver.
Perhaps the reason is a poor-quality cable. To fix it, try using a SATA cable without latches, which has a tight connection with the disk contacts.
If there are errors in the current attribute, it is worth replacing the data loop. You can do it yourself.
Checking the hard drive with victoria. CHECK THE DISK SURFACE.
Going to the third tab Test, I will draw your attention to only the Start button, after pressing which you will start scanning the physical surface of the HDD with each sector recorded in a category separated by color gradation.

The bottom line is that, depending on the reading time, the sector falls into a certain category, and accordingly, the worse the sector, the more colorful the group. Particularly difficult fall into the red group, tolerant into the orange, etc. When finding a sector with a delay in the response greater than the allowable norm, we get the sector of the error group, perhaps this is our Current Pending Sector. But I do not advise you to fix sectors yourself, and especially through the Window version of Victoria.
A lot of users came across right on the most obvious, when setting remap they remapped the very first sector to the HDD in a second 🙂 After that, the partition table flew off and the user was left alone with the RAW disk without his data. Moreover, in such situations, when the user was left one on one, I would bet on the victory of the hard one 🙂
Therefore, if you find obvious deviations from the norms in SMART, a lot of hanging sectors during the check, I advise you to try to copy important information and contact the SC. There, on the basis of conclusions on secondary and more difficult to formulate parameters, they will conclude for you whether to repair or go into replacement. Good luck and don't lose your data!)
Good day!
Sooner or later, any user of a computer (laptop) is faced with problems caused by improper operation of the hard drive. (note: often called short - HDD) ...
Most often, the symptoms that something is wrong with the HDD are:
- the impossibility of loading the "old" Windows (and installing a new one);
- resetting some OS or program settings;
- inability to open any files or programs (an error related to file integrity can often appear);
- very slow copying and reading files;
- high processor load when accessing the disk and trying to open (read) any file from it;
- Windows freezes when trying to read, copy files from a disk;
- the appearance of clicks, rattles, tapping, etc. during disk operation (pay special attention to this if there were none before!);
- unreasonable reboots of the computer, etc.
When the symptoms listed above appear, the first thing to do (while everything is still working) - I recommend copying everything important documents to a separate medium.
Well, after that, you can start checking ...
In general, a hard drive is a rather fragile thing, and if not handled carefully, it can be quickly disabled. The reasons for its unstable work(and failure), most often, are:
- unexpected power outages - when the PC simply cuts off power abruptly (laptops, by the way, are protected from this). As for the PC, not every user has a UPS (UPS) (unfortunately);
- forced power off by the user. Sometimes, when the computer freezes "tightly" - other options simply do not fit;
- strong vibration, blows to the disk - laptops that are carried with them most often suffer. Also, the disc can be damaged during transportation;
- during unstable operation of the power supply, poor contact on the disk (when the power is - that is, then not ...);
- work not in optimal temperature conditions (most often overheating);
- physical wear and tear (during very long work);
- a bad batch (with some flaws) from the disc manufacturer.
All these factors can be the reasons for the formation of file system errors and bad sectors (they are also called bad blocks, bad - means bad, translated from English). Consider checking for this and that in detail, and step by step...
For mistakes
Checking and fixing file system errors in Windows is done using the built-in program - chkdsk. It is available in all versions of Windows: XP, 7, 8, 10. By the way, you may even have seen her work after an emergency power outage: before loading Windows, a black screen is observed and some percentages run there, something is checked ( example in the screenshot below) ...

How to run the chkdsk utility
Method number 1 - in this computer
First you need to open File Explorer and go to "This PC" ( note: used to always be called "My Computer").

Then open the "Service" section and click the "Check" button (administrator rights are required).


Windows finished checking
Method number 2 - through the command line
Also run the utility chkdsk You can use the command line (however, the command line must be run as administrator).
To do this, open the task manager (key combination - Ctrl + Shift + Esc ), then click file/new task , enter in the line "Open" cmd, and check the box "Create task with admin rights"(an example is shown in the screenshot below).

- chkdsk d:- command to check the disk in read mode;
- chkdsk d: /f- checking and correcting the found errors;
- - get help about the utility's capabilities.

On bad blocks / bad sectors
What are bad blocks?
Perhaps, starting this subsection of the article, one cannot do without a brief explanation. In fact, a hard disk consists of several magnetic disks, over which the read head moves. When writing to a disc, the head magnetizes certain areas of the disc ( from computer science: zeros and ones ).

This information is recorded in certain areas called sectors. Sometimes information cannot be read from a sector (the reasons why this happens are indicated at the beginning of the article) - such sectors are called broken (or bad blocks. Bad - bad (English)).
To check the disk for bad blocks, you need a special. program: it will turn to all sectors on the disk and try to read information from them. If everything is in order with the sector - the reading time is 3 milliseconds, the critical reading time is 600 milliseconds (this time indicates that this block has become "unreadable" and you should not work with it).
By the way, the same special utilities can not only find such sectors, but also reassign them to backup ones (such an operation is called Remap).
Now about how it's done...
The best programs for working with HDD (test, diagnostics, etc.) -
From under Windows
One of the best software for testing and diagnosing a hard drive - Victoria. With it, you can see the readings of the S.M.A.R.T table. (disc self-monitoring technology, in more detail), evaluate the technical condition of the drive, replace bad sectors with spare working ones, and much more.
Another important point: Victoria does not show file system defects, software errors, etc. She evaluates the physical condition of the disk! About finding and correcting errors - see the first part of the article.
Victoria
Developer site: http://hdd-911.com/ (different versions)
HDD operating mode settings tab in BIOS -
After checking the disk by Victoria, return the option back. Otherwise, the disk will start to slow down, Windows will "pour" errors.
By the way, below is what the problem disk will look like. Notice the line G-Sensor shock jacket(the tab shows whether they hit or hit the disk) - as you can see below, they hit it. Because of this, in fact, the disk began to freeze and slow down. In general, his status bad(and red). In this case, there is only one solution - to copy all the information from it (whatever is possible), and buy a new disk.
TEST tab
We proceed directly to testing the disk: for this, open the TEST tab and set the settings (as in the screenshot below: read, ignore). To start the test - click the button "Start".
Victoria will start checking the disk, and you will start to see how the numbers will grow next to the rectangles of different colors (highlight-3 in the screenshot below). Particular attention must be paid red and blue rectangles (these are the bad sectors that have become unreadable).
If blue rectangles were found on your disk - you need to run the disk again with Victoria with the option enabled Remap(rectangle-4, see screenshot below). In this case, Victoria will replace these sectors with reserve ones, which is why they remember the word "treatment" in this case ...
Testing (treatment) of the disk // TEST Victoria
If you have too much blue rectangles - then such treatment, if it helps, then most likely not for long. If the disk starts to "crumble" - I recommend transferring all the data from it (if you haven't done it yet due to some strange coincidence ☻) and look for a replacement for it.
By the way, the appearance of blue blocks on a new hard drive is unacceptable!
ADDITION!
I would like to draw attention to one point - if you run a check and scan of a disk from under Windows, which is launched from the same disk that you are scanning - then the test results may be somewhat inaccurate (and the appearance of green or even orange rectangles - may say nothing). Perhaps, in this case, you can only look at the blue ones (bad blocks).
A much more accurate option is to use Windows installed on another disk, or an emergency bootable LiveCD. Checking by Victoria from under DOS - will show much more accurate results and give a real assessment of the disk. How to make it is described below ...
From under DOS
Many, of course, are afraid of DOS and that everything will be incomprehensible there (at least not in the same way as in Windows). I will try all the same (as far as possible) to show by example where and what to click to check your disk.
Victoria (3.5 for DOS)
Of. website: http://hdd-911.com/
As already said, Victoria has quite a few versions. To work from under DOS - you need a special. version (usually 3.5 is used). It is a regular ISO image that needs to be correctly written to a USB flash drive (or disk). Often the image comes in a RAR or ZIP archive, the ISO image from the archive must first be extracted (WinRAR will help).
How to record Victoria correctly so that she boots from a USB flash drive
- to burn an ISO image - you need the WinSetupFromUSB program (the official website of the WinSetupFromUSB program -);
- first insert a USB flash drive and run the program;
- then select your flash drive in the list and check the boxes next to the items: Auto Format it with FBinst, align, copy BPB, FAT32;
- in step Linux ISO/Other Grub4dos compatible ISO- specify your ISO image with Victoria;
- press the GO button (note: the program will ask you several times that you are aware that all data from the flash drive will be deleted! Copy everything important from it in advance so as not to be distracted at this moment).
Actually, if everything is OK with the flash drive, and you did everything right, in a couple of minutes you will see a message Job Done- work is done!
Note: if you write the flash drive incorrectly (for example, many people write using UltraISO), you may see an error like "no kernel sys ...". Just overwrite the flash drive using the method suggested above.
How to boot from a flash drive with Victoria. Selecting the right drive for the test
By and large (if the flash drive is written correctly), then the download is no different, as if you were doing it for a Windows installation flash drive.
The best option, in my opinion, is to call the Boot Menu and select our flash drive. If you don’t know how to call the Boot Menu, you can use this article:
If you recorded a USB flash drive in WinSetupFromUSB (as recommended above), then you will need to select Victoria in the boot menu (see screenshot below - "vcr35r").
Not the fact that by default, the program will select the hard drive that you need. To select a disk yourself - press the key P.
A menu should appear: use the up and down arrows to move the pointer. The last item in this menu is responsible for selecting the hard drive on the PCI/ATA/SATA/RAID controller.
If you used the last menu - then you need to specify the disk number (specified in the list found) and press the Enter key (example below).
Disk testing in Victoria (DOS)
To start testing in Victoria - press the function key F4. After that, a menu should appear where you need to set the parameters: "Start LBA", "End LBA", "Linear Read", "Ignore Bad Blocks"(ignore unreadable sectors). The choice is made using the arrows "Right" and "Left".
Important! Instead of linear reading, you can set "Write (erase)", "Write from file", and in the next menu item - "BB = Erase 256 sect": be aware that such parameters erase the information located on the HDD!
To run the test- press the button again F4. Gray rectangles should immediately run across the monitor screen. Now it remains only to wait for the end of the test (By the way, Victoria reports check times, see bottom right corner - remain ).
What to look for and what conclusions to draw ...
In principle, everything that I said about checking the disk from under Windows is also relevant here. On the right - sectors are shown, depending on their reading time. The more red and orange - so, in fact, worse for the disk. If there are a lot of red ones, it means that the disk may soon completely fail (as a rule, in this case it slows down a lot, files are slowly read and copied on it, often the PC freezes, etc. "joys").
Addition
Also pay attention to the section "Defects"(on the right, approximately in the center of the screen). If everything is fine with the disk, ideally, it should say - "No defects found" (as in the photo above). If you have found defects in this section, then this may indicate serious problems with the disk.
And lastly, if you experience difficulties in working with the program and do not know what to press - try to look in the help - the key F1. In general, be careful with the Victoria utility and do not "test" with your disk if it has the necessary data.
To show all aspects of working with Victoria and consider all the nuances - I think this is hardly possible even within the framework of several articles. Well, I hope I fulfilled the set goal - to assess the condition of the hard drive, and therefore I am completing the article.
Thanks in advance for additions to the topic.
good luck!


