When typing on a computer, users often ask how to make a paragraph in Word. Usually in such cases, they are not interested in the paragraph itself, but indent before it.
If you are facing this problem, then this article should help you. Here you can learn how to indent before a paragraph in Word 2003, 2007, 2010, 2013 or 2016.
How to make a paragraph in Word 2007, 2010, 2013 or 2016
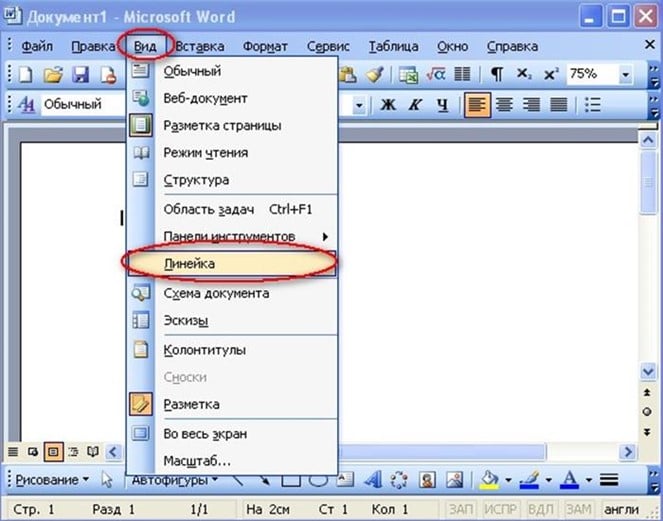
In order to make a paragraph in Word, you must first enable the display of the ruler. For this go to the "View" tab and check the box next to "Ruler"».
In addition, the ruler can be turned on by clicking on the button, which is located in the upper right corner of the sheet (just above the horizontal scroll bar).
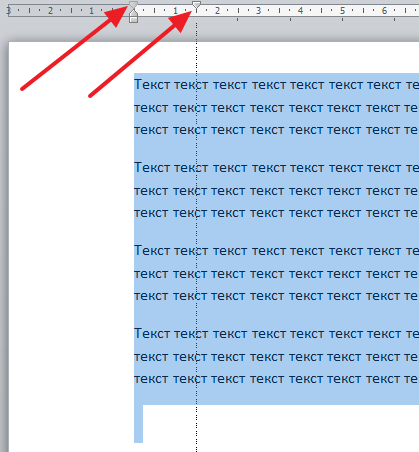
When the ruler is turned on, examine it carefully. There are three sliders in the form of triangles on the ruler. Two on the left and one on the right. With these sliders, you can control the indentation between text and the edge of the sheet, as well as paragraphs. To make a paragraph you need to select all the text with the mouse and move the upper left slider to the right.
After that, each paragraph of text will be separated from the edge of the sheet by an additional gap.

If you need to indent only one paragraph of text, then you can not select the text, but simply place the cursor on the desired paragraph and indent it by moving the slider.
How to make a paragraph in Word 2003
In a similar way, you can make a paragraph in the Word 2003 text editor. First you need to turn on the display of the ruler. This is done using the "View - Ruler" menu..
How to make a paragraph using the keyboard
It should also be noted that you can make a paragraph using the keyboard. For this you need to place the cursor at the beginning of the block of text and press the TAB key on the keyboard.

This method of creating a paragraph is also convenient in that it works not only in Word, but also in many other text editing programs.
Paragraph formatting in Word. In any document, text formatting is indispensable. , we reviewed in the last lesson, now it's the turn to analyze the issue of formatting paragraphs in Word. The main semantic unit of the text is usually a paragraph. Therefore, alignment commands and formatting operations are designed to change the appearance of individual paragraphs. Without a paragraph, the text will not look nice, and it is not very suitable for reading. You must have convinced yourself of this? On sites where the text is a solid wall, eyes get tired very quickly. And no matter how interesting it may be, visitors stop reading it in mid-sentence and leave. That is why a competent web designer necessarily breaks the text into small paragraphs. Books written without paragraphs lose their appeal and most often remain unclaimed.
Therefore, paragraphs must be mandatory. In Word, there is an opportunity to make your work easier from paragraphs. For this you need to customize the text editor "for yourself."
Paragraph formatting inWord
Note
The paragraph formatting setting in Word is the same for all versions of the program, so you don’t have to worry about this.
For full formatting of a paragraph, use the dialog box "Paragraph ". Enter menu -Format , and select - Paragraph –
or right-click on the document field and select the item from the drop-down context menu Paragraph .
![]()
- In the opened window " Paragraph» tab « Indents and spacing » customize alignment paragraph
- Left side
- in the center
- Right side
— By width
- Drop Level you can set the semantic level of a paragraph in the overall structure of the text.
- Panel Indent defines the right and left margins of a paragraph relative to the right and left margins of the page.
- Drop First line you can set the presence and size of the "red line" (paragraph indent).
- Panel Interval allows you to set the gaps between paragraphs, as well as between the lines of this paragraph. Increased spacing between paragraphs often replaces paragraph indentation.

- Tab Position on the page is designed to format paragraphs that fall on the border between pages. Here you can prohibit tearing off one line from a paragraph, require that the paragraph be placed on one page entirely, “attach” the next paragraph to this one, or start a new page with the current paragraph.

Note:
With a window Paragraph it's very easy to format, but don't do it. It is useful for learning formatting techniques, but for practical work it is better not to use it.
Now let's look at more efficient ways to format paragraphs in Word.
There is a way - formatting paragraphs with a ruler . A lot of people don't use a ruler at all. But in vain - this is also quite a powerful tool in capable hands, and you will soon see for yourself.
Formatting a paragraph with a ruler
Ruler in Word not only provides information about document markup, but is also a powerful formatting tool. It allows you to control the margins and tab stops of the current paragraph. Paragraph boundaries are set by moving (dragging) special markers.
How to include a ruler inWord
In Word 2003 the ruler is included in the menu - View. You just need to check the box next to the entry Ruler .

IN Word 2007/2010 the ruler is also in the menu - View - Show and hide block - Ruler.

Note

- The triangular marker located at the bottom left of the ruler (point up) sets the left border for all lines of the paragraph, except for the first.
- An inverted triangular marker at the top left sets the line for the beginning of the first line of a paragraph and allows you to form a paragraph indent.
- The square marker below the ruler is a control that is always located directly below the triangular marker on the left border of a paragraph. Dragging it moves both left border markers together, keeping their relative positions. This paragraph design can be used when formatting epigraphs, especially important fragments text, quotes etc.
- The triangular marker, located on the right, sets the right border of the current paragraph.
- The ruler is also used to set tab stops . It will already be formatting paragraphs with tabs . Tab stops are used when a line consists of multiple fields, such as in a simple table. By default, tab stops are every half inch and are marked on the ruler with short vertical serifs.
- The tab stop symbol is located on the left side of the ruler. It looks like " corner". By clicking on it, you can change the appearance of the tab character and, accordingly, the method of displaying the text.
The selected tab character is set by clicking on the ruler. In the future, its position can be changed by dragging. To remove a tab character it is dragged outside the ruler.
After setting the tab stop manually, all tab stops set by default and located before it are deleted, i.e. all your subsequent documents will be with this new paragraph formatting.
∟ Left-aligned tab position. The text is positioned to the right of the specified position, starting directly from that position;
┴ Center-aligned tab stop. The text is positioned symmetrically with respect to the specified position;
┘ Right-aligned tab stop. The text is placed to the left of the specified position, ending at the specified location;
Types of tab markers:
Character-aligned tab stop. Allows, for example, to arrange a column of numbers of different lengths so that the decimal points are located one below the other.
Note:
Use the keys to navigate between tab stops. TAB And BACKSPACE .
Here's how much new we learned today, and what is , And how include line in Word , and what is tab in Word . I hope that this new knowledge will be useful to you.
How to make the same paragraph indent in Word. When writing reports, abstracts, reports and other text documents in Word, the creation of a paragraph is one of the mandatory items for proper design.
In addition, the red line gives the text a nice look and also makes it easier to read.
This question is most often faced by office workers and students.
In this article, we will show you how to indent paragraphs in Word.
Method One: Ruler Tool
This method is considered the most common for creating a paragraph indent and the easiest.
In this case, the length of the red line is determined approximately.
It happens that by default this tool is removed, and it needs to be enabled. This is done in the following way:
- Find and click on the "View" tab, which is located directly under the name of the document;
- Find the tab area called "Show";
- Click on the box next to the line "Ruler".
Pay attention to the top ruler, as the paragraph line is adjusted on it.
The text will be limited by clear borders, on which you will see four "sliders": two lower ones, a middle one and a top one.
To create a paragraph indent, you need to pay attention to the "sliders" on the left side.
- When moving the bottom "slider", an indent will be created for all text in the paragraph;
- When moving the middle "slider", an indent will be created for all text, except for the first line;
- When moving the upper "slider", a red line will be created.

Remember that the division price on the ruler is 0.25 centimeters.
Method two: the "Tab" key
This method is also called tabulation.
It, like the first method, does not give full accuracy, but it is also in demand.
Using it, you can indent from the left edge for the first line.
Tabulation is done using the "Tab" key on the keyboard.
When you press it, one large space is set, which will be your paragraph.
The only disadvantage of this method is its methodical affixing in each paragraph.
Therefore, it is easier to use a ruler and the third way to put down a red line.
Method Three: Paragraph Menu
The third way to put down a paragraph will help you most accurately put down a red line throughout the text.
Under the document name, click on the "Home" tab. It opens by default when you open a document.
In the lower right corner of the area, click on the small square icon.

In the pop-up window, pay attention to the field called "Indent". In it, you can fully customize the setting of paragraph indentation.
First of all, pay attention to the list drop-down under the inscription "first line". Choose the one that suits you from the options below:
- No (nothing will happen when clicked);
- Indent (when pressed, a red line is created);
- Protrusion (when pressed, all lines of text will shift except the first).
The bottommost field in the box called "Sample" will show how the text will look after all the changes.

These methods will help you to indent a paragraph in a document. Remember that beautiful and correct design of the text makes it easier to read.
The red line is familiar to us from the school bench. And if earlier we measured it with the size of our fingers, now Word does it successfully, and we only command it how far the paragraph line should be moved.
Making a paragraph indent in Word 2007
- If you need to move the entire paragraph to the left or right, and not just one line, we find the “Paragraph” section on the toolbar on the “Home” section, select the button to reduce indent” or “increase indent”, respectively. The cursor should be on the "moved" paragraph.
- You can adjust the indentation of the red line by right-clicking the window in which you should select the line "Paragraph" (or click on the lower right corner of the "Paragraph" section on the top panel). You will see a menu in which you can set the settings not only for the first line, but also for all indents in the document.
- If you put the cursor at the beginning of the line and press "Tab" on the keyboard, the line will automatically move to the right.
- You can adjust the indentation of the red line with the sliders at the top of the page; for this, you must first select the text. If the sliders are not visible, you should go to the "View" tab - the "Show or hide" section - check the "Ruler" box.
Indentation in Word 2003
- We select the text to be formatted, right-click on the "Paragraph" list, in the "Indents" section, set the required interval in the "First Line" field. Or we make the appropriate settings by going to the "Format" on the toolbar - the "Paragraph" subsection.
- You can also adjust the indents with the slider at the top of the page, which is called by the "View" tab - the "Ruler" section. Select the formatted text.

With these minimal efforts, the necessary formatting of the text in the indentation area is achieved.
Conquer Word and see you soon!
Artem Ostapov
Introduction
This article will focus on setting up paragraphs. If you need to properly and beautifully format documents, you cannot do without knowing how paragraphs are set up. The main ways of formatting paragraphs will be described here.
Paragraph Format
A paragraph is a structural component of the text, usually logically connected and highlighted graphically, for example, in the form of indents. As you type, each time you press the "Enter" key, you create a new paragraph. The paragraph type setting determines its format, which is responsible for the placement of text on the page.
Setting (formatting) a paragraph implies:
- spacing to the right or left of a paragraph;
- paragraph line spacing;
- paragraph line alignment relative to the left and right margins;
- indent or indent the first line of a paragraph;
- spacing before and after a paragraph;
- pagination of a paragraph.
First of all, starting to set up a paragraph, you need to be able to select it. To do this, do the following:
1 way:
Triple left-click on any word in the paragraph;
2 way:
Use keyboard shortcuts:
Paragraph line alignment
By default, paragraph text is left-aligned. But documents are different, and alignment may also be required differently. For example, for university tests, width alignment is accepted.
In order to set the desired alignment of the lines of a paragraph, use one of the following methods:
1 way:
Go to the "Home" tab, and then select the necessary paragraphs (the order does not matter).
In the Paragraph group, click one of the four available alignment buttons:
- "Left" - align the lines of the paragraph to the left;
- "Centered" - align the lines of the paragraph in the center (proportionately equidistant from the right and left edges);
- "Right" - align the lines of the paragraph to the right;
- "Fit to width" - align the lines of the paragraph at the same time both on the left and on the right margin. In this case, the text will visually "stretch" (fill the space of lines), and additional space will appear between words.
2 way:
Select the paragraphs you need, and then use keyboard shortcuts:
Figure 1 - Paragraph line alignment
Indent the first line of a paragraph
The most commonly used when formatting paragraphs is setting the first line indent. How many times have you seen how "experienced assistant secretaries" and representatives of other professions associated with the creation of text electronic documents have no idea how to set a paragraph using the Word 2010 interface. Usually they use double or triple pressing the spacebar for this purpose , or, at best, a key
Now let's look at how to adjust the indents, and you can do this visually (by eye) or exactly (by setting a certain value in the "Paragraph" window). Visual adjustment involves the use of a horizontal ruler, where you can quickly change the size of the indent, guided by the feeling of the desired size "by eye". Fine tuning allows you to set the indentation value in the units used in the document - it is worth using it when you know the size of the indentation value.
Visual setting of first line indent
To indent the first line of a paragraph, do the following:
1 way:
- Select the required paragraphs;
- On the horizontal ruler, move the cursor to the "First line indent" icon;
- Click and hold the left mouse button, and then drag the icon along the ruler to the desired location.
2 way:
- Click the tab indicator button until the First Line Indent icon appears;
- Click on the horizontal ruler where you want the first line to be indented.
Fine-tuning the indentation of the first line
1 way:
- Select the required paragraphs;
- Right-click on the selected fragment;
- In the context menu (Fig. 1), select the "Paragraph" item (you will go to the "Paragraph" window);
- On the "Indents and Spacing" tab, in the "Indent" group in the "First line" column, set the desired indent value (default is 1.25 cm).
2 way:
- In the open document window, go to the "Home" tab;
- Select the required paragraphs;
- Further, in the "Paragraph" window, proceed in the same way as in the first case.

Figure 2 - Using the context menu to go to the "Paragraph" window
Setting the first line protrusion
In rare cases, in addition to the usual indentation of the first line of a paragraph, a ledge is used. This technique is often used to design poetic prose and a number of works of art, in particular, magazine articles.
To create a ledge, do the following:
1 way:
- Select the required paragraphs;
- Click on the tab indicator button (Figure 3) until the Tab icon appears;
- Click the horizontal ruler where you want the first line indent to end, and then enter the text for the first line of the paragraph. Now, starting on the second line, the text will start below the tab position on the horizontal ruler.

Figure 3 Tab indicator button
2 way:
- In the document, select the desired paragraphs, and then go to the "Home" tab;
- In the "Paragraph" group, click on the "Paragraph" button;
- In the "Paragraph" window, on the "Indents and Spacing" tab, in the "Indent" group, in the "First Line" column, select the "Indent" value;
- Set the desired value manually or with the knobs.

Figure 4 - Indent and indent of the first line of a paragraph
Quick left indent setting for a paragraph
Sometimes you need to quickly adjust the position of a paragraph relative to the edges of the document. In particular, when it seems to us that the indent set for lists is too large, or the inserted images are too far from the left margin, and this spoils the overall look of the document. In this case, we can very quickly, "on the fly" change the value of the indent, choosing the optimal one. To set the left indent for all lines of a paragraph by a given amount (a multiple of the standard), do the following:
1 way:
- Select the necessary paragraphs, and then go to the "Home" tab;
- In the "Paragraph" group, click on the "Decrease Indent" and "Increase Indent" buttons. All paragraph lines will indent (or move to the side) from the left margin by 1.25 cm.
Note. Please note that each repeated click on these buttons shifts the lines of paragraphs by 1.25 cm. Do not get carried away, if you click too much on the button to reduce the indent, you will remove it altogether, and on the contrary, by constantly increasing the indent, you will ensure that the words completely disappear from view (more precisely, they will go beyond the edges of the visible area). To remove the first line indent for a paragraph, use the "Paragraph" window and select "None" in the "First line" field or enter zero in the "To" field. You can also use the Undo button on the Quick Access Toolbar to go back a few steps.
2 way:
- Highlight the required paragraphs;
- On the horizontal ruler, move the mouse cursor over the "Left Indent" icon and, holding the left button, move it to the desired position.
If you get confused when adjusting the indents, you can easily fix it by removing them, to do this, do the following:
1 way:
- Select the required paragraphs;
- On the Home tab, in the Paragraph group, click the Decrease Indent button.
2 way:
- Select the required paragraphs;
- On the horizontal ruler left-click (and hold) the Left Indent icon;
- Drag it to its starting position on the ruler, at the level of the left margin.
Quick adjustment of padding on the right
It is also possible to quickly adjust the indent on the right. This is useful when you are typing text that should look like a block, such as when you are writing poetry, thangka, or poetic prose. In these cases, right-alignment gives the text a special look, also emphasizing its subject matter.
To quickly set the indent to the right, do the following:
- Select the required paragraphs;
- On the horizontal ruler, click and hold the left mouse button on the "Indent right" icon;
- Drag it to the desired position on the ruler.
To remove the indent on the right, do the following:
- Select the required paragraphs;
- On the horizontal ruler left-click (and hold) the Right Indent icon;
- Drag it to its starting position on the ruler, at the level of the right margin.
Fine tune paragraph indentation
By default, paragraph lines start directly at the left margin and end at the right margin (if you fill the page with text, in one large paragraph, it will look like a page-sized text block). It is often necessary to specify the exact distance from the left margin, or from the end of lines to the right margin. In particular, this is necessary when you have clear requirements for the design of the work, in particular, the value of the indentation values. To do this, do the following:
1 way:
- Select the required paragraphs;
- Go to the "Home" tab and in the "Paragraph" group, click on the "Paragraph" button;
- On the "Indents and Spacing" tab of the "Paragraph" window, in the "Indent" group, in the "Right" and "Left" items, set the desired value.
2 way:
- Select the required paragraphs;
- Go to the "Page Layout" tab and in the "Paragraph" group in the "Left Indent" and "Right Indent" lines, set the desired value.

Figure 5 - Paragraph indent setting
Line spacing
Line spacing is very often used when formatting documents, and its most common values are single and one and a half. The spacing itself is determined based on the baselines of the lines that run through the center of the letters (taking into account their tops and bottoms, such as superscript/subscript). So, single spacing corresponds to the text font size, and is the "default" spacing in Word 2010. One and a half spacing is used in most business documents, in term papers and essays. To set line spacing, do the following:
1 way:
- Select the desired paragraphs and right-click on the selected area;
- In the context menu, select "Paragraph";
- In the "Paragraph" window, "Indents and Spacing" tab, in the "Spacing" group in the "Interline" column, select the required one from the list:
- "Single" - spacing corresponds to the font size of the paragraph text;
- "1.5 lines" - the interval is equal to one and a half paragraph text font size;
- "Double" - the spacing is equal to the double font size of the paragraph text;
- "Minimum" - the interval is not less than the size specified in points;
- "Exactly" - the spacing exactly corresponds to the size specified in points (that is, if the font is 12pt, then the spacing will be exactly the same);
- "Multiplier" - a multiplier for spacing equal to the font size of the paragraph text (the larger the multiplier, the larger the spacing).
2 way:
- In the "Paragraph" group, click on the "Line Spacing" button (you will go to the "Paragraph" window to the "Indents and Spacings" tab);.
- In the Interval group, in the Value field, enter the desired value and click OK.
3 way:
- Select the required paragraphs;
- Using keyboard shortcuts, set the required interval:
- Ctrl+1 - single spacing;
- Ctrl+5 - one and a half interval;
- Ctrl+2 - double spacing.
Adjusting the spacing between paragraphs
In most cases, when special care is not required in the design of a document, the vertical distance between paragraphs (interval) is set by pressing the key
1 way:
- Select the required paragraphs;
- In the "Paragraph" window of the "Indents and Spacing" tab, in the "Spacing" group, in the "Before" (above the paragraph) and "After" (after the paragraph) items, use the sliders to set the desired value. Please note that each click on them corresponds to a step multiple of 6pt (points). To enter an arbitrary value, use the data entry area.
2 way:
- Select the desired paragraphs and go to the "Page Layout" tab;
- In the "Paragraph" group in the "Interval" column, set the desired value;

Figure 6 - Line spacing
Breaking paragraphs into pages
When working with large documents, it may be necessary to set the proportional placement of paragraphs of text on pages. For example, you are writing a document with large paragraphs, and you want each new paragraph to start on a new page. To break paragraphs into pages, do the following:
- Highlight the required paragraphs;
- Click on the selected fragment with the right mouse button and in the context menu that appears, select "Paragraph";
- In the "Paragraph" window, go to the "Page Position" tab;
- In the "Pagination" group, select the desired items:
- "Prohibition of hanging lines" - prohibition of transition of one line to the next page or the first line to the previous one;
- "Do not tear off from the next" - prohibition of the transition of the next paragraph to the next page;
- "Do not break paragraph" - prohibition of splitting a paragraph into two pages;
- "From New Page" - Insert a page break before a paragraph (each subsequent paragraph starts on a new page).

Figure 7 Breaking a paragraph using the Page Position tab tools
To quickly set the spacing at the top of a paragraph, which corresponds to the font size of a standard line (12pt), do the following:
- Place the cursor on the desired paragraph;
- Press key combination
Please note that pressing the keys again removes the interval.
Paragraph sorting
Sometimes it is necessary to sort paragraphs, for example, when you have created a bibliography (for a test or abstract) and it needs to be sorted alphabetically. Another example is when you form a news sample and you need to select articles and comments by date. To sort, do the following:
- Go to the "Home" tab and select the necessary paragraphs;
- In the "Paragraph" group, click on the "Sort" button and in the "Sort Text" window, in the "First by" column, select the "Paragraphs" value;
- In the "Type" column, select the value "Text", "Number" or "Date", depending on where the paragraph begins (from a number, date or text);
- Set the sort direction - "Ascending" (from smallest to largest), or "Descending" (from largest to smallest);
- Click OK.

Figure 8 - Sorting paragraphs
Highlight paragraphs with the same formatting
This technique can be used when you insert text fragments with different formatting, for example, you are preparing a review of a new Aston Martin car and you need as much information as possible from various sites. At the same time, you insert text fragments from sites as you download (read) the article. The sites are different and the formatting is also different there, but, for example, you most trust a couple of sites that specialize in covering the automotive industry. Accordingly, you need to find all the articles from these sites that you have copied into your document. You can do this by setting just one paragraph as an example - all other paragraphs with similar formatting will be selected, and you, for example, can rebuild them into a block for subsequent actions (editing, formatting).
To highlight paragraphs with identical formatting, do the following:
- Select a paragraph with the desired formatting options;
- Right-click on the selected fragment and in the context menu, hover over the "Styles" item;
- From the Styles pop-up menu, click Highlight Text Same Format.
Reverting formatting in a paragraph
To remove changes made when formatting paragraphs, do the following:
- Select the desired paragraph;
- Press key combination
Setting the default paragraph style
To use a specific default paragraph style other than the base paragraph style (Normal style), do the following:
- Click the "File" tab, then "Word Options", "Advanced";
- In the "Editing Options" group, in the "Default Paragraph Style" item, select the desired style;
- Click the OK button.

Figure 9 Setting the paragraph style
This technique is useful if you are using a paragraph style that is different from the usual one.
Conclusion
Adjusting paragraphs allows you to completely change the look of a document. By changing the line spacing values, you can visually increase or decrease the size of the document. In this case, you can set quite standard values for the indentation of the first line, and at the same time, give the document a correct and complete look. This has a definite bearing on the overall look of the document, as the lack of visual appearance of a paragraph detracts from the "readability" of the document.
Knowing how to format paragraphs is essential for anyone who works with documents that require at least minimal formatting.


