Sooner or later, every user of Android devices is faced with a situation where the internal memory of the device is about to run out. When you try to update existing or install new applications, a notification pops up in the Play Market that there is not enough free space, you need to delete media files or some applications to complete the operation.
Transferring Android apps to a memory card
Most apps are installed to internal memory by default. But it all depends on what place the developer of the program prescribed for installation. It also determines whether it will be possible to transfer application data to an external memory card in the future or not.
Not all applications can be transferred to a memory card. Those that were preinstalled and are system applications cannot be moved, at least in the absence of root rights. But most downloaded applications tolerate the “move” well.
Before starting the transfer, make sure that there is enough free space on the memory card. If you remove the memory card, the applications that were transferred to it will not work. Also, do not expect applications to work in another device, even if you insert the same memory card into it.
It is worth remembering that programs are not completely transferred to the memory card, some of them remain in the internal memory. But the main volume is moved, freeing up the necessary megabytes. The size of the portable part of the application is different in each case.
Method 1: AppMgr III
The free AppMgr III (App 2 SD) has established itself as the best tool for moving and uninstalling programs. The application itself can also be moved to the map. It is very easy to master it. There are only three tabs on the screen: Relocatable», « On the SD card», « In phone».
After downloading, do the following:
1. Run the program. It will automatically prepare a list of applications.
2. In the tab " Relocatable» Select an application to transfer.
3. From the menu, select " Move App».

4. A screen appears that describes which functions may not work after the operation. If you want to continue, click the appropriate button. Next select " Move to SD card».

5. In order to transfer all applications at once, you must select an item with the same name by clicking on the icon in the upper right corner of the screen.

Another useful feature is the automatic cleaning of the application cache. This technique also helps free up space.

Method 2: FolderMount
FolderMount is a program designed to completely transfer applications along with the cache. To work with it, you need ROOT rights. If there are any, you can even work with system applications, so you need to carefully select folders.
And to use the application, follow these instructions:
1.After starting the program, it will first check for root rights.
2. Click on the " + ' in the top corner of the screen.

3. In the field " Name» Enter the name of the application you want to transfer.
4. In the line " A source» enter the address of the application cache folder. As a rule, it is located at:
SD/Android/obb/
five. " Purpose"- the folder where you want to move the cache. Set this value.
6. Once all options are specified, click the checkmark at the top of the screen.
Method 3: Move to SDCard
The easiest way is to use the Move to SDCard program. It is very easy to use and takes only 2.68 MB. The application icon on the phone may be called " Delete».
Using the program looks like this:
1. Open the menu on the left and select " Move to map».

2. Check the box next to the application and start the process by clicking " Move» at the bottom of the screen.

3. An information window will open showing the progress of the move.

4. You can carry out the reverse procedure by selecting the item " Move to internal memory».
Method 4: Regular means
In addition to all of the above, try to carry out the transfer using the built-in tools of the operating system. This feature is only available for devices with Android version 2.2 and higher installed. In this case, you need to do the following:
1. Go to " Settings”, select the section “ Applications" or " Application Manager».

2. By clicking on the corresponding application, you can see if the " Move to SD card».

3. After clicking on it, the moving process begins. If the button is not active, then this function is not available for this application.

But what if the Android version is lower than 2.2 or the developer did not provide for the possibility of moving? In such cases, third-party software, which we talked about earlier, can help.
Using the instructions in this article, you can easily move apps to and from your storage card. And the presence of ROOT-rights provides even more opportunities.
Most smartphones and tablets running the Android operating system have a relatively small amount of built-in physical memory, which does not allow you to store large files on your mobile device. This shortcoming is easily compensated by installing external memory, usually represented by microSD cards. However, photos, audio and videos are not the only type of content that requires users to resort to expanding the internal memory of the device, games and applications can also fill it.
There are two ways out of the situation - either delete some of the software, or try to transfer applications from the phone to the memory card. Why try? Because this procedure, simple at first glance, can cause certain difficulties for a beginner. In addition, the method of transferring software from the internal memory of a mobile gadget may depend on the model and version of the operating system, however, these differences, if present, are not so significant. So let's learn how to move apps to SD card in Android.
Moving applications using standard Android tools
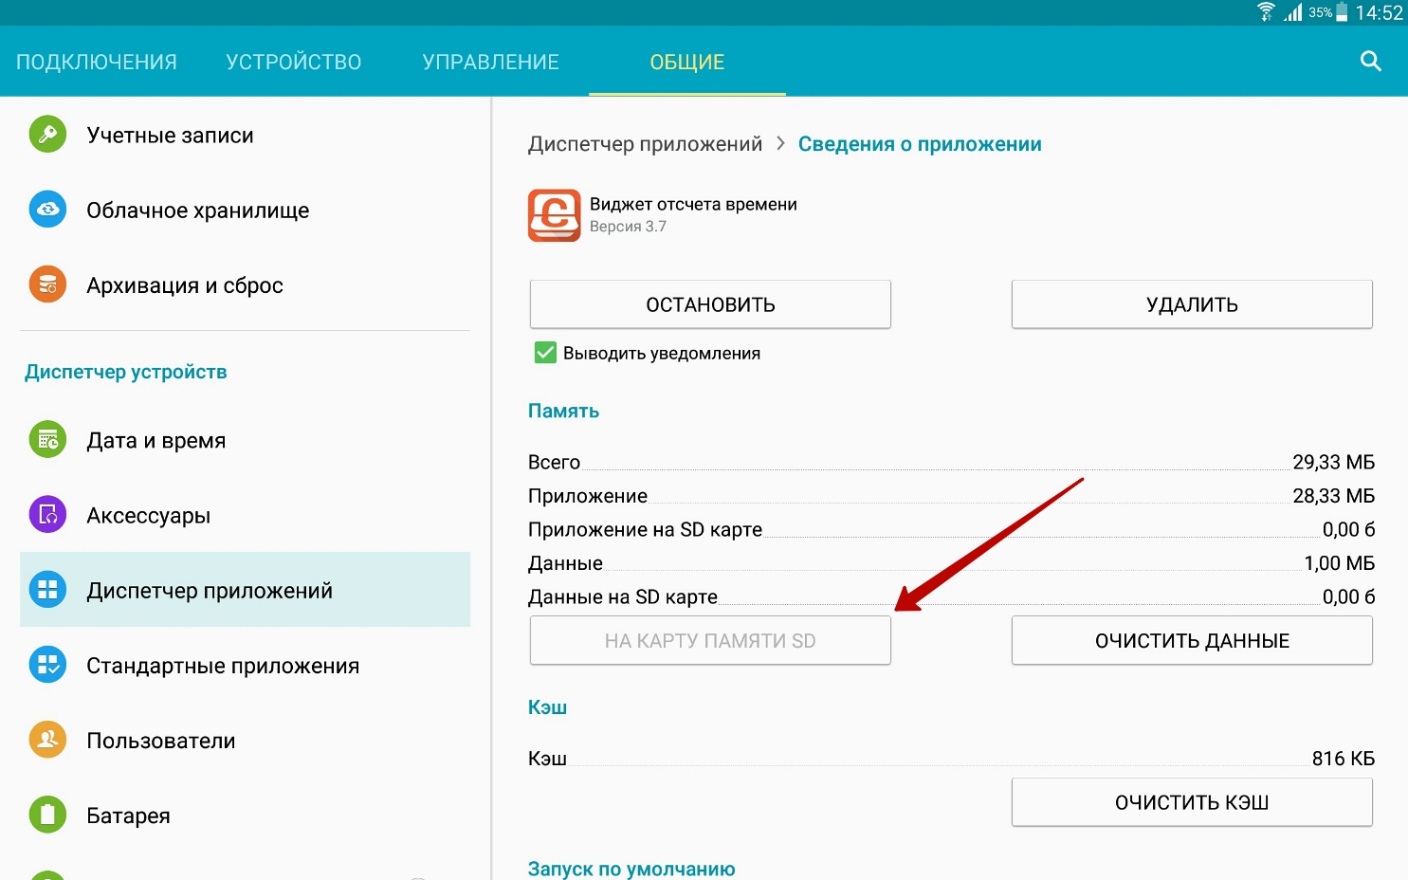
The function of transferring applications to the card using regular means appeared in Android 2.2 and was removed in version 4.4, but it is still available in many firmware. If you have the fourth version of the system, do the following. Go to Settings - Application manager or Settings - Applications, select the program you want and press the "To SD card" button, if available.
If the button is missing or inactive, then you cannot transfer the application to the card using Android. This applies mainly to system applications, as well as programs, manipulations with which are not provided by the developer.
You can try to move applications from your phone to a memory card on Android up to 4.3 in such a radical way. Go to the "My Files" folder, by default it is labeled as sdcard0, select and then cut in Explorer all its contents or folders of selected programs and paste into the location extSdCard, that is, to the external memory of the SD card. Everything that can be transferred will be moved, system files will remain in place. You can use this method if the application transfer button is not active, however, you cannot give a 100% guarantee that everything will work perfectly after that.
As a rule, when using the regular function of transferring applications, not all data is transferred to the memory card, but only part of it. The cache, for example, may remain, and special utilities are required to transfer it.
Now let's see how to move apps to SD card in Android 5.0 and 5.1. In Android 4.4 KitKat, due to improved security, the application transfer algorithm was changed, but soon many third-party developers adapted their applications to the new algorithms, thus making application transfer available. First of all, go to the section with third-party applications and check if there is a corresponding button in their settings. If yes, use it, if not, proceed as follows.
Go to settings, choose Memory - Main Memory, activate the "Memory card" radio button and click "Change". After the reboot, the system will consider the memory of the SD card as internal, all applications and games will be installed on it from now on. The disadvantage of this method is that already installed applications may have to be reinstalled, since they will not automatically move to the memory card.
In the sixth version, transferring applications from your phone to a memory card on Android has become a little easier, and the transfer function itself has been improved. Here is the simplest example. After opening the settings, go to the "Applications" section, select the desired program, click Memory - Change and select "SD card" from the menu that appears. The application will be migrated.


In addition, in Android 6.0 and above, you can take advantage of the new feature Adoptable Storage, which allows you to use a memory card, albeit with some restrictions, as part of the internal storage. To use it, after creating a backup copy of the data on the card, go to the phone settings, select "Memory", click on your SD card there and follow the chain of options Settings - Format as internal memory - Erase & Format.


Upon completion of the procedure, select the option "Use as internal storage", click "Next" and restart the gadget. After these manipulations, a new “Memory” tab will appear in the application menu, with which you can move applications from the internal memory of the smartphone to the external one.
Since the SD card will be encrypted for security, you will not be able to use it as a normal medium, that is, read and write data to it from a PC.
Transferring applications to the SD card using special programs
Unfortunately, all the above transfer methods, including the last one, cannot guarantee one hundred percent success. If the transfer is not supported by the firmware or its possibility is not provided by the developer of a particular application, you will not be able to transfer the software using the standard means of the operating system. In such cases, special programs should be used, however, even they cannot promise that everything will go as it should. Here you need to try, if one program does not cope with the task, you should choose another one and so on. There are quite a lot of methods and programs invented and intended for these purposes, but we will limit ourselves to only three examples of transferring applications from a phone to a memory card on Android.
Method 1
To move applications to external memory, you can use a free program AppMgr III (App 2 SD). It is extremely easy to use. The program automatically sorts all installed applications into three groups: On phone (portable), On SD card (already transferred) and Phone only (not transferable).

Clicking the icon of any application in the list brings up a menu where you can find the desired option. If available, the function of automatically transferring the application to the card when it is installed will also be available.

Method 2
This method is more efficient and reliable, but to use it, you will need root rights and two applications - Link2SD and any disk manager, since two partitions will need to be created on the memory card, preferably one in the FAT32 file system, the other in the Ext4 file system (for older versions of Android Ext3). To split the map into sections, you can use both desktop programs like Paragon, and mobile, for example, Aparted.
After the partition is created, start Link2SD and immediately select the file system of the second partition (Ext4), after which the program will ask you to reboot the device to mount the new volume. After the reboot, start Link2SD again. This time you will see a list of applications installed on your smartphone. Further, everything is simple. Through the main menu of the program, go to the "Memory" section, open the menu of the roaming application and click the "Send" button in the properties.

This method allows you to move almost any games and applications to the memory card, including system ones, but we would not recommend transferring the latter without special need. The risk that after the completion of the procedure they will not work correctly, although not great, is still present. You should also be careful with the most commonly used applications, such as browsers and instant messengers.
Method 3
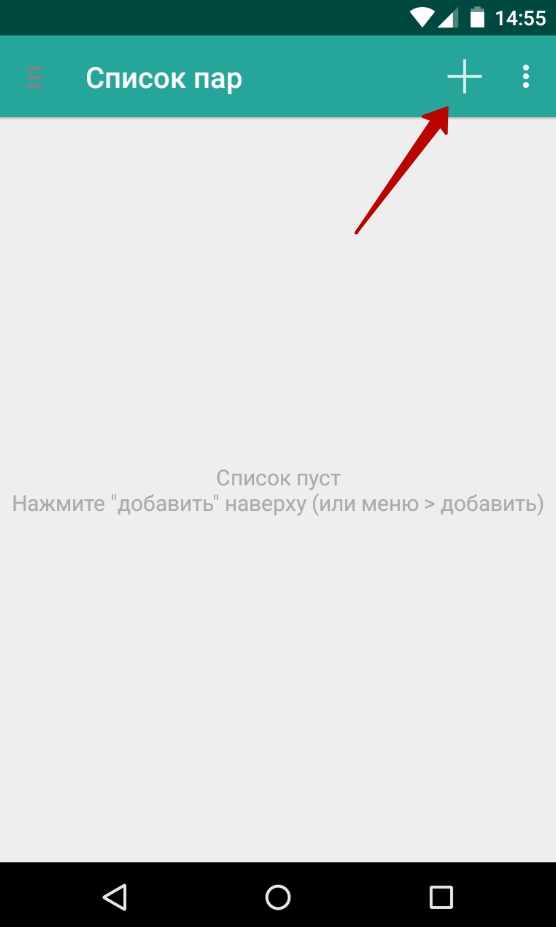
The two examples above showed how to transfer applications from internal memory to an SD card on Android. The third way refers not so much to the programs themselves, but to their cache, the size of which, as you know, can significantly exceed the size of the application itself. For business, you again need root rights and a utility FolderMount. After launching this program, click the plus sign in the upper right corner, in the next window in the "Name" field enter the name of the application whose cache you are going to move, and in the "Source" field specify the path to the directory with the cache files.

The cache folders are located at SD/Android/obb, the name of the folder you need will contain the name of the application. Finally, in the Destination field, you must specify the directory on the SD card where the cached data will be transferred. Having configured the transfer settings in this way, first click the checkmark in the upper right corner of the screen, and then the pin button opposite the selected application. After a few seconds, the application cache will be moved to the memory card.
Many smartphone owners regularly face a lack of memory. Installing a memory card can partially solve this problem. Then it remains only to transfer all the programs to it, after which the device will stop complaining that it does not have enough space to perform certain operations. But doing this is not as easy as it seems.
The Android operating system, as we have already written more than once, is famous for its openness. It seems to many that there are no restrictions at all. But actually it is not. The mobile operating system created by Google does not like memory cards very much. It allows you to easily place videos and photos on them. There are already some problems with music. And sometimes it is not allowed to install applications on the SD card at all. Sometimes such a strict restriction is imposed by the smartphone manufacturer, while in other cases it is not allowed by the developers of a particular program.
All these problems are caused by the fact that earlier memory cards were too slow. In comparison with the built-in memory, they lost hopelessly. And the smartphone manufacturer wants the customer to get the best experience. If applications with games open for too long, the user will blame the manufacturer, and not the previously installed memory card. No big company needs this. Fortunately, now the situation is changing, as the creators of smartphones are changing their attitude towards microSD.
Transferring an application using built-in tools
If you are thinking about how to transfer applications to an Android memory card, then we are in a hurry to provide you with an answer to this question. Do the following:
Step 1. Go to the section " Settings».
Step 2 Select " Applications».
Step 3 Click on the program or game you want to move to the SD card. On Samsung smartphones, before this, you will have to take an intermediate step in the form of a transition to " Application Manager».
Step 4 If the button " Move to SD card» is active, then click it. If not, then it is impossible to move this application using the built-in Android tools. In some versions of the operating system, the card may be referred to as a USB drive.
Using the AppMgr III utility
If the operating system has disappointed you or if you are going to move a large number of applications, we recommend that you try using the AppMgr III utility. In addition to everything, she can:
- Notify about the end of the installation of the application;
- Sort programs by their current location;
- Hide pre-installed applications in the menu;
- Clear the cache at the click of a button.
Also, the utility automatically determines whether a particular application supports transfer to a memory card. If this process is not supported by the program, then next to it there will be an icon “ phone only».
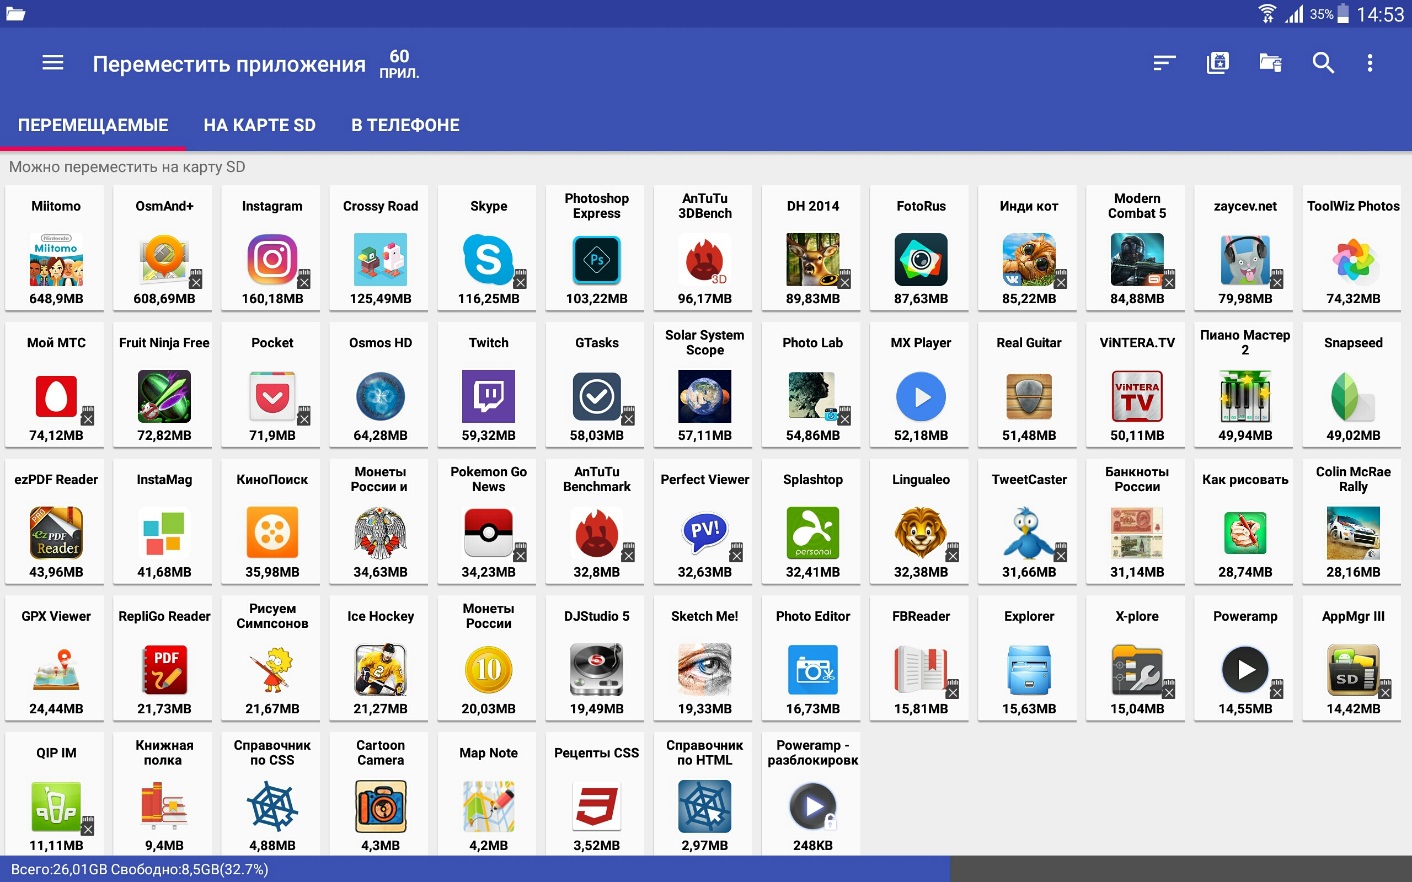
Moving an Android app to a storage card using AppMgr III is easy. Instructions for these purposes are not required - the utility itself will carefully tell you everything.
Moving the cache
If you want to move the game, then get ready for the fact that AppMgr III will cope with this task, but it will almost not free up space in the built-in memory. This is due to the fact that games often use a cache. It is he who takes up the most space, since it contains graphics and musical accompaniment. And the aforementioned application does not know how to move the cache. But on the other hand, the FolderMount utility is capable of this. Its main problem is that it requires root access to function. If you don't have one, you won't be able to move the cache. If you have superuser rights, then follow our instructions:
Step 1. Install and run FolderMount, then click on the " + " in the upper right corner.
Step 2 A menu will open in which you must specify the name of the application whose cache you want to transfer.
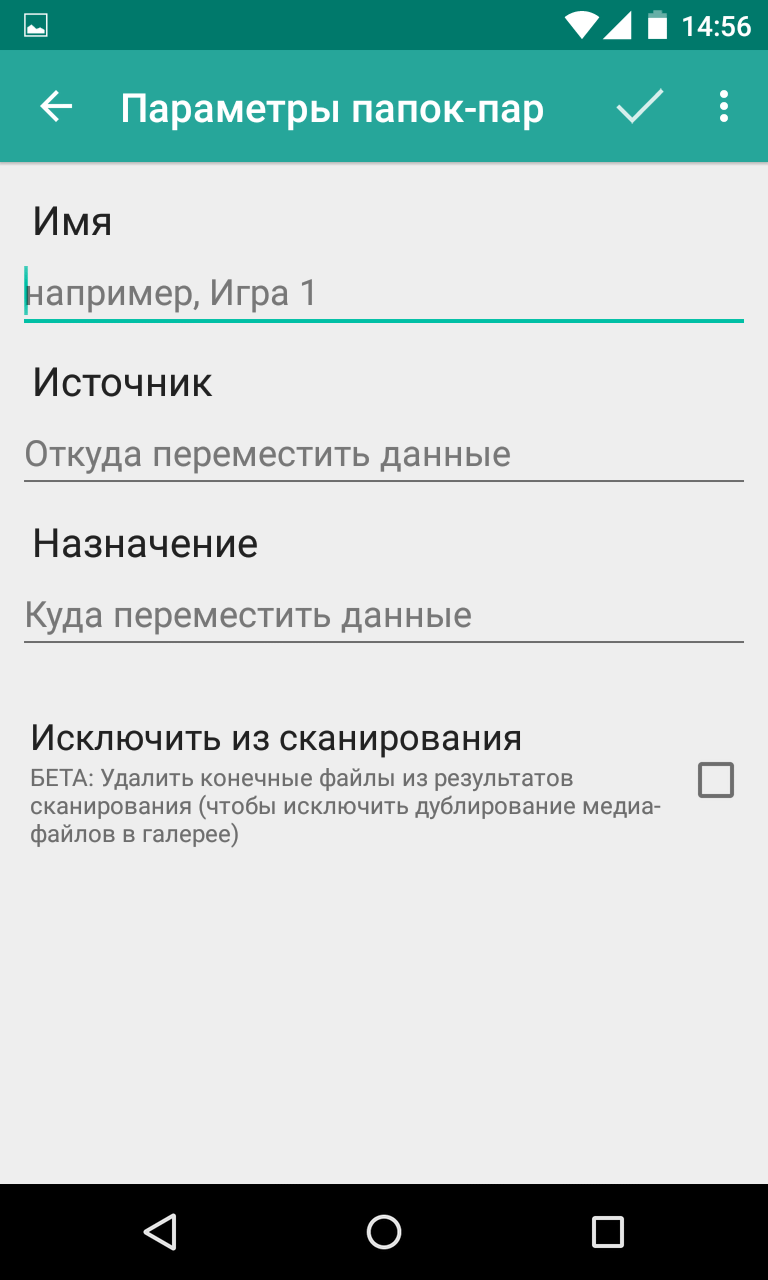
Step 3 In the column " A source» you should specify the path to the folder with the cache. Most often, the corresponding folder can be found in Android/obb/».
Step 4 In the column " Purpose» you must select a folder on the memory card, where the cache will then be moved.
Is the transfer worth it?
Many people try to install applications on a memory card without even thinking about the further consequences. But in fact, experts do not recommend doing this. It is possible that your card is slow, and this makes the functioning and opening of the program not the fastest. Therefore, you should save applications to a memory card only if your drive belongs to the standard Class 10 or, much better, UHS-I.
Also, do not forget that any card is less reliable than the built-in memory. And if it fails, it will entail the deletion of all information recorded on it. Including all applications moved to it will be deleted. Therefore, leave the most important programs in the built-in memory. For example, it should store instant messengers and utilities designed to track expenses and income.
Sooner or later, every user of Android devices is faced with a situation where the internal memory of the device is about to run out. When you try to update existing or install new applications, a notification pops up in the Play Market that there is not enough free space, you need to delete media files or some applications to complete the operation.
Most apps are installed to internal memory by default. But it all depends on what place the developer of the program prescribed for installation. It also determines whether it will be possible to transfer application data to an external memory card in the future or not.
Not all applications can be transferred to a memory card. Those that were preinstalled and are system applications cannot be moved, at least in the absence of root rights. But most downloaded applications tolerate the “move” well.
Before starting the transfer, make sure that there is enough free space on the memory card. If you remove the memory card, the applications that were transferred to it will not work. Also, do not expect applications to work in another device, even if you insert the same memory card into it.
It is worth remembering that programs are not completely transferred to the memory card, some of them remain in the internal memory. But the main volume is moved, freeing up the necessary megabytes. The size of the portable part of the application is different in each case.
Method 1: AppMgr III
The free AppMgr III (App 2 SD) has established itself as the best tool for moving and uninstalling programs. The application itself can also be moved to the map. It is very easy to master it. There are only three tabs on the screen: "Relocatable", "on SD card", "In phone".
After downloading, do the following:


Another useful feature is the automatic cleaning of the application cache. This technique also helps free up space. 
Method 2: FolderMount
FolderMount is a program designed to completely transfer applications along with the cache. To work with it, you need ROOT rights. If there are any, you can even work with system applications, so you need to carefully select folders.
And to use the application, follow these instructions:

Method 3: Move to SDCard
The easiest way is to use the Move to SDCard program. It is very easy to use and takes only 2.68 MB. The application icon on the phone may be called "Delete".
Using the program looks like this:

Method 4: Regular means
In addition to all of the above, try to carry out the transfer using the built-in tools of the operating system. This feature is only available for devices with Android version 2.2 and higher installed. In this case, you need to do the following:


But what if the Android version is lower than 2.2 or the developer did not provide for the possibility of moving? In such cases, third-party software, which we talked about earlier, can help.
Using the instructions in this article, you can easily move apps to and from your storage card. And the presence of ROOT-rights provides even more opportunities.
The internal memory on the phone is expensive. Gadgets with a large volume are expensive, so many are faced with the problem when it is necessary to transfer applications to a memory card in Android 7.0. There are two ways to perform the move: from the manufacturer and third-party software.
Each smartphone has the default function of transferring from internal memory to an SD card. The process is not complicated, so we will consider it in stages.
- 1. On the main screen, click "Settings".
- 2. Look at the "General" tab. There will be a category "Applications" at the bottom.
- 3. From the list that appears, select the desired software that you are going to export.
- 4. Now find something like a category called phone storage or SD card.
- 5. By clicking on "Change" specify the route - SD-card.
- 6. Otherwise, it remains to agree with the changes being made and wait until the end of the export of the application.
Some inaccuracies in the description of Android 7.0 are not excluded. Different installed themes or other third-party applications easily change the menu names. However, based on this scheme, you will still understand the course of action.
Third-party software for transferring applications to an SD card
If for some reason it is impossible to transfer the application according to the scheme from the manufacturer, we resort to using third-party software. Officially, in stores you can download a lot of programs that will help you export from internal memory. Their management is reduced to a few taps in the menu - everything is intuitive. The following programs are in great demand in the market:
- AppMgr III
- Link2SD
- Recovery utility
- EaseUS Partition Master
- Link2SD
Not everyone works on smartphones. The EaseUS Partition Master application will require manipulation from a computer. In addition to exporting, moving software can be deleted, renamed, and much more. Third-party utilities are more convenient than factory settings due to advanced features. Although you will have to spend more time learning the export process.
You will also need to get root access in Android 7.0. All manipulations are possible only on behalf of the developer.
Root rights are opened by using the appropriate applications. More details can be found on the subject on the Internet. Be sure to check the availability of the root access function before switching to using software to export applications.
Features of internal and external memory
It should always be taken into account that the internal memory of the smartphone provides a more stable operation of applications. Some game manufacturers, due to this feature, remove the possibility of exporting their products. That is, in order to make a move, this function must be implemented by the manufacturer itself. Not all software can be transferred to external memory. There are no options here - there is no memory, you download other games and programs where the export function is implemented.
The SD card is not suitable for storing many powerful applications. Due to their high performance, they need to work directly in symbiosis with the processor. Moving to external media will decrease performance, which will cause a number of problems. Therefore, despite the availability of export, such a function is not always appropriate in its application.
Conclusion
I hope you figured out how you can transfer applications to a memory card in Android 7.0, and you also know the key differences between internal and external memory on your Android device. If you have other questions and difficulties in using it, ask questions in the comments on this page or our groups in contact.


