From time to time I come across a situation when a disk check for errors is started before Windows boots. This is quite normal, if the check succeeds, the necessary corrections are made, and then the system works stably. But what if the check happens every time you boot? Here are two options for solving the problem:
1) Find the reason why the disk check is started before the system boots.
Windows launches chkdsk before booting because the disk is set to a dirty bit state.
You can check using the command line utility fsutil with the following command:
fsutildirtyqueryX:- where X is the drive letter.
In this case, Drive C is not dirty.
If the state is set to dirty bit, Windows will run a power-on error check. This problem is solved in different ways, the reason may be, both due to the physical condition of the hard disk, and due to problems with the software.
You can try the following:
Install all system updates, update the motherboard chipset driver, check the integrity of all protected system files using the command line utility sfc(Example: sfc /scannow), defragment, check disk chkdsk(example, checking drive C: chkdskC: /f). Check the hard disk with MHDD or Victoria.
If the problem persists, then you can use the second method.
2) The easy way. Disable checking for a disk that is constantly being checked.
This can be done in two ways through the registry or through the command line, whichever is more convenient.
We open the register. In Windows Vista, 7, 8, run as Administrator.
Go to the registry key
HKEY_LOCAL_MACHINE \ SYSTEM \ CurrentControl \ SetControl \ Session Manager

Find the parameter BootExecute- default value autocheck autochk *, i.e. all disks are checked. Change the value to autocheck autochk / k: C * if you want to disable check of the C drive.
Meaning autocheckautochk /k:D /k:E * disables checking drive D and E.
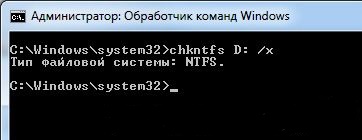
To disable check disk using the command line, open the command line. In Windows Vista, 7, 8, run as Administrator.
On the command line, write: chkntfsD: /x- in this case, disable disk check D.
In order to return the default value, enter in the command line chkntfs / d .
From time to time I come across a situation when a disk check for errors is started before Windows boots. This is quite normal, if the check succeeds, the necessary corrections are made, and then the system works stably. But what if the check happens every time you boot? Here are two options for solving the problem:
1) Find the reason why the disk check is started before the system boots.
Windows launches chkdsk before booting because the disk is set to a dirty bit state.
You can check using the command line utility fsutil with the following command:
fsutildirtyqueryX:- where X is the drive letter.
In this case, Drive C is not dirty.
If the state is set to dirty bit, Windows will run a power-on error check. This problem is solved in different ways, the reason may be, both due to the physical condition of the hard disk, and due to problems with the software.
You can try the following:
Install all system updates, update the motherboard chipset driver, check the integrity of all protected system files using the command line utility sfc(Example: sfc /scannow), defragment, check disk chkdsk(example, checking drive C: chkdskC: /f). Check the hard disk with MHDD or Victoria.
If the problem persists, then you can use the second method.
2) The easy way. Disable checking for a disk that is constantly being checked.
This can be done in two ways through the registry or through the command line, whichever is more convenient.
We open the register. In Windows Vista, 7, 8, run as Administrator.
Go to the registry key
HKEY_LOCAL_MACHINE \ SYSTEM \ CurrentControl \ SetControl \ Session Manager
Find the parameter BootExecute- default value autocheck autochk *, i.e. all disks are checked. Change the value to autocheck autochk / k: C * if you want to disable check of the C drive.
Meaning autocheckautochk /k:D /k:E * disables checking drive D and E.
To disable check disk using the command line, open the command line. In Windows Vista, 7, 8, run as Administrator.
On the command line, write: chkntfsD: /x- in this case, disable disk check D.
In order to return the default value, enter in the command line chkntfs / d .
Consider this situation. You start the system unit (well, that is to say, turn on the computer) and the system starts ... no, not to boot, but to carry out some kind of check. You see white characters running across the blue screen. This is the action of the system utility CHKDSK. This utility is extremely useful because it checks your hard disk for gross system errors, which, subsequently, will definitely lead to some kind of global failure, followed by reinstalling the OS (this is at best), according to www.woodlan.ru ...
However, the situation may turn out in such a way that everything is absolutely normal with your hard drive. The question arises: so why, then, the system utility CHKDSK is constantly launched along with the system? The fact is that the system identifies problem areas on the hard disk according to some of its criteria. It often happens that a hard drive is working absolutely fine, but the system (for some reason?) Detects some inconsistencies on it.
It is at this moment that the system utility CHKDSK is launched. But if you are firmly convinced that everything is fine with your disk, then at the time of launching the system utility you have two options for ignoring the check: 1) press the Space key to skip the check (however, for this you have just a couple of seconds: you will see the countdown); 2) at the end of the check, just disable this utility altogether.
If everything is very clear with the first option, then the second option is more preferable for practical users. In the sense that now you do not need to sit and catch the moment when you need to click on the "Space" key. So, disabling the check by the CHKDSK utility is as follows.
We go to "Start" and select the section "All Programs" (or simply "Programs"). In the opened long list of system "stuffing" select the line "Standard" - "Command line". A black window will open, in which you enter the following command: "chkntfs / X C:" (without quotes, but with a colon - chkntfs / X C :). Keep in mind: the letter "C" is the letter of your local drive, which is being constantly checked. Then it remains to press the "Enter" key and the constant check of your hard drive is disabled!
However, keep in mind that in case of system problems, such as freezing, freezing and other garbage, then you should periodically enable the disabled CHKDSK utility. This is done very simply: "Start" - All programs "-" Accessories "-" Command line ", enter the command chkntfs / X D: and press the" Enter "key (Enter). The utility is now enabled again.
The next lesson will help you to cancel the constant launch of the chkdsk utility when booting Windows 10/8/7. Checking the disk will be very useful though as it periodically checks for system errors and crashes. But, when you turn on your computer, you get by default 8 extra seconds for the disk check to pass. Check Disk Utility or Chkdsk.exe in Windows 10/8/7 is used to check for disk and file system errors.
In such cases, you can cancel the scheduled DskChk at boot. To cancel a disk check, you need to first determine if any disk has all scheduled checks. Once you determine, you can simply press any key to skip the disk check for the next reboot session.
If you face various problems ranging from a blue screen and the inability to open or save files or folders, you should run the chkdsk.exe program. In case of an abrupt stop of the OS or if it finds problems with the file system, then the disk check will start working automatically. There may also be times when you may find that this disk check utility starts automatically every time Windows starts. You can schedule it to run once yourself, or your Windows may decide to schedule it to run itself. But instead of only working once, it keeps working every time the computer is turned on when Windows boots.
Automatic disk check runs on every startup
If the disk check or chkdsk, a tool built into Windows, runs on every boot, here are a few things you can try.
1. First of all, let it run completely once.
2. Now, you need to open the registry editor and go to the following registry key:
HKEY_LOCAL_MACHINE \ SYSTEM \ CurrentControlSet \ Control \ Session Manager
In the right pane, you will see the bootexecute parameter. Here you need to change its value from autocheck autochk * /. on autocheck autochk *
3. Open a command prompt in Windows and type the following command and press Enter:
fsutil dirty query g:
This command will ask for the disk, and more than likely it will tell you that it is dirty.
Next, enter the CHKNTFS / X G: command to not check a specific drive (G) on the next reboot. Next, manually restart the computer, it should not run the chkdsk program, and will take you directly to the Windows desktop.
Once Windows is fully loaded, enter another command Chkdsk / f / r g: into the command line. This command should go through five stages of scanning and determine which bit is dirty. Finally, type fsutil dirty query g: and press Enter. Windows will confirm that the disk is clean.
You can run chkdsk / r or chkdsk / f commands from the command line to check your hard disk for errors. However, if you entered the chkdsk / r and chkdsk / f commands, they can take a very long time to complete on a Windows 10.8.7 computer.
Hope this solution helps you!
Hello friends! Well, it's time to publish another useful lesson. Right here and now I will tell you about checking the disk, more precisely, about how to disable automatic disk check that starts when the operating system boots.
Perhaps the question arises, why do this, it also takes several minutes, and they are rarely checked. If you look at all this from one side, then everything is so, but on the other, this is not always the case. I recently came across two computers in which, for some unknown reason, a disk check (chkdsk) appeared every time the PC was booted.
No matter how many times I waited for the end of the test, after the next restart of the PC, the image with the start of the test, one of the sections, reappeared on the screen. After several hours of searching for the problem, nothing brought the desired result, I even did, but the test showed that everything is in order with the tough one. Therefore, after that I decided to just turn off automatic disk check so that she does not bother the user who contacted me.
I want to note that sometimes the constant launch of a disk check is associated with a USB flash drive inserted into the computer. Therefore, first of all, make sure that you do not have any external drive inserted into your computer.
If it's not a USB flash drive, then let's figure out how to disable automatic disk check (chkdsk) and get rid of wasting time when the system boots.
Disable automatic disk check or chkdsk
As I mentioned in most of the previous articles, many settings related to the system can be changed in the system registry, which we will still have to use now.
As usual for getting started.
We proceed along this path:

Now we turn to the right window where we find a key with the name “ BootExecute". Immediately you can see that the opposite is set to " autocheck autochk *", Where the first two words start a disk check, and" * "Means that all disks installed in the computer will be checked.

By changing this value, we get what we want. To do this, just double-click on " BootExecute"And there in the line that appears, before the asterisk, write in the following letters:" / K: C". Just " / K"And is responsible for disabling automatic disk check at the time of Windows startup. Well, as you understand, the second half of the value is the drive letter that will be ignored. For an illustrative example, I will show the value of "BootExecute" how it should look:
autocheck autochk / K: C *

To unmount other drives, such as D, simply change the drive letter only. If you need to disable automatic checking on both disks, then the required value should look like this:
autocheck autochk / K: C / K: D *

If you suddenly decide to return to the previous settings, then just change the value to the standard one that was originally set:
autocheck autochk *
After that, my problems were solved, the disk was no longer checked, and the users were satisfied. Therefore, by disabling the automatic disk check at Windows startup, in this way, perhaps even without fully understanding the essence of the problem, you can get rid of the lengthy boot of your system.
P.S... Do not hesitate to subscribe to free lessons and join us at