Good afternoon.
Today Wi-Fi is available in almost every apartment that has a computer. (even providers almost always install a Wi-Fi router when connecting to the Internet, even if you connect only 1 stationary PC).
According to my observations, the most common problem with the network for users when working on a laptop is connecting to a Wi-Fi network. The procedure itself is not complicated, but sometimes even new laptops may not have drivers installed, or some parameters that are necessary for the network to function properly (and because of which the lion's share of nerve cell loss occurs :)).
In this article, I will look step by step at how to connect a laptop to a Wi-Fi network, and I will look at the main reasons why Wi-Fi may not work.
If the drivers are installed and the Wi-Fi adapter is turned on (i.e. if everything is fine)
In this case, you will see a Wi-Fi icon in the lower right corner of the screen (without red crosses, etc.). If you click on it, Windows will report that there are connections available (i.e. it has found a Wi-Fi network or networks, see screenshot below).
As a rule, to connect to a network, it is enough to know only the password (we are not talking about any hidden networks now). First, you just need to click on the Wi-Fi icon, and then select the network you want to connect to from the list and enter the password (see screenshot below).
If everything went well, you will see a message on the icon that you have access to the Internet (as in the screenshot below)!
By the way, if you are connected to a Wi-Fi network, and the laptop reports that “...there is no access to the Internet,” I recommend that you read this article:
Why is there a red cross on the network icon and the laptop does not connect to Wi-Fi...
If everything is not ok with the network (more precisely with the adapter), then you will see a red cross on the network icon (as it looks like in Windows 10, shown in the photo below).
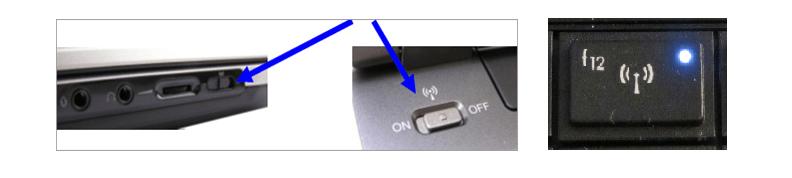
By the way, some laptops have special keys for turning on the Wi-Fi adapter (these keys usually have a characteristic Wi-Fi icon). Examples:
- ASUS: press the combination of the FN and F2 buttons;
- Acer and Packard bell: FN and F3 buttons;
- HP: Wi-Fi is activated by touch button with a symbolic image of an antenna. On some models, the key combination is: FN and F12;
- Samsung: FN and F9 (sometimes F12) buttons, depending on the device model.
If you don't have special buttons and LEDs on the device body (and even those who have it, and the LED does not light up), I recommend opening device Manager and check if there are any problems with the driver for the Wi-Fi adapter.
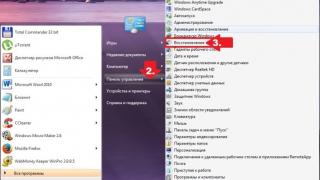
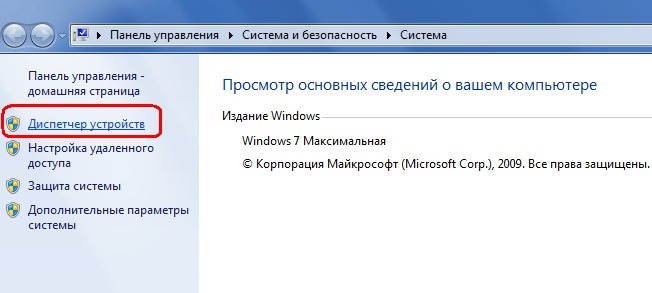
How to open Device Manager
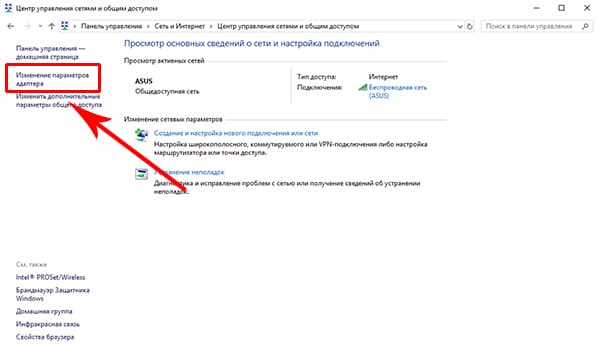
The easiest way is to open the Windows Control Panel, then write the word “dispatcher” in the search bar and select what you are looking for from the list of results found (see screenshot below).
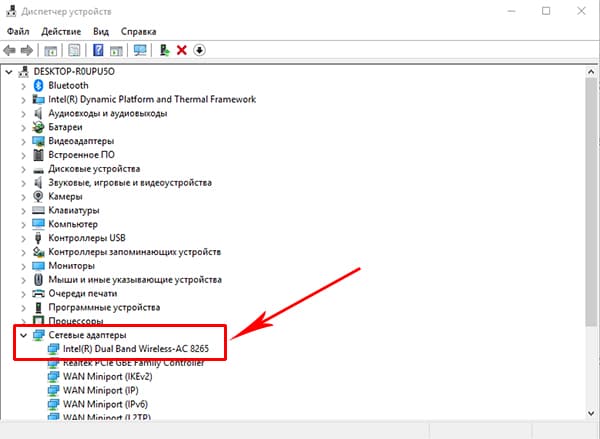
In Device Manager, pay attention to two tabs: “ Other devices"(here there will be devices for which no drivers were found, they are marked with a yellow exclamation mark), and on " Network adapters"(here will be the Wi-Fi adapter that we are looking for).
Notice the icon next to it. For example, the screenshot below shows an icon for a device that is turned off. To enable it, you need to right-click on the Wi-Fi adapter (note: Wi-Fu adapter is always marked with the word “Wireless” or “Wireless”) and engage it (thus it turns on).
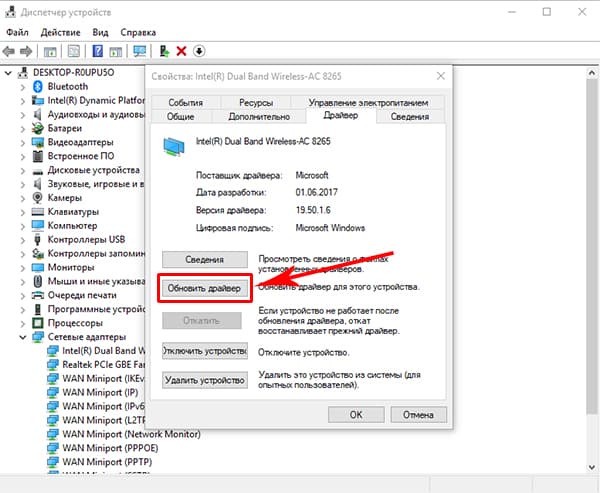
By the way, pay attention, if there is an exclamation mark next to your adapter, it means there is no driver for your device in the system. In this case, you need to download and install it from the device manufacturer’s website. You can also use special driver search applications.
There is no driver for Airplane Mode Switch.
Important! If you have problems with drivers, I recommend reading this article:. Using it, you can update drivers not only for network devices, but also for any others.
To do this, press the Win+R key combination and enter ncpa.cpl and press Enter (in Windows 7, the Run menu is md START menu).
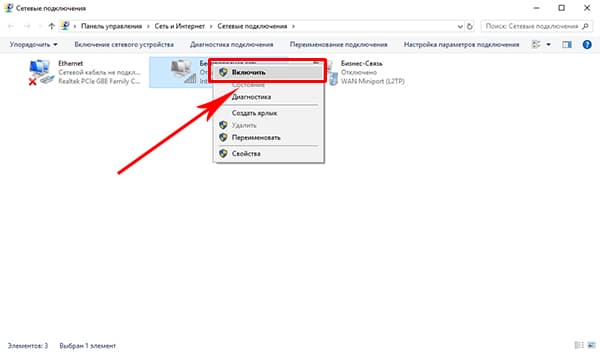
Next, a window will open with all network connections. Notice the connection called "Wireless Network". Turn it on if you have it turned off (as in the screenshot below. To enable it, just right-click on it and select “enable” in the pop-up context menu).
I also recommend going to the properties of the wireless connection and seeing if automatic acquisition of an IP address is enabled (which is recommended in most cases). First open the wireless connection properties (as in the picture below)
Then set to automatically obtain an IP address and DNS server. Save and restart your PC.
Managers for working with Wi-Fi
Some laptops have special managers for working with Wi-Fi (for example, I came across these in HP laptops. Pavilion, etc.). For example, one of these managers .
The bottom line is that if you don't have this manager, Wi-Fi is almost impossible to run. I don’t know why the developers do this, but like it or not, the manager will need to be installed. As a rule, you can open this manager in the START menu/Programs/All Programs (for Windows 7).
The moral here is: check on the official website of your laptop manufacturer to see if among the drivers there is such a manager recommended for installation...
Network diagnostics
By the way, many people neglect it, but Windows has one good tool for finding and fixing network-related problems. For example, once for quite a long time I struggled with the incorrect operation of airplane mode in one laptop from Acer (it turned on normally, but to turn it off, I had to “dance” for a long time. That’s how, in fact, it came to me after the user was unable to turn on Wi-Fi after this flight mode...).
So, to get rid of this problem, and many others, something as simple as troubleshooting (to call it, just click on the network icon).
Next, the Windows Network Diagnostic Wizard should start. The task is simple: you just need to answer the questions, choosing one answer or another, and the wizard will check the network operation and correct errors at every step.
After such a seemingly simple check, some of the problems with the network will be solved. In general, I recommend trying it.
This article is complete. Have a good connection!
Problems with connecting to a wireless network from a laptop often arise even for experienced users, and beginners do not even know how to approach the settings. Therefore, we decided to consider this issue in more detail. In the article we will figure it outhow to turn on Wi-Fi on a laptop, and we will provide a connection algorithm for different types of operating systems. We will also find out what main problems users face and how to solve them.
How to turn on Wi-Fi on a laptop
First of all, let's figure out how to activate the Wi-Fi module on the device. Without this, you will not be able to use wireless communication or set up a connection. Typically, activation depends on the laptop model and varies slightly in each specific case. The process involves certain function keys.
- For an ASUS laptop this is FN+F.
- If your gadget is called Acer or Packard bell, then you need to press FN+F3.
- Gadget from HP includes the WiFi module with a dedicated touch button, indicated by an antenna icon or FN+F12. A number of models from this manufacturer have a simple button with an antenna to activate a wireless connection.
- Lenovo - FN+F5, if there is no dedicated button.
- Samsung - FN+F9 or FN+F12, depending on the model.
We have listed the most common equipment manufacturers. If your laptop was produced by another company, then the required combination can be clarified in the instructions for the gadget or on the company’s website. Usually this is the FN function key, which is found on all modern laptops and an additional one from the F1-F12 series. 
If the power button is dedicated, then you can look for it in a separate block or even at the ends of the case. Usually it is indicated by the corresponding icon associated with the distribution of the signal.
Wi-Fi settings depending on OS
Now let's talk about those inclusion methods that are intra-system. Simply, how to enable a connection to a wireless network in the operating system. We will analyze the two most common ones; by analogy, you can make settings on other versions of Windows.
Windows 10
How to turn on Wi-Fi on a laptop, if everything is in order with the settings, the answer to this question is no less important than enabling the module. So, we bring to your attention a step-by-step algorithm for the tenth version of the operating system.

That's all. As a result, the laptop will connect and you will be provided with Internet access.
Windows 7
We also consider setting up for this version provided that the system is equipped with the necessary drivers and has a network adapter. That is, technically all the nuances have been met and the WiFi module is enabled. 
In the case of this version of the OS, everything is much simpler. You can simply click on the Internet connection icon in the lower right corner and select the desired network from the list of available wireless connections. Enter the password and wait for the connection to activate. That's all.
What to do if you can't connect

Situations often arise in which, when performing the above algorithms, the connection to the network is not achieved. In this case, two options are available:
- WiFi adapter is disabled;
- the necessary drivers are missing.
Don't be afraid. In both cases, the issue is not as terrible as it seems and everything is completely solvable.
Seventh version of the operating system
For the seventh version of Windows, the verification algorithm will be as follows.

The absence of an entry or the presence of a yellow sign next to the inscription means there are problems with the drivers for the adapter. In this situation, you will have to reinstall them from the disk provided with the laptop or the manufacturer’s official website. In any case, the process is simple, just download the necessary programs and reboot the computer, the system itself will distribute the software to the required location and activate it.
If there is a yellow icon, then click on it and in the menu that opens, click the “Engage” command. Then right-click on the adapter and in the “Properties” section, select “Power Management” and in the option to turn off the adapter in power saving mode, uncheck the box, if any. 
Enable the adapter in “Network Connections”, find the wireless connection here and click “Enable” next to it. At this point, all the problems in Windows 7 that the user can solve on their own have been fixed, and if the problem remains, it means that the problem is a technical issue and it is better to contact a professional.
Tenth version of Windows
If you have “Ten”, then, solving the issuehow to connect Wi-Fi on a laptop, problems with the adapter and drivers should also be ruled out.
If the icon for connecting to Wi-Fi is not found on the taskbar, then the adapter is disabled. To be able to connect to the Internet, the first one must be turned on.

If there is no “Wireless Network” icon at all, then go to the first section of our article and read how to enable WiFi using hardware.
To check the drivers, you need to right-click on an empty space on the taskbar and select the “Settings” section in the context menu. Then in the main section, select “Devices” and go to “Device Manager”. Expand the “Network adapters” block and look for an entry with the word Wireless. If the icon is accompanied by an exclamation mark, it means that the driver is not working correctly and needs to be reinstalled. If after downloading new drivers the problem is not solved, then you should also contact a professional.
To connect to the Internet on a laptop via a wireless network, you need not only a WiFi module, but also a working access point. To do this, you will need to buy a router at home, and to access the Internet while sitting somewhere in a cafe, it will be enough to turn on Wi-Fi on your laptop and enter the password for the desired network: installing an access point is the task of the owners of the establishment.
A WiFi module is installed in almost all modern laptops, and it’s easy to check whether your device has such a function. To do this you will need:
- Open “Control Panel”;
- Launch “Device Manager” (you can use the search bar);
- Expand the “Network adapters” block.
An existing device with the word “Wireless” in the name means that your laptop supports wireless Internet.
Turning on Wi-Fi on a laptop using the keyboard
Most often, Wi-Fi can be turned on using hot keys, usually two, pressed simultaneously. Their combination may vary among different laptop manufacturers, but the main Fn key, as a rule, is always there. The second key required to turn it on has a special WiFi icon and is located on the keyboard in the function row F1-F12.
You can learn more about how to enable Wi-Fi on a laptop of a specific brand from the following table.
In devices of the previous generation, Wi-Fi is turned on using a special slider on the laptop body, but the network icon remains the same.
How to turn on Wi-Fi on Windows 10
On laptops with “Ten”, “Wi-Fi” can be enabled either in the system parameters or using the notification area, and the second method is more convenient and faster:
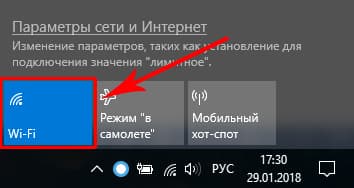
1. From the taskbar, open system notifications.
2. Open the Network tab.

3. Turn on WiFi by clicking on the corresponding thumbnail.
To enable Wi-Fi on Windows 10 using the options menu, you must:
1. Open “Settings” and select the “Network and Internet” block.
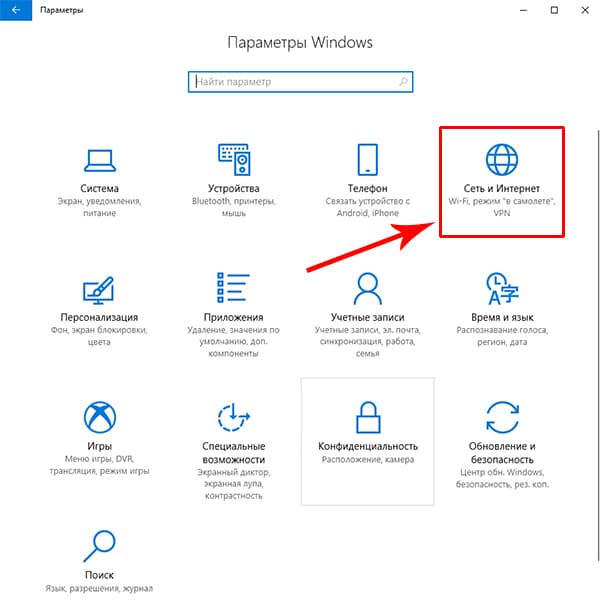
2. Click on the WiFi menu and turn on the wireless network status slider.

After these steps, the laptop will begin searching for all available wireless networks. If it is already in memory, the connection will occur automatically; if the access point for your device is new and protected (you will see a lock icon), you need to select it and enter a password to connect to the Internet.
Connecting WiFi on Windows 7 and 8
For laptops on previous versions of Windows, the algorithm for software enablement of Wi-Fi is different.
1. Go to “Control Panel” – “Network and Internet”, or right-click on the computer icon in the notification panel next to the clock.
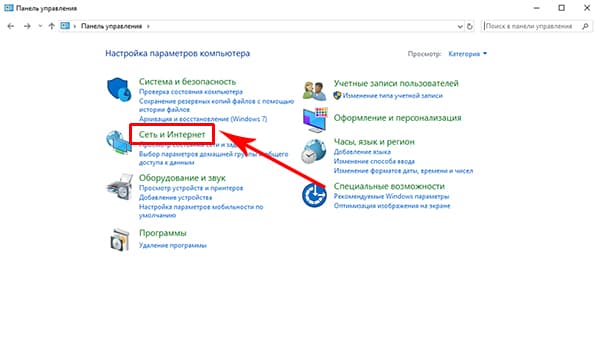
2. Select Network and Sharing Center.
3. Click on the “Change adapter settings” menu.
4. Using the right mouse button, turn on the wireless network.
When the Wi-Fi module is working, you need to select an access point (the list will open by clicking on the WiFi icon in the notification area) and, entering the password if necessary, connect to it.
If the Internet via Wi-Fi does not turn on
If Internet access on your laptop still does not appear after all of the above, connect the network cable to the computer directly, open Device Manager through the Control Panel, select the Network Adapters tab, find your Wifi module in the list and try updating the drivers. After that, disconnect the Internet cable and restart the laptop.
If you still cannot turn on the Internet after this, there may be either problems on the provider’s side, or incorrect router settings, or the Wi-Fi module is faulty. The cost of repairs at a service center ranges from 1000 to 2000 rubles, but you can get by with an external WiFi module - on Aliexpress such devices cost about 150 rubles.
None of the owners of laptops are protected, for example, from a situation where water may spill on the keyboard. In this regard, the keyboard may either stop functioning completely, or some specific keys may not work as they should. At the same time, on laptops, many actions can be performed solely using a combination of hot keys, including connecting to a network using Wi-Fi. To do this, use the Fn button on the keyboard and the button with the image of an antenna. If, for example, the Fn button does not work, then starting a Wi-Fi network becomes much more difficult.
It is worth noting that the Fn button operates under the control of the BIOS, the main software where you can change most of the computer’s parameters. It is worth noting that even modern laptops do not offer any special software for running Wi-Fi, that is, somehow fixing the pressing problem, even through the BIOS it will not work. Fortunately, there are several ways out of this situation, for example, using additional software.
Is it possible to enable Wi-Fi without hotkeys?
You can use the KeyRemapper program and use it to reassign keys. For example, if the Fn button does not work, then it should be reassigned to another and then turn on Wi-Fi. In addition, using the same program, you can reversely replace keys and buttons, that is, swap them, etc. If one of the buttons to turn on the Wi-Fi network does not work, then this method is the best and simplest way out of this situation.
There is another option - buying another keyboard that includes a function key. Of course, in this case you will have to spend money on a keyboard, but it is still better to buy it than a new laptop. The same method of solving the problem can include contacting a special service center, where the keyboard will be replaced with a new one, but this is also an additional cost.
In addition, function keys can simply be disabled in the BIOS itself. Accordingly, to solve the pressing problem, you need to go there, change and save the settings.
Unfortunately, today there are no other ways to launch Wi-Fi on laptops without using hot keys, therefore, as mentioned above, the best way out of this situation is to reassign the keys, and if the keyboard does not work at all, you will have to buy a new one or replace the old one.
Thanks to their mobility and stylish design, as well as good functionality, laptops and netbooks have become very popular. Nowadays, every modern person uses the Internet. Thanks to Wi-Fi technology, taking a book with you to a bar or cafe you can communicate with friends and work colleagues, check your email, read news on the Internet and much more.
Many laptop users are interested in the question: how to turn on WiFi on a laptop. As a rule, in order to turn on Wi-Fi you need to perform a couple of simple operations.
Quickly turn on wifi on a laptop
The combination of keys pressed depends on the specific laptop model. Here are several options for launching a wifi network on popular models.
- On Samsung laptops, to turn on wifi, you need to press the Fn and F12 or F9 buttons for a couple of seconds, depending on the model.
- On Aser laptops, turn on by holding the Fn + F3 buttons
- To enable on Asus, you need to press Fn + F2
- On Lenovo, turn on wi-fi by pressing Fn + F5. But there are also models where there is a separate switch with a wireless network design for this.
Different laptop models from different manufacturers use their own keyboard shortcut to turn on Wi-Fi. For more detailed information about the startup scheme, please refer to the user manual for the laptop. All modern laptops have an Fn key. If there is no such button, then there is a separate switch or button to start wifi. And it looks like this:
Did you turn on Wi-Fi using the required key combination or a separate button, but it doesn’t work? This means you need to configure wifi on your laptop.
Checking Wi-Fi Drivers
Let's start with the basics, check the version and the presence of installed drivers. This is necessary to make sure whether the necessary drivers are available and whether they are enabled. On the desktop, select the icon<<компьютер>> and select the item<<свойства>>. Then in the left column select<<диспетчер устройств>>.
In the window that opens, find the line network adapters. This line should contain our wifi adapter and be signed as a wireless network adapter.

If there is no such line or there is an icon with an exclamation mark on a yellow background, then the driver is either not installed or is not working correctly. We solve the problem by installing them from the disk that came with the laptop. If there is no such disk, then you will have to look for them on the laptop manufacturer’s website.
Turn on the Wi-Fi adapter
We sorted out the drivers by installing the ones necessary for our laptop model. Now you need to start wifi. To do this we do the following: Control Panel > Network and Internet > Network and Sharing Center > Change adapter settings. Choose Wireless network connection Right-click on it and select Enable from the menu.

If everything was done correctly and wi-fi was turned on, then you will see this icon on your desktop.

Click on the icon, a menu will appear with available wireless networks, which should include yours.

After you click on the name of your network and click Connect, a window like this will appear in which you need to enter the security key - the password for your network. If it is not password protected, the connection will occur automatically.