In the previous article, we considered method 9. This is necessary in order for the SSD to work as long as possible. Of course, this does not mean that such rules are not suitable for ordinary hard drives, quite the contrary, but the fact is that HDDs are very inferior in speed, and disabling some functions, such as file indexing or defragmentation, can slow down the speed of work in system. By the way, defragmentation is applicable only for HDD, but you should not abuse it either.
I have already talked about the price range of SSDs several times, it is still quite large, but it is declining. True, so far, solid state drives are still quite expensive, unlike hard drives. For example, SSD Sandisk Ultra II, the volume of which is 120 GB costs 3599 rubles, and the Toshiba P300 hard drive with 500 GB costs 3150 rubles. As you can see, the price per unit of memory is very different.
An SSD for the system is enough with a capacity of up to 120 GB, so there is no need to chase large volumes, at least for now.
SSD optimization for modern operating systems
By modern OS, I always mean a system starting with Windows 7. At the development stage, they already had SSD compatibility, but most of the functions were still calculated on HDD drives. Most of these functions are already familiar to you: , indexing, . They not only do not improve the performance of the SSD, but also reduce the life of the drive.
How to effectively optimize an SSD?
As is clear from everything that has been written above, optimizing solid state drives is an important component in a computer system. Not only are these disks quite expensive, but if the user simply does not follow such advice, then his disk will fail very quickly. And then they will run to the service or to their friends to pay a lot more money to get the device fixed. Okay, let's get down to business.
An SSD consists of a microcircuit in which the firmware to be updated (firmware) is embedded. You need to make sure that the drive has the latest update. You can check this using the CrystalDiskInfo program. Then you need to go to the official website of the manufacturer of your drive and see what firmware versions are there, if there is a newer one, then download it.
The manufacturer's website will have instructions for installing the update, so there is no need to talk about it here.
The next item is to enable AHCI, I won’t talk about it a hundred times, about how to enable this feature.
The only thing I will say is how to enable AHCI if the system is already installed. This can be done through the registry (the method works on Windows 7). You need to go to the registry editor, for this we press the Win + R keys and enter the command regedit.
Now let's move on to the next section: HKEY_LOCAL_MACHINE\System\CurrentControlSet\services\msahci
There we find the Start parameter, double-click on it and set the value to 0. After that, restart the computer and go into the BIOS, set the SATA controller to AHCI mode.
Third moment. It will be nice if you leave 10-20% of the unallocated area from the entire disk volume from the SSD. It will be in case of drive wear.
Optimizing Windows for SSD
Before applying any actions, it is recommended to create a system and registry restore point.
Here are the steps that need to be taken in Windows in order to achieve the result we want. I will take some points from previous articles, but you will have to read their description by clicking on the link.
- Disable file indexingdefragmentation andhibernation is possible;
- Disable NTFS file system journaling. You need to enter "cmd" in the search and right-click on the search result, then select "Run as administrator". In the command line that opens, enter fsutil usn deletejournal /D C:.
Where C: - system drive;
- Shutdown. Sometimes the shutdown may not happen, you can go to the registry and go to the following section: KEY_LOCAL_MACHINE\SYSTEM\CurrentControlSet\Control\Session Manager\Memory Management. In this section we find the parameter DisablePagingExecutive and change its value to 1. Restart your computer;
- Disable Superfetch, ReadyBoot, Prefetch. Here ;
Solid State Drive Optimization with SSD Tweaker
This option is suitable for those who do not have sufficient knowledge in working at a computer, or who like everything to be faster.
For such a case, there is a special utility called SSD Tweaker. There is a paid version, and there is a free version, of course, some functions are not available in the free version, but this does not reduce the effectiveness of the program.
There is a similar program - SSD Mini Tweaker. It's free and looks like this:

Optional Method - Enable Write Caching
This feature improves not only the performance of the SSD, but also the HDD. You can enable it as follows. Again, press the Win + R keys, enter the command to open the device manager - devmgmt.msc, in disk devices we find the SSD drive and go to its properties. Go to tab "Politics" and check the box next to the appropriate item.

Risky move: disable system protection
To do this, you need to go to the system properties and click on the item on the left "System Protection".

For each disk, you can configure system protection and select the amount of memory you need. Unless you use other system backup methods, disabling protection is risky. If the system crashes in the future, you won't be able to restore anything.

You can end there. In two articles, we have covered quite a few options for improving system performance in an SSD, as well as increasing the life of an SSD. I recommend using these methods. And don't forget to ask questions in the comments.
Optimizing an SSD drive is very important, because despite its high speed and reliability, it has a limited number of write cycles. There are several ways to extend disk life under Windows 10.
To ensure that your SSD lasts as long as possible, there are several ways to optimize it. These tips are relevant for the system drive. If you're using an SSD for file storage, you won't need most of the optimization options.
Method 1: Disable hibernation
During hibernation (deep sleep mode), the information contained in the RAM is converted into a special file on the computer, and then the power is turned off. This mode is useful in that the user can return after a while and continue working further with the same files and programs. Frequent use of hibernation mode negatively affects the SSD drive, because the use of deep sleep leads to frequent overwriting, and it in turn spends disk overwrite cycles. The need for hibernation is also eliminated because the system on the SSD starts up pretty quickly.

Method 2: Set up temporary storage
The Windows operating system always saves service information in a special folder. This function is necessary, but it also affects the rewrite cycle. If you have a hard drive, then you need to transfer the directory Temp on him.
It is important to understand that due to the transfer of this directory, the speed of the system may drop slightly.

Method 3: Customize the swap file
When the computer does not have enough RAM, the system creates a paging file on the disk, which stores all the necessary information, and then gets into RAM. One of the best solutions is to install additional RAM sticks, if possible, because regular overwriting wears out the SSD.

Method 4: Disable defragmentation
Defragmentation is necessary for HDD drives, because it increases the speed of their work by writing the main parts of files next to each other. This way, the recording head will not have to jump around for a long time looking for the right part. But for solid-state drives, defragmentation is useless and even harmful, as it reduces their service life. Windows 10 automatically disables this feature for SSDs.
For a long time, the main component that “slows down” the performance of even the most sophisticated home computer was hard drives. The fact is that spindle HDDs have reached the limit of development in terms of speed at some point. Physical laws were to blame for this, which did not allow the disk spindle to spin up above a certain speed, which affected the data access time, as well as the speed of writing and reading. The volume continued to grow, but the speed did not. SSDs are the next generation of hard drives.
An SSD is a computer non-mechanical storage device based on memory chips. Simply put, now the hard drive is a large and very fast USB flash drive that contains the operating system and user files.
Why do you need Windows 7 SSD optimization?
Undoubtedly, the main advantage of an SSD drive is its write and read speed, but it also has disadvantages, such as a limited number of write cycles. This disadvantage is especially relevant for outdated versions of operating systems, which can prematurely “kill” the drive, not taking into account the specifics of working with it.
That is why the important moment can be Windows optimization for SSD. This article aims to help "extend the life" of your SSD by properly configuring your computer's operating system.
Setting up an SSD drive
The Windows 7 operating system is initially optimized for working with solid state drives, but to improve reliability, you should adhere to the following rules:
1. Use an SSD solid state drive (for operating system and programs) along with a classic HDD on the spindle. In this option, you combine speed and reliability.
2. Before you start using the solid state drive, be sure to enter the BIOS and set the mode to ACHI.

3. From any other computer, go to the SSD drive manufacturer's website and check for the latest device firmware. If possible, update the firmware.
4. When partitioning a disk during Windows installation, leave about 20% of the total disk space unallocated. As the SSD wears out, it will take clusters from this area.
Optimizing Windows 7 for SSD
1. Disable the system cache Prefetch and Superfetch. There will be no sense from them when using a solid-state HDD. Most likely, Windows 7 will disable Prefetch on its own, but we will definitely check this. How:
Open the registry editor (Start - in the search bar, enter - regedit)
HKEY_LOCAL_MACHINE -> SYSTEM -> CurrentControlSet -> Control -> Session Manager -> Memory Management -> PrefetchParameters
Set - EnablePrefetcher = dword:00000000
HKEY_LOCAL_MACHINE -> SYSTEM -> CurrentControlSet -> Control -> Session Manager -> Memory Management -> PrefetchParameters
Set - EnableSuperfetch = dword:0000000
2. It is necessary to disable automatic file defragmentation. It also makes no sense now. It will only unnecessarily reduce the resource of the SSD drive.
Start - in the search bar, enter - Defragmentation. Click on the "Set Schedule" button. Uncheck the "Run on schedule" checkbox.

3. If you have a 64-bit operating system and 8GB or more of memory, then it makes sense to disable the paging file.
Computer -> Properties -> Advanced System Settings -> Advanced -> Performance Options -> Advanced -> Virtual Memory -> Change. Install - No paging file

4. Change the Memory Management parameter:
Open Registry Editor Start-Run->regedit
HKEY_LOCAL_MACHINE -> SYSTEM -> CurrentControlSet -> Control -> Session Manager -> Memory Management
Set - DisablePagingExecutive = dword:00000001
5. SSD Optimization can also enable and disable NTFS file system journaling:
Start - in the search bar, enter - cmd - click on the program icon with the RIGHT mouse button - Run as administrator.
In the command line window, enter: fsutil usn deletejournal /D C: - example for drive C:

6. Disable sleep mode. The system will boot very quickly anyway and there is no need for sleep mode.
In the already open command prompt window, enter - powercfg -h off and press ENTER.
7. Disable indexing for the SSD drive:
Start-Computer-right-click on the system drive and select properties - uncheck the option "Allow the contents of files on this drive to be indexed in addition to file properties"

8. Transfer temporary TEMP folders from SSD to HDD.
Open Computer - (right-click) Properties - Advanced system settings - Advanced - Environment variables.
We enter a new address for the TEMP and TMP environment variables, placing them on the second hard drive.

9. In the end, it remains to transfer the user's folders (Documents, Videos, Downloads, etc.) from the SSD to the HDD.
We create a user folder on the HDD in advance, in which user libraries will now be stored.
We right-click on each folder whose location we want to change. On the Location tab, click the Move button. We move to the HDD in the newly created folder.

10. It is also worth transferring the profiles and temporary files of the browser you use from SSD to HDD, or disable file caching by the browser.
You saw for yourself that configure SSD under Windows 7 it's not that hard. And now you can enjoy the speed of your PC.
That's all. Thanks for reading the article. I hope it was helpful to you.
- very high operating system speed compared to conventional HDDs
- low power consumption (for laptops greatly increases battery life)
- high fault tolerance in case of severe overloads and damage (shaking, laptop falling, etc.)
But besides the advantages, there are also disadvantages:
- higher cost compared to HDD
- limited number of rewrite cycles
How to get rid of the last minus will be discussed in this article.
During the operation of the operating system, service files are constantly changed, recorded and overwritten. Also, modern operating systems often automatically defragment the disk and perform other operations that, when working with a conventional HDD, serve to speed up the system as a whole.
But when working on an SSD, such operations are harmful by reducing the disk's write resource.
Therefore, it is necessary to rid the operating system of these procedures, or at least reduce to an acceptable minimum.
Optimal for working on an SSD from the Windows family, version 7 and higher is suitable. An implementation based on Windows XP is also possible, but the result will not be so successful, because. Microsoft only introduced full support for these media with the release of the Windows 7 series.
What should be taken into account?
- First of all, to reduce the recorded volumes (and reduce the volume as a whole), you need to get rid of the paging file. This, in turn, means that the amount of RAM on your computer / laptop should cover your needs with a margin (at least 30-50%). Those. if you usually use up to 2 GB of RAM for work, then you need to have 3-4 GB in your computer. Otherwise, when there is a peak moment in the use of RAM and it exceeds 4GB, the system may crash and crash.
- It is also necessary to understand that there are no exact statistics on the resources of the SSD of various manufacturers and models as part of the OS, and thus there is no way to accurately predict the moment when the disk runs out of resource and starts to fail. Therefore, I recommend systematically monitoring SSDs with specialized utilities (it will be described in more detail at the end of the article) and do not forget to back up important data to removable media or network / "cloud" storage. As a "Cloud" resource for data backup, I recommend using the Yandex.Disk resource - because of its ease of use and good availability throughout Russia.
Before installing the operating system:
It is advisable to disable all other media (HDD and USB-Flash), if they are connected - this will simplify the installation and allow Windows 7 to optimize some of the parameters for SSD during installation.
You also need to check the inclusion of the AHCI mode controller for the SATA controller. For most modern PCs and laptops, it is already enabled by default, and if you haven't changed anything yourself, then you probably won't need anything.
Installing Windows 7:
Installation is best done from the original image. Do not use ready-made builds - they are in most cases set to prevent changes that will be required later to reduce the number of rewrites.
Setting up Windows 7 on an SSD:
For quick and easy setup, the easiest way is to use the special free SSD Mini Tweaker utility.
SSD Mini Tweaker - will quickly and correctly make all the necessary changes to the system to reduce the frequency of writing system files.
But you will also need to independently disable indexing of the contents of files on the disk.


To do this, open the properties of the system drive and on the "General" tab, uncheck the box "Allow indexing the contents of files ...". After that, click apply and in the "Confirm attribute changes" window that opens, select the option "... to all attached files and folders", then click "OK". The process will take some time. During this process, you will receive a message about the lack of rights to modify files - you can select the "Ignore all" option and continue.
After completing this operation, you can consider the setting complete. After that, you can turn off the computer and connect other volumetric media (HDD), which will serve to store large amounts of data (media library, game library, galleries, etc.)
Have a nice work!
As mentioned above, it is advisable to use specialized software for systematic SSD diagnostics. One option is SSD Life.
 The state of "health" of the disk, the program does not count, but receives from the disk itself, more precisely from the S.M.A.R.T. Then, based on the received data and based on the current mode of use of the drive, it calculates its service life.
In this regard, in order to more accurately assess the health of an SSD, the SSD Life program needs to monitor the operation of your drive for some time, viewing its load and calculating average values. The longer the analysis period, the more accurate the data.
Solid state drives are victoriously marching around the world. Flash-based drives have many advantages, and now the availability of large drives up to 1 TB has been added to them. In addition, devices of the middle and highest category are durable, as evidenced by the large warranty indicated by manufacturers. And, it would seem, all that remains is to buy a module, install and transfer the OS. However, not everything is as simple as we would like. Optimum performance and long life can only be achieved with the right settings. In the first part of the article, we talk about the parameters of the most popular types of solid state drives.
 The type of non-volatile memory device is determined by the protocol that provides data transfer. At first glance, the difference may be almost imperceptible. Using the conventional AHCI mechanism, data transfer speeds reach 550 MB / s, and the new NVMe specification - up to 4000, with a shorter response time and improved parallel access. Drives supporting these protocols exist in a variety of form factors. For AHCI, this is a traditional 2.5-inch SATA case and an M.2 module with the so-called B key. For NVMe, the M.2 form factor with an M key is the most popular.
In the second part of the article, we will talk about the capabilities of solid state drives. To do this, we created a RAID 0 array of two high-speed media. However, before you try to set records, it is worth trying to achieve optimal performance on a regular solid state drive.
 We connect correctly
The first M.2 port (highlighted in yellow) shares bandwidth resources with SATA ports 5-6. If the second M.2 port (highlighted in red) is used for AHCI storage, it uses the bandwidth of the SATA ports 1-2 - along with the NVMe drive in the M.2 connector
Optimal use of M.2 SSDs
M.2 drives are fast and compact (22x80mm) and are ideal for mobile computing. True, M.2 modules do not fit in all computers, in addition, NVMe and AHCI are two different protocols. If you consistently follow the recommendations, you will quickly find a drive that is best suited for your PC.
In the user manual or in the technical specifications on the website of the desktop motherboard manufacturer, you will find information about the possibility and conditions for installing an M.2 form factor drive.
 Setting
NVMe drives work best with manufacturer drivers. In addition, you need to check this box in the drive settings (in the device manager)
The M.2 slot is provided on boards for Haswell/Broadwell processors (LGA 1150 socket) and higher, but, as a rule, data transfer on older boards is carried out only over two PCIe 2.0 lanes, which is why the speed cannot exceed one gigabyte per second. In addition, it is not uncommon to find that UEFI does not support NVMe devices or does not have drivers for them, so you will most likely need to purchase an M.2 module with AHCI or a regular SATA drive.
Starting with Skylake, the motherboard chipset supports four PCIe 3.0 lanes, which in total provide speeds up to 4 GB / s. If at the same time Windows 10 is installed on the computer, nothing prevents you from placing an M.2 module with NVMe support. The installer and OS of Windows 7 and 8 lack USB drivers for the Skylake platform and NVMe drives, making installation doubly difficult. Before mounting the module, pay attention to which interfaces the M.2 slot shares bandwidth resources with: SATA connectors may not be available when an M.2 AHCI drive is connected, and an M.2 NVMe drive may use the bandwidth of one of the PCIe slots. Check the user manual and, if necessary, connect other drives or video cards to free slots.
 Windows 10 only reaches optimal boot speed when the computer boots in UEFI mode and the Fast Boot option is enabled
 With a laptop, it can be more difficult to determine compatibility with an M.2 drive and its protocol, since manufacturers do not publish such data. Therefore, you often have to scour the Internet, scoring the computer label and “M.2” into the search. If you find a laptop in the same line with an M.2 drive, it can be considered a sign of compatibility. But still, the M.2 module is worth buying only after you disassemble the laptop and examine the M.2 slot. It can be used to determine the length of a suitable module (42, 60, 80 or 110 mm - form factors are designated "M.2 2242", "M.2 2260", etc.). When in doubt, get an AHCI M.2 module for your laptop. Such memory can be identified by the fact that it is also available in a 2.5-inch form factor with SATA, for example, Samsung 850 Evo, Crucial MX300 or SanDisk X400.
OS optimization for NVMe
 Disable auto-loading of unnecessary software
Despite the use of a fast drive, unnecessary programs that start with the system slow down the boot process. In the Task Manager (Windows 10) or from the System Configuration application, disable all unnecessary startup programs
For new drives that run on NVMe, in any case, you need the appropriate driver. Windows 10 has it by default, so installing and configuring an SSD shouldn't be a problem. For the best boot speed and maximum performance, install Windows 10 in pure UEFI mode. From the boot menu, select the installation media in UEFI mode (instead of "USB" or "SATA"). During logical partitioning of the system drive, ensure that the installer creates a GUID partition table. So in the UEFI Boot settings, the Fast Boot or Ultra Boot options will be available, allowing you to reduce the startup time to the welcome screen to a few seconds.
NVMe drives work with Windows 10 drivers, but only really overclock with drivers from their manufacturer, so it is better to choose such a drive from a large manufacturer with good software support (Samsung, Intel, Toshiba, OCZ) and install their latest drivers. For Windows 7 and 8, install the manufacturer's drivers during the reinstallation.
SSDs and motherboards with SATA 3Gb/s ports
A SATA SSD can significantly speed up a PC even if it only has legacy SATA 3Gb/s ports. You only need to take into account the following points:
> Speeds over 300 MB/s no drive connected via SATA 3 Gb / s will reach. Newer SATA 6Gb/s drives are backwards compatible with older ports, but speeds will be limited to 3Gb/s minus overhead.
> You need to enable AHCI mode in BIOS Setup. Often pre-installed on older computers, IDE mode robs a solid state drive of a lot of speed. During system startup, open BIOS Setup and look for the desired setting, for example, in the "Peripherals ... SATA Controller" section.
> Very old SSDs(e.g. Intel X25-E and earlier, Samsung up to 470) do not support the TRIM command, so the disk cannot physically delete unnecessary data, resulting in a significant loss of performance as a result of heavy use. To bring such a drive to life, you can back up the data, then use a Live Linux distribution to roll it back to factory settings and transfer the backup back.
Moving to an NVMe drive
 If the AS SSD Benchmark in the upper left corner for "1024K" does not show "OK", you need to adjust the partition alignment
 If you want to migrate your Windows 7 or 8 system to a new computer with an NVMe drive, first connect the old hard drive as a SATA system drive to the new computer, boot from it, and install the missing drivers (for chipset, network adapters, USB controllers, etc.) .). If Windows asks you to reactivate, don't do it yet.
First, insert the NVMe drive and install the drivers for it from the manufacturer's website. Then transfer your operating system to the NVMe drive using the manufacturer's dedicated migration tools or imaging software. Carefully check partition alignment with block sizes (see left screenshot) to ensure maximum drive performance and lifespan. And only when the computer starts without problems from the NVMe drive, activate Windows.
Increasing the speed
 Bundle of two high-speed solid-state drives
The Gigabyte Z270X-Gaming 7 motherboard has two M.2 slots where we created a RAID 0 array consisting of two Samsung 960 Pro drives: no faster speeds can be achieved at this time
After moving Windows to an SSD, everything should run faster, unless the system has been used for a long time or too many programs are installed. If the system performance did not increase even on a solid state drive, it is possible that some programs got into startup and system services and slow down the OS.
To clean them up, open the System Configuration app in Windows. On the "Services" tab, activate the "Do not display Microsoft services" option, then uncheck the checkboxes of all services that are not related to your antivirus or devices that you cannot work without. Do the same on the "Startup" tab. In Windows 10, startup redirects to the task manager, where programs are disabled from the right-click context menu.
 Drive diagnostics using manufacturer's utilities helps determine its condition
 Owners of SATA drives, especially new ones, are advised to check the status of the device using the manufacturer's tools (for example, Samsung Magician, Crucial Storage Executive, Intel SSD Toolbox) or using the Tool SSD Life utility. Programs not only evaluate the state of the disk, but also predict the time of its failure, displaying the SMART value on the screen. Of particular importance is an attribute called Reallocated Sector Count (or similar), which reflects the number of failed sector remapping operations.
The results are calculated based on the increase in wear on a scale from the maximum value (100 or 255) to the threshold (for example, 10 or 0) at which the drive stops working. But these are only predictions and theory, because in reality even drives whose SMART values were within the normal range can unexpectedly fail, and vice versa - drives with critical values (more than 20-30% wear against the original values) can work for a very long time.
However, you should be aware of the possibility of drive failure and make regular backups. It is also useful to test (for example, using AS SSD Benchmark) and compare the results with data from the same drives, looking for reviews on the Internet: if your drive is significantly slower or the system as a whole is unstable, the drive may need to be replaced.
In pursuit of speed records
 Setting up a RAID array
To be able to boot from a RAID array, you need to configure it at the hardware level in UEFI
A two-drive RAID 0 array is faster than an NVMe SSD when the system writes and reads information from two drives at the same time. If you take the hardware RAID configuration in BIOS/UEFI and go through the Windows installation, you can get the same data transfer speed on the two available SATA drives as on an entry-level NVMe drive. We want to combine two high-speed NVMe drives in this way and break speed records.
Creating a RAID array
 For Windows, the Intel RAID drivers and proprietary Intel Rapid Storage software must be installed
 The first barrier to NVMe RAID is hardware. The motherboard should have two NVMe slots, as well as the ability to combine them using the Intel chipset's RAID function. In addition, the system after this procedure should also boot. In principle, top motherboards with Intel Z170 chipsets and the latest Z270 (for Kaby Lake processors) can cope with this task.
We installed two Samsung 960 Pro SSDs on the Gigabyte Z270X Gaming 7 motherboard. We then needed to set up hardware RAID in UEFI. In the early version of the motherboard firmware, we also had to perform a small task along the way: we had to first activate the RAID mode of the SATA controller, and only then in the menu item “Peripheral | EZ Raid, we were able to combine both NVMe drives into a RAID 0 array, which received twice the capacity of a single drive.
The RAID array was ready in a few clicks. To install Windows 10, we copied the Intel Rapid Storage program from the disk that came with the motherboard to a USB flash drive. When it was necessary to select a system drive during installation, we loaded the driver by clicking the appropriate button, after which the array associated with the Intel controller was identified as the destination drive.
During the UEFI installation process we launched, the system automatically boots from the RAID array, which is used even in the current mode of operation as the most common drive. But due to the fact that the operating system now only communicates with the Intel RAID controller, and not directly with the drives, we were unable to use the Samsung NVMe driver, which would allow the full potential of the 960 Pro, and this slightly affected speed.
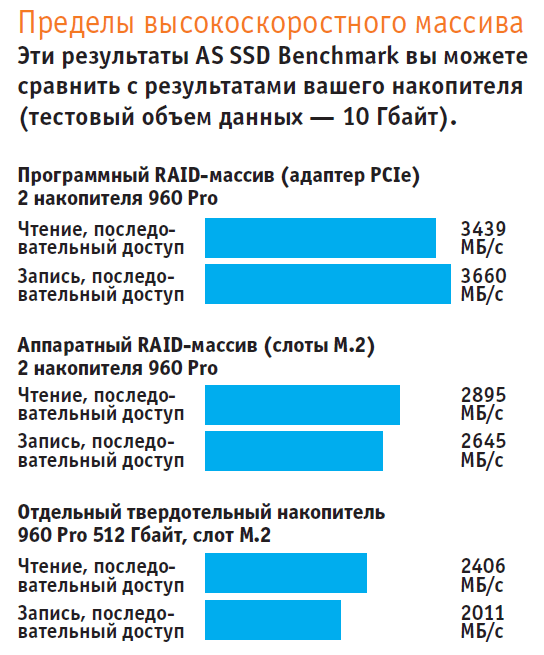 RAID 0 Benefits and Benchmarks
With the correct UEFI settings, our test system boots in less than ten seconds. The full installation of LibreOffice, along with writing 7000 files, took 21 seconds. Benchmarks (see above) reflect in numbers the speed of the RAID array, as well as its limit. The limit is because instead of a theoretical 100% increase in speed compared to a single drive, we only got a 20% increase in read speed and 32% in write speed.
We were able to achieve faster speeds by using a rather useless method in practice: using an adapter, we connected a second SSD to the PCIe slot for video cards, then booted from a third SATA SSD and combined both NVMe drives with Samsung drivers in Windows into one software
 M.2/PCIe adapter
If necessary, an M.2 form factor SSD can be connected to a PCIe x4 slot via an adapter
RAID array. Such an array (which, however, is not suitable for use as a disk to boot the system) outperformed a single drive by 43% in reading and as much as 82% in writing.
The results of a simple but rather fast ATTO Disk Benchmark test showed that the speed of even this combination will not exceed 4 GB / s. This is the maximum bandwidth of the DMI bus connecting the processor and chipset. Intel must make urgent decisions to redesign the platform to support the massive transfer rates of NVMe-compatible drives.
A year ago, Samsung launched the first NVMe-enabled M.2 SSDs for end users, the 950 Pro. The next device - 960 Pro - has significantly increased speed compared to the first. In terms of price per gigabyte, the 960 Evo is of interest, which is almost on par with the Pro model.
 PHOTO: CHIP Studios; manufacturing companies


