How to merge two disks into one without losing information? I have a C: drive and the operating system is installed on it. There are two more disks E: and F:, that's exactly what I want to combine into one disk, but there is information on both disks. This means that with the help of the built-in tools of Windows 7, I cannot do this. Or I can, but I need to transfer the information from the F: drive and delete it, then attach the resulting unallocated space to the E: drive, as a result I will have one large E: drive.
In short, there is a lot of information on both disks and it is quite difficult to transfer it anywhere, I do not have a portable hard disk. I found articles on your site about the free partition manager "", these articles have almost everything: how to create a partition, increase, decrease, and most importantly, all this happens without loss of information, that is, before working with the program, information does not need to be transferred anywhere. You don’t have only an article on how to combine two disks into one, I think that a large audience of your resource will be grateful to you for such an article. Gleb.
How to merge two disks into one
Hello, friends! As our reader correctly noted, for these purposes, you can use the free program "EaseUS Partition Master Free Edition". With this program, you can merge two disks into one without losing information on these disks.Our article is suitable for operating systems: Windows XP, Vista, Windows 7 and Windows 8.1.
We return to today's article. The content of the article:
1) We connect two disks into one using the program "EaseUS Partition Master Free Edition" quickly and easily, naturally without losing information.
2) We connect two disks into one without resorting to any programs, that is, using the tools built into Windows 7. I think this part of the article will also be useful to someone. But we will have to transfer data from the disk that we want to delete, otherwise there is no way.
3) Friends, we also have an article on how to merge two disks into one using the program. This program is the leader among hard disk managers, but unfortunately it is paid.
How to merge two disks into one using EaseUS Partition Master Free EditionLet's go to the official website http://www.easeus.com/download.htm. Choose " EaseUS Partition Master Free Edition"and click Download

freeware download

Download Now

The program installer is downloaded. Let's launch it. Installing the program is simple, but there are a few things to keep in mind.
If you do not need the TuneUp Utilities 2013 optimizer, then uncheck the box and click Next.

Email is not required

Before starting the program, go to Disk Management. We will not touch drive C:, but we will connect drive E: (59 GB) and drive F: (59 GB), as a result we will get one drive E: (119 GB).

We start the program.

In the main window of the program, click once with the left mouse on the drive E: and click on the Merge tool (merge),
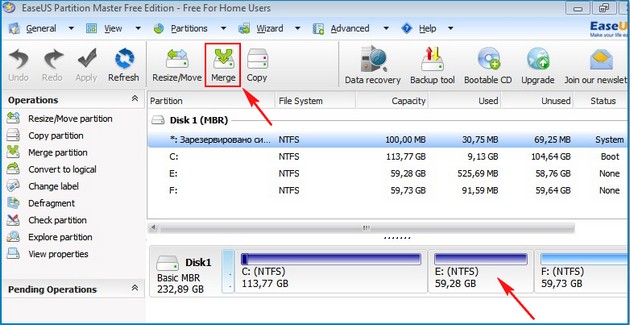
In the window that appears, specify the drive with which we want to merge the E: drive, this is the F: drive, check the F: box and OK.


Our program is running in pending operation mode, press the Apply button and OK,


The disk merging process has begun.

We go to Disk Management and look at the result. Instead of two drives E: and F:, we now have one drive E: (119 GB).

All data that was on drive F: moved to drive E:, to the folder Local Disk F. 
How to connect two disks into one using the Windows 7 operating system itself, Windows 8 without resorting to any programs
Suppose some users do not want to install additional software on their computer and try to get by with the tools built into the operating system.

Let's go to Disk Management. To connect drives E: and F:, you must first transfer all the data from drive F: to a portable hard drive or to a USB flash drive, or to drive E:, then delete the F: drive, right-click on it and select Delete volume, agree Yes.


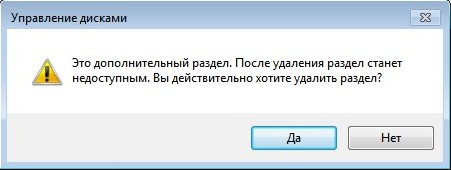
Once again, right-click on the "Free" space and select Delete Partition.

Are you sure you want to delete the section? We agree Yes.
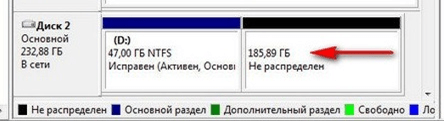
Unallocated space appears with a volume of 59 GB. We attach this unallocated space to the E: drive. Right click on the E: drive and select Extend Volume.


Ready.

Everything. I will be very glad if someone helped.
If you need to combine several hard disk partitions into one volume, then the first thing to do is save important data on another medium. Most likely, they will be irretrievably destroyed. If the paging file of the operating system is stored on the logical drive to be removed, transfer it to the main partition in advance.
Partitions can be merged correctly not only by means of the OS, but also by external programs.
During the process of merging hard disk partitions, all programs must be closed. A program or process accessing the hard drive may block access to the system, and the procedure will not be able to start. Do not turn off or restart your computer while changing disks.
- The operating system removes the logical volume you specified.
- The partition on which the logical volume functioned is removed.
- The system partition expands to the freed disk space.
Combining partitions using external programs
You can merge hard disk partitions, for example, using the Acronis Disk Director Suit package with the Acronis Partition Expert utility or the AOMEI Partition Assistant program. There are other programs, but these have proven to be optimal.
The Acronis package is user-friendly, has an intuitive interface, and is able to merge disks without data loss, just like the free AOMEI Partition Assistant.
Merge partitions with AOMEI Partition Assistant
In the main screen of the program, right-click (RMB) on drive C and select "Merge Partitions" in the context menu

Mark the disks for merging, confirm with Ok, and the program places the order you generated into the delayed start queue.
 To start the procedure, click the "Apply" button.

The program will ask you to confirm the operation a few more times, then it will check the disks for errors and merge the volumes into one.
All folders on the former D drive will be placed in the D-drive folder on the C drive.
Merging partitions under Windows XP
To solve the problem of merging hard disk partitions under XP, there are several options.
1) Through the OS control panel.
"Start" - "Control Panel" - "Administrative Tools" - "Computer Management" - "Disk Management"
- After entering the "Disk Management" menu, right-click (RMB) click on the name of the volume you want to delete. In the context menu, select "Delete logical drive"
- After removing the logical drive, delete the empty partition. Right-click on it and select "Delete Partition"
- Right-click on the name of the remaining volume and select Extend Volume. The extension wizard will start, follow its instructions.

2) Using the DISKPART utility located in C:\WINDOWS\system32\diskpart.exe.
To launch the DISKPART utility, select Run from the Start menu, or press the Win+R key combination and manually enter the name of the utility: diskpart.
To work with this utility, you need to remember the principles of managing the operating system from the command line.

Merging partitions under Windows 7
The diskmgmt.msc utility allows you to merge hard disk partitions. The utility can be launched in two ways:
- Through the control panel. "Start" - "Control Panel" - "Security and System" - "Administrative Tools" - "Computer Management" - "Disk Management".
- Through the "Start" menu - "Run" or the key combination "Win + R", then enter the name of the utility diskmgmt
Step-by-step algorithm for merging sections:
In the Disk Management window that appears with a list of disks, right-click (RMB) click on the name of the volume you want to delete. From the context menu, select "Delete Volume"
 After deleting a volume, an unnamed partition will appear in its place. Right-click on it and select "Delete Partition"
Select the volume you want to expand, and right-click on it, select "Extend Volume" and then "Next"

Specify how much you expand the disk and click "Finish".
Restart your computer immediately after the process is finished.
Merging partitions under Windows 10
The algorithm for merging partitions under Windows 7, Windows 10 and Windows 8.1 is identical. The difference is in the way you enter the control section.
To enter the disk utility under Windows 10, right-click on the "Start" button, and select "Disk Management" in the context menu
The window that appears is the window completely described above for the Windows 7 system.
Conclusion
Any changes made to the hard disk structure are critical and important. Incorrect actions can lead to the inoperability of the hard drive, data loss and the need to reinstall the operating system. The process of merging disk partitions is quite lengthy, and if the computer turns off during operation, or an unexpected failure occurs, data may be lost. Therefore, before starting work, be sure to back up your data, make sure that you can restore the operating system if necessary, and only then start.
Soviets. How to merge two local drives into oneThere are several ways to merge local drives. You can use both downloaded programs and tools that are available on your computer system. Today we will look at merging multiple disks using Windows as an example. Actually the version of the system (XP, Vista or 7) does not matter. The principle is about the same everywhere. We will consider aboutjoining disks using system tools.
A warning! Before you begin, make a copy of the data located on the attached disk, as they will be removed. For example, you can write information to a USB flash drive or drop it into . We open Start\ Control Panel\System and Security\Administrative Tools

A list of available disks will open (they are also called "Volumes").

Volume 1, as we can see, is reserved for system recovery. Volume 2 is a system partition that is necessary (reserved) for the hard drive to work. But with volumes 3 and 4 just we can work. But since in volume 3 we have the system itself installed, we will not touch it. And we can merge volume 4 with volume 3 if we need it.
So we found the volume to be attached, by right-clicking (right-clicking), we select "Delete Volume".

Or through the Disk Management menu

There is very little left. After we freed up some space on our computer, we need to add it to the existing drive. To do this, click on our only RMB volume and find in the menu that opens "Expand Volume". After that, the assistant will open and we need to follow its instructions.
Please note that when merging, data from the second partition will be completely deleted (photos, videos, documents, programs). Copy them to a removable USB drive or to the cloud so you don't lose them.
Thereafter:
- Launch the Run system utility using a keyword search or by pressing the Windows + R keys on your keyboard at the same time. It can also be launched through the "Standard" menu.

- Next, you need to open the classic application and enter the command "diskmgmt.msc" in the empty column, as shown in the screenshot. Then click "OK".

- The Disk Management utility will launch. With it, the HDD or SSD partitions will be combined. In the first column, you can see the list of available volumes. On the contrary, the file system type (NTFS, FAT32), status, capacity and free space (in GB, MB or percentage) are indicated.

- In our example, we will merge "New volume W" with drive "C". Note that multiple partitions are merged one at a time, i.e. "C" with "D", but not with "W" or "E". If they are not nearby, then the system will not allow you to do this. If you do not want to delete data from the volume that you plan to merge with the main one, then make sure that you copy it. After that, right-click on the partition you want to remove and select "Delete volume" in the context menu that appears.

- A notification will appear where you will be asked to abandon the procedure if you have not yet managed to create backups from the selected partition. Click "Yes" to continue.

- After that, the section will disappear from the list, and an inscription will appear at the bottom of the program: “Not distributed”.

- Right-click on the disk you want to enlarge and select "Expand Volume" from the context menu.

Attention! If you do not have the "Expand volume" button active, then most likely you are trying to merge partitions that are not "in a row". For example, if there is another occupied (or vice versa free) disk space between them. Only volumes that are in close proximity can be merged.
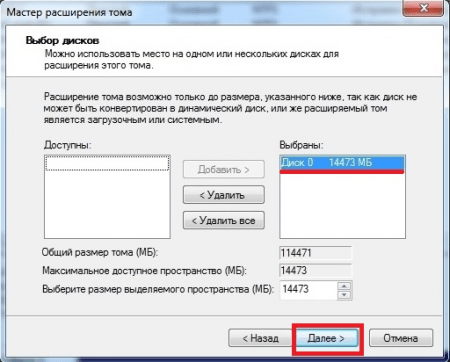
- The Extend Volume Wizard opens. Select the logical or local drive that you want to use to increase the space and click Next. If only one is available, it will be marked automatically.

- Confirm your selection and click Finish to complete the process.
After that, the remaining sections will be displayed in the list. You can close the utility and continue using your computer. Optionally, here you can create a new volume, delete it, hide the disk.

The computer will automatically mark all changes. Therefore, in case of problems, you can do a full system restore. In this case, user data will not be affected. However, if you deleted them when merging, then you will not be able to return them.
Through third party software
If you do not want to use the built-in tools from Microsoft, then you can merge disks using third-party software. Many of them are available for free download and allow you to:
- save data from partitions in automatic mode;
- merge disks and partitions that are out of order.
What is a dynamic disk? This is a technology that allows you to divide physical media into several volumes, partitions. They can be created, deleted, extended (at the expense of others).
The application is available for free download from the official website of the developer. It is completely in Russian, so you won’t have to download the crack separately. Run the downloaded distribution kit of the program and follow the instructions of the wizard during installation. After that, run the program.
The order of work on the PC will be as follows:
- Right-click on the disk (if it is not hidden) that you want to add to the main one. In the context menu that appears, select "Delete Partition". In our example, this is drive "G".

- A notification will appear to warn you that the information will be completely deleted. Agree to move on to the next step. To do this, we recommend that you select the first item and click OK. For more information, click on the "Help" button.

- Drive "G" will disappear from the list, and "Unallocated space" will appear instead. We will “add” it to the main section “C”.

- To do this, right-click on "C" and select "Merge Sections" from the context menu.

- The Merge Wizard opens. From the list, select the section that you want to add to the main one. Then click "OK".

- Click on the big green "Apply" checkmark icon in the toolbar to connect "C" and "G".

The selected sections will be merged into one, no other changes need to be made. Similarly, you can merge several sections at once, which have the opposite space written - unallocated. To do this, they do not have to be in close proximity to each other, as required by the system utility from Microsoft.
A broken disk can be divided into sections and combined into one unlimited number of times. Please note that data loss in this case is inevitable. Therefore, do not forget to make backup copies or use third-party software.
The program is fully compatible with OS Windows 10 (home, extended or other version) and is available for free download from the official website. Please note that it does not support the Russian language, so you will have to work with the English interface. After installation, follow these steps on the PC:
- Run the program and select MiniTool Partition Wizard. The program for working with disks will open.

- Right-click on the main section to which you want to add another. Select "Merge" from the context menu that appears.

- A new window will open, select "Disk 1" and partition "C". When you're ready, click Next.

- The program will prompt you to come up with a name for the folder into which all information from the current section to the main one will be moved. Here, in the upper part, mark the section by which you want to increase the main one (in our case, this is “C”). Click "Finish". You can add multiple disks here if you wish.

- The "Merge Partition" window will close. In the application itself, click on the blue "Apply" checkmark to start the merge.

Please note that the process may take from several minutes to hours. The exact time will depend on the size of the partition, the presence of files that will be copied to the main disk. They will remain in the root directory with the name you specified.
Unlike Aomei, MiniTool Partition allows you to immediately backup all the data saved on the partition. This is useful if you don't want to save the information manually (for example, if it is too large). But in this case, the operation will take much longer.
To speed up the merging and backup process, delete unnecessary files yourself or move at least some of them to removable media or the cloud.
Conclusion
Now you know how to merge disks in Windows 10 using standard system tools or third-party software. But keep in mind that without losing data, the operation will not work. Therefore, be sure to save all important information from the disk whose space you want to add to the main one. Because it will not work to restore them later.
If you plan to merge several partitions, then we recommend using free software. Additionally, it allows you to copy files to a new partition, so you don't have to do it manually.
Video
Below you can watch a video on the topic of merging disks on Windows 10.
When working with a computer, situations can often arise when you need to resize hard disk partitions, or even combine them into one. For example, you need to install a new operating system that is larger than the previous one. Also, if the system has 2 or more logical volumes (not counting the partition with the installed operating system), it is more expedient to combine them into one. To do this, you can use both regular Windows tools and third-party software. Let's consider both options.
Method 1: Merge disk partitions using standard Windows utilities.
Before starting the procedure in this way, you need to copy all the data from the partition that you want to attach to another, since the volume is deleted before the operation and, accordingly, all information from it is erased. In Windows, there is a Disk Management Console to perform such operations. To open it, right-click on the "Computer" icon and select "Manage". The computer management console will open, where in the left menu you need to select the "Disk Management" item.The console displays all available drives. Now you need to select a section that is combined with some other. After that, by right-clicking on it, select "Delete volume". We confirm the operation, after which an unallocated space will appear in the menu. Then open the context menu of the volume to which you want to attach the unallocated space, and select the "Extend Partition" item.
Next, the expand volume wizard opens, in which you will be prompted to select a disk, due to which you need to increase the space on the local partition. In our case, this is just one volume, which was previously a hard disk partition.
Method 2: Merge disk partitions in Acronis Disk Director.
This method is more reliable, since it is not necessary to transfer data from one disk to another in Windows: the program will automatically merge the partitions. Acronis Disk Director has an intuitive interface that makes it easy for any user to understand.Note: there are 2 versions of this program: under Windows OS and boot version. It is recommended to use the second version in order to avoid errors that may occur during the procedure. If this is not possible, then first make sure that your operating system is working without errors and failures.
The main window of the program will display information about all partitions of the hard disk. To merge, select the section you want to merge and click "Merge Sections" in the sidebar.
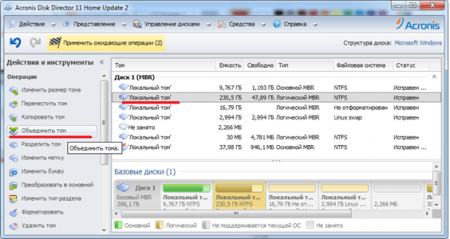
A wizard will open in which you need to select the disks to merge, as well as specify which of them will be the main one, that is, which disk will be joined to which.
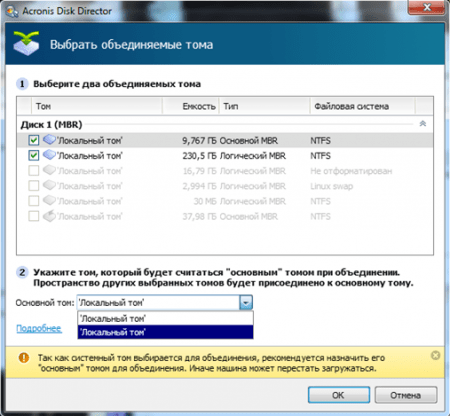
After completing the necessary manipulations, you need to fix them by clicking the "OK" button. Now a new section will appear in the main window with the same volume as the 2 previous ones. However, this does not mean that it has already been created. Acronis Disk Director uses confirmation of operations to avoid incorrect user actions. After performing the necessary manipulations, a checkbox with the number of operations to be performed will appear in the upper corner.

When you click on it, a window with a list of operations will appear. Here the user can once again check the correctness of their actions. If everything is correct, then pressing the "Continue" button will start a step-by-step partitioning of the disk according to the instructions specified by the user.

This process is irreversible. If the program is running under Windows OS, then the computer will be restarted to complete the operation.
You can also use Partition Magic and Paragon Partition Manager to merge hard disk partitions. In terms of functionality, they are similar to Acronis Disk Director, so you can use any of them. All of these disk merger programs work well for any version of Windows.


