Hello to all! Today is a very interesting article about fine-tuning a video card for high performance in computer games. Friends agree that after installing the video card driver, you once opened the "Nvidia Control Panel" and saw unfamiliar words there: DSR, shaders, CUDA, sync pulse, SSAA, FXAA and so on, decided not to climb there anymore. But nevertheless, it is possible and even necessary to understand all this, because the performance of your video card directly depends on these settings. There is a misconception that everything in this tricky panel is configured correctly by default, unfortunately this is far from the case and experiments show that the correct setting is rewarded with a significant increase in the frame rate. So get ready to dig into streaming optimization, anisotropic filtering, and triple buffering. As a result, you will not regret it and you will be rewarded with an increase in FPS in games.
So, in order to get to the video driver control menu, right-click anywhere on the desktop and select "Nvidia Control Panel" from the menu that opens.

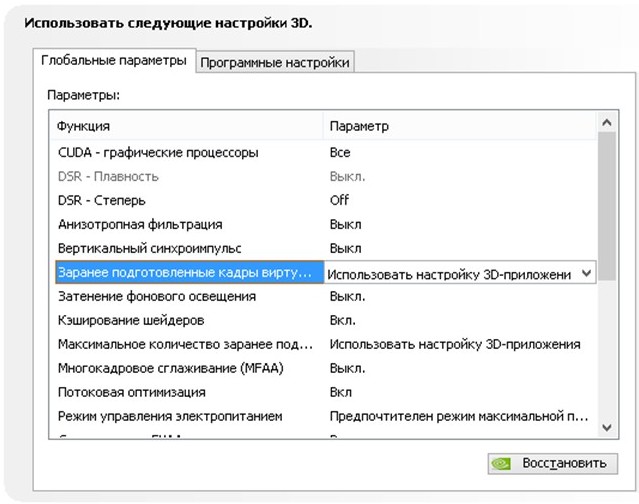
Then, in the window that opens, go to the "Manage 3D parameters" tab.

Here we are with you and we will configure various parameters that affect the display of 3D pictures in games. It is not difficult to understand that to get the maximum performance of the video card, you will have to cut the image a lot in terms of quality, so be prepared for this.
So, the first point “ CUDA - GPUs". Here is a list of video processors you can choose from and will be used by CUDA applications. CUDA (Compute Unified Device Architecture) is a parallel computing architecture used by all modern GPUs to increase computing performance.

The next item " DSR - Smoothness»We skip, because it is part of the setting of the" DSR - Degree "item, and it, in turn, needs to be disabled and now I will explain why.

DSR (Dynamic Super Resolution)- a technology that allows you to calculate a picture in games in a higher resolution, and then scaling the result to the resolution of your monitor. In order for you to understand why this technology was invented at all and why we do not need it to get maximum performance, I will try to give an example. You have probably noticed in games that small details such as grass and foliage very often flicker or ripple when moving. This is due to the fact that the lower the resolution, the smaller the number of sampling points for displaying fine details. DSR technology corrects this by increasing the number of points (the higher the resolution, the more sampling points). I hope this will be clear. In terms of maximum performance, this technology is not interesting to us as it consumes quite a lot of system resources. Well, with disabled DSR technology, the smoothness setting, which I wrote about a little higher, becomes impossible. In general, turn it off and move on.
Next comes anti-isotropic filtration... Anti-isotropic filtering is a computer graphics algorithm designed to improve the quality of textures that are tilted relative to the camera. That is, when using this technology, textures in games become clearer. If we compare anti-isotropic filtering with its predecessors, namely bilinear and trilinear filtering, then anti-isotropic is the most power-hungry in terms of video card memory consumption. This item has only one setting - the selection of the filtration coefficient. It is not difficult to guess that this function must be disabled.

The next item is vertical sync pulse... This is the synchronization of the image with the monitor's scanning frequency. If you enable this parameter, you can achieve the smoothest gameplay possible (tears in the image are removed during sharp turns of the camera), however, frame drops often occur below the monitor's scan rate. To get the maximum number of frames per second, it is better to disable this parameter.

Pre-rendered virtual reality footage... The function for virtual reality glasses is not interesting to us, since VR is still far from the everyday use of ordinary gamers. We leave it by default - use the 3D application setting.

Shading background lighting... Makes scenes more realistic by softening the ambient light intensity of surfaces that are shaded by nearby objects. The function does not work in all games and is very resource intensive. Therefore, we take it to the digital mother.

Shader caching... When enabled, the CPU saves the shaders compiled for the GPU to disk. If this shader is needed again, the GPU will take it straight from disk, without forcing the CPU to recompile this shader. It's not hard to guess that if you disable this option, then performance will drop.

Maximum number of pre-trained personnel... The number of frames that the CPU can prepare before being processed by the GPU. The higher the value, the better.

Multi-frame anti-aliasing (MFAA)... One of the anti-aliasing technologies used to eliminate "jaggedness" at the edges of images. Any anti-aliasing technology (SSAA, FXAA) is very demanding on the GPU (the only question is the degree of gluttony).

Stream optimization... By enabling this feature, an application can use multiple CPUs at once. If the old application does not work correctly, try to set the "Auto" mode or disable this function altogether.

Power management mode... There are two options - adaptive mode and maximum performance mode. During adaptive mode, power consumption depends directly on the degree of GPU utilization. This mode is mainly needed to reduce power consumption. During the maximum performance mode, as you might guess, the maximum possible level of performance and power consumption is maintained, regardless of the degree of GPU load. We put the second.

Smoothing - FXAA, Smoothing - gamma correction, Smoothing - options, Smoothing - transparency, Smoothing - mode. I already wrote about anti-aliasing a little higher. We turn off everything.

Triple buffering... A kind of double buffering; an image output method that avoids or reduces artifacts (image distortion). In simple terms, it increases productivity. BUT! This thing works only in tandem with vertical sync, which, as you remember, we turned off before. Therefore, we also disable this parameter, it is useless for us.

Acceleration of multiple displays / mixed GPUs... The setting defines additional options for OpenGL when using multiple displays and multiple video cards. Single display - single display performance mode respectively. Two or more - multi-display performance (or compatibility mode in case of incorrect operation of applications). Two or more video cards - compatibility mode.

Texture filtering - anti-isotropic filtering optimization... Enabling the option will lead to a slight deterioration in the picture and an increase in performance, which is exactly what we need.

Texture filtering - quality... Allows you to control Intellisample technology. This technology is designed to improve the quality of anti-aliasing in scenes with partially transparent textures. We unscrew it to a minimum, that is, we set the high performance mode.

Texture filtering - negative LOD deviation... A technology that allows you to render textures in applications with more contrast.

Texture filtering - trilinear optimization... Enabling this option allows the driver to lower the quality of trilinear filtering to improve performance.

This completes the performance tuning of the Nvidia video driver.
The mask tracker transforms the mask to follow the path of one or more objects in the movie. The object selected to be tracked must maintain the same shape throughout the movie, but it can change position, scale and / or perspective, as such changes do not interfere with tracking.
When you select a mask, the Trace panel switches to mask tracking mode and displays the following controls:
- Track forward or backward one frame at a time or to the end of a layer
- A method by which you can change the position, scale, rotation, skew, and perspective of a mask
Select mask and then items Animation> Track Mask... Alternatively, you can also hold down the CONTEXT key and click the mask and select Track mask on the shortcut menu to display the Tracking panel.
Mask tracking.
the effect Zoom in while maintaining the level of detail provides the ability to significantly increase the image, while maintaining its small elements, as well as the sharpness of lines and curves. For example, you can upscale footage from SD to HD or from HD to digital cinema.
For more information, see Detail Preserve Zoom effect.
HiDPI Content Viewers for Retina Displays on Mac
After Effects displays content on Retina displays on Mac computers so that each pixel of content in the viewer appears as a separate pixel on the screen.
This affects the content of the following elements:
- Footage panel
- Layer panel
- Composition panel, including video content and some interface elements in the content area
This feature does not affect cursors, buttons, or other panels in the After Effects user interface.
Updated Cineware Features
In the Options dialog box, under the Cineware effects section, two new parameters have been added. They can be used to customize an instance of Cinema 4D to be used in conjunction with After Effects.
Cinema 4D render path: Select the version of Cinema 4D (R14 or R15) to be used for rendering when working in After Effects.
Path to the Cinema 4D executable file: Select the version of Cinema 4D to use when opening a .c4d file in After Effects, for example using the command Edit original.
See Cinema 4D Updates for more information.
New OptiX Ray-traced 3D Rendering Library
After Effects CC now uses the new OptiX 3.0 library. Previous versions of After Effects used the OptiX 2.0 library.
The main advantages of the new OptiX library over the old Optix 2.0 library:
- Eliminated causes of crash in Mac OS X v10.9 (Mavericks)
- Higher performance, including in a multi-GPU environment
Bypass whitelisting to speed up GPU rendering in case of ray-traced 3D rendering
The GPU Data dialog box provides a ray tracing options menu from which the user can select GPU or CPU.
In previous versions of After Effects, if there was no hardware installed in the list of tested and supported GPUs, the corresponding item in the GB menu was blocked (grayed out), and a message was displayed below the menu GPU Not Available - Incompatible device or display driver.
Users now have access to a new option for configuring the GPU, presented in the menu Edit> Preferences> Preview> GPU Data: "Use untested, unsupported GPU to accelerate CUDA ray-traced 3D rendering."
When this check box is selected, After Effects uses ray-traced 3D graphics accelerated rendering using any GPU that meets the minimum requirements.
List of New CUDA Whitelisted Cards for OptiX
The following cards have been added to the CUDA whitelist for OptiX (for graphically accelerating ray-traced 3D rendering):
- GTX 675MX (Windows and Mac OS)
- GTX 680MX (Windows and Mac OS)
- GTX 590 (Windows)
- GT 650M (Added to Windows Maps List; Already Shown to Mac OS List)
- GTX 760 (Windows)
- GTX 770 (Windows)
- GTX 780 (Windows)
- GTX TITAN (Windows)
- Quadro K6000 (Windows)
- Quadro K4000 (Windows)
- Quadro K2000 (Windows)
- Quadro K5000M (Windows)
- Quadro K4000M (Windows)
- Quadro K3000M (Windows)
- Quadro K5100M (Windows)
- Quadro K4100M (Windows)
- Quadro K3100M (Windows)
- Quadro K2100M (Windows)
Improved analysis phase performance for 3D Camera Tracker and Warp Stabilizer
Significantly accelerated background analysis of footage for 3D Camera Tracker and Warp Stabilizer. Depending on the information about the footage and other factors, the obtained indicators of an increase in the processing speed at the analysis (tracking) stage range from 60% to 300%.
Improved and changed properties
Show properties with keyframes
Changed commands for displaying changed properties in the Timeline panel; there are now three commands on the Animation menu for displaying properties:
- Show properties with keyframes(U key) - Displays any property that has a keyframe associated with it. If a property has both keyframes and expressions associated with it, the property is displayed, but the associated expression is not displayed.
- Show properties with animation- displaying any property to which a keyframe or expression is associated.
- Show all changed properties(shortcut: UU) - Displays keyframes, expressions, or all changed properties (including keyframes and expressions) that are not animated.
Creating property references
- Select any property or set of properties.
- Please select Edit> Copy with Property References.
- Paste properties into any layer of any composition.
Pasted properties now retain their link to the layer they were copied from. This ensures that any change made to the original property is reflected in all instances of that property added by reference.
To create duplicates that reflect the changes made to the original, you can copy and paste the entire property reference layer. You can also create links to groups of properties that are present in a particular layer. For example, to reference all transformation properties without selecting them individually, copy the transformation group and paste it on another layer.
New properties in the Expression Language menu
Corrected sound waves
In After Effects, sound waves are represented as "corrected" sound waves. This means that the amplitude of the sound is displayed in only one direction on the horizontal axis on a logarithmic scale. This display method simplifies the calculation of the perceived loudness of a sound.
To switch to the old method of displaying sound waves, uncheck the Corrected sound waves from the Timeline panel menu.
Changes to the anchor method for 2D and 3D layers
Two new options have been added next to the Anchor checkbox in the Tools panel:
Snapping along edges has been extended beyond layer boundaries: turn on snapping to lines outside the layer boundaries. For example, snapping along a line defined by extending the edge of a layer in 3D space. This feature makes it much easier to align layers in 3D space.
Binding to functions inside collapsed compositions and text layers: rotation of internal armatures for layers that are inside compositions with collapsed transformations, as well as for individual symbols in character-by-character 3D text layers. With this function, you can, for example, snap the anchor point of one layer to another layer in the composition.
Enabling Video Preview for External Devices (Mac OS)
To enable video preview on external devices in Mac OS, select the new option Enable QuickTime Video Preview in the category of installations Preview video... When this check box is selected, After Effects asks QuickTime for a list of external video preview devices.
Attention! Enabling this option may cause Adobe QT32 Server to crash, which in turn will cause After Effects to crash.
Earlier versions of After Effects automatically ask QuickTime for a list of external devices for video previews.
Changes and improvements to functions for working with layers
Center anchor point
The anchor point that will become the center of the layer's content can be set in the following ways:
- Layer> Transform> Center Anchor Point In Layer Content
- On Windows, use the Ctrl + Alt + Home key combination; on Mac OS, use the Command + Option + Home key combination.
- You can also use the combination Ctrl + double click(Windows) or Command + double click(Mac OS) to activate the tool Pan backward (anchor point).
For information about anchor points, see Control point properties.
Create a new layer
Setting the Pre-Song Length
In the dialog box Preliminary composition there is a new parameter: Adjust the duration of the composition to the time range of the selected layers.
Select this option to create a new composition with the same duration as the selected layers.
In previous versions of After Effects, the duration of the new composition is the same as the original, regardless of the duration of the layers included in the precomposition.
Bicubic sampling of the Transform effect
The Transform effect has a new Sampling parameter that can be set to Bilinear or Bicubic.
Enable logging
Please select Help> Turn on logging to record session details. The generated logs will be sent to a set of text files. Restart the application to start the logging process. To view the log files, select Help> Show Log File.
Note. Logging has some performance degradation, so the logging feature enabled with this parameter will be disabled after 24 hours.
Automatically open Project panel folders when dragged
.Anisotropic filtering - set to Application-controlled. Check the value in the application itself. Preferably no more than 8x.
Anisotropic filtering is needed to improve the clarity of the image of 3D objects relative to the camera (character, car, etc.). We set the value Application-controlled - this means that the application will automatically select the desired anisotropic filtering mode, or the filtering is controlled in the application itself (program, game), the higher the filtering value, the clearer the image will be.
For each application, this parameter can be configured separately (the software settings tab), obtaining a higher quality if the application does not support or does not handle anisotropic filtering correctly.
Antialising - Gamma correction - set to On
Smoothing Gamma Correction smooths the gamma when going from light to dark, or vice versa. Turning on makes it possible to smooth out moments, for example, when the character's face "shines" in the rays of light (a direct example of a game with excellent play of light and dark tones). Does not affect performance.Antializing Mode - set to Application-controlled
A very important parameter, turning on the anti-aliasing mode makes it possible to get rid of the effect of ladders on a three-dimensional object. We set the value Application-controlled (Control from the application). - this means that the application will automatically select the desired anti-aliasing mode, or anti-aliasing will be controlled in the application itself (program, game), the higher the anti-aliasing value, the less ladder effect the image will have, the lower the application performance, the fewer frames per second.
For each application, this parameter can be configured separately (Programmatic Settings tab), in this case, the Antialising Setting item will become available, where you can manually set the anti-aliasing level from 2x to 16x. Even if the application does not support anti-aliasing, the video card driver itself will do it for it.
Anti-aliasing Setting - Automatic value Application-controlled. Check the value in the application itself. Preferably no more than 4x.
If you enable the previous item Anti-aliasing Mode - Application-controlled, the current value will be inactive, active only if the Anti-aliasing Mode value - Enhance the application setting) ( Override application settings or increase application settings).For each application, this parameter can be configured separately (the program settings tab), obtaining a higher quality if the application does not support or does not handle Anti-aliasing correctly. Read the point above.
Anti-aliasing - Transparency set the value to Off
Smoothing transparent surfaces means that objects with no structure will be smoothed. For example, it will smooth "transparent" places in the texture of stairs, because stairs, for example, are drawn with a single texture, using the alpha channel to indicate transparent and non-transparent places. It does not affect performance very much, but if performance is still more important to you, you can set it to "Off".In general, there was no significant difference in the picture quality between situations when this option was turned on or off.
Conformant texture clamp - Use hardware parameter
As the name implies, the choice of the texturing method, of course, is optimal in quality and performance at the hardware levels - Use hardware - which is naturally more productive than the software (software) mode.Error reporting - Off
Senseless parameters, the inclusion of which makes it possible, in the event of a driver error, to send all error data and PC configuration to NVidia developers.(One of the meaningless parameters, turning it off will allow the driver to have unlimited access to the application code when processing graphics, of course we remove all restrictions with the Off value)
mipmaps (Enable scalable textures) - value None (No)
Obsolete meaning of the work of 3d applications. Disable because applications no longer use this method, the value is None.Maximum pre-render frames - value 1 or 2 (depending on the power of your CPU)
The maximum number of frames after the first that the CPU can prepare for further processing by the GPU of the video card. At one frame, 1 to 8 frames will be prepared before being loaded into memory, loading your CPU while preparing these frames. We set the value to 1 or 2, this will greatly increase the speed of graphics processing in real time. You can choose the number of frames yourself, but still I recommend no more than 3. Focus on the power of your CPU (central processing unit, do not confuse it with GPU - graphics processor).Multi-display / mixed - GPU acceleration - Single display performance mode
Simply put, if Multi display performance mode is set, your graphics card's graphics processing unit (GPU) renders an image for both ports on the video card. And if the mode is Single display performance mode, then the signal will go to only one of the ports.So if you have one video card and one monitor, then make sure to set Single display performance mode.
Note that when you installed new drivers on the video card, the default is Multi display performance mode, which means that if you had two monitors, connecting it to the second video output would also render the image. The productivity is lost somewhere by 5-15%. In general, Single display performance mode improves performance by rendering per video output).
Texture filtering - Anisotropic sample optimization - Off
Texture filtering - Anisotropic optimization, this parameter is set to Off, since this parameter increases the performance in 3D applications by degrading the final image when rendering by a video card. But since we strive for speed without loss of quality, we do not need this parameter. (If the Texture filtering parameter is set to Hight quality, then this parameter will be inactive, disabled.)Texture filtering - Negative LOD bias - Clamp value
Filtering textures using a negative with a scalable level of detail, set the value to Clamp, which will optimize texture procedures by binding. This will allow you to get an additional 2-3 FPS in rendering performance, without losing quality. Increases productivity in 3D applications.Texture filtering - Quality or Hight quality. (Choose according to the power of your graphics card)
Filtering textures allows you to improve the quality of the picture, the clarity of the image without lowering the performance in rendering, respectively, set the value of Hight quality (High quality). It practically does not affect performance.Texture filtering - Trilinear optimization - Off
Texture filtering - trilinear optimization, this parameter is set to Off, if the Texture filtering - Quality parameter is set to High quality, then this parameter will be inactive.About the parameter Texture filtering - Trilinear optimization (Filtering textures - trilinear optimization) I want to note that it increases the performance in 3D applications by degrading the final image when rendering by a video card. But since we strive for speed without loss of quality, we do not need this parameter, moreover, Trilinear filtering is much older and it has its drawbacks, as well as two-line (bilinear) filtering. Moreover, Anisotropic filtering "practically" includes both of these texture filtering methods with some refinement.
Threaded optimization - On. (Enable only if you have a multi-core processor, if not, set to "Auto")
Optimization of the video card driver for multi-core processors, a tidbit for owners of 2 - 4-core processors. The default value is Auto, but judging by the tests carried out in applications, it was automatically set to Off, but since we are trying to increase performance, we set it to On. Increases productivity in 3D applications.Triple buffering - Off
Triple screen buffering, buffers several frames in vertical sync, which allows for smoother frame transitions, thereby reducing performance in 3D applications. We set the value to Off, thereby disabling unnecessary buffering. Performance is negatively affected.Vertical sync - Force off value
Vertical frame synchronization, through the vertical sync pulse, the number of frames per second is synchronized with the refresh rate of your monitor, thereby removing a certain effect of "picture tearing" (on the screen it will look, for example, when the camera is turned sharply, as if the upper part of the screen has moved a little to the side, in relation to the bottom), with a fast change of frames. At the same time, for frequent FPS drops (number of frames per second), it does not drop so much only if your monitor is updated at a frequency higher than 100-120 Hz per second, but even at this frequency, the FPS is still reduced by 10 -15%. We set the value to Off, thereby disabling unnecessary vertical sync. Performance is negatively affected.
Ambient occlusion - Value "Off"
Ambient occlusion A shading model used in 3D graphics to add realism to an image by calculating the intensity of light reaching a point on a surface.Ambient occlusion is most often calculated by constructing rays emanating from a point on the surface in all directions, and then checking them for intersections with other objects.
This process loads the video card very decently., so see for yourself, if the video card is powerful, you can turn it on. If not, then it is better to turn it off.
In general, in my opinion, this effect of what eats is not worth it =) You will not see much difference anyway, it is there, but it is minimal and noticeable only if you look closely and know what to look for =)
Hello to all! Today is a very interesting article about fine-tuning a video card for high performance in computer games. Friends agree that after installing the video card driver, you once opened the "Nvidia Control Panel" and saw unfamiliar words there: DSR, shaders, CUDA, sync pulse, SSAA, FXAA and so on, decided not to climb there anymore. But nevertheless, it is possible and even necessary to understand all this, because performance directly depends on these settings. There is a misconception that everything in this tricky panel is configured correctly by default, unfortunately this is far from the case and experiments show that the correct setting is rewarded with a significant increase.frame rate.So get ready to dig into streaming optimization, anisotropic filtering, and triple buffering. As a result, you will not regret it and you will receive a reward in the formincrease FPS in games.
Setting up an Nvidia graphics card for gaming
The pace of development of game production is gaining more and more momentum every day, however, like the exchange rate of the main monetary unit in Russia, and therefore the relevance of optimizing the work of hardware, software and the operating system has sharply increased. It is not always possible to keep your steel stallion in good shape due to constant financial injections, so today we will talk about increasing the speed of a video card due to its detailed settings. In my articles, I have repeatedly written about the importance of installing a video driver, therefore I think you can skip. I'm sure you all know perfectly how to do this, and all of you have it installed long ago.
So, in order to get to the video driver control menu, right-click anywhere on the desktop and select "Nvidia Control Panel" from the menu that opens.
Then, in the window that opens, go to the "Manage 3D parameters" tab.

Here we are with you and we will configure various parameters that affect the display of 3D pictures in games. It is not difficult to understand that to get the maximum performance of the video card, you will have to cut the image a lot in terms of quality, so be prepared for this.
So, the first point “ CUDA - GPUs". Here is a list of video processors you can choose from and will be used by CUDA applications. CUDA (Compute Unified Device Architecture) is a parallel computing architecture used by all modern GPUs to increase computing performance.

The next item " DSR - Smoothness»We skip, because it is part of the setting of the" DSR - Degree "item, and it, in turn, needs to be disabled and now I will explain why.

DSR (Dynamic Super Resolution)- a technology that allows you to calculate a picture in games in a higher resolution, and then scaling the result to the resolution of your monitor. In order for you to understand why this technology was invented at all and why we do not need it to get maximum performance, I will try to give an example. You have probably noticed in games that small details such as grass and foliage very often flicker or ripple when moving. This is due to the fact that the lower the resolution, the smaller the number of sampling points for displaying fine details. DSR technology corrects this by increasing the number of points (the higher the resolution, the more sampling points). I hope this will be clear. In terms of maximum performance, this technology is not interesting to us as it consumes quite a lot of system resources. Well, with disabled DSR technology, the smoothness setting, which I wrote about a little higher, becomes impossible. In general, turn it off and move on.
Next comes anisotropic filtering... Anisotropic filtering is a computer graphics algorithm designed to improve the quality of textures that are tilted relative to the camera. That is, when using this technology, textures in games become clearer. If we compare anti-isotropic filtering with its predecessors, namely bilinear and trilinear filtering, then anisotropic is the most power-hungry in terms of video card memory consumption. This item has only one setting - the selection of the filtration coefficient. It is not difficult to guess that this function must be disabled.

The next item is vertical sync pulse... This is the synchronization of the image with the monitor's scanning frequency. If you enable this parameter, you can achieve the smoothest gameplay possible (tears in the image are removed during sharp turns of the camera), however, frame drops often occur below the monitor's scan rate. To get the maximum number of frames per second, it is better to disable this parameter.

Pre-rendered virtual reality footage... The function for virtual reality glasses is not interesting to us, since VR is still far from the everyday use of ordinary gamers. We leave it by default - use the 3D application setting.
Shading background lighting... Makes scenes more realistic by softening the ambient light intensity of surfaces that are shaded by nearby objects. The function does not work in all games and is very resource intensive. Therefore, we take it to the digital mother.

Shader caching... When enabled, the CPU saves the shaders compiled for the GPU to disk. If this shader is needed again, the GPU will take it straight from disk, without forcing the CPU to recompile this shader. It's not hard to guess that if you disable this option, then performance will drop.

Maximum number of pre-trained personnel... The number of frames that the CPU can prepare before being processed by the GPU. The higher the value, the better.

Multi-frame anti-aliasing (MFAA)... One of the anti-aliasing technologies used to eliminate "jaggedness" at the edges of images. Any anti-aliasing technology (SSAA, FXAA) is very demanding on the GPU (the only question is the degree of gluttony).

Stream optimization... By enabling this feature, an application can use multiple CPUs at once. If the old application does not work correctly, try to set the "Auto" mode or disable this function altogether.

Power management mode... There are two options - adaptive mode and maximum performance mode. During adaptive mode, power consumption depends directly on the degree of GPU utilization. This mode is mainly needed to reduce power consumption. During the maximum performance mode, as you might guess, the maximum possible level of performance and power consumption is maintained, regardless of the degree of GPU load. We put the second.

Smoothing - FXAA, Smoothing - gamma correction, Smoothing - options, Smoothing - transparency, Smoothing - mode. I already wrote about anti-aliasing a little higher. We turn off everything.

Triple buffering... A kind of double buffering; an image output method that avoids or reduces artifacts (image distortion). In simple terms, it increases productivity. BUT! This thing works only in tandem with vertical sync, which, as you remember, we turned off before. Therefore, we also disable this parameter, it is useless for us.


