Good afternoon, dear readers of the site, in this article we will learn how to increase performance in windows 7 .
If your computer slows down and freezes, do not think that it is time for you to get a new computer orreinstalloperating system. All problems may be due toincorrect settings.
So let's start speeding up your computer.
Step 1. First of all you need configure autoload. Startup programs slow down the system at startup.You need . This is one way to improve the performance of your system.
Click Start choose Control Panel. Clicking on the link System. Then on the right side of the window select Additional system settings. In the Advanced tab in the block Performance press the button Parameters...

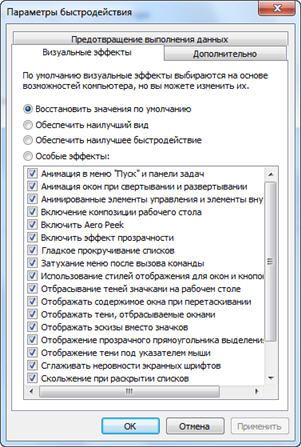
In the opened window Performance options tab Visual effects put the radio button in the box Ensure the best performance. This option disables all visual effects on your computer. But if you cannot do without any component, then you can include it, but no more than two. After adjusting performance settings, click OK. And then one more time OK.

Step 3. Also, for the speed of your computer, it is important to have good antivirus, which is able to find various kinds of threats and viruses. And also do not overload the system. I use antivirus Kaspersky Internet Security 2012. It has an option that allows you to avoid conflicts with other programs and slow down your computer.
To enable this feature in the main window of Kaspersky Internet Security 2012 antivirus, click the link Setting then go to the tab Extra options(fourth in a row) and select Compatibility.
In the window Compatibility options check the box Donate resources to other programs.
Step 4. Another way performance improvement this . The program does an excellent job with this action. CCleaner. In the main window of the program, you can analyze the system and the program will advise you on what needs to be removed for more efficient operation of your computer.
Step 5. Disable unused services. In order to disable services you need to press Start and choose Control Panel. Next, select Administration and in the window that opens, double-click on the word Services.
In the window that opens, you can disable the following services:
- Automatic update.
- windows firewall.
- Print spooler (if there is no printer).
- Infrared monitor.
- Time service.
- Help and support.
- Security Center.
In order to disable the service double click on it. In the window that appears, in the tab General in field Launch type put Disabled and press OK. After that, we reboot the system.
That's all. I think these tips will be enough for you to increase performance in windows 7.
Over time, even the most powerful laptops tend to lose their performance. This is due in most cases to the clutter of the laptop operating system. In addition, operating systems such as Windows 7 often include various features that are not needed. Conversely, some performance-enhancing features are turned off. How to turn on what you need and turn off what you don’t need will be discussed below.
Do you want your computer to fly like peppers? Then follow our advice!
Over time, even the most powerful laptops tend to lose their performance. This is due in most cases to the clutter of the laptop operating system. In addition, such operating systems often include various functions that are not needed. Conversely, some performance-enhancing features are turned off. How to turn on what you need and turn off what you don’t need will be discussed below.
Disabling unnecessary services.
Here you need to be extremely careful. It is necessary to clearly understand which services do not affect the stability of the system, and which ones are better not to be touched at all. In any case, now we will list some services, the disabling of which will not entail serious consequences for the stability and performance of the system.
If you do not use the printer to print documents and are unlikely to use it in the near future, you can safely disable the print spooler service. Next, if your laptop is not equipped with a touch screen, disable the service that is responsible for input on tablet PCs. Most PC and laptop users do not use smart cards, so disable the smart card service. It is highly recommended to disable the Remote Registry Service. Since the inclusion of this service negatively affects the security of the system. If you have not used Windows search in your life and are not going to use it in the future, feel free to disable the service Windows Search.
All this is a list of those services that can be disabled without much concern and not spoil the stability and performance of the system.
It is better not to touch other Windows services.
Disabling indexing of disk contents
Since we have disabled Windows Search, you can safely disable the file indexing feature, as it serves to speed up Windows search. Moreover, this function "eats" a considerable amount of RAM.
In order to disable indexing, you need to enter " My computer”, right-click on the disk name and select the menu item“ Properties". After that, uncheck the box " Allow file indexing "and press the button" Apply". Now you need to wait a bit until the system applies the new settings to all files on the disk. If the disk is clogged "to the eyeballs", then the process may be somewhat delayed.
Enable Ready Boost technology.
An exceptional performance boost comes from the inclusion of the very useful Ready Boost feature. The bottom line is that if there is not enough physical RAM, the system uses the paging file not from a slow HDD drive, but from a high-speed USB. Thereby reducing the load on the hard drive. To enable this feature, you will need a "flash drive" with a minimum capacity of 8 GB. To enable Ready Boost, simply right-click on the name of the USB drive and select the menu item " Properties". Then go to the tab " Ready Boost' and tick the box ' Grant this device for Ready Boost ". The system itself will determine how much storage space you need to allocate for the paging file.
Disk defragmentation.
Sometimes the performance of the system can "fall" due to the strong fragmentation of files on the system disk. This slows down the read/write speed, causing the entire system to run slower. You can use the Windows system utility to defragment the disk. It is located in the menu Start" in folder " Service". The program interface is simple and clear.
Conclusion.
Following all the above recommendations will allow you to give your laptop a new life. After this setup, your system will pleasantly surprise you with its speed. All of these are the simplest ways to increase productivity using Windows system functions.
Even though Windows 7 boots and responds in many ways better than its predecessor, Vista, its default settings are far from optimal for the job. However, while speeding up the work of the "seven", it must be taken into account that some changes made to its settings lead to a deterioration in the functionality and appearance of the system. Your task is to choose a configuration that will give you the best balance between performance, functionality and appearance. Next, we will look at several ways to speed up a number of Windows 7 systems, as well as a number of its utilities.
Windows 7: Optimize System Boot
It is known that the user is most annoyed by the long loading of the operating system. Despite the fact that the "seven" is optimized by developers in such a way that it loads 10-20 seconds faster than Vista, users are always striving to make it even faster. Multi-core processors allow you to speed up system boot even more, for which you need to make a number of settings. Open the msconfig utility by typing its name in the Start menu bar. In the window that opens, we need the Download tab, where we need to click on the Advanced Options button.
 Check the box next to Number of processors and select the maximum number of your cores from the drop-down menu. After you click OK to save the settings, reboot the systems, and you will see how much faster the Windows 7 boot has become. To speed up the system boot, you should also consider that its speed directly depends on the number of processes and applications launched with the start Windows. Therefore, having opened the msconfig utility again, let's go to its other Startup tab.
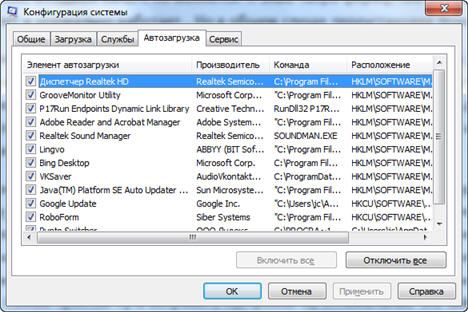
  Many Windows applications are written into the system startup without the user noticing. When there are too many such programs, the download starts to slow down significantly. Therefore, carefully analyze the list of applications presented in the startup tab and uncheck all programs that you do not need. Ideally, you should leave a checkmark only in front of the name of your antivirus. In the same way, Windows will speed up loading by disabling all unnecessary services that slow down not only startup, but also work. We will discuss how to disable them below.
 Optimizing Services in Windows 7
Throughout the Windows OS family, there are many services designed to interact with internal hardware, drivers, and some system options. Many third-party programs also add their own services to the system. Running in the background, many services significantly reduce system performance, while not improving its functionality in any way. Moreover, a number of Windows 7 services are detrimental to the overall security of the system. These services, first of all, include the default Remote Registry, which allows an attacker to make any changes to the system. There are two ways to open the service management utility: go to Control Panel - Administrative Tools - Services or enter services.msc in the Start menu bar. After starting this application, a window with a list of all services will open in front of you.
  To disable a particular service, you need to left-click on it, after which a window will open.
  Click the Stop button to stop the service and change the startup type to Disabled to prevent it from being enabled again the next time the system starts. After that, click Apply and OK, the service will no longer interfere with your computer. When working with the list of services, you should be especially careful, since disabling the desired process can lead to a partial loss of system performance: certain equipment or applications may stop working. If you have made changes to the properties of several dozen services at the same time, it will not be easy to find the right service required for the operation of a particular program. Below we provide a list of services that can be disabled on almost any computer, whether it be a single machine or part of a local network.
 - The remote registry allows remote users to make changes to the system registry. For security reasons, this service should be disabled without fail.
- Offline Files is responsible for implementing the Offline Files API. Not needed by the vast majority of users. Disable.
- The Tablet PC Input Service is required for pen and similar input devices to work on tablets. Disable.
- The Windows Error Logging Service is responsible for logging system errors. If you have a habit of analyzing log entries in order to find the cause of errors in the event of problems with your PC, leave the service start type set to Auto. If you are almost never interested in what is recorded in the system log, the service can be disabled.
- IPsec Key Exchange Key Modules… - Provides IKE key handling and authenticated IP operation. Disable.
- Changed link tracking client. The service keeps track of file associations within an NTFS system. Once disabled, your computer will run faster.
- Windows Search is required to index the files on your computer in order for the search to work. If you do not use the built-in system search, the service can be disabled.
- parental control. This service came into Windows 7 from the version of Vista and is needed only for compatibility with it. Disable.
- IPSec Policy Agent. Almost never used on a home PC. Disable.
- KtmRm for the distributed transaction coordinator. If you read the description of the service, it will become clear that it is not recommended to run it unless you are sure that you need it. Disable.
- Helper service IP. Not used on home computer. Disable.
- Print Manager. If you are not using a printer, disable this service. If you print documents from time to time, try setting the startup to Manual. If printing does not work in this case, change the startup type to Auto. Whether your printer will work or not with the Manual startup type depends only on its drivers.
- A second login is required to run processes as a different user. Disabled for security reasons.
- Fax machine. Disable if you are not sending or receiving faxes.
- Windows Defender protects against spyware. Can be disabled if you plan to install an alternative protection system on your system.
- Windows Firewall. Can be disabled if you have installed a third-party firewall on your system.
- Smart card deletion policy. If you do not use smart cards, you do not need the service.
- Microsoft iSCSI Initiator Service. If you are not using iSCSI devices, you can set the startup type of the service to Manual.
- SSDP discovery is required for devices using the SSDP protocol. Can be disabled.
- Adaptive brightness control is required only for PC owners with a built-in light sensor to automatically adjust the brightness of the monitor.
- Computer Browser is required to discover work machines on the local network. A single computer does not need the service. Disable.
- Server. The service is required only for computers that are used for file sharing or printer sharing. Disable.
- Bluetooth support service. Disable if you don't have Bluetooth.
Shutdown Time Reduction: Windows 7 Optimization
The system shutdown time can also be reduced, but this can only be done using a somewhat barbaric method - reducing the time given to the process to complete running programs. If the system does not have time to complete their work, they will be stopped forcibly. Open the registry again and find the HKEY_LOCAL_MACHINE -> System -> CurrentControlSet -> Control branch there. Find the WaitToKillServiceTimeout parameter there and change its value from 12000 to 2000.
ReadyBoost function
Windows 7 has an option to use flash drives in addition to RAM for data caching. This speeds up data read and write operations and improves system performance. To use the ReadyBoost option, you must have USB drives or flash cards connected to the PC using a card reader. Insert the drive into the USB port of the computer and in the AutoPlay window select Speed up the system using Windows ReadyBoost. Specify the space limit available for use. Click the Apply and OK buttons to save the settings. After that, the ReadyBoost.sfcache file will be created on the USB drive. Do not remove the flash drive from the computer under any circumstances!
 Optimizing your hard drive in Windows 7
This function is valid in the Windows family of systems, starting with the XP version, it is also available in the "seven", however, if this option was enabled by default in XP, you must enable it in Windows yourself. Right-click on the My Computer icon and open Device Manager. Find Disk Drives in the list, right-click on the name of the HDD and select Properties. A window will appear where we need the Policy tab. Put a check in the box "Disable buffer clearing ...". Here, in the Device Manager, we find the IDE ATA / ATAPI controllers branch in the list, where in the properties of all ATA channels in the Advanced settings tab, check the box next to Enable / Enable DMA (Enable DMA).
Speed up copying and moving files
One of the new options in Windows 7 is remote differential compression, which is designed to calculate differences between two objects, which reduces the amount of data transferred, but requires more time to calculate. You can disable this option in the Windows Components utility. Find the Programs and Features icon in the Control Panel and open Turn Windows features on or off from the list on the left. Uncheck the box next to Remote differential compression.
Disable Driver Signature Verification
This setting will significantly reduce the time required to install drivers. Search the Start menu for the gpedit.msc utility. Then, in the User Configuration item, go along the path Administrative Templates -> System -> Driver Installation. Click Digitally Sign Device Drivers and select Disable in the window that opens, click Apply and OK.
Speed up thumbnail view
To increase the speed of viewing thumbnails, make the necessary settings in the registry. Open the branch HKEY_CURRENT_USER -> Control Panel -> Mouse. Change the MouseHoverTime setting to 100 or less.
Speed up the start menu
When you open the Start menu, the system spends some time identifying and highlighting recently installed programs. If you do not need this option, you can turn it off, reducing the menu opening time. Right-click on the Start button and select Properties from the menu that appears. On the Menu tab, click the Customize button. In the window that appears with a list of settings, uncheck the item "Highlight recently installed programs."
  Before opening the Start menu, there is a short pause, which can be reduced by changing the corresponding registry setting. To do this, first start the registry by entering the word regedit in the Start menu bar and pressing Enter.
  In the registry editor that opens, find the key HKEY_CURRENT_USER -> Control Panel -> Desktop and change the value of the MenuShowDelay key from 400 to 50. After that, the pause when opening the menu will noticeably decrease.

Turn off unnecessary visual effects
If your computer is equipped with a weaker graphics card or uses a graphics solution built into the motherboard card, the visual effects of Aero can cause a noticeable decrease in performance. Especially often this problem is faced by owners of inexpensive laptops, mainly designed for office work. In the Control Panel, click on the System icon and in the window that opens, select Advanced system settings. You will see a window where you should go to the Advanced tab. Click the Options button under Performance. A window will open with a list of special effects, many of which significantly affect system performance.
  You have to configure the system so as to provide the optimal balance between appearance and performance. On weak computers, you can turn off all effects by selecting the "Ensure the best performance" item. By making the “Special Effects” item active, you can independently choose which effects you need. Most users prefer not to disable the "Smooth jagged screen fonts" option.
 An interesting topic and always relevant is how to increase the speed of your computer. In the modern world, the race for time is becoming more and more interesting, everyone gets out as best they can. And the computer plays an important role here. How can he infuriate with ridiculous brakes at a crucial moment! At this moment, I am visited by such thoughts: “Kick-ass, well, I don’t do anything like that! where are the brakes from?
In this article, I will analyze the 10 most effective ways to increase computer performance.
Replacement of components
The most obvious way is to replace the computer with something more powerful, we will not consider it. But it is quite possible to replace some spare part (component). You just need to figure out what can be replaced by spending less money, and getting the maximum increase in computer speed.
BUT. CPU it is worth replacing if the new one is at least 30% faster than the installed one. Otherwise, there will be no noticeable increase in productivity, and a lot of funds will be required.
Thrill seekers can try to overclock their processor. The method is not for everyone, but nevertheless it allows you to postpone the upgrade of the processor for another year, if the overclocking potential of the motherboard and processor allows. It consists in increasing the nominal frequencies of the central processor, video card and / or RAM. It is complicated by the individual features of a particular configuration and the possibility of its premature failure.
b. RAM. Definitely need to be added if all the memory is loaded during operation. We look through the "Task Manager", if at the peak of work (when everything that can be opened) is loaded up to 80% of the RAM, then it is better to increase it by 50-100%. Thankfully, it's worth every penny now.

C. HDD. It's not about disk size, it's about speed. If you have a slow 5400 RPM economy hard drive, replacing it with a more expensive 7200 RPM hard drive with higher storage density will add performance. In all cases, replacing with an SSD drive makes users smile. Performance before and after is completely different.
You can approximately determine the bottleneck in the computer configuration using the standard Windows 7 performance tool. To do this, go to "Control Panel -> System" and click "Evaluate performance" or "Update". The overall performance is determined by the lowest score, so the weak link can be identified. For example, if the estimate of the hard drive is much less than the estimate of the processor and RAM, then you need to think about replacing it with a more productive one.

Computer repair, cleaning
Your computer may be slow due to some kind of malfunction, and a simple repair can help improve performance. For example, if the processor cooling system malfunctions, its clock frequency is greatly underestimated, and as a result, performance drops. It can still be trivial to slow down due to the components of the motherboard due to heavy dust! So first, try to thoroughly clean the system unit.
Defragmentation and free disk space
If you have never heard what it is or have not done it for a long time, then this is the first thing to do to increase the speed of your computer. Defragmentation collects pieces of information on the hard disk into a whole, thereby reducing the number of movements of the read head and increasing performance.
The lack of at least 1 GB of free space on the system disk (where the operating system is installed) can also cause a decrease in overall performance. Keep track of free space on your drives. By the way, for the defragmentation process it is desirable to have at least 30% free space.
Reinstallation of the Windows XP/7/10 operating system
Reinstalling 90% allows you to increase the speed of your computer by 1.5-3 times, depending on its "pollution". This OS is so arranged that over time it needs to be reinstalled. I know people who “interrupt Windows” several times a week. I am not a supporter of this method, I try to optimize the system, get to the bottom of the true source of the brakes, but still, about once a year I reinstall the system, and then because some components change.
In principle, if I didn’t have such a flurry of programs, then I could live 5-10 years without reinstalling. But this is rare, for example, in some offices where only 1C: Accounting and Microsoft Office are installed, and nothing has changed for years. I know such a company, Windows 2000 has been running there for more than 10 years and it works fine ... But in general, reinstallation is a good way if you do not know how to increase the speed of your computer.
Using Operating System Optimizer Programs
Sometimes you can significantly increase the comfort of work with the help of special programs. And in most cases, this is almost the only simple, fast and suitable method. About one good program called I already wrote earlier.
You can also try a good PCMedic utility. It is paid, but this is not a problem. The highlight of the program is in a fully automated process. The whole program consists of one window in which you need to select your operating system, processor manufacturer (Intel, AMD or another) and the type of optimization - Heal (cleaning only) or Heal & Boost (cleaning plus acceleration). We press the "GO" button and that's it.

And one of the most powerful programs is Auslogics BoostSpeed, although it is also paid, but there is an evaluation version. This is a real monster that includes several utilities to increase the speed of your computer on all fronts. There is an optimizer, and a defragmenter, and cleaning the computer of unnecessary files, and cleaning the registry, and an Internet accelerator, and some other utilities.
Interestingly, the program has an advisor that will tell you what to do. But always check what is advised there, do not use everything indiscriminately. For example, the adviser really wants the automatic Windows update to work. Those who did not buy licensed Windows know that this can end badly ...
For optimization, there are also cleaner programs, such as CCleaner, which clean the computer of unnecessary temporary files and clean the registry. Removing junk from disks will help free up free space.
But cleaning the registry does not lead to a noticeable increase in performance, but it can lead to problems if important keys are deleted.
IMPORTANT! Before any changes, be sure to!
NECESSARILY view everything cleaners want to remove programs! I scanned my computer with Auslogics Disk Cleaner and at first I was glad that I had 25GB of garbage in my trash. But remembering that I recently cleaned the trash, I opened the files prepared for deletion in this program and just went nuts! There were ALL my most important files, my whole life for the last few months. Moreover, they were not in the trash, but in a separate folder on drive D. That's how I would have deleted it if I hadn't looked.
In Windows 7, you can improve performance somewhat by simplifying the graphical interface. To do this, go to "Control Panel -> System -> Advanced -> Settings" and turn off some of the checkboxes or select "Ensure the best performance."
Motherboard BIOS settings
The BIOS stores the most basic computer settings. You can enter it while turning on the computer using the Delete, F2, F10 or some other keys (it is written on the screen when turning on the computer). A strong decrease in performance can only be due to critical jambs in the settings. Usually it is set up normally and there is no need to interfere there, and even harmful.
The easiest way to fix the settings to optimal is to go into the BIOS and select an option like "Load Optimal Settings" (the spelling may differ depending on the BIOS), save the settings and reboot.
Disabling unnecessary services and programs from autorun
Today, almost every second installed program gets its nose into autoload. As a result, the loading of the operating system is delayed for an indefinite time, and the work itself is slowed down. Look at the system tray (near the clock), how many unnecessary icons are there? It is worth removing unnecessary programs or disabling their startup from startup.
This is easy to do using the System Configuration utility built into Windows. To run it, press the "Win + R" combination and enter "msconfig" in the window. In the program, go to the "Startup" tab and uncheck the extra checkboxes. If after a reboot something is missing, then the checkboxes can be returned back. You should have an idea what programs you have installed and.
One powerful way to improve performance is... disabling the antivirus. It's bad, but for the duration of resource-intensive tasks, I sometimes disable the antivirus.
No need to do this while surfing the web or installing unknown software!
Installing the latest drivers
This really can help, especially if very old or default drivers are installed (by default from Microsoft). The motherboard chipset drivers have the greatest influence, but others can also slow down performance. You need to update the drivers for each device, and you can find them on the manufacturers' websites.
It is better to update drivers manually, but there are many programs for automatically updating drivers. For example, a good one will scan devices and look for updated drivers.

Choose your operating system wisely
If you are still sitting on Windows XP, having 2 gigabytes of RAM, then I advise you to quickly switch to Windows 7, the performance will increase. And if you have 4 GB or more, then feel free to install Windows 10 64-bit version. The speed of work will increase even more, but only in 64-bit programs. Processing video, audio and other resource-intensive tasks can be processed 1.5-2 times faster! Windows Vista is also time to change to the seven.
Do not use different builds of Windows for installation, such as Windows Zver and the like. They are already crammed with necessary and unnecessary software, besides, they often fail.
Viruses
Although they are in my tenth place, this does not mean at all that they should not be paid attention to. Viruses can significantly slow down your computer or even "freeze" it. If there is a strange decrease in performance, then it is worth scanning the system with one of the scanners, for example. But it is better to have a reliable antivirus installed, such as DrWeb or Kaspersky Anti-Virus.
In this article, we have analyzed the main methods on how to increase the speed of your computer. I hope this article helped you save the most important thing in our lives - this is time that should be used productively, every hour and every minute, and not wasted. In the following articles, I will touch on the topic of increasing computer performance more than once, subscribe to blog updates.
An interesting video for today - incredible ping-pong!
Windows 7 operating system is still one of the best developed by Microsoft. It supports all currently existing programs designed for the Windows platform, has high performance, is not demanding on resources and has a user-friendly interface.
Despite its undemanding to resources, sometimes there is a slowdown when working under its control. Especially often this happens after a long time of its use without carrying out preventive work.
Sometimes reason for slow performance there is an attempt to launch a program that is too demanding on resources, for example, a modern game that requires a powerful video accelerator, or launching a large number of tabs in Photoshop, which requires a lot of RAM. In this case, software optimization of the Windows 7 computer can slightly increase performance, but for a serious increase in performance, it is better to upgrade the hardware.
How to speed up your Windows 7 computer with hardware
To increase performance, you can add RAM, use a solid state drive, install a more powerful processor.
The presence of problems with already installed hardware can also lead to stuttering. This may be caused such reasons:
- Availability bad sectors on the hard disk or in RAM cells.
- Malfunction cooling of the processor and the entire computer, leading to overheating of the equipment and the operation of the thermal protection of the processor, which significantly reduces its performance. Overheating can be caused by banal dustiness.
- Loss of contact one of the memory cells. The memory bar can simply not be fully inserted into the slot, and the computer will work with less memory.
- Hard drive wear and a significant increase in access time to it.
You can try to fix these malfunctions without replacing components, by cleaning and purging, checking the contacts on the connectors, running programs for checking and repairing sectors on the hard drive, and periodically defragmenting the drive.
Speed up Windows 7 with better resource management
In most cases, you can achieve a significant increase in computer performance by optimizing the use of computing resources. For this it is necessary reduce load on the processor, memory and minimize the frequency of access to the hard disk.
Main reasons low performance of a computer or laptop running Windows 7 at the software level are:
- Infection viruses, including hidden cryptocurrency miners.
- autostart unnecessary programs for everyday use.
- Work unnecessary services.
- Usage visual effects and other decorations that unnecessarily load resources.
Virus cleaning
In order to be sure that there are no viruses, it is best to install the operating system again. If this is not possible, you need to use a good antivirus to scan and clean. This can be done completely free of charge by downloading a trial version of the antivirus. The best of them are Norton Antivirus and Kaspersky Antivirus. After downloading the antivirus, you need to update its databases and run a full scan. After scanning, you can find a huge number of viruses, especially if most of the programs are pirated. For everyday use, you can use a free Czech antivirus Avast Free Antivirus. It consumes few resources and also has many built-in components.
CPU and memory load can be viewed in the task manager. But you need to understand that the most advanced viruses can hide and disguise themselves in such a way that it is very difficult to detect them. They may even stop working when the user is viewing the task manager. Therefore, regular reinstallation of the system and the use of a good antivirus should become the norm. Reinstallation is conveniently done using images created by programs like Acronis. After installing the new system and optimizing it, you can create an image and use it if necessary. This will not take long and will ensure that a clean and optimized system is being used.
Disabling extra decorations
To significantly increase system performance, you can disable unnecessary decorations. First of all, visual effects are disabled by right-clicking on my computer, where the properties are activated:
In the tab that appears, select the menu additionally and press parameters:
In the options click on the visual effects and activate the provision best performance:
Disabling Remote Assistance
In the system properties window on the tab remote access Disable remote assistance connections. This is a useless option that only takes resources and reduces security. 
Disabling widgets and unnecessary programs
Further must be deactivated available widgets (if any). In addition to consuming resources, they create a security hole. To completely remove them, the easiest way is to go to the menu enabling and disabling components systems and deactivate them, as well as other unnecessary components. To do this, click on start and enter the control panel: 
On the control panel, find the tab programs and components.
When you go to the programs and components section, you will be able to remove installed programs, as well as enable or disable system components. To remove unnecessary programs double-click the left mouse button on an unnecessary program and uninstall it according to the standard procedure. 
Cleaning up unwanted Windows components
To clean up unnecessary Windows components, you must enter this menu in the same section and in the tab that appears deactivate unnecessary components. Disable Remote Differential Compression, Windows Search, Gadget Platform, Tablet PC Components, Indexing Service, and other unnecessary components: 
Troubleshooting Disk Drive
Often the reason for slow operation is the presence disk errors. To check and fix them, you need to right-click on the disk and in the window that appears choose a service and doing the check: 
Next, in the drop-down window, activate the options verification and recovery and start checking. 
If the system drive is selected, a reboot may be required to check. In this case, click the disk check schedule and reboot: 
Before the operating system loads, a progress image of the disk check will appear. Full check it out and fixes can take a long time. 
Removing unnecessary programs from startup
An important element in cleaning up unnecessary trash is check startup menu. To use regular tools, press start, enter msconfig in the search bar and press enter: 
As a result, the system configuration menu appears. Needed here: 
Unnecessary startup items are turned off and the changes made are applied: 
Using the maximum possible number of cores at boot
Using the system configuration, you must also set the number of cores to use at boot to speed up the computer or laptop. This will help speed up the loading time a bit. To do this, go through the tabs - Extra options. 
And in the line " number of processors» select how many cores will be used at boot. It's better to set the maximum possible number: 
After that, you will need to reboot for the changes to take effect: 
Turn off unused services
The number of concurrently running services greatly affects performance. To disable useless services, go to Control Panel:
In the control panel window go to the window systems and security:
After that, activate the tab administration:
In the administration window run services shortcut:
In the services menu, carefully check what starts automatically. Useless for a computer, used for surfing the net and used for home purposes, are the following services:
- WindowsSearch;
- computer browser;
- server;
- work station;
- session manager
- desktop window manager;
- diagnostic policy service;
- client for tracking changed links;
- IP helper service (when IPv6 support is not required);
- secondary login;
- error logging service;
- offline files;
- portable device enumerator service;
- print manager (if there is no printer);
- secure storage;
- remote registry;
- security center;
- tablet PC input service;
- NetBIOS support module over TCP/IP;
- themes;
- WindowsMediaCenter service launcher.
You can also deactivate Auto Update Center And background intelligent transfer service. They are needed to receive updates from Microsoft and can be run manually from time to time.
To disable double-click on an unnecessary service: 
Then install startup type– disabled, apply changes. After stopping the service, its window will look like this: 
If the sidebar is enabled, it must also be disabled using services. To this end, disable the sidebar.exe process in the manager.
Checking RAM for failures
If the computer has a bad memory bar, then it may malfunction and brake for some time. To check it is necessary to administration window run the memory checker: 
In a popup window agree to restart and check: 
After the reboot, the diagnostic utilities will appear: 
In this window pressing F1 You can change the validation parameters by changing the number of passes and the test set: 
As a rule, the basic set is completely enough for verification. If there are failures in the RAM, they usually immediately manifest themselves in the test as errors. If there are errors in the RAM, it must be changed.
Adjusting power options and turning off hybrid sleep
An important parameter in the work is the choice of the necessary power supply scheme. If you need maximum performance, then choose the appropriate power supply scheme. To do this, go to the tabs in the control panel system and safety – power supply and open the closed line of additional plans, where they activate the high performance scheme: 
By clicking on the setting of this scheme, you can adjust optimal parameters screen dimming, screen off, sleep mode and brightness: 
In addition, you can fine-tune the circuit more deeply by changing additional parameters: 
In these values turn off hybrid sleep mode, as it takes up a lot of disk space and slows down the computer. To completely disable it, you need to in the search bar when you click the start button dial a team power cfghibernate off and press enter.
This will reduce the amount of used disk space by the amount of installed RAM: 
Disabling Windows Aero and using the classic look
It is also worth disabling an option such as Windows Aero. It decorates the interface, but consumes a lot of resources. To do this, go to the control panel along the path personalization – choice of topics and choose the classic option: 
In this window, choose the base theme and color of the classic system window.
Enabling ReadyBoost Technology
If you have a slow hard drive and little RAM, then a little speed up will help. ReadyBoost technology. It works by plugging in a USB flash drive and using some of its space for this technology. To use it, it must be SuperFetch service enabled. On the icon of the connected USB flash drive, right-click and activate the function. In the properties, select the ReadyBoost submenu, activate the use of this option, and use the slider to select how much memory will be allocated to this technology. System she will offer optimal size. The changes are then applied. 
If you are using a solid state drive that already has good performance, this technology is useless. The system will display a message about the impossibility of using: 
Disabling system sounds
A small contribution to acceleration can be made by disabling system sounds. Select the menu in the control panel equipment and sound, and then a line for changing system sounds: 
In the pop-up window, open the list of sound schemes and select a scheme without sound. Then apply this change. 
Disable disk indexing
In operating systems of the Windows family, disk indexing is always enabled by default, which does not bring any benefit, but slows down the work. To turn it off you need on each section perform the same actions in turn: right-click to call the context menu and deactivate the content indexing permission line and apply the changes: 
There may be an error in the application of attributes, while simply clicking the button skip all.
Disabling software protection
To free up processor resources, disable software protection.
For this purpose, in the search bar type regedit and press enter: 
Moving on along the way HKLM\SYSTEM\CurrentControlSet\Services\sppsvc where to set the value start 4. This will greatly reduce CPU usage: 
The change is made double click on the required line and selecting the option to change: 
Disabling User Account Control
The useless User Account Control (UAC) takes over resources quite a lot. To turn it off in the search field are gainingUAC and press enter: 
In the drop-down window, move the notification slider down: 
Swap file setup
With a small amount of RAM, the computer will inevitably slow down. It helps a little in this case to increase the size and virtual memory transfer to the fastest drive, preferably a dedicated partition. To set the optimal size and space for swap, go to the system properties by right-clicking my computer and selecting its properties: 
Next, choose the options: 
Then select the advanced menu and the option to change virtual memory: 
Further deactivate the option automatic volume selection and indicate the exact size. It is better to set the stable size of virtual memory to at least the amount of installed RAM, and preferably twice as much: 
Then press the Set button, OK and reboot.
Change to classic cursor view
A small increase in performance can be obtained by switching to the classic cursor view. To select it, call the mouse parameters, for which they click keyboard shortcutWin+R and type in the command control mouse, and then press enter. In the properties of the mouse, select the pointers and select either the standard scheme or the absence of any scheme (the word is not) and apply the changes. 
Cleaning up junk files
The operating system accumulates a lot of unnecessary data over time. To get rid of them, you need to right-click on the volume that is going to be cleaned and on the general tab select Disk Cleanup. In the window that appears, information about the available extra data and their size will appear. You must activate the appropriate options and click OK. The same should be done with the system files tab in the same window: 
In addition, you can manually go to system folder Windows, further to the directory SoftwareeDistribution and delete everything in the folder Download and file data store.
edb in the Data Store folder. All these files are service files and after installing the updates they are no longer needed. 
A lot of unnecessary data is stored in the downloads folder and in the user's temporary folder.
Easily accessible in the left column of the explorer: 
Everything in it can be deleted.
Temporary user folder is on the way C:\Users\1\AppData\Local\Temp, where C is the system drive, and 1 is the folder with the name of the username.
To see this folder, you need to turn on show hidden files. For this purpose, on the control panel, select styling and personalization and then showing hidden folders: 
In the window that appears, select the option to show hidden files: 
In the user's temporary folder, you can delete everything: 
Using Third Party Cleaning and Optimization Software
To clean up useless garbage, you can use a lot of third-party programs. The best of them are CCleaner And Auslogics BoostSpeed. Using them is intuitively simple and effective. The latest free version of CCleaner looks like this: 
The program works quickly and efficiently: 
Data defragmentation
Hard drives need to be defragmented periodically. To do this, right-click on the volume that you want to defragment and activate defrag button:
Then select the desired partition and start defragmentation: 
The progress of the process can be controlled here. For large volumes defragmentation takes several hours: 
After performing all the above steps, the computer will run much faster. It is guaranteed to free up a lot of computing resources, which will allow you to work with great convenience and without failures. It is advisable to take a snapshot of a well-tuned system with Acronis True Image so that, in the event of the slightest failure, the computer can be restored to its ideal state in a few minutes.


