Laptop owners usually use a wireless connection to access the Internet, since there is a Wi-Fi adapter on all laptop models without exception. However, in order to use it, sometimes you have to figure out how to turn on wifi on a laptop.
Hotkeys or hardware switch
The first step is to physically turn on the Wi-Fi adapter. On different laptop models, this procedure is slightly different, but its meaning is the same: you need to find a hardware switch or use the function keys. Let's look at a few examples:
You can go on with the options for enabling Wi-Fi for a long time, giving ways for MSI, Acer, Samsung and other brands. Even different series of the same manufacturer have different ways to activate the wireless module, therefore:
- Examine the laptop case for a hardware switch or Wi-Fi button.
- Examine the keyboard - one of the keys in the F1-F12 row should be labeled with a wireless icon. If you press it together with the Fn button, the adapter turns on or off.

If you have a Sony Vaio series laptop, then there may not be a hardware key or Fn button on its keyboard. For Wi-Fi to work in this case, a special VAIO Smart Network utility is required, which can be found on the manufacturer's official website.
Fn button does not work
What if the Fn button doesn't work? How do you enable the adapter in this case? First you need to figure out why the key is not working. Fn runs under BIOS control and has its own utility, without which the key does not function. Therefore, if the button does not work, first you need to find on the manufacturer's website a utility for enabling hot keys for a specific laptop model (the name should contain the word “HotKey”). 
If the installation of the utility did not help or the key is physically damaged, then you will have to use an alternative method to turn on the adapter. On Windows 8 and Windows 10, to enable the adapter, simply click on the Wi-Fi icon in the notification bar and move the Wireless network slider to the active position. If the adapter drivers are installed correctly, then the icon must be present. 
In Windows 7, there is no such function, but you can try to enable the wireless connection through the window for changing adapter parameters (described below). If this method did not help, then you will have to look for an external keyboard with a working Fn key and then no longer turn off the Wi-Fi module.
Setting up Wi-Fi on different versions of Windows
You will figure out the physical inclusion of the module quickly enough. Sometimes this completes the Wi-Fi setup: the system performs the rest of the necessary actions on its own, displaying a list of available wireless points. But sometimes you have to establish a connection manually.
Regardless of the Windows version, first you need to check that the Wi-Fi module drivers are installed without errors:

To be sure, it is better to go to the official website of the laptop manufacturer and find the latest version of the wireless module driver for your model. In addition, right-click on the adapter and select "Enable" (if it is stopped).
Windows XP
In theory, Windows XP should have stopped using a long time ago, but on some older Dell models and other laptops, the legendary system still continues to perform its functions. Wi-Fi in Windows XP is configured as follows:

There should be a "Wireless Network Connection" icon in the Explorer window. Its presence demonstrates that the Wi-Fi module is working correctly. Right-click the icon and select Enable. Further:

If the list of available points does not contain the network that your router distributes, click "Refresh List". Then select the desired point by name and click "Connect". If the network is password protected, you will be prompted to enter an access code, after which the connection will be established.
Windows 7
On Windows 7, the procedure for connecting to a wireless network has changed slightly, becoming a little easier. Now all available networks are displayed after clicking on the Wi-Fi icon in the system tray. But if there is no icon, then:
- Go to the Network Sharing Center.
- Click "Change adapter settings".
- Find a wireless connection and make sure it's turned on.

After turning on the wireless connection, the Wi-Fi icon will appear in the tray. Click on it to see a list of available points, select a network and click "Connect".
Windows 8
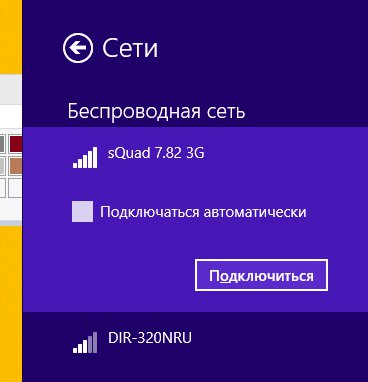
On Windows 8, the procedure for connecting to Wi-Fi remains the same, but the Airplane mode has been added, with which you need to be able to work. If the adapter driver is installed and the wireless connection is working correctly, then on the notification panel you will see the Wi-Fi icon, when you click on it, a list of available networks appears.
If there is no icon, follow the same steps as on Windows 7 - open the "Change adapter settings" window and turn on the wireless connection. If there is no wireless connection itself, check the drivers and the status of the module - everything should be turned on and installed. 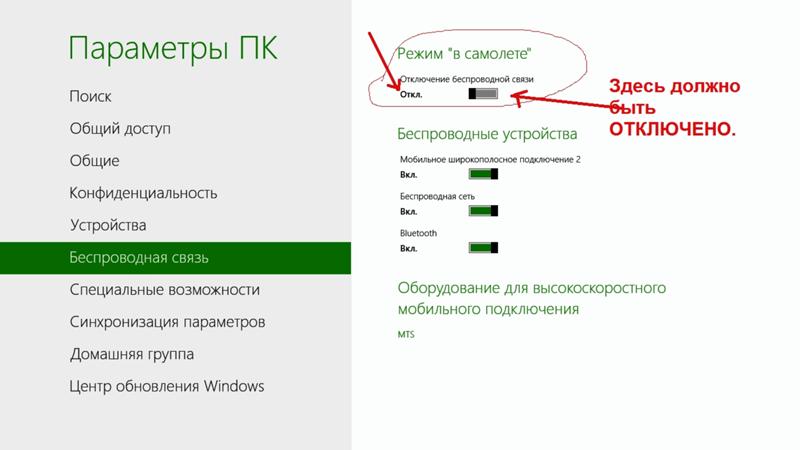
If the adapter is turned on, the drivers are installed, but no available networks are found, check that the Airplane mode icon is not displayed in the notification bar. If there is one, you need to disable this mode. To do this, click on the icon and move the slider to the "Disabled" state.
Windows 10
On Windows 10, everything remains the same with minor changes, so you can quickly figure out how to connect your laptop to Wi-Fi:
- Click on the wireless icon in the tray.
- Select the desired network.
- Click "Connect" and enter your password.
If the access point is not displayed, try adjusting the network settings. Click on the link of the same name - the "Network and Internet" section of the Windows 10 settings will open. 
There are two tabs you are interested in here:
- Wi-Fi - Make sure your wireless network is turned on.
- Airplane mode - make sure the mode is disabled.
You can go to the section for changing adapter parameters and enable the wireless connection. Simply put, on Windows 10, you have several equivalent options - you just need to choose the one that is more convenient for you.
You will need
- Connected Wi-Fi router, Windows computer, wireless client
Instructions
Enter the Start Menu. Select "Settings" and in them - "Network Connections". Right-click on the "Network Neighborhood" icon, call the drop-down menu, in which select "Properties".
Return to the "Network Connections" window. Right-click on the "Wireless Network Connection" icon and select "Properties" from the drop-down menu.
In the tab that opens, select "General" and make sure that the check box is on the buttons "When connected, display the icon in the notification area" and "Notify when connected or limited."
Click on the Wireless & Networks tab in the same window.
If the "Wireless Networks" tab in the "Wireless Network Connection" - "Properties" window is missing for some reason, click the OK button.
Go to the Start menu, select Settings and go to Control Panel.
In the new "Control Panel" window, double-click on the "Administrative Tools" and "Services" icons.
Make sure the Wireless Tuning service is operational. Otherwise, double-click the Wireless Settings icon, and in the new Properties window, click Start and OK.
Return to the "Network Connections" window. Right-click on the "Wireless Network Connection" icon to open the drop-down menu and go to "Properties".
Make sure the "Use Windows to configure your network" button is checked on the Wireless & Networks tab.
Click the Add button in the Preferred Networks section. Go to the "Links" tab. Enter MIAN in the Share Name box. Make sure that the checkbox next to the Connect even if the network is not broadcasting is checked. Select WPA from the Test section of the menu. Select TKIP from the drop-down menu on the Data Encryption tab. Make sure that the checkbox is checked on the "This is a direct connection to computer" button and unchecked on the "Access points are not in use" button.
Click the Authentication tab in the Wireless Properties window. Select "Protected EAP" from the drop-down menu under "EAP Type". Uncheck the box next to Authenticate as when information is available. Make sure that the check box is not checked on the button "Authenticate as a guest without information about the computer or user." Click the Properties button.
Uncheck the Check Servers button in the EAP Protected Properties window. Check if "Secured password" (EAPMSCHAP v2) is in the "Select an Authentication Method" section. Uncheck the box next to the Enable Fast Reconnect button.
Click the "Configure" button. Uncheck the "Automatically use Windows login and password" button in the EAPMSCHAP v2 Properties window. Then click the OK button.
Click OK on the EAP Secured Properties window. Click on the "Connection" tab in the "Wireless Properties" drop-down window. Make sure the checkbox is checked on the Connect if the network is within range button and click OK.
Click OK on the Wireless Network Connection Properties window.
note
The names of buttons and tabs vary slightly depending on the version of the operating system.
Useful advice
As operating systems improve, the procedure for connecting to wireless networks becomes easier and, perhaps, some of the steps described above will be unnecessary in your particular case.
Sources:
- Information IT portal
- no wireless network
In the modern world, most people are gradually abandoning cables and other inconveniences of wired internet... And this is not surprising. Why tie yourself and your laptop to a specific place when you have the opportunity to walk with it throughout the apartment and even outside of it? Almost all providers offer to connect the wireless WiFi service internet... But there are ways to bypass the system and save a lot. We will tell you how to set up wireless Internet at home. Using the example of the Beeline provider and the D-Link dir 615 router.
You will need
- WiFi router
- Laptop or PC with WiFi adapter
- LAN cable
Instructions
Installation .
The most optimal location for this is in the center of the apartment. This will allow you to achieve the best signal in any corner of it. After installing the router, connect it either with the supplied network cable, inserting one end of it into the network card, and the other into any LAN port. Go to the router menu by typing in any //192.168.0.1 using the username admin. Go to Setup - Internet Connection Setup Wizard. Press next 2 times, and in the third step select username (Russia L2TP).

Next, enter your username and password, leave the DNS Setting as standard, and in the L2TP Server IP Address item, enter tp.corbina.net. Click connect. After that, you will need to reboot by disconnecting the power from it for at least 15 seconds. This action should be performed if it did not happen automatically.

WiFi setup.
Go to Setup - Wireless Settings - Wireless Network Setup Wizard. Now sequentially enter the name of your future network and the password to it. After pressing the Save button, the wireless network will be ready for use. If there is no access, restart the router.

Related Videos
note
Set strong passwords containing letters, numbers and symbols to avoid hacking your router.
Useful advice
Try not to reset your router to factory defaults after setup.
If the device does not work properly, update the firmware downloaded from the manufacturer's website.
Sources:
- how to connect wifi internet
For all its convenience, wireless compound is most vulnerable to unauthorized connections. However, it can be reliably protected by standard router tools with certain settings.

Instructions
Connect Wi-Fi to your computer using an Ethernet cable. In this case, the indicator on the router should light up, signaling the network connection. After that, launch any browser in order to enter the router settings. To do this, enter the address 192.168.1.1 into the address bar of your browser. If the connection is successful, a dialog box should appear in the browser, in which you must enter your username and password to enter. By default, login and password are "admin" "admin". In the router settings window, go to the Security tab.
Most reliable wireless compound password protected. To set a password, first select the type of encryption that will be used by the router. For home use, WPA encryption is recommended. As a password, it is better to use a random set of letters, numbers and, which will be difficult to crack. Do not use a number, surname and date as a password, this kind of data is quite easy to hack or brute-force.
Enter the password for all devices that you plan to connect to your home Wi-Fi, and to avoid inconvenience, have them connect automatically.
In addition to the password, the wireless network can be protected by a restriction on the number of network clients, that is, if only two are continuously using wi-fi in your house, you can set a restriction for two clients, and no one else will be able to connect to this network. This is also done in the settings of the router. However, if one of the devices for some reason disconnects from the network, then anyone can connect to the "free slot". Therefore, this method cannot be compared in its effectiveness with a password.
Related Videos
Useful advice
Use both methods to secure your wireless network for the best security. Set a password and limit the number of clients based on the number of Wi-Fi devices in your home.
Technologies such as infrared, Bluetooth are less and less popular, because they are being replaced by modern wireless networks. Wi-Fi is used more and more often, as there are a large number of free hotspots in cities.

Instructions
On wireless compound a specific key combination. Usually this is Fn + F2. To connect to the Internet, you need to search for specific access points. On a personal computer, you can connect to Wi-Fi only if you have a special removable device. Ask your Peripherals consultant about Wi-Fi devices for your personal computer. Prices may vary, however, it mainly depends on the radius of signal reception.
Once the device is purchased, unpack it and insert it into your USB drive. If you have USB 3.0 technology in your computer, then insert the Wi-Fi there. The computer system will automatically detect the new device. The set also includes a CD with drivers. Insert it into the drive and install all drivers. Next, restart your computer so that all the saves in the system are fixed. After rebooting, an icon will appear in the tray that will show the Wi-Fi status.
Go to the "Control Panel" item. This can be done using the shortcut "My Computer". Next, click the shortcut called "Wireless & networks". Here you will find all the settings related to W-Fi technologies as well as Bluetooth. Click the Turn on Wi-Fi button.
After that, the wireless technology will be active, but it is not yet possible to connect to the Internet, since you need to look for special access points that can be closed with passwords so that unauthorized persons cannot enter the system and automatically connect to the connection. To do this, click the button "Find new compound". The system will automatically start scanning access points that are in operation.
If no such systems are found, try scanning elsewhere. Once compound will be found, try to connect. As practice shows, some cafes and educational institutions use free access points that allow you to connect to the Internet. You can find a list of such establishments on the Internet using search engines.
Tip 5: How to set up wireless Internet on your computer

You will need
- Wi-Fi adapter.
Instructions
To connect a stationary computer to an access point, you need a special device - a Wi-Fi adapter. Select the appropriate module. They come in two types: internal and external adapters.
Check the types of radio signals your Wi-Fi router generates. Most often you can find 802.11 b, g and n channels. Based on the information received, select the appropriate Wi-Fi adapter.
Connect the wireless module to your computer. Turn on your PC and wait for the operating system to load. Install the drivers required for the Wi-Fi adapter to function properly. It is best to use the original disc supplied with the device.
After updating the software, open the Network and Sharing Center. Click on the link "Manage wireless networks". Wait for the launch of the new menu and click the "Add" button.
In the next dialog box, select Create Network Profile Manually. Study and fill out the proposed form. Be sure to enter exactly the parameters with which the desired access point works. Any error will result in you being unable to connect your computer to the Wi-Fi network.
If your access point is configured to hide its name, activate the "Connect even if the network is not broadcasting" item. Click "Next". Select "Finish" and wait until the connection with the access point is established.
Check if the wireless connection is working. It is worth noting that some PCs may not connect to a wireless access point if they are connected to a Wi-Fi router via a patch cord.
Related Videos
The benefits of a wireless network are undeniable. You are not tied to any specific workplace, and you can go to net from anywhere in your apartment, office, shopping center, etc., where there is a network coverage area. It is convenient and can greatly simplify the work of any organization. Our instructions will help you set up a wireless network yourself.

Instructions
Find the Network Neighborhood icon on your workstation. If this icon is not on the desktop, go to the Start menu // Settings // Network Connections. Then right-click on the Network Neighborhood icon. A drop-down menu will appear in which you need to select the "Properties.
In the Network Connections window that opens, right-click on the Wireless Network Connection icon. A drop-down menu will appear, select “Enable.
Find and select the "Wireless Networks" tab in the "Wireless Network Connection -" Properties
If you did not find such a tab there, then in the "Wireless Network Connection -" Properties window you need to click the "OK. In the" Start menu, click the "Settings" button, then the "Control Panel" button.
In the Control Panel window that opens, double-click the Administrative Tools icon, double-click the Services icon. Make sure that Wireless Zero Configuration is in the Running state. If not, then double-click on "Wireless Zero Configuration, in the service properties window that appears, click the" Start "button and" OK. In the "Network connections" window, right-click on the "Wireless network connection" icon, select "Properties. Find the Wireless & Networks tab and make sure the Use Windows to configure network checkbox is checked.
In the Preferred networks field, click the Add button. On the “Connections” tab, in the “Network name (SSID) field, you need MIAN (Attention! All letters must be capitalized). Check the box “Connect even if the network is not broadcasting. In the Authentication section of the menu, select WPA. On the Data Encryption tab, select TKIP from the pop-up menu. Make sure there is a check mark on the "This is a direct connection to a computer" button, and there is no check mark on "Access points are not used."
In the "Wireless Properties" window, select the "Authentication" tab. In the EAP Type section, select Protected EAP (PEAP) from the pop-up menu. Uncheck the box next to Check as y when information is available. Make sure there is no check mark on the "Authenticate as if you do not have computer or user information" checkbox. Click the Properties button.
In the Protected EAP Properties window, uncheck the Verify Server Certificate button. Make sure that the section “Selecting an authentication method” is exactly “Secured password (EAPMSCHAP v2). Check the box next to Enable Fast Reconnect.
Click the Configure button. In the EAP MSCHAPv2 Properties window, uncheck the Automatically use Windows login and password button. Now click the OK button.
Click OK on the Protected EAP Properties window. In the Wireless Properties dialog box, select the Connection tab. Make sure to check the box next to Connect if the network is within range. Then click “OK.
Related Videos
note
The vast majority of laptops and other mobile devices available on the market are equipped with Wi-Fi adapters to access wireless networks. These can be home networks, public networks, corporate networks, and many other networks. How to connect to such a network and how to configure it correctly is described in this article.
Useful advice
Moreover, in order to set up a Wi-Fi network, you do not have to be a "network connection genius". This procedure can be performed by any modern student. First, what are we connecting? In our case, it will be 2 computers with Windows XP (with service pack not lower than SP2) and a wireless access point. First, we will find in the instructions the IP address (computer ID) and the password of the access point. For example, the address might be 192.162.2.234.
Sources:
- setting up wireless internet
Many users have already learned how to create their own local area networks with Internet access. But not everyone knows that such a network can be configured even if your provider provides access to an ADSL network.

You will need
- - DSL router.
Instructions
Setting up such a network does not fundamentally differ from the usual LAN-network. The only significant difference is that a specific router is required. Purchase a Wi-Fi capable device with a DSL port to connect to the Internet.
Install this Wi-Fi router near one of the stationary computers. Connect power to the equipment. Using a splitter, connect the telephone line cable to the DSL link of the router.
Find any Ethernet (LAN) port on the equipment case and connect it to your computer's network card using a twisted pair cable. Turn on the selected PC and launch any of the existing browsers.
Open the instructions for the Wi-Fi router and find the original IP address of the equipment in it. Enter its value in the browser url input field to enter the device settings menu.
Examine the menu that opens. Find WAN (Internet) and open it. Configure this item as you would with a regular DSL modem. It is also recommended to enable DHCP and NAT functionality.
Save the settings for this menu. Reboot the Wi-Fi router and make sure that the authorization on the provider's server was successful. Go to the Wi-Fi (Wireless Setup Settings) menu. Create a wireless access point. Pay particular attention to the choice of types of security and radio transmission.
Save the settings changes. Reboot the Wi-Fi router again. Connect stationary computers to the rest of the Ethernet (LAN) channels. Connect laptops and communicators to the Wi-Fi hotspot you created. Check the Internet access for all of the above devices.
Useful advice
Alternatively, you can share your LAN router and DSL modem.
Some netbook and laptop owners choose to create their own wireless net Wi-Fi. This eliminates cables that compromise the advantages of these mobile devices over desktop computers.

You will need
- - network cable;
- - Wi-Fi router.
Instructions
To create and successfully configure the above network, you need a Wi-Fi router. Choose the hardware suitable for your mobile computers. To do this, study the following parameters of Wi-Fi adapters of laptops: types of radio signal (802.11n, b or g) and security protocols (WEP, WPA-PSK or WPA2-PSK).
If you do not have instructions at hand, then open the device manager, find the wireless adapter there and write down its model. Visit the official website of the company that produces these devices. Find out the technical characteristics of this model. Purchase an appropriate Wi-Fi router.
Install this equipment in the desired location and connect the device to AC power. Connect the cable provided by your ISP to the Internet (DSL, WAN) channel of the equipment.
Open the user manual for the equipment. Find in it the username, password and IP address required to access the router settings. Enter this IP into the address bar of your browser.
The program window will display the web-based interface of the router's Wi-Fi settings. Go to Internet Setup Setting or WAN menu. Change the values of the items in this menu to communicate with the server of your provider.
Save the settings and go to the Wireless Setup Settings menu. The settings in this menu depend only on the characteristics of yours or laptops. Select the desired values and save the settings.
Reboot the equipment by clicking the Save & Exit button. If there is no such function, then disconnect the power from the Wi-Fi router for a few seconds.
Disconnect the cable. Search for available wireless access points. Connect your laptop to the network you recently created. Make sure you have internet access. Connect other devices to the router.
Related Videos
With a home wireless network for multiple devices, you need to be very careful when choosing a Wi-Fi router. This equipment must be able to create such an access point to which all the necessary laptops can connect.

This article will focus on what to do if Window 7 does not connect to a WiFi network. The fact is that although this operating system is more stable than its predecessors, there may still be various errors that must be corrected manually.
Before moving on to connection problems and their solution, you need to understand what WiFi is and how the technology works. This will allow you to quickly fix some problems.
The fact is that an access point is required to connect to such a network. Its functions are usually performed by a wireless router. And therefore, first of all, if there are no available connections to the WiFi network in Windows 7, you should pay attention to the router.
As a rule, the reason is precisely in it. But of course, there are other problems as well. So let's go in order.
Router check
Everything is very simple here. If the laptop does not see available connections, then you should go to the WiFi router settings menu and check if the wireless network is enabled. To do this, you need to connect to the router using a regular Internet cable. After that, open a browser (any) and write 192.168.0.1 in the address bar. Press "Enter". Next, a window will appear in which you will be asked to enter your password and login. As a rule, the default key and login are admin, admin, respectively.
How to easily find out the IP address of a WiFi router: Video
If you changed this data, then enter your values. Next, we find ourselves in the settings menu. We're interested in Network Wireless Settings. In the settings of the wireless network, you need to check the box next to Enable Wireless Router Radio. That's it, this completes the router setup. And if in a laptop with Windows 7 problems with WiFi still remain, then you should proceed to setting up the operating system.
Why does my computer not see available wireless networks?
There can be many reasons for this, as well as solutions. Fortunately, Windows 7 is user-friendly and has many options for diagnosing and fixing problems. But we will only consider the most common ones.
First of all, you should check the status of your WiFi wireless connection. To do this, you need to open the Network Control Center. To do this, click on the network icon in the tray and select "Network and Sharing Center" in the window that appears.
The menu will start, in which all the settings related to the network are made. Here we are interested in the item "Change adapter parameters". In the window that opens, you need to find a shortcut that has the name "Wireless Network Connection". If this connection is gray, it means that it is disabled. To enable it, you must right-click on it and select the "Enable" item.
Windows 7 Won't Connect to Wi-Fi: Video
The wireless icon is not displayed in the tray
Often users ask the question, what to do if the WiFi icon is not displayed in the tray in Windows 7? This can only mean one thing - the wireless module is turned off or does not work. occurs, as a rule, using the Fn key combination + the adapter power button. On different laptops, this button may be located in different places.
For example, on Asus laptops, this is a combination of Fn + F2, on Lenovo - Fn + F5. The WiFi power button itself is indicated by the corresponding image. In addition, on some models a separate key is provided to activate the wireless module. In this case, just click it.
So, after turning on the wireless adapter, Windows 7 should automatically start searching for available networks. If this did not happen, and the icon in the tray did not appear, then you should check the correctness of the drivers.
What to do if a laptop with Windows 7 does not see Wi-Fi: Video
Driver check
You can check the software in Windows 7 in the Task Manager.
You can start it by clicking on the shortcut "My Computer", which can be found on the desktop, in the start menu or in Windows Explorer, with the right mouse button. In the window that appears, you need to click "Properties". Next, a menu will open in which you need to open the "Device Manager".
In the window that appears, we are interested in network adapters. If you did not find this, then there are no drivers for the device and you need to install a driver for this module. If, nevertheless, there is such an item, then we open it. Typically, the wireless adapter is called the Wireless Network Adapter. Also, the device may be indicated by an exclamation mark. This indicates that the driver is not working properly and needs to be updated or reinstalled.
This is very easy to do. As a rule, a special disc is included with a laptop, which contains all the necessary programs and drivers. If there is no such disc, do not rush to get upset. The necessary software can always be downloaded from the Internet, since the manufacturers have taken care of supporting their customers.
To do this, find the official website of the manufacturer of your laptop and write the exact name of the laptop (exact model) in the search. Next, download the necessary drivers and install them. It should be noted that it is not recommended to install software downloaded from third-party sources, as such drivers may work unstable, and sometimes even pose a threat to the integrity of the system.
How to Reinstall WiFi Driver: Video
It is also important to know that sometimes, even with the driver installed, the adapter cannot be turned on because additional keyboard functions are used for this. This means that along with the software for the network adapter, you should also download the driver for the keyboard, as well as the recommended utility for managing the wireless module.
Are you missing a Wi-Fi wireless connection icon or an Internet network connection in the taskbar in the notification area in Windows 10? Is this network or wireless icon not updating? In this guide, we will see how to repair missing or damaged networks or wireless Wi-Fi icon in Windows 10.With the default settings, network or wireless icon always, elen is displayed in the system tray on the Windows 10 taskbar, regardless of the connection status to the internet.
The network or wireless icon automatically updates when your computer is connected to a network or disconnected from the network to reflect the status of your internet connection. If the network or wireless icon is missing from the taskbar, please try the following solutions to restore the icon.
Missing network restore or wireless icon in Windows 10
Solution 1
Check if the network or wireless icon is hidden
Step 1: Click on the small arrow icon on the taskbar to display hidden icons.
Step 2: If a network or wireless icon appears there, just drag it to the taskbar.
Solution 2
Enable network or wireless icon in settings
Step 1: Open the Start menu, select the Settings icon to open the Settings app. Windows logo + I can also be used to open preferences.
Step 2: Click the system icon. Push notifications and actions.
Step 3: Click the Enable or Disable System Icons button.
![]()
Step 4: check the status of the Wi-Fi network icon, and enable it.
![]()
Step 5: click the back arrow to return to notifications and actions. Click the Select which icons to display on the taskbar button.
![]()
Step 6: check if the network is off, and turn on the same if it is off.
![]()
Solution 3
Restart Windows Explorer
This solution is ideal if the network or wireless icon does not automatically update to show the status of the internet connection. For example, many times, this icon indicates that the status is not connected, even when you are unable to browse the web.
Step 1: Open the Task Manager by right-clicking on an empty space in the taskbar and selecting the Task Manager item.
![]()
Step 2: If you see Restricted View Task Manager, click Details.
Step 3: under the Processes tab, right-click in Windows Explorer, and then click the restart button.
![]()
If there is no sign in to Windows Explorer, it is because the Windows Explorer process is not running. To run it, open This PC or any folder to view the Windows Explorer entry in Task Manager. The network or wireless icon should now display correctly.
Solution 4
Enable network icon in Group Policy
This method is only applicable to Windows 10 Professional and Enterprise. This method does not work in the main editorial office.
Step 1: From the Start menu or search in the taskbar, type gpedit.msc, then press Enter to open the Local Group Policy Editor.
Step 3: on the right side, look for an entry by name to remove network icon. Double click on it to open its properties.
![]()
Step 4: select a disable click the Apply button to see the network or wireless icon on the system in the notification area on the taskbar.
![]()
Log out and log back in to see the changes. You can also restart Windows Explorer to apply the new settings.
After the release of a new version of Microsoft software, the problems grow like a snowball. And one of them is the lack of a Wi-Fi button or settings, which leads to the error: "Could not find wireless devices on this computer." So, the topic of the article is solving the issue with the button, with the settings and turning on the wireless network in Windows 10. If the wireless Internet does not turn on on the computer (there is no button, no settings, etc.), the problem lies either in the adapter or in the driver Wi-Fi.
If the problem with the driver or adapter is resolved and the Internet is stable, you can turn your laptop, desktop computer into a router. Create a hot-spot (we already wrote about how to do this earlier) and distribute the Internet to peripheral devices - PCs, smartphones, tablets, ultrabooks.
Interesting advice received in the comments:
- Open the system drive, for example, "C" and search for the "wireless LAN" folder.
- Go to: C: \ eSupport \ eDriver \ Software \ WirelessLan \ Qualcomm Atheros \ WirelessLan \ 10.0.0.342 \ 2886 \.
- There are two installation, Setup, files. Open both files and the problem is solved.


