When trying to format a USB flash drive, SD / MicroSD card or other removable media, the system may give an error. If Windows or the disk by standard means, there are enough ways to solve the problem: from using safe mode to formatting through the Disk Management service.
Reasons for the error
Typically Windows will fail to complete formatting if removable media has been misused or removed. The problem is relevant both for old versions of Windows 7 and XP, and for the new 10-ki. The frequency and chance of an error is not affected by the media file system - FAT32, NTFS, exFAT.
Most often, Windows cannot format a USB stick or CD-card for the following reasons:
- The flash drive or card was removed from the phone / camera / other equipment, after which it stopped working correctly, it became impossible to format.
- Unsafe device removal. The medium was disconnected from the computer (power supply) while data was being written.
- Power or mains failures, especially while reading or writing to a USB flash drive.
- Disconnecting the drive from the system while programs are running from the flash drive or files are open.
- The consequences of using programs designed to work with disk partitions.
Regardless of the reason, Windows displays the message "Windows was unable to complete the format". Sometimes the system will not even allow formatting to start because the disc is write protected. In this case, you need to deactivate protection, and then start formatting the drive.
Often the system itself writes what exactly the problem is:
- Windows cannot format the USB stick. Quit all other programs. The system cannot delete files that are currently in use. You should check if all documents and programs that use files from the flash drive are closed. You can use Safely Remove Hardware to have the system shut down by itself, and then try to start formatting again.
- The disc is write protected. You can remove protection using the Group Policy Editor, the command line and the system registry. Group Policy Editor is not available in all versions of Windows.
- Check if the connection is correct. Check if the drive and disk are properly connected, make sure the disk is not read-only, and then try again. Again, you need to remove the protection, if any, and also try to connect the media to a different USB port.

Formatting with programs
Problems with formatting a flash drive or other storage medium do not depend on the type of file system or the manufacturer. The error rate is the same for flash drives and memory cards from Transcend, Kingstone, Silicon Power, SanDisk or another company.
Manufacturers of flash drives and memory cards are aware of this problem, so large companies have their own proprietary utilities. For example, Transcend JetFlash Online Recovery for flash drives from the manufacturer Transcend. Official programs are good because they are guaranteed to cope with the problems of formatting flash drives from specific companies. If such software is not on the official website, or if it does not help, it's okay, there are universal free solutions.
- EzRecover- a free program with basic functionality. To restore the flash drive, you need to run the file and click the "Recover" button. Helps to complete formatting and fixes an error when Windows sees 0 MB of free space on a USB flash drive.
- D-Soft Flash Doctor- another free solution with simple functionality that allows you to complete the formatting of a problem USB drive. There is an opportunity to create a flash memory image. The recorded image can later be written to another, serviceable flash drive or card.
- AlcorMP- software for recovering media with Alcor controllers.
- Format Utility For Adata Flash Disk- a program for formatting, searching and correcting errors on USB sticks A-Data.
- Kingston format utility- a solution for flash drives from the manufacturer Kingston.
- Flashnul- Software for diagnosing problems and fixing problems with flash drives. Copes not only with USB sticks, but also with memory cards and other types of media.
- JetFlash Online Recovery- a new version of the utility for solving problems with Transcend drives. You can not only erase the data to zero, but also try to correct errors while saving the recorded information.
Not all of these programs have official sites from which downloads are available. In other cases, these sites were unavailable. For the safety of your computer, you should be careful when downloading and running files from the Internet when searching for programs, and also check all downloads with an antivirus. There is another way - to try to solve the problem with Windows capabilities, without installing additional software.
Mechanical protection on flash drives and cards
Many memory cards and flash drives have mechanical protection that reliably protects the device from writing. In the latched position, the safety lever can be accidentally pulled out, after which the media will stop working normally and it will be impossible to format it.
The solution to the problem is elementary: you should inspect the device for a mechanical switch and put it in the right position, if required.
It looks something like this: 
Formatting in the Group Policy Editor
The local group policy editor is not available in all versions of Windows - it is absent even in basic versions of Windows 10, remaining a privilege of the Pro version and the corporate OS. If the Group Policy Editor is present on your computer, you can use it to remove write protection on a USB flash drive in a few steps.
Removing the write lock from a flash drive:
- Click "Start" - "Run".
- In the "Run" window in the "Open:" field, enter gpedit.msc and press Ok / Enter. An editor window should open.
- You must go along the following path: "Computer configuration" - "Administrative templates" - "System" - "Access to removable storage devices".
- Find the lines "Removable drives: Deny reading" and "Removable drives: Deny writing." Remove restrictions, if any, by moving the required property to the "Disabled" status.
After that, you should exit the editor and try recording or formatting again. If the ban did not initially stand or its removal did not help, you should try the other methods described in the article. It should be remembered that there is a small probability that the flash drive can be mechanically damaged. In this case, no software solutions will help to revive it. But before you bury the device, you should try another method - disabling the "Read-only" mode via the command line.
Removing protection through the command line
Using the command line allows you to resolve the error when the command interpreter does not work correctly as an administrator. The method is good because the command line is present in all versions of Windows, and therefore the method is universal.
Removing the "read-only" mode from a USB flash drive via the command line:
- Run the command line as administrator: "Start" - "Run" - "cmd.exe" or "Start" - "Accessories" - "Command line".
- Introduce diskpart and press Enter.
- Introduce list disk and press Enter.
- See what number the problematic flash drive is in the list that appears. Introduce select *, where "*" is the serial number of the flash drive in the list - 1, 2, 3, and so on. For example, enter select 2, if the flash drive is numbered 2, press Enter.
- Enter command attributes disk clear readonly, press Enter.
- Introduce exit or close the command prompt window.
These actions do not format the USB flash drive, but only remove write protection from it. After that, you can try to complete the formatting again.
Removing protection through the system registry
Before making changes to the registry editor, you should make sure that the file itself is not write-protected, and not a USB flash drive or card. This method should be used last, or if you have certain PC skills. Making erroneous changes to the registry can lead to the loss of performance of the entire system.
Removing write protection through the registry:
- Press "Start" - "Run" or the key combination Win + R.
- In the window that appears, enter regedit, press Enter.
- The Registry Editor will open. On the left side of the window, you need to follow the path: HKEY_LOCAL_MACHINE \ SYSTEM \ CurrentControlSet \ Control.
- Find parameter StorageDevicePolicies, double-click on it with the left mouse button. If there is no parameter (there is no line with such a name), you need to right-click and select "New" - "DWORD". The parameter should be named StorageDevicePolicies and set to 0 (zero).
- In the window that opens, set the value 0 (zero).
- Save changes, close the registry.
- Remove the device and restart the computer.
After restarting, Windows will start with unprotected, and the formatting process will be successfully completed. If none of the above methods helped, the flash drive itself or the CD-card may be damaged. To guarantee, you should try to format the device on another computer using the instructions provided.
Sometimes, when a user of a personal computer starts formatting a USB flash drive, an error may occur, such as "Windows cannot complete formatting." Also, one encounters such a problem while working with DVD-RW, HDD and other removable media. But this mainly applies to the Micrso SD. And yet, why does this breakdown appear?
Different things can be the reason. The problem may be caused by the operating system itself, which is unable to format, or it is contained in the micro card. It is possible that this SD was used on another computer with a third-party OS (Mac OS, Linux) and that is why the file system does not accept reading information, which is one of the most common reasons.
The window with this error looks like the one shown below.

How do I fix this problem? There are several methods for this. One of the simplest is automatic configuration with standard Windows support, which is available not only in XP versions, but also in the seventh and tenth.
Correction of the error by means of the OS.
Below we will consider each step in solving the problem that occurs during formatting a removable drive:
First, let's use the Win + R key combination, after which the Run dialog box will load. The figure below shows the necessary keys to call this command.

In an empty field, enter the following command: diskmgmt.msc and click on the OK button. The steps taken will open the Disk Management utility.
- In this window, you should find the specified drives. You can find the necessary memory card by a certain inscription "Removable device" located in the lower window, and also use the image of a flash drive, which differs from unconnected devices.

In one of the areas, indicated by a green frame, as shown in the picture above, you need to right-click, after which a small menu will pop up.

From the list that opens, select the "Format" item, as a result of which the full formatting of the medium will begin, while a completely different algorithm will be used, which is absent in the standard procedure.
Additional information: Another cause of this problem may be a lack of distribution in the media. If this is your mistake, then the item "Delete volume" will be active for performing actions, in other words, you can click on it with the mouse. Do whatever is necessary for this, after which you will need to create a fresh volume.
How do I create a new volume?
To create a new volume on a media with unallocated information, go to the required disk and enter the "Create Simple Volume" section.

After completing the above steps, the "Simple Volumes Creation Wizard" window should open, where you should not edit the specified parameters. It is recommended to leave the standard injections and double-click on the "Next" button. Then, in the Disk Management utility to the right of the drive name, a status with the inscription "Fixed" will be displayed. These steps are shown below.

After all these steps, you should try again to format the removable storage using standard options. Enter "My Computer", right-click on the flash drive icon and select "Format" from the drop-down menu.

Disable the extraneous process in the system.
Another reason for the error that occurs can be a third-party active process.
To make sure that this option is incorrect, follow these steps:
First you need to restart your computer and turn it on in Safe Mode. Open the "Start" window, and then click on the restart button. During the power-on process, press the F8 button on the keyboard, then wait until the power is turned on.

Next, we launch the command line with the permission of the administrator account. There are several options to accomplish these steps. One of the simplest is to simultaneously hold down the Shift key and the right mouse button in any area of the desktop. In the loaded list, enter the "Open command window" section.

In the window that opens, you need to write the command format [letter of the medium]. If you do not know the drive letter, then go to "My Computer" and find your USB flash drive in the list, where a letter will be indicated in front of the name. After specifying the required symbol, press the OK button.

If all of the above methods did not fix this error, then the last option would be to use third-party recovery programs.
Media stabilization utilities.
D-Soft Flash Doctor belongs to programs of this type. It is distributed on the World Wide Web absolutely free. Its menu looks like below:

In the window that opens, you need to specify the required drive. You can find it by the symbol mentioned above. First, right-click on the definition of removable media located in the upper panel of the utility (the figure above shows these actions in orange). Next, go to the "Recover Media" section (circled in red). After that, the recovery procedure will begin. As soon as the process is completed, try to format the disk again in normal mode. For complete confidence, you can scan the flash drive for errors, the end of which will give detailed information about it.
If the USB drive is still not formatted and there is no information about its volume, then you should use one of the powerful EzRecover applications. You can find out the storage capacity by going to "My Computer". In the figure below, the red frame shows the place where the same volume is indicated.

In this case, there is 5.18Gb, but if the figure is 0MB, then load EzRecover with confidence.

This utility automatically detects connected flash drives, you do not need to type any information. As soon as it starts, you should click on the "Recover" section and wait for the process to finish. Then we try to format the media again.
There are quite a few programs on the network for recovering the drive's system. If none of the error correction options helped, then you should replace the USB flash drive.
I wanted to format my 16-gig Transcend flash drive yesterday. I inserted it into the usb port - went to “My Computer” - right-clicked on it - “Format” - “Start.” At the end of the formatting process, a window suddenly appeared with the message: “”. When trying to repeat everything again, the error appeared again :
In the article I will give two ways solutions to this problem:
Method 1: use a proprietary utility for flash drive recovery from Transcend -.
This program can help if your the flash drive became buggy: not formatted, read with errors, is not visible in the system, or it is impossible to write anything to it.
To download JetFlash OnlineRecovery, click here. On the page that opens, we find the "Download" button on the left. Then we download the version of the utility suitable for our flash drive (you can download them all and try it in turn). Unpack the downloaded archive.
Now insert your USB stick into your computer and run the program.
In the first window, select the volume of your device:  In the next one I leave a daw in front of “ Repair drive & erase all data", Which means" Repair disk and delete all data”.
If it is important for you to try to save the information available on the flash drive, then choose “ Repair drive & keep existing data” (“Recover disk and keep existing data”). We press “ Start”.
In the next window, click "OK": 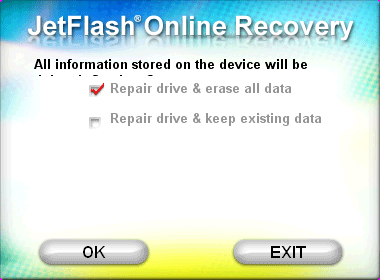 The formatting process starts:
  Upon completion, the following window should appear:
  Press here " Exit”And remove the device from the computer.
After that, insert the USB flash drive again and check its performance.
I tried to format it again using Windows. And now everything went well:  If you suddenly encounter any errors while the program is running, do not give up. Try plugging your flash drive into a different usb port, re-launch the utility, you can even restart your computer and repeat all over again.
For example, I succeeded on the second try. The first time JetFlash OnlineRecovery encountered this error: 
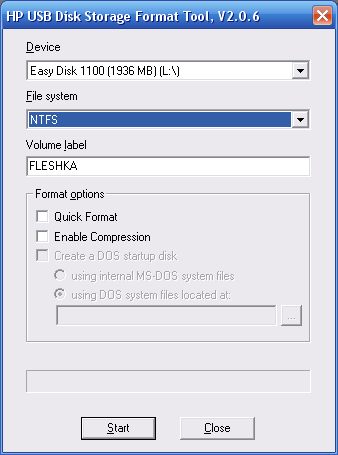
Method 2: use the utility.
This method was suggested in the comments to this article, and many unsubscribed that it helped. Moreover, this utility allows you to format flash drives not only from Transcend, but also from other manufacturers.
1.and run the utility as Administrator
2. In the drop-down list Device
select the flash drive you want to format
3. In the drop-down list File system
choose NTFS or FAT32
4. Press the button Start
5. A window will appear warning that all data on the USB flash drive will be destroyed. Click the button Yes
If it is necessary to delete all information from a drive, for example, a flash drive, memory card or external hard drive, the user resorts to the formatting procedure. There is nothing complicated in it, but only if an error does not occur. If the drive is damaged or a software failure occurs, the user will see the message "Windows cannot complete formatting the drive." This problem can be corrected both by means of the operating system and by third-party applications, and in this article we will consider what needs to be done for this.
How to fix the error "Windows cannot complete formatting" using the system tools
Getting the error discussed in this article is a fairly common problem that indicates a failure in the formatting process. However, you can format the drive not only in the standard way (by right-clicking on it in the explorer and selecting the appropriate item), but also through the disk management manager.

In a situation where the error "Windows cannot complete formatting" occurs, it is recommended to do the following:

Selecting one of the items will launch the Windows utility. Follow the steps that it suggests, and then the problem with the formatting error should go away.
If the method above did not help correct the situation, you can try to format the drive from Safe Mode. This method is appropriate when a formatting error occurs due to a program running in the background, which prevents the drive from being cleaned. You need to do the following:

Note that in the example above, "E" is the drive letter and will vary depending on your computer.
After executing the command, the problematic drive should be formatted. If this method did not help to solve the problem with the error, then you can try to fix the situation using third-party applications.
How to fix "Windows cannot complete formatting" error by applications
Third-party applications can help when the error cannot be resolved when formatting the drive using Windows. On the Internet, you can find many free programs with approximately the same functionality that cope with the task of fixing the error "Windows cannot complete formatting the disk." Below we will look at two such applications.
An extremely simple application, the only task of which is to format the drive. The program can be useful not only when an error occurs that informs about unsuccessful disk formatting, but also if the volume of a flash drive or memory card is displayed as zero.

EzRecover is free of charge. After downloading it and running it, just click on the Recover button to fix the errors that have occurred.
D-Soft Flash Doctor
Unlike the previous program, this application has a little more functionality. It is able not only to restore a USB flash drive, but also, if necessary, create an image of it in order to write it to another drive in the future.

A nice feature of the application is the localization into Russian.
Today we want to tell you about an interesting situation. There is a computer with Windows XP. Winchester is divided into two sections: C - system and D - data. When trying to format drive D, the system gives an error:
Windows cannot complete formatting
Why does this problem arise?
This pun with partitions and the location of the boot sector occurs in the following situation. When you reinstall Windows, the system partition is deleted, and then it is recreated in the unallocated area, which is located in front of the other partition:


As you can see from the second picture, the newly created section is called "Section3" for a reason.
What happens in this case?
As a result:
- the second partition on the disk is the main one
- the partition that is physically located first is logical
- the first one is the system one, however, the boot disk is the second one.
The picture below shows that:
- drive D is active and bootable because is the only main section and drive C contains the system and is logical, which occupies the entire additional partition;
- the additional section is physically located in front of the main one - where the other main section was previously located:

Attention! At Microsoft, for some reason, the "Download" label means the drive containing the Windows and Program Files folders, and "System" means the active partition. Although, it would be logical to swap the names in places.
Let's look at the contents of the C drive - indeed, here are the folders Windows, Program Files and Documents and Settings:

However, on drive D we see the boot.ini, ntldr and other boot related files. Therefore, neither C nor D can be formatted:

How to avoid this situation when installing the system
- If during reinstallation you do not need to save any data on from the SSD / HDD, delete all partitions (key D), then recreate them and install Windows on the very first one.
- If you do not want to format the hard disk completely because of the necessary data, then in no case delete any partitions in the installer! Just select the first one to install, then do a quick format and install Windows on it.
How to fix the situation
Method 1... The easiest way for the user: save all important data to an external hard drive or SSD and reinstall Windows, taking into account the recommendations from the previous paragraph:
- save all important data to an external drive;
- reinstall Windows, during which:
- delete ALL partitions from the hard disk;
- create the first partition for the system;
- create another or several for the data;
- install windows first.
Method 2- complex: make the first partition bootable, active, edit the boot.ini file.
Install the MiniTool Partition Wizard Home Edition program. (You can download the program from here: http://www.partitionwizard.com/free-partition-manager.html)
1 Convert partition C from logical to main.

Click the button Apply up:

Click on Yes:

Click on Restart Now:

The computer will reboot and convert the logical drive to basic (primary). Expect:

After rebooting, you will receive an error message:
Windows cannot start due to a corrupted or missing hal.dll file

Now boot from ERD Commander (or DaRT 5).
2 Copy all system files from D to C.
Attention! When you boot into DaRT or ERD Commander, the letters of the main and logical drives will be swapped! Focus on the volume of partitions and their content! Simply put, all system files should be in the root directory of the volume containing the Windows and Program Files folders.

3 Open the boot.ini file and correct the boot partition number. Usually instead of (2) need to register (1) .

4 Run the command line and make the desired partition active:

We reboot. The system should boot from the first disk and now the other (non-system) one can be formatted.


