There are cases when the frame turned out to be insanely cool, but some objects interfere: passers-by, cars, wires, birds and other random objects. In this article, we will show you how to remove an object from a photo on your phone in seconds!
Snapseed
If you don’t know how to remove unnecessary items from a photo online and for free, then use the Snapseed application. This is the easiest option of all presented. You can download it absolutely free in the official AppStore and Google Play stores.
How to remove an unwanted item from a photo:
- Open application Snapseed.
- Click Tools-Spot Correction.
- Zoom in with your fingers.
- Gently tap on the screen to remove an object or object from a photo in Snapseed.
Facetune
The second app that removes items in a photo is called Facetune. The program is paid, but it often happens on discounts in the AppStore (for only 15 rubles). If you don't want to buy the app, you can use the free version of Facetune 2. It has exactly the same function.
How to remove an item from a photo on iPhone and Android:
- Open program Facetune.
- At the bottom, go to "Patch".
- Click on the item to be removed. 2 circles will appear. The first is the zone of the object, and the second is a circle with the surface that can replace the first part. Circles can be moved in any direction, choosing the best option.
- Edit the photo with dotted movements and save it to the Gallery.
Touch Retouch is a program that removes objects from a photo in minutes. But it is paid, it costs 149 rubles (price for 2018).

Photoshop Fix
Remove an unwanted object or people from a photo on your phone using the Photoshop Fix application. It is absolutely free to download in official stores.
How to remove an object from a photo through the application:
- Open the Photoshop Fix application.
- Register or log in via Facebook or Google Play.
- Open the desired photo.
- In the bottom menu, click on the patch icon "Recovery".
- This program has Spot recovery, there is Stamp, Patch, red eye and Eraser, which restores if you don't like something.
- For processing, it is best to zoom in on the photo by touching your fingers.
- If you have selected the item "Stamp", then first you need to click on the surface next to the unnecessary object and put a mark (circle), but where it does not exist. It is by cloning this area that we will remove the subject from the photo.
- Touch the element you want to remove from the photo with your finger and gently erase it step by step.
- Save photo to Gallery!
Union
And the last program that removes unnecessary items from a photo is called Union. The application is paid and costs 379 rubles (price for 2019).
How to remove an object from a photo in a photo editor:
- Open application Union.
- For background upload the snapshot you want to make changes to.
- For Foreground upload a clean photo, where there are no foreign objects: wires, cars, people, etc.
- To make the layers evenly lie on top of each other, you can remove a little intensity, and then return it back.
- Click on the Mask and Eraser gently erase the entire layer.
- Next, tap on the brush and paint over all unnecessary space.
- If you want to repeat the layer mask, then you need to click on flattens and add a photo to Foreground.
- Save image to Gallery.
With applause
Be the most stylish! Use super effects.
How to remove an extra object from a photo in Photoshop?Today we’ll talk about such an action in Photoshop as removing unnecessary objects or elements of an object. The need for such an operation, although it does not arise so often, but nevertheless, this operation is very necessary, because in this way you can save a good photo.
The traditional way to remove objects is with the stamp tool. We will also tell about it. And in the beginning, I would like to talk about one fresh trick - this is deletion using the Content-Aware Fill tool. We will show this first. Then we will get acquainted with the following necessary techniques:
Content Aware Fill is a fairly quick removal of objects that are fairly simple - better to say straightforward. For example, let's take a photo of a street from which a pole needs to be removed.
Upload a photo, duplicate the layer for work. Next, select the Lasso tool, namely the rectangular one. We circle the pillar with it, leaving a little background around the edges.
In the window that opens, in the top line, select "Content-Aware". Often, this function is already set by default. Then you don't have to choose.
Leave everything else unchanged and click OK. We get the result - the column has disappeared. The wires remain. A miracle happened :)
This is such a simple, quick operation. But, let's go further and see how you can remove unnecessary elements on the face.
Removing an extra object from the face in the photo
Sometimes, when making portraits, it suddenly turns out that unnecessary objects are very clearly visible on the face. Most often it is acne. Depending on the number of acne, their location and shape, you can act in different ways. For example, we have such a portrait.
We upload a photo, enlarge it to the desired and convenient size and proceed to deletion. The first option that can be used for small objects is the brush. But first, select the pipette from the toolbar and click it on a healthy area of skin. At the same time, note that the main color has changed to the selected one.
Now you can start painting. Select the “Brush” tool, set the size close to the size of the object and click on the pimple until it is painted over.
As you can see the pimple is gone. Remove the rest in the same way. If somewhere a sharp border is formed between the place of the distant object and the original skin, you can use the Blur tool and correct it.
Also, with this tool, you can try and cover up the object, provided that it does not differ sharply from the background. Here is the result of using these two tools. Pretty effective result, now you know how to save a good photo.
As you can see, large objects have been removed. The same can be done using the Content Aware Fill feature described above. With the help of "Lasso" select the object, go to edit-fill. In the window that appears, select "Content Aware" and click OK. The result is the same.
How to remove an extra object from a face in Photoshop without losing the background?
In this example, we will consider not exactly removing from the face, but from the portrait. We will remove the bow on the head. But, for complex objects on the face, you can use the same method. So, upload a photo of a girl with a bow and duplicate the layer.
We need to remove the bow. Let's use the "Content-Aware Fill" method. Select the bow with the lasso tool.
Now go to the edit menu - fill. By the way, you can do it easier. We click on the selected object with the right mouse button and select the same item in the menu that opens.
In the window that opens, select based on the content and click "OK". However, the bow was cut out not quite correctly.
This problem is solved with the help of another tool - "Stamp". We find it on the toolbar. The icon looks like a stamp.
Next, press the "Alt" key and, holding it, select the area with the stamp tool, which will replace the unsuccessfully deleted area. Naturally, we choose where the hair is well defined. Here is an example of the result of the first section, where the bow was removed not quite correctly.
In the same way, we delete all other incorrect areas. At the same time, do not forget to periodically change the clone location by pressing the "Alt" button. This is due to the fact that when moving over the shaded area, the area from which the copy example is taken also moves and may fall on the color that you do not need. Here is the finished result of removing the bow from the girl's head.
As you can see, there is no trace left of the bow. At the same time, the background is preserved, the photo looks natural.
Removing excess from the photo using the tool "Stamp"
The stamp is also a very unique tool, just like the fill discussed earlier. Let's see some more features of this tool. Let's say you need to remove an item from this picture:
Load into the program, make a duplicate of the layer. Remove the haystack. Note that the haystack lies in three different parts of the drawing. On the field and against the background of the forest and the sky. Accordingly, we will clean up according to these parts.
We start with the sky background. Select the stamp, hold down the "alt" button and click on part of the sky background.
Since the haystack does not lie against the background of clouds. And more on the dark part, then select it. Let's release the "alt" button and move the round cursor over the top of the haystack. Periodically, if necessary, again select a part of the sky for cloning. As a result, we get:
We clean up to the edge of the forest. Now let's move on to the forest part of the haystack. Similarly, we click with the “Alt” button pressed on the forest and clean further. Result:
It remains to remove part of the haystack located on the field. It's a little easier here. There are many textures of the field, choose any place and clean it. As a result, we get the finished image without a stack.
As you can see, everything is very simple. Good luck with this wonderful program.


Good day to all, my dear friends. I'm with you again, Dmitry Kostin. I recalled here many moments when you are being photographed, and some extra person or some object that is out of place in the photo gets into the frame. Familiar? You only notice it when you can't take a photo. Leave as is? Yes, for nothing!
Extra objects can be thrown out of the photo, and no one will notice the difference. Do you want to know how to remove an unwanted object from any photo in Photoshop? Then read on.
Content-aware padding

As you can see the cat has evaporated, but you don't have a cut out area as it usually happens. The void was filled with adjacent pixels, which, according to the program itself, most likely could be in this place.

I had a small "bump". when I removed the cat, a piece from the handle appeared in the area where the tail should be (probably a clothes dryer). But it is removed in exactly the same way. And now you have a clean blanket without a pet.
Similarly, I decided to remove the textbook from the desk. Agree that it is very simple? But that is not all.
Stamp Tool
Sometimes the first method may not be quite suitable for the purposes we need. But that's not a problem. Photoshop almost always has several solutions for a specific task. And this case is no exception.

Let's take a picture of a beautiful view of the coast. A beautiful view, but as you can see, a daring bird flew past and got into the frame. It hit beautifully, but let's say it's not needed there.
Then we roll up our sleeves, take a lasso and do all the operations from the first paragraph. Let's see what we got. Somehow not so much, right?
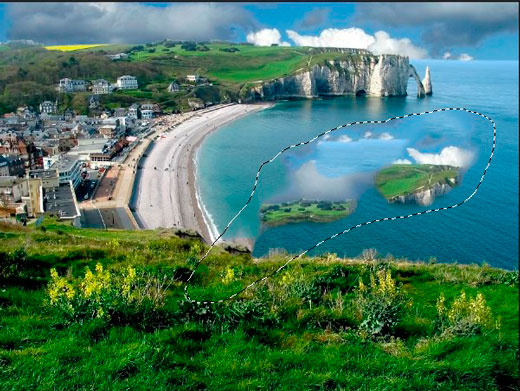
The stamp tool will help us with this. This tool is similar to "Healing brush", which we used, but there are differences. With the repair brush, we took the donor area and painted over an unnecessary detail with it in such a way that the colors that correspond to this area were then superimposed. Nothing like this happens with a stamp.

If it is somehow difficult for you to understand this process in the text version, then I made a separate video tutorial especially for you. Happy viewing.
It turned out quite a good picture, as if it were so. You can combine several methods to achieve the desired result.

Do you have photos where you can remove something superfluous? If so, then it's time to get rid of it. Well, if you want to explore all the possibilities of Photoshop in a short time, then I recommend that you look great video course. In it, all the information is presented amazingly and is designed for any level of user.
Well, that's all I have. I hope you enjoyed my lesson today. Do not forget to subscribe to blog article updates, then you will be the first to know about the release of interesting articles and other interesting information. See also other blog articles. I am sure you will find something interesting for yourself. Well, I say goodbye to you. Bye Bye!
Sincerely, Dmitry Kostin
Sometimes, looking through the pictures, you find that extra objects got into the frame. Or you need a photo to place the logo, but it already has other inscriptions. How to remove the inscription from the picture and remove the extra object in Photoshop?
For these tasks, use the tool Clone Stamp Tool or Patch/Patch Tool. The latter is preferable if the extra object is located on a simpler (monotone) background.
Working as a tool Patch/Patch Tool, we cut out (copy) the donor area and cover everything unnecessary with it. How it works? Hold down the left mouse button, draw a suitable area and move the patch. This tool has two modes:
"Source" / Source. When using it, the selected area will be filled with the donor fragment, into which the selection has been moved.
Destination. In this mode, the selected area will cover the area into which it will be moved.
Consider examples.
Patch Tool
Open the photo in Photoshop and create a duplicate layer ( ctrl + J). On the toolbar, in the group of repair tools, select Patch/Patch Tool. If the tool in the group is the default, just press the key J.
To make it easier to work with the image, scale it ( ctrl+ and ctrl-).
We will remove the Shell logo. So, we select the first donor site. Press the button on the control panel "Destination", parameter "Diffusion" set it to 7. Move the cursor and outline the area for the patch (it will be highlighted with a dotted line).

Then drag the selected area onto the logo. If the first time the patch does not completely cover the area being painted, move it again until the unwanted object completely disappears. You can cancel an unsuccessful action by simultaneously pressing the keys Ctrl+Alt+Z.

Save the finished image ( Shift+Ctrl+S) by choosing the file type that suits you (for example, JPG).
Here is our result:


Learn more about Photoshop in a course at Fotoshkola.net.
Clone Stamp Tool
Now let's take a more difficult case. Let's remove the person from the image.

For this we need a tool Clone Stamp Tool. It is called with the key S. You can adjust its size with the keys [ and ] . This tool creates a clone of the donor site. They are corrected gradually, in small strokes.
Select the donor area next to the area to be filled. To do this, move the cursor to the donor site and, holding the button alt, click once with the left mouse button. The donor site is marked with a cross. When moving over the image, it follows the cursor, so the donor area needs to be changed periodically. Now move the cursor and click the left mouse button.

This image has a lot of vertical and horizontal stripes of different shades. In place of the umbrella, you need to add a ceiling. In front of the boy, one door is ajar, the second is closed. All this should be taken into account when painting.

So that the lines of beams and boards do not look broken, the donor site should be selected carefully. It is important to set the stamp so that the stripes match.

One of the stages. Here is a gap between the doors.

Gradually paint over the lines horizontally and vertically. To finish the door on the left, the donor area is taken from the very left edge, and the vertical lines are taken from above. We brought the stamp, clearly combining the sections so that the straight lines go smoothly.
How to cut out people and objects from a photo
Modern technologies allow you to take snapshots in almost any conditions and make it possible to immediately see the result. However, when viewing the resulting images, it may turn out that some part of the picture (for example, someone's face suddenly caught in the frame) needs to be cut out so that it does not interfere with the overall composition. Often there are extra objects in the photo, and sometimes it is necessary to remove a person or his shadow from the photo. How to remove everything superfluous from a photo? We have prepared instructions for you, as well as answers to some frequently asked questions. Click on the appropriate link to jump to the relevant section.
How to remove unwanted objects from a photo
Movavi Photo Editor is great for removing objects from photos. It's very easy to learn, so you don't have to fiddle around with the settings before you get started. Download the program and see for yourself!
This manual is suitable for both versions of the program: Windows and Mac. All you need to do is choose the version that suits you and follow the tips below.
Install Movavi Photo Editor
Open the installation file and follow the instructions of the installer.
Add a photo
After starting the program, press the button Open file and select the desired image. You can also add a file to the program by simply dragging a photo from a folder into the Photo Editor window.
Select and delete an object or person
To cut out an object from a photo, open the tab Deleting objects and select the object with the tool Brush. For a more convenient selection, you can also use magic wand or Lasso. To correct the selected area, use the tool Eraser. Now delete the unwanted object by clicking the button Erase.
To remove the remaining fragments, use the tool Stamp, which allows you to copy any portion of the image to the selected area.
Save the corrected photo
With Movavi Photo Editor you can magically remove unwanted elements from your photos. It only takes a couple of minutes to remove an item from a photo!
Frequently asked Questions
How to remove the background from a photo in Paint?
Open the image you want to remove the background from in Paint. Find the button on the toolbar Highlight and click on the arrow below it. Click on the item Transparent Selection, then - by Highlight to select the selection method: rectangle or freehand. Move your mouse around the part of the image you want to keep, then click Copy. Create a new file and click Insert. Ready! You can save your picture without a background.
If you want to not only remove the background, but, for example, make it lighter or erase not all objects, try Movavi's photo editor. Its functionality is much wider than that of Paint, and it is easier to use.


