Allowing you to watch digital television. Digital TV has significantly more benefits than usual, which is why many people switch to it. And, of course, you need to start with the choice of the receiver. In this case, it is necessary to take into account the brand of the manufacturer, functionality, quality and, of course, the price. Finally, having acquired a digital receiver, it is necessary to prepare it for use. But how to do that? In this article, you will learn how to connect and set up DVB-T2 digital television. Let's look into the matter together.
If you want to learn how to set up a TV box, then this article is for you.
The first step is to connect all the elements together. There is nothing difficult in this, see for yourself. Connect the antenna to the receiver, and the receiver itself to the TV. That's all - done! It is recommended to connect the set-top box via HDMI cable, of course, provided that the devices have the appropriate inputs and connectors. If HDMI is not supported, please connect via regular tulips. With any model of the set-top box, there is an instruction in the kit, which clearly shows what needs to be connected and with what.

Let's connect the device
Please note that the setup process is the same for all models digital receivers, so it doesn't matter what brand your set-top box is. Of course, the design of windows and some names of menu sections may differ slightly, however general essence does not change.

First, choose a connection method.
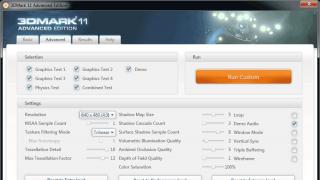
After connecting the device, turn on the TV and set-top box. On the TV, you need to select the video input to go to the receiver's menu. If everything is done correctly, then on the screen you will see a welcome window in which you will need to select the language, region, mode and image format, as well as the search mode. Install required parameters using the remote control. You can leave the settings unchanged and leave them as default. Click "OK" to go to the next window.

The first dialog window on the screen
If in the “Search mode” section there is “DVB-T + DVB-T2”, then the receiver will immediately find all the channels available for your region on its own. But this method will only work if you already have a working antenna pointing in the right direction. When the auto search is completed, you can close the menu and enjoy watching. Other users need to perform antenna positioning. There is nothing complicated in this, all that is needed is to make a few settings in the receiver's menu.

List available channels loaded manually or automatically
If you didn't have an antenna before and it appeared only now, together with the DVB-T2 set-top box, being in the welcome window, press the button to open the menu on your remote control. Go to "DVBT Setup" and select "Channel Search". In the window that opens, set the "Search Mode". Here you can set both "by channel" and "by frequency". There is no big difference here - choose what you like best. Next, set the search band to "UHF".
To simplify the process of finding channels, go to a special site with information on frequency channels for your particular city. In principle, it is not necessary to do this, you can do without it, but this approach will facilitate and speed up the setup process. Select desired value in point " frequency channel". If the direction was chosen correctly, then after a couple of seconds you will see the filled scales "Signal intensity" and "Signal quality" at the bottom of the window. If the level of the scales is good, then click "Search". After that, the receiver will tune in the specified frequency channel.
In the event that you do not know the desired direction of the antenna, take it and gently twist it, following the scales of intensity and quality. As soon as they are filled to an acceptable level, fix the antenna and search. Once
How to connect a DVB-T2 set-top box to a TV? Connection and setup digital television- not really difficult task, anyone more or less competent in technical matters the male.
Standard set-top box
- user guide;
- RCA cable ("tulip") with characteristic connectors, allows you to connect set-top boxes to almost all modern models TVs;
- decryption and conversion device digital signal to analog (receiver);
- remote controller remote control(PU);
- batteries for PU;
- network adapter.
At different brands and different models devices, the basic equipment may have different variations (for example, instead of a “tulip” there may be an HDMI cable), but in general, the kit consists of just such elements.

The rear panel has connectors:
- antenna input;
- connector for connection satellite dish, UHF antenna or local operator cable;
- socket for hdmi-cable, designed to connect a monitor or TV;
- sockets for cable "tulip".
Some devices may optionally be equipped with a "Scart" socket that can be connected to a TV or DVD player with a video recording function.
Attachment process DVB-T format 2 to the TV is in many ways similar to the connection procedure satellite receiver or AV receiver. There are several different ways how to connect a t-2 set-top box, how to connect a monitor to a set-top box. Each of them depends on the type of connector that is on the two paired devices. You can connect the tuner via an RCA cable (which is usually called simply "tulip"), via an HDMI connector, via an antenna cable.
RCA cable
This is the simplest and standard way connecting a digital tuner to a TV. The picture quality in this case is very different from connecting via HDMI, but the differences are not so significant on large TVs.
Before connecting, both devices must be disconnected from the electricity. After that, you need to insert the cable plugs into the sockets on the console. Each plug has its own color, so you need to insert them into the connectors of the corresponding color. The yellow cable carries a video signal, the white and red cables carry 2 channels of audio. After that, an external or indoor antenna is connected to the appropriate socket (on the prefix it is designated as “RF IN”).
It happens that the set of wires does not include a "tulip", but there is a "SCART" connector, which is called "comb" in the common people. In this case, you will need a special adapter from RCA to Scart. In the same way, you can connect a satellite receiver.
HDMI connector
HDMI interface is capable of transmitting a signal High Quality. For example, video quality can be up to 1080p, and audio can be up to 192kHz. This meets the highest standards in the field of multimedia content.
If you have modern TV, and it has an HDMI connector, it would be advisable to connect the receiver through this interface. The same can be recommended for satellite tuner to watch TV in high definition.
Channel setup
The number of channels depends on whether you will use paid package services of a single operator, or you will be satisfied with the usual broadcasting. About 20 available for normal TB free TV channels. If this is not enough for you, then in order to view encrypted broadcasts, you will need to purchase a CAM module that is built into the receiver. A provider card is inserted into the CAM module, which, for a fee, provides access to a large list of digital TV channels.
Setup: turn on the TV (if the set-top box is already connected), switch the TV to the “AV” mode, go to the tuner menu.
By default, the set-top box does not have a list of digital TV channels, so you will have to look for them yourself. To do this, it is recommended to use "Auto search", which will independently find 10-20 channels. If the tuner can find them, it will offer to save the list. The whole setup algorithm is similar for different device models, but each has its own nuances.
Connecting a set-top box to a TV
Before connecting a digital set-top box to a TV, you need to decide on the choice of the receiving device - the antenna.
Antennas are different types and types. When choosing the right one, they are usually guided by several criteria, the main of which is the distance to the transmitting TB tower. The antenna can be either indoor or outdoor. For DVB-T standard 2, the antenna must be in the decimeter range (UHF), namely, to receive frequencies from 470 to 860 MHz. An indoor antenna will only work well in a city that has a transmitting tower.
It happens that DVB-T2 does not find channels. This may happen for the following reasons:
- the antenna does not receive a digital terrestrial television signal (does not receive the UHF range);
- equipment software is not up to date;
- equipment does not support DVB-T standard
Most often, the lack of a signal is faced by those people who are trying to connect through a local antenna. Here you can’t guess in advance whether such an antenna receives a signal in the UHF range or not. To do this, you need to call the company that services the antenna, and clarify. But it's best to have your own antenna.
Connecting the set-top box to older TV models

The connection method via an antenna cable is used in cases where there are no other connectors on the TV other than the antenna input (in older TV models). In this way, you can connect the tuner to an old TV by plugging the cable into a socket called "RF OUT". In this case, the image quality will be much worse than when connecting via HDMI interface. But given the fact that the TV is old, such an image can be considered quite acceptable.
For cable connection digital TV to an old TV, you will need a piece of antenna wire of the appropriate length, as well as two antenna plugs. In order not to resort to the help of a soldering iron, you can use special F-connectors. To do this, you need to clean the insulation with antenna cable(very carefully so as not to damage the shielding braid). It is necessary to strip the end about 1.5 cm long. After that, bend the braid, remove the insulating material from the central core. Strip 10 mm from the center wire. Screw the connectors clockwise until the center wire protrudes 2 mm from the connector. Using the received cable, connect the antenna input of the TV to the corresponding output of the set-top box.
DVB-T2 technology is the second generation of the DVB-T standard, European standard terrestrial digital television. With its help, you can watch up to 20 channels for free (at the time of writing) in digital quality. Broadcast TV picture and audio is done by digitally encoding the video signal and the audio signal using digital channels. Digital coding unlike analog, it provides signal delivery with minimal losses, since the picture and sound are not affected external factors(interference). As a result, you see a clear. beautiful picture, no interference.
In a previous article, I described how set up terrestrial digital television , on a conventional kinescope TV using a DVB-T2 set-top box. But such a combination: TV + set-top box DVB-T2, not the only way watch digital broadcast channels. You can do without a set-top box at all if your TV supports DVB-T2 technology, you can learn about this from the documentation for the TV. In addition to DVB-T2, the TV can support DVB-C, DVB-S2, you can read more about what these abbreviations mean.
As I wrote earlier, if your TV supports DVB-T2, then there is no need to purchase optional equipment to watch digital terrestrial television. It is enough to connect the antenna, select the search broadcast channels.
You can specify to search for digital channels only. 
And after a few seconds, your TV will find 10 or 20 channels, depending on the region, you can learn more about the number and possibility of viewing digital terrestrial channels by calling hotline RTRS: 8-800-220-20-02 (toll-free within Russia) or on the website: www.rtrs.rf.

I would like to dwell in more detail on the antenna for viewing digital terrestrial channels. Many people think that you need to buy a specialized antenna and invite masters to install and configure it, in fact, this is not the case. As I wrote in one of his articles , you can use the usual external antenna, but you can use indoor antenna, moreover, you can simply use coaxial cable. This is the antenna I use on my TV in the kitchen.

Back view.

I had no desire to connect cable TV or a satellite dish to the TV in the kitchen, because it takes time and a monthly payment, and I don’t spend much time in the kitchen, those 20 channels that digital terrestrial television provides me with enough head. So I decided to try to make the most a simple antenna of all possible, i.e. used as an antenna tv cable, read more on how to make such an antenna correctly. I want to add one clarification, in my case, I wanted to hide the cable behind the TV so that it would not be visible, but this led to the fact that the TV stopped catching the channels. So it is necessary that the cable peeks out a little from behind the TV. In order to hide this piece of wire in the future, it can be beautifully bent into a wallpaper pattern or hidden in a doorway, then someone has enough imagination for what. One more thing, this antenna will not work for everyone, but only if you live near a TV tower and you have a high signal level. For all others, you must use an indoor or outdoor antenna.
Free digital channels become the new norm, providing unique quality services. TsTV confidently marches across the country, covering not only Moscow, but also many other large regions. And all because the century modern technologies implies the most rational and competent use of innovative technical means. Such as image-sound transmission using digital signal programming on specific digital frequencies. At the same time, the quality is transferred to highest level without being subjected to any kind of interference. In connection with the expansion bandwidth chance of viewing more programs on a wide variety of topics. The exact lists are being specified for each individual region, which covers the federal broadcasting of CETV, but now you can connect to the most advanced television, which improves its services every season.
To view free-to-air channels in the Moscow region, you will need to purchase and install an individual UHF antenna. Home TV must be equipped digital tuner DVB-T2 (digital TV standard). For older models, you need to buy a set-top box that supports MPEG 4 video signal compression, as well as Multiple PLP mode. After that, it is enough to professionally connect the equipment and set up the on-air DVB-T2 channels that are broadcast from the Ostankino TV tower. The coverage area today is almost 95% of the Moscow region.
An ordered list of TV frequencies is designed to make tuning as easy as possible, including older non-HD TVs. Today open digital channels are broadcast without subscription fee, in addition to the first one, the second and third multiplexes were launched with the ability to view 10 programs in each, now there are already 20 of them. It is worth remembering that the equipment of the first generation of the DVB-T format is not capable of supporting new standard, it was officially disabled in early 2015. Having at your disposal broadcast antenna and DVB-T2 tuner, can be easily connected big package news, entertainment, sports, music programs.
| The first digital terrestrial TV multiplex | ||||||
| Channel logo | Name | Number | Frequency | genre | Video Format | Audio Format |
|---|---|---|---|---|---|---|
| 30 | 546 MHz | Federal | MPEG4 | MPEG2 | ||
| 30 | 546 MHz | Federal | MPEG4 | MPEG2 | ||
| 30 | 546 MHz | Sport | MPEG4 | MPEG2 | ||
| 30 | 546 MHz | Federal | MPEG4 | MPEG2 | ||
| Petersburg - Channel 5 | 30 | 546 MHz | Federal | MPEG4 | MPEG2 | |
| 30 | 546 MHz | Federal | MPEG4 | MPEG2 | ||
| 30 | 546 MHz | news | MPEG4 | MPEG2 | ||
 | 30 | 546 MHz | Children's | MPEG4 | MPEG2 | |
 | 30 | 546 MHz | Public Television of Russia | MPEG4 | MPEG2 | |
 | 30 | 546 MHz | Federal | MPEG4 | MPEG2 | |
| 30 | 546 MHz | Radio | - | MPEG2 | ||
| 30 | 546 MHz | Radio | - | MPEG2 | ||
| 30 | 546 MHz | Radio | - | MPEG2 | ||
| The second digital terrestrial TV multiplex | ||||||
 | 24 | 498 MHz | Federal | MPEG4 | MPEG2 | |
| 24 | 498 MHz | Religion | MPEG4 | MPEG2 | ||
 | 24 | 498 MHz | Entertaining | MPEG4 | MPEG2 | |
|
 | TV3 | 24 | 498 MHz | Entertaining | MPEG4 | MPEG2 |
 | 24 | 498 MHz | Entertaining | MPEG4 | MPEG2 | |
 | 24 | 498 MHz | Military patriotic channel | MPEG4 | MPEG2 | |
| 24 | 498 MHz | CIS channel | MPEG4 | MPEG2 | ||
 | 24 | 498 MHz | Movies | MPEG4 | MPEG2 | |
| Muz TV | 24 | 498 MHz | Music | MPEG4 | MPEG2 | |
| The third digital terrestrial TV multiplex It has not yet been officially launched, so the channel list is displayed on separate page with broadcast schedule |
||||||
Information obtained from open sources and is valid as of 2019. As the grid changes, the data will be updated.
Article 37. Erotic publications
×Law of the Russian Federation of December 27, 1991 N 2124-1 (as amended on July 13, 2015)
"About funds mass media"
Distribution of releases of specialized radio and television programs of an erotic nature without signal coding is allowed only from 23:00 to 04:00 local time, unless otherwise established by the local administration.
For the purposes of this Law, a mass media specializing in messages and materials of an erotic nature means a periodical or program that generally and systematically exploits the interest in sex.
Retail sale of media products specializing in messages and materials of an erotic nature is allowed only in sealed transparent packages and in specially designed premises, the location of which is determined by the local administration.
State program for a phased transition to a digital standard DVB broadcasting T2 is approaching the final stage of phasing out the number of analog repeaters. This suggests that the time has come to join new technologies and switch to digital. We will talk about the equipment needed to receive a television signal in a new format, as well as how to connect it correctly. digital set-top box(receiver) to a TV or monitor.
Necessary equipment
To watch digital broadcasts, unlike analog broadcasts, you will need a receiver that decodes the signal. Many modern TV models (Philips, Samsung, Sony, Toshiba, LG, Panasonic, etc.) are equipped with such a unit. To verify this, please refer to the user manual, this short instruction included with each product. At the same time, check if the built-in tuner supports the DVB-T2 format, if not, you will need to purchase a receiver.
Depending on the set functionality, the cost of such a device can vary between 800 - 3000 rubles. Note that many digital service providers cable television provide subscribers with receivers for rent.
In addition, we need to receive a digital signal. In cities and large settlements there will be no problems with this, it is enough to contact local providers. Residents countryside you need to install a decimeter antenna or a satellite dish. The latter is preferable, since it is not a fact that your house is in the coverage area of the nearest digital repeater. In addition, the option with a satellite dish gives a wider selection of television channels.
Let's take a look at what's included standard set receiver, this information may be useful when connecting it to a television receiver.

Let's list what is shown in the figure:
- A - user manual, we recommend that you carefully read this manual in order to get a complete picture of all the functionality of the device and its connection to a TV and antenna.
- B - cable "Tulip" (RCA) with characteristic connectors, allows you to connect the set-top box to almost all modern models of television receivers.
- C - a device for decoding and converting a digital signal into an analog one (receiver).
- D - packing box.
- E - remote control device.
- F - batteries for the remote control.
- G - network adapter for connecting the device to a household power outlet.
- H - coupon for warranty service.
The basic equipment may differ slightly from that shown in the photo (for example, "Tulip" is replaced by an HDMI cable).
Connectors and their purpose
There are various connectors on the back of the device, we will briefly describe what they are for.
 Figure 3. SDT-96 receiver connectors from model range SUPRA
 Explanation for the figure:
- Antenna output.
- Connector for connecting a satellite dish, decimeter antenna or local provider cable.
- Nest for HDMI cable, allows you to connect a monitor or TV equipped with this input (digital output, can transmit sound and image).
- Tulip cable jacks (transmits analog video signal as well as stereo sound).
Some devices may additionally be equipped with a SCART connector, a TV, VCR or DVD player with a video recording function is connected to it.

In addition, there may be devices where D-SUB outputs (Fig. 5) or DVI are installed instead of the HDMI jack.
 Fig 5. Digital set-top box with standard VGA(D-SUB) output
 Please note that such interfaces do not transmit audio, so you will need to additional connection with the help of "tulips" for its transmission.
The process of connecting a digital set-top box to a new TV step by step
Important! All manipulations must be done with the equipment turned off. If you connect operating equipment, there is Great chance its failure.
Let's write down the order of our actions:
- You must select the interface for connecting the set-top box to the TV. It can be analog (tulips, D-SUB, SCART) or digital (HDMI, DVI). The choice is made depending on specific model TV. Despite the fact that many FULL HD television receivers have an analog input, it is better to feed them a "digit", since the double conversion of the signal will negatively affect the quality of the "picture".

This interface allows you to transmit video and audio, so the connection can be made with a single cable.
If the TV does not have digital input, it connects to any analog interface, the easiest way to do this is with tulips. In the event that the device has only a bulky SCART connector, you can purchase an adapter for a tulip for it. In this way, you can connect almost any model, except for very ancient ones.
- We check the availability of the cable necessary for connecting, it can be included with the receiver or television receiver. If you can't find one, you will need to purchase it.
- Remove from console protective film(if available), install it in the selected place and connect it to the TV. The cables are made in such a way that it is physically impossible to insert them into a connector not intended for this. The exception is tulips, they can be mixed up in places. But, to prevent this, manufacturers make nests for them in the appropriate color.

As you can see, the colors of the connectors match the colors of the sockets (4 in Fig. 3).
- We connect power to the console. If the AC adapter is built-in, just plug the plug into the socket, the remote power supply is first connected to the corresponding socket of the receiver.
- We connect the provider's cable, decimeter antenna or satellite dish to the antenna input (2 Fig. 3).
- We insert the batteries into the remote control, turn on the set-top box and the TV.
This completes the connection procedure, and you can start setting up channels. If your TV does not have the interfaces listed above, do not worry, we will tell you how to get out of this situation.
Connecting to an old TV
The signal converter can even work with old models of television receivers when connected to the antenna output (1 in Fig. 3). To do this, you will need a piece of antenna wire of the appropriate length and two antenna plugs. In order not to bother with soldering, you can take special F-connectors, the procedure for mounting them on a cable is shown in Figure 8.

Procedure:
- We remove the insulation from the antenna cable, carefully so as not to damage the braid (it is enough to peel 15 mm).
- We bend the braid, as shown in the picture.
- Carefully remove the insulation from the central core.
- It is necessary to expose 10 mm of the central wire.
- Screw the connector clockwise.
- We do this until the central core protrudes 2 mm from the connector.
With a cable made, we connect the antenna input of the TV to the corresponding output of the set-top box. In this way, you can connect any TV, be it Horizon 101 or the legendary KVN.
How to connect 2 TVs to a digital set-top box
Two television receiver can be connected via the antenna output, for this you need a special adapter from one to two cables (splitter).

Since the set-top box is designed for only one device, the two TVs will work synchronously, that is, show the same channel.
Setting
The set-top box is configured in the same way as a TV, namely:
- The menu is called up using the button of the same name on the remote control.
- We select the appropriate command that starts channel scanning.
- When the scanning is completed, we save the list of detected channels, if desired, they can be grouped in a certain way, given a name, etc.
Detailed instructions and description of functionality can be found in the user manual. In most cases, the menu interface is intuitive, so setting up the receiver is as easy as connecting a digital set-top box to your TV.