We bring to your attention a complete description of the driver control panel. Please note that some settings are available only with certain types of equipment used. In this review, we have tried to reflect all the possible settings.
Panel main window
The main window is shown in the illustration:
The navigation bar is on the left and allows you to navigate through the desired settings with one click. The View menu allows you to enable the extended view, which gives the most complete access to all the driver settings, or to customize the panel view, leaving only those items that you intend to use. Also, in the lower left part of the panel, access to the help system of the control panel is provided (link "System Information"):

from which you can find out about the versions of files, installed drivers and other NVIDIA software, as well as the characteristics of the video card.
Category "3D Settings"
Adjusting playback images
The following settings are available:
- Settings according to 3D application- this option allows you to control the quality and display speed by means of 3D applications. However, the trilinear filtering optimization and anisotropy sampling optimization enabled by default are retained under any application settings.
- Advanced 3D Image Settings- advanced driver settings set by the users themselves are used. The Go To link gives you access to the Manage 3D Settings tab. It is the control of additional driver options that allows you to achieve maximum image quality.
- Custom settings with a focus on ...: - the most interesting option that allows simplified management of additional driver options for novice users:
Meaning Performance corresponds to the maximum operating speed and includes settings: vertical sync disabled, all optimizations (trilinear filtering optimization, anisotropy mip filter optimization, anisotropy sampling optimization) are enabled, negative detail level: prohibiting negative level - enabled, texture filtering - “quality ”, Anisotropic filtering and anti-aliasing is controlled by applications.
Meaning Balance has the following settings: anti-aliasing - 2x, anisotropic filtering - 4x, all optimizations (trilinear filtering optimization, anisotropy mip filter optimization, anisotropy sampling optimization) are enabled, negative detail level is enabled, texture filtering is “quality”, vertical sync - driven by applications.
Meaning Quality has the following settings: trilinear filtering optimization - enabled, anti-aliasing - 4x, anisotropic filtering - 8x, negative detail level - enabled, texture filtering - "quality", vertical sync - controlled by applications.
All modes are provided with detailed explanations for their use, and a rotating company logo demonstrates the use of certain settings.
For more detailed settings, use the window Controlling 3D parameters.
Controlling 3D parameters
Global parameters

Possible bookmark settings Global parameters :
Anisotropic filtering. Possible values are "Off", "Application control", "2x-16x" (depending on the video adapter model). Anisotropic filtering is the most advanced pixel distortion compensation technique today, and in combination with trilinear filtering gives the best filtering quality. Enabling any value other than Application Control allows you to ignore application settings. Keep in mind, however, that this is a very resource-intensive setting that can significantly reduce performance.
Vertical sync pulse. Possible values - "On." and Off, Use 3D Application Setting. Vertical sync (it is completely incomprehensible why NVIDIA has moved away from this term) means the synchronization of the image output with the monitor's scan rate. Turning on vertical sync allows you to achieve the smoothest possible image on the screen, turning it off allows you to get the maximum number of frames per second, often leading to a breakdown (displacement) of the image due to the fact that the video adapter has started drawing the next frame, while the output of the previous one has not yet been completed ... Due to the use of double buffering, enabling Vsync can cause frames per second and below the monitor refresh rate to drop in some applications.
Enabling scalable textures. Possible values are "None" and "Bilinear", "Trilinear". No - Do not enable scalable textures in applications that do not support them. Bilinear - the best performance due to a drop in quality. Trilinear - good image quality with lower performance. It is highly discouraged to use this option in the forced bilinear filtering mode, since the image quality obtained when forcing the option is simply depressing.
Shading background lighting. Enabling the technology for simulating global illumination (shading) Ambient Occlusion. The traditional lighting model in 3D graphics calculates the appearance of a surface based solely on its characteristics and the characteristics of light sources. Objects in the path of the light cast shadows, but they do not affect the lighting of other objects in the scene. The global illumination model increases the realism of the image by calculating the intensity of light reaching the surface, with the brightness value of each point on the surface depending on the relative position of other objects in the scene. Unfortunately, an honest volumetric calculation of shadowing caused by objects in the path of light rays is still beyond the capabilities of modern hardware. Therefore, the ambient occlusion technology was developed, which allows using shaders to calculate the mutual shadowing of objects in the plane of the "virtual camera" while maintaining acceptable performance, first used in the Crysis game. This option allows you to apply this technology to images of games that do not have built-in ambient occlusion support. Each game requires a separate adaptation of the algorithm, so the option itself is enabled in the driver profiles, and the panel option only allows the use of the technology as a whole. The list of supported games can be found on the website NVIDIA... Supported for G80 (GeForce 8X00) and newer GPUs starting with driver 185.81 in Windows Vista and Windows 7. May decrease performance by 20-50%. Possible values - "On." and Off.
Maximum number of pre-trained personnel- allows you to limit the control of the maximum number of frames prepared by the central processor when disabled. In case of problems with the slow response of the mouse or joystick, you need to decrease the default value (3). Increasing the value can help achieve a smoother picture at low frame rates.
Expansion limitation. Possible values are "Enabled" and "Disabled". It is used to solve compatibility problems with old OpenGL applications due to overflow of the memory allocated for storing information about the capabilities of the video card. If applications crash, try enabling extension limiting.
Stream optimization- allows you to control the amount of GPUs used by applications, in most cases changing the default value (Auto) does not require. However, some older games may not work properly in these configurations. Therefore, the ability to manage this option is given.
Power management mode... Possible values are "Adaptive" (default) and "Maximum performance". With GeForce 9X00 and newer graphics cards that have a division into performance modes, for games and programs that create a small load on the graphics processor, the driver does not switch the graphics card to 3D performance mode. This behavior can be changed by selecting the "Maximum Performance" mode, then any time you use 3D, the video card will go into 3D mode. These functions are available only when using driver 190.38 or higher in Windows Vista and Windows 7.
Anti-aliasing - gamma correction. Possible values "On" and Off. Allows you to perform gamma correction of pixels with anti-aliasing. Available on video adapters based on GPU G70 (GeForce 7X00) and newer. Improves the color gamut of applications.
Anti-aliasing - transparency. Possible values are "Off", "Multiple sampling", "Oversampling". Controls advanced anti-aliasing technology that reduces the “ladder” effect at the edges of transparent textures. We draw your attention to the fact that under the phrase "Multiple sampling", there is a more familiar term "Multisampling", and under "Oversampling" - "Supersampling". The latter method has the most severe impact on the performance of the video adapter. The option is operable on video cards of the GeForce 6x00 family and newer, when using drivers version 91.45 and higher.
Anti-aliasing - options. The item is active only if the item "Anti-aliasing - mode" is set to "Increase application settings" or "Override application settings". Possible values are "Application control" (which is equivalent to the "Application control" value of the "Antialiasing - mode" item), and from 2x to 16x, including "proprietary" Q / S modes (depending on the capabilities of the video card). This setting has a serious impact on performance. For weak cards, it is recommended to use the minimum modes. Note that only the 8x, 16x and 16xQ options will have an effect for the "Increase Application Setting" mode.
Anti-aliasing - mode... Enables full-screen image anti-aliasing (FSAA). Anti-aliasing is used to minimize the "jagging" effect that occurs at the boundaries of 3D objects. Possible values:
- "Application control" (default value) - anti-aliasing works only if the application / game directly requests it;
- "No" - completely disable the use of full-screen anti-aliasing;
- Application Settings Override - forcibly apply the anti-aliasing specified in the Anti-aliasing - Options item to the image, regardless of whether or not anti-aliasing is used by the application. "App Settings Override" will have no effect on games that use the technology Deferred shading, and DirectX 10 or higher applications. It can also distort images in some games;
- Increase application settings (available only for GeForce 8X00 and newer video cards) - allows you to improve the anti-aliasing requested by applications in problem areas at a lower performance cost than when using Application Settings Override.
Error messages. Determines whether applications can check for rendering errors. The default value is "Off", because many OpenGL applications do this check quite often, which degrades overall performance.
Corresponding texture binding. Possible values - "Off." , "Hardware is being used", "The OpenGL specification is being used." Texture binding refers to the binding of texture coordinates outside of its bounds. They can be anchored to the edges of the image or within it. You can turn off snapping in case of texture defects in some applications. In most cases, changing this option is not required.
Triple buffering. Possible values - "On." and Off. Enabling triple buffering can improve performance when using vertical sync. Keep in mind, however, that not all applications are capable of forcing triple buffering, and the load on video memory increases. Works for OpenGL applications only.
Acceleration of multiple displays. Possible values are Single Display Performance Mode, Multi Display Performance Mode, and Compatibility Mode. The setting defines additional options for OpenGL when using multiple graphics cards and multiple displays. The control panel assigns a default parameter. If you experience problems with OpenGL applications running on multiple video cards and displays, try changing the setting to Compatibility Mode.
Texture filtering - Anisotropic filtering optimization. Possible values - "On." and Off. When enabled, the driver forces the use of a point mip filter at all stages, except for the main one. Enabling this option slightly degrades the picture quality and slightly increases performance.
Filtering textures. Possible values are "High Quality", "Quality", "Performance", "High Performance". Allows you to control Intellisample technology. This parameter has a significant impact on image quality and speed:
- High Performance - Offers the highest possible frame rate for the best performance.
- "Performance" - setting optimal performance of applications with good image quality. Provides optimal performance and good image quality.
- "Quality » Is the standard setting that gives the optimum picture quality.
- "High quality" - gives the best image quality. It is used to obtain images without using software texture filtering optimizations.
Texture filtering - ohnegative deviation of UD (level of detail). Possible values are "Allow" and "Bind". Applications sometimes use a negative level of detail (LOD) value to filter textures with more contrast. This increases the contrast of the still image, but “noise” appears on moving objects. To obtain a better image when using anisotropic filtering, it is advisable to set the option to "snapping" in order to prohibit negative UD deviation.
Filtering textures - tlinear optimization. Possible values - "On." and Off. Enabling this option allows the driver to lower the trilinear filtering quality to improve performance, depending on the Intellisample mode selected.
Software settings

The bookmark has two fields:
Select the program to configure.
In this field you can see the possible application profiles that serve to override the global driver settings. When you run the corresponding executable file, the application-specific settings are automatically activated. Some profiles may contain settings that cannot be changed by users. As a rule, this is the adaptation of the driver for a specific application or the elimination of compatibility problems. By default, only those applications that are installed on the system are displayed.
Specify the settings for this program.
In this field, you can change the settings for a specific application profile. The list of available settings is completely identical to the global parameters. The Add button is used to add your own application profiles. When you click it, a Windows Explorer window opens, with which you select the executable file of the application. After that, in the field "Specify settings for this program" you can set personal settings for the application. The Delete button is used to delete user application profiles. Please note that it is impossible to delete / change the initially present application profiles by means of the driver; for this you will have to use third-party utilities, such as nHancer.
Setting up a PhysX configuration
Allows you to enable or disable the processing of physical effects using NVIDIA PhysX technology by means of a video card, provided that it is based on a G80 (GeForce 8X00) or newer GPU. Support is enabled by default; disabling may be required when solving problems with applications that incorrectly use PhysX (for example, the Mirror`s Edge game without patches). If there is more than one NVIDIA GPU in the system, the user is given the choice of the GPU on which the physical effects will be processed, unless the SLI mode is used. For more details on the specifics of using NVIDIA PhysX, see the dedicated FAQ section of our website.
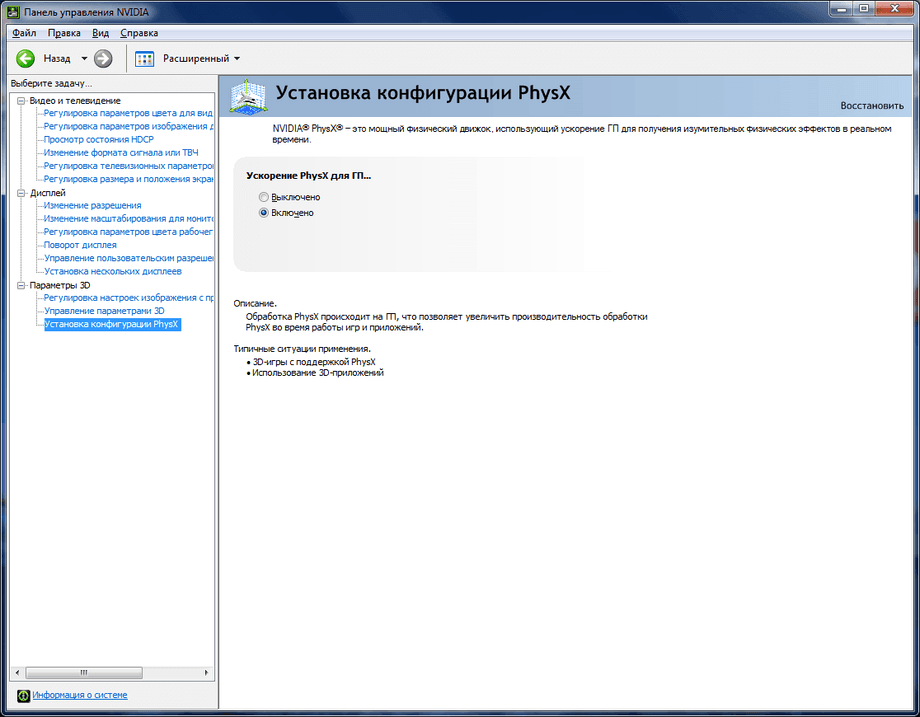
Additionally, starting with driver version 195.62, you can enable the display of the PhysX acceleration indicator in games. To do this, in the top menu "3D Settings" check "Show PhysX visual indicator". The acceleration status is displayed in the upper left corner of the image.

What is Render (Rendering)
Render (Rendering) is the process of creating a final image or sequence of images from 2D or 3D data. This process takes place using computer programs and is often accompanied by difficult technical calculations that fall on the computing power of a computer or on its individual components.
The rendering process is present in one way or another in various areas of professional activity, be it the film industry, the video game industry, or video blogging. Often, rendering is the last or penultimate stage in the work on a project, after which the work is considered completed or needs a little post-processing. It is also worth noting that it is often not the rendering process itself that is called the render, but rather the already completed stage of this process or its final result.
the words "render".
The word Render is Englishism, which is often translated into Russian by the word “ Visualization”.
What is 3D rendering?
Most often, when we talk about rendering, we mean rendering in 3D graphics. It should be noted right away that in fact there are no three dimensions in 3D rendering as such, which we can often see in the cinema wearing special glasses. The prefix “3D” in the name rather tells us about the way of creating a render, which uses 3D objects created in computer programs for 3D modeling. Simply put, in the end we still get a 2D image or their sequence (video) that were created (rendered) based on a 3D model or scene.
Rendering is one of the most technically difficult stages in working with 3D graphics. To explain this operation in simple terms, you can make an analogy with the work of photographers. In order for the photo to appear in all its glory, the photographer needs to go through some technical steps, for example, film development or printing on a printer. Approximately the same technical stages are burdened with 3d artists who, to create the final image, go through the stage of setting up the render and the rendering process itself.
Building an image.
As mentioned earlier, rendering is one of the most difficult technical steps, because during rendering there are complex mathematical calculations performed by the render engine. At this stage, the engine translates the math data about the scene into the final 2D image. During the process, the 3d geometry, textures and light data of the scene are converted into combined information about the color value of each pixel in a 2D image. In other words, the engine, based on the data it has, calculates what color each pixel of the image should be painted with to obtain a complex, beautiful and complete picture.
Basic rendering types:
Globally, there are two main types of rendering, the main differences of which are the speed with which the image is rendered and finalized, as well as the quality of the image.
What is Real-Time Rendering?
Real-time rendering is often widely used in gaming and interactive graphics, where the image must be rendered as fast as possible and displayed in its final form on the monitor display instantly.
Since the key factor in this type of rendering is interactivity on the part of the user, the image must be rendered without delays and in almost real time, since it is impossible to accurately predict the player's behavior and how he will interact with the game or with the interactive scene. In order for an interactive scene or game to work smoothly without jerks and slowness, the 3D engine has to render the image at a speed of at least 20-25 frames per second. If the render speed is below 20 frames, then the user will feel discomfort from the scene watching jerks and slow motion.

The optimization process plays a big role in creating smooth rendering in games and interactive scenes. In order to achieve the desired render speed, developers use various tricks to reduce the load on the render engine, trying to reduce the forced number of miscalculations. This includes lowering the quality of 3D models and textures, as well as writing some light and relief information to pre-baked texture maps. It is also worth noting that the main part of the load when calculating the render in real time falls on specialized graphics equipment (graphics card -GPU), which reduces the load from the central processing unit (CPU) and free up its processing power for other tasks.
What is Pre-Render?
Pre-rendering is used when speed is not a priority and there is no need for interactivity. This type of rendering is used most often in the film industry, in working with animation and complex visual effects, as well as where photorealism and very high image quality are needed.
Unlike Real-Time Rendering, where the main load was on the graphics cards (GPU), in the preliminary rendering, the load falls on the central processing unit (CPU) and the rendering speed depends on the number of cores, multithreading and processor performance.
It often happens that the rendering time of one frame takes several hours or even several days. In this case, 3D artists practically do not need to resort to optimization, and they can use 3D models of the highest quality, as well as texture maps with very high resolution. As a result, the picture is much better and more photo-realistic compared to rendering in real time.

Rendering software.
Now, there are a large number of rendering engines on the market, which differ in speed, image quality and ease of use.
Typically, render engines are built into large 3D graphics programs and have enormous potential. Among the most popular 3D programs (packages) there is such software as:
- 3ds Max;
- Maya;
- Blender;
- Cinema 4d and etc.
Many of these 3D packages have renderers already included in the package. For example, the Mental Ray render engine is included in the 3Ds Max package. Also, almost any popular render engine can be connected to most of the famous 3d packages. Popular rendering engines include:
- V-ray;
- Mental ray;
- Corona renderer and etc.
I would like to note that although the rendering process has very complex mathematical errors, the developers of 3D rendering programs are trying in every possible way to save 3D artists from working with the complex mathematics underlying the rendering program. They try to provide relatively easy-to-understand parametric render settings, as well as material and lighting sets and libraries.

Many render engines have found fame in certain areas of work with 3D graphics. So, for example, "V-ray" is very popular with architectural renderers, due to the availability of a large number of materials for architectural rendering and, in general, the good quality of the render.
Visualization methods.
Most render engines use three main calculation methods. Each of them has both advantages and disadvantages, but all three methods have the right to be applied in certain situations.
1. Scanline (scanline).
Scanline rendering is the choice of those who prioritize speed over quality. It is due to its speed that this type of rendering is often used in video games and interactive scenes, as well as in the viewports of various 3D packages. With a modern video adapter, this type of render can produce a stable and smooth picture in real time with a frequency of 30 frames per second and higher.
Work algorithm:
Instead of rendering "pixel by pixel", the "scanline" rendering algorithm is that it determines the visible surface in 3D graphics, and working on the "row by row" principle, first sorts the polygons needed for rendering by the highest Y coordinate that belongs to this polygon, after which each row of the image is calculated by intersecting the row with the polygon that is closest to the camera. Polygons that are no longer visible are removed when moving from one row to the next.
The advantage of this algorithm is that there is no need to transfer coordinates about each vertex from the main memory to the working one, and the coordinates of only those vertices that fall into the visibility and rendering zone are broadcast.

2. Raytrace (raytrace).
This type of render was created for those who want to get a picture with the highest quality and detailed rendering. Rendering of this particular type is very popular among fans of photorealism, and it is worth noting that it is not casual. Quite often, with the help of ray tracing rendering, we can see stunningly realistic shots of nature and architecture, which not everyone will be able to distinguish from photography, moreover, it is often the ray tracing method that is used when working on graphs in CG trailers or movies.
Unfortunately, for the sake of quality, this rendering algorithm is very slow and cannot yet be used in real-time graphics.
Work algorithm:
The idea behind the Raytrace algorithm is that for each pixel on a conventional screen, one or more rays are traced from the camera to the nearest three-dimensional object. The light beam then goes through a certain number of bounces, which can include reflections or refractions, depending on the materials in the scene. The color of each pixel is calculated algorithmically based on how the light beam interacts with objects in its traced path.
Raycasting method.
The algorithm works on the basis of "throwing" rays as if from the eyes of the observer, through each pixel of the screen and finding the nearest object that blocks the path of such a ray. Using the properties of the object, its material and scene lighting, we get the desired pixel color.
It is not uncommon that "raytrace" is confused with "raycasting". But in fact, "raycasting" (method of casting a ray) is actually a simplified "raytrace" method, in which there is no further processing of the bounced or bent rays, and only the first surface in the path of the ray is calculated.

3. Radiosity.
Instead of the "ray tracing method", in this method the rendering works independently of the camera and is object-oriented, in contrast to the "pixel by pixel" method. The main function of “radiosity” is to more accurately simulate the color of a surface by allowing for indirect illumination (scattered light bounce).
The advantages of "radiosity" are soft, graduated shadows and color reflections on an object from nearby brightly colored objects.
The practice of using the Radiosity and Raytrace method together to achieve the most impressive and photorealistic renders is quite popular.

What is Video Rendering?
Sometimes, the expression "render" is used not only in working with computer 3D graphics, but also when working with video files. The video rendering process begins when the user of the video editor has finished working on the video file, setting all the parameters he needs, soundtracks and visual effects. In fact, all that is left is to combine everything done into one video file. This process can be compared to the work of a programmer when he wrote the code, after which all that is left is to compile all the code into a working program.
As with the 3D designer and the user of the video editor, the rendering process is automatic and without user intervention. All that is required is to set some parameters before starting.

The rendering speed of the video depends on the duration and quality required for the output. Basically, most of the calculation falls on the power of the central processor, therefore, the speed of video rendering depends on its performance.
Categories: , / / fromWe translate ... Translate Simplified Chinese Traditional Chinese English French German Italian Portuguese Russian Spanish Turkish
Unfortunately, we cannot translate this information right now - please try again later.
Introduction
This example demonstrates the creation of a texture in OpenGL * 4.3, the sub-region of which is updated by the OpenCL ™ C kernel running on an Intel® Processor Graphics GPU running Microsoft Windows *. One of the uses of such technology could be real-time computer vision applications, where it is necessary to trigger a detector of certain image elements in OpenCL, but display the finished image with clearly marked detectors on the screen in real time. In this case, you need access to all the C features of the OpenCL core, as well as the rendering capabilities of the OpenGL API for compatibility with the existing rendering pipeline. Another example of the use of this technology: if dynamically created in OpenCL procedural textures are used to render three-dimensional objects in the scene. Finally, imagine post-processing an image in OpenCL after rendering a scene using a 3D pipeline. This can be useful for converting colors, changing resolutions, or performing compression in certain scenarios.
This example shows an OpenCL update of a texture created in OpenGL. The same guidelines apply for updating a vertex buffer or offscreen framebuffer object that can be used in a stand-alone image processing pipeline.
The Sharing Surface Extension is defined in the OpenCL Extension Specification by the line cl _ khr _ gl _ sharing. We also use the cl _ khr _ gl _ event extension, which is supported by Intel GPUs.
Motivation
The purpose of this tutorial is to familiarize readers with the ability to create surfaces that are common to OpenCL and OpenGL. You will also be able to better understand how the API works, the performance considerations for the various texture creation paths in the OpenGL API, particularly on Intel GPUs, and the difference between this approach and using discrete GPUs.
The basic principle
To create OpenGL textures and access them as OpenCL images with the highest Intel GPU performance, you should not create an OpenGL Pixel Buffer Object (PBO). PBOs do not offer performance benefits on Intel GPUs. In addition, they create at least one additional linear copy of the data, which is then copied into the texture format used by GPU for rendering. Second, instead of using glFinish () to synchronize between OpenCL and OpenGL, we can use an implicit synchronization mechanism because Intel GPU supports the cl _ khr _ gl _ event extension.
Intel® GPU with Shared Physical Memory
Intel® GPU and CPU share memory together. Their relationship is shown in Figure 1. There are several architectural mechanisms (not shown in this figure) that extend the capabilities of the memory subsystem. For example, to improve the performance of the memory subsystem, cache hierarchies, samplers, atomic operations, and read and write queues are used.
Drawing 1. Relationship between CPU, GPUIntel® and main memory. Note that the CPU and GPU share a common pool of memory (as opposed to discrete GPUs with their own dedicated memory managed by the driver)
Why you shouldn't use Pixel Buffer Objects (PBOs) with Intel GPU
“The main advantage of using a buffer object to store texture data in between is that the transfer from the buffer object to the texture does not have to happen immediately if it happens before the data is required by the shader. This allows the transfer to occur in parallel with the execution of the application. If the data is in the application memory, then the semanticsglTexSubImage 2 D () requires a copy of the data to be created before the function returns thereby eliminating parallel transmission. The advantage of this approach is that the application is free to modify the data passed to the function as soon as the function returns. "
Note that the point of this API call is to share between application memory (i.e. CPU memory) and GPU, and not shared between two APIs, each executing its own stream of commands on the same device and the same physical memory, as shown in Figure 1.
Using PBOs actually results in decline performance on devices that share physical memory. First, the PBO object is an additional staging area, which means an increase in the amount of memory consumed by the application. Secondly, the data in the PBO is stored in a linear form, and if the data is required in a segmented form, as, for example, in OpenGL textures or in OpenCL images, you have to convert the data into the required format. Finally, copying between the two APIs takes some time, which also has a negative impact on the performance of the application.
In the case of shared access with a discrete GPU, it makes sense to use PBO objects: you can start a DMA transfer that runs asynchronously to the CPU. Without PBO, OpenGL semantics require synchronous writing and wait for the result to be returned, which also degrades performance. In our case, there is no data transfer from the CPU to the GPU memory subsystem.
When can a WBO be used with shared surface access?
There are scenarios where it makes sense to use WBO objects. For example, unless there is a suitable surface format that is compatible with OpenGL and OpenCL according to Table 9.4 in the OpenCL Extension Specification. In this case, you can create a PBO and share it with the buffer sharing APIs. However, try to avoid these scenarios to avoid the performance degradation discussed above. If necessary, see the example of Maxim Shevtsov, which is referenced in the reference section.
Synchronization between OpenCL ™ and OpenGL *
It is important to get the best OpenCL and OpenGL performance at runtime. The spec says the following:
"Before calling objectsclEnqueueAcquireGLObjectsthe application must ensure that all pending operations are completeGLthat have access to the objects specified inmem_ objects... To do this while maintaining portability, you can execute and wait for the command to completeglFinishfor all contextsGLwith deferred references to these objects. Better synchronization methods may be available in different implementations. For example, on some platforms it may be sufficient to callglFlush, or synchronization can be implicit within the flow, or there can be vendor-supported extensions that allow delimiting the flow of commandsGLand wait for each part in the command queue to completeCL... Note that currently the only synchronization method that supports portability between different implementations isOpengl, is anglFinish».
For best portability, the spec says glFinish () should be called, but it's a blocking call! On Intel GPU it will be more efficient to use implicit synchronization or synchronization objects between OpenCL and OpenGL with the cl _ khr _ gl _ events extension. This will be described in more detail below. The use of implicit synchronization is optional. The sample code contains commented-out snippets that you can use if you want to use implicit synchronization.
Overview of Surface Sharing for OpenCL and OpenGL
First, we describe the steps required to maintain surface sharing during initialization, execution, and shutdown. Then we will describe the API and syntax of the language in more detail. Finally, we'll show you how these ideas can be developed to cover other texture formats beyond the scope of this example. We are using the open source freeglut library for window management, as well as the glew library. It is standard practice to use these libraries in sample OpenGL applications, so we will not describe them in more detail.
Initialization
- OpenCL:
- Create a context passing the appropriate device parameters.
- Create a queue on the device and a context that supports communication between OpenGL and OpenCL.
- OpenGL: Create an OpenGL texture that you want to share with OpenCL.
- OpenCL: Using the OpenGL descriptor you created in step 2, create a shared surface using the OpenCL extension.
Steps 1 and 2 can be swapped. Step 3 should follow steps 1 and 2.
Writing to a common surface inOpenCL
- Lock the surface for OpenCL exclusive access.
- Write to this surface via the OpenCL C core. When working with texture data, it is necessary to use the functions of reading or writing the image and transfer the image accordingly.
- Unlock the surface to give OpenGL read or write access to it.
Steps 1, 2 and 3 must be followed in the order shown.
Cycle
This article is about sharing resources between CPU and GPU. The render loop uses a simple pass through a programmable vertex and pixel shader to create a texture map for two triangles that together form a quadrilateral. This quad does not fill the full screen for the background color to be visible.
Completion of work
- Clearing OpenCL State
- Clearing OpenGL State
Details on Sharing OpenGL and OpenCL Surfaces
This section provides details on the steps in the previous section.
Initialization
- OpenCL:
- Issue a query to determine if extensions are supported; terminate and exit if not supported.
Not all OpenCL implementations support OpenCL and OpenGL surface sharing, so you first need to determine if the extension you want is available at all. We iterate through the platforms sequentially to find the extension string for the platform that supports surface sharing. A close examination of the specification reveals that this is a platform extension, not a device. We then create a context that will need to be interrogated to determine which of our devices in the context support sharing the OpenGL context.
This example is only supported on Intel GPUs, but you can easily implement support for other GPUs. The extension we need is cl _ khr _ gl _ sharing. Here is the relevant code snippet. char extension_string; memset (extension_string, "
- Issue a query to determine if extensions are supported; terminate and exit if not supported.
Anisotropic filtering - set to Application-controlled. Check the value in the application itself. Preferably no more than 8x.
Anisotropic filtering is needed to improve the clarity of the image of 3D objects relative to the camera (character, car, etc.). We set the value Application-controlled - this means that the application will automatically select the desired anisotropic filtering mode, or the filtering is controlled in the application itself (program, game), the higher the filtering value, the clearer the image will be.
For each application, this parameter can be configured separately (the software settings tab), obtaining a higher quality if the application does not support or does not handle anisotropic filtering correctly.
Antialising - Gamma correction - set to On
Smoothing Gamma Correction smooths the gamma when going from light to dark, or vice versa. Turning on makes it possible to smooth out moments, for example, when the character's face "shines" in the rays of light (a direct example of a game with excellent play of light and dark tones). Does not affect performance.Antializing Mode - set to Application-controlled
A very important parameter, turning on the anti-aliasing mode makes it possible to get rid of the effect of ladders on a three-dimensional object. We set the value Application-controlled (Control from the application). - this means that the application will automatically select the desired anti-aliasing mode, or anti-aliasing will be controlled in the application itself (program, game), the higher the anti-aliasing value, the less ladder effect the image will have, the lower the application performance, the fewer frames per second.
For each application, this parameter can be configured separately (Programmatic Settings tab), in this case, the Antialising Setting item will become available, where you can manually set the anti-aliasing level from 2x to 16x. Even if the application does not support anti-aliasing, the video card driver itself will do it for it.
Anti-aliasing Setting - Automatic value Application-controlled. Check the value in the application itself. Preferably no more than 4x.
If you enable the previous item Anti-aliasing Mode - Application-controlled, the current value will be inactive, active only if the Anti-aliasing Mode value - Enhance the application setting) ( Override application settings or increase application settings).For each application, this parameter can be configured separately (the program settings tab), obtaining a higher quality if the application does not support or does not handle Anti-aliasing correctly. Read the point above.
Anti-aliasing - Transparency set the value to Off
Smoothing transparent surfaces means that objects with no structure will be smoothed. For example, it will smooth "transparent" places in the texture of stairs, because stairs, for example, are drawn with a single texture, using the alpha channel to indicate transparent and non-transparent places. It does not affect performance very much, but if performance is still more important to you, you can set it to "Off".In general, there was no significant difference in the picture quality between situations when this option was turned on or off.
Conformant texture clamp - Use hardware parameter
As the name implies, the choice of the texturing method, of course, is optimal in quality and performance at the hardware levels - Use hardware - which is naturally more productive than the software (software) mode.Error reporting - Off
Senseless parameters, the inclusion of which makes it possible, in the event of a driver error, to send all error data and PC configuration to NVidia developers.(One of the meaningless parameters, turning it off will allow the driver to have unlimited access to the application code when processing graphics, of course we remove all restrictions with the Off value)
mipmaps (Enable scalable textures) - value None (No)
Obsolete meaning of the work of 3d applications. Disable because applications no longer use this method, the value is None.Maximum pre-render frames - value 1 or 2 (depending on the power of your CPU)
The maximum number of frames after the first that the CPU can prepare for further processing by the GPU of the video card. At one frame, 1 to 8 frames will be prepared before being loaded into memory, loading your CPU while preparing these frames. We set the value to 1 or 2, this will greatly increase the speed of graphics processing in real time. You can choose the number of frames yourself, but still I recommend no more than 3. Focus on the power of your CPU (central processing unit, do not confuse it with GPU - graphics processor).Multi-display / mixed - GPU acceleration - Single display performance mode
Simply put, if Multi display performance mode is set, your graphics card's graphics processing unit (GPU) renders an image for both ports on the video card. And if the mode is Single display performance mode, then the signal will go to only one of the ports.So if you have one video card and one monitor, then make sure to set Single display performance mode.
Note that when you installed new drivers on the video card, the default is Multi display performance mode, which means that if you had two monitors, connecting it to the second video output would also render the image. The productivity is lost somewhere by 5-15%. In general, Single display performance mode improves performance by rendering per video output).
Texture filtering - Anisotropic sample optimization - Off
Texture filtering - Anisotropic optimization, this parameter is set to Off, since this parameter increases the performance in 3D applications by degrading the final image when rendering by a video card. But since we strive for speed without loss of quality, we do not need this parameter. (If the Texture filtering parameter is set to Hight quality, then this parameter will be inactive, disabled.)Texture filtering - Negative LOD bias - Clamp value
Filtering textures using a negative with a scalable level of detail, set the value to Clamp, which will optimize texture procedures by binding. This will allow you to get an additional 2-3 FPS in rendering performance, without losing quality. Increases productivity in 3D applications.Texture filtering - Quality or Hight quality. (Choose according to the power of your graphics card)
Filtering textures allows you to improve the quality of the picture, the clarity of the image without lowering the performance in rendering, respectively, set the value of Hight quality (High quality). It practically does not affect performance.Texture filtering - Trilinear optimization - Off
Texture filtering - trilinear optimization, this parameter is set to Off, if the Texture filtering - Quality parameter is set to High quality, then this parameter will be inactive.About the parameter Texture filtering - Trilinear optimization (Filtering textures - trilinear optimization) I want to note that it increases the performance in 3D applications by degrading the final image when rendering by a video card. But since we strive for speed without loss of quality, we do not need this parameter, moreover, Trilinear filtering is much older and it has its drawbacks, as well as two-line (bilinear) filtering. Moreover, Anisotropic filtering "practically" includes both of these texture filtering methods with some refinement.
Threaded optimization - On. (Enable only if you have a multi-core processor, if not, set to "Auto")
Optimization of the video card driver for multi-core processors, a tidbit for owners of 2 - 4-core processors. The default value is Auto, but judging by the tests carried out in applications, it was automatically set to Off, but since we are trying to increase performance, we set it to On. Increases productivity in 3D applications.Triple buffering - Off
Triple screen buffering, buffers several frames in vertical sync, which allows for smoother frame transitions, thereby reducing performance in 3D applications. We set the value to Off, thereby disabling unnecessary buffering. Performance is negatively affected.Vertical sync - Force off value
Vertical frame synchronization, through the vertical sync pulse, the number of frames per second is synchronized with the refresh rate of your monitor, thereby removing a certain effect of "picture tearing" (on the screen it will look, for example, when the camera is turned sharply, as if the upper part of the screen has moved a little to the side, in relation to the bottom), with a fast change of frames. At the same time, for frequent FPS drops (number of frames per second), it does not drop so much only if your monitor is updated at a frequency higher than 100-120 Hz per second, but even at this frequency, the FPS is still reduced by 10 -15%. We set the value to Off, thereby disabling unnecessary vertical sync. Performance is negatively affected.
Ambient occlusion - Value "Off"
Ambient occlusion A shading model used in 3D graphics to add realism to an image by calculating the intensity of light reaching a point on a surface.Ambient occlusion is most often calculated by constructing rays emanating from a point on the surface in all directions, and then checking them for intersections with other objects.
This process loads the video card very decently., so see for yourself, if the video card is powerful, you can turn it on. If not, then it is better to turn it off.
In general, in my opinion, this effect of what eats is not worth it =) You will not see much difference anyway, it is there, but it is minimal and noticeable only if you look closely and know what to look for =)
A question from one of the users
Good day. Is it possible to somehow increase the performance of an NVIDIA (GeForce) video card, that is, to increase the FPS? My video card is already quite old, and running a couple of games is an irresistible desire ...
Hello!
99% of questions about the performance of a video card are asked by game lovers. It is in games, if the video card is outdated and does not pull, you will begin to notice slowdowns, the picture jerks, jerks, and it becomes very uncomfortable to play.
To increase the number of FPS (this is the number of frames per second, the higher this parameter is, the better!), Issued by the video card, you can resort to different methods: overclock the video card, reduce the graphics quality in the game settings, set the optimal parameters of the video card driver (with a scope performance). That's about fine-tuning the video card, and I'll write a couple of lines in this article ...
Note! You may be interested in the following related articles:
- AMD graphics acceleration -
- acceleration of the IntelHD video card -
- how to find out and increase FPS in games - several ways:
Fine-tuning the NVIDIA graphics driver // to improve performance
Important note!
Many users interpret and understand the concept "performance" quite differently. In this article, I will start from the FPS parameter (it is in it that performance is measured). The higher the FPS, the higher the performance!
To measure the current number of FPS in your game, I recommend using the FRAPS program (I talked about it in this article:).
Set the button in the FRAPS settings to show the number of FPS - and in the upper corner of the screen, after starting the game, you will see the value of this parameter. By the way, I recommend remembering it in order to compare it with the indicator that will be after our video card settings ...

In the left corner of the screen, FRAPS shows in yellow numbers the number of frames per second - that is, FPS!
How to log into the NVIDIA Control Panel
The first thing to do is enter the NVIDIA (GeForce) Control and Settings Panel. This can be done in different ways: for example, the simplest is to right-click anywhere on the desktop, and select the desired link in the pop-up context menu (see the screenshot below).

How to Enter the NVIDIA // GeForce Control Panel - Method # 1: From the Desktop
Another way is to go to control Panel Windows, then open the section "Hardware and Sound" , in this section there should be a cherished link (see the screen below).

Method number 2 - through the Windows control panel // NVIDIA control panel
If you do not have such a link to NVIDIA settings - then most likely you simply do not have the drivers installed. Many users, for example, after installing Windows do not update the drivers at all, and use those that were installed by Windows itself ... In principle, there is nothing wrong with that - you just will not be able to access many functions, including fine-tuning the video card.
utilities for finding and updating drivers -
Fast NVIDIA tuning with a focus on performance
In the video card control panel, open the section "3D Options / Adjusting Picture Settings" , then set the slider to the mode "Custom settings with a focus on performance" and slide it all the way to the left (see the exemplary screenshot below).

Then save the settings and try to start the game again. As a rule, even such a simple tincture helps to increase the number of FPS.
Global parameters
The section will help you to configure the video card much more productively. "Manage 3D Settings" , where all the main parameters can be set manually.
To increase the FPS in games, you need to set the following:
- Anisotropic filtering: it affects the performance of the video card very strongly, so we disable it.
- Anti-aliasing transparency: helps to make the water picture better in games (for example). It "eats" a lot of resources, so we turn it off as well. Anyway, all anti-aliasing can be disabled !
- Triple buffering: turn off;
- Vertical Sync (V-Sync): the parameter, in some games, has a very strong effect on the number of frames issued, so turn it off;
- Include scalable textures: No;
- Extension limitation: turn off;
- Power management mode: set the maximum performance mode;
- Maximum number of pre-trained personnel: 1;
- Acceleration of multiple displays / mixed GPUs: Single display performance mode;
- Filtering textures(anisotropic optimization by sampling): disable;
- Filtering textures(negative deviation of UD): binding;
- Filtering textures(quality): set the slider to performance;
- Filtering textures(trilinear optimization): disable;
- Filtering textures(anisotropic filtering optimization): disable;
- Vertical sync pulse: set to adaptive;
- Stream optimization: turn off;
- PhysX: CPU.
Comment! Some of the modes and parameters listed above may be absent in your settings (or have a slightly different name ("translation difficulties")). It all depends on your video card model and driver version (an example of what this tab looks like is shown in the screenshot below).

NVIDIA Control Panel: Global Settings
After the entered settings do not forget to save them, in some cases it is advisable to restart the computer, and only then proceed to tests (measuring FPS). Quite often, the performance of a video card increases significantly: up to 15-20% (you must admit that without overclocking and there were no risky things to do - it is not bad to accelerate by such a percentage)!
Important! The picture in the game may deteriorate slightly. But this is the price: the video card starts working faster, saving on quality (after all, we turned off all filters and anti-aliasing ...). But I want to note that usually, the picture, although it gets worse, is far from so much as to seriously prevent you from having a pleasant time playing your favorite game ...
Software settings
If a specific game slows down you (and everything is fine with the rest), then it makes sense to change not the global parameters, but the parameters for a particular application! So that there is a special tab in the NVIDIA settings for this. Thus, with low quality graphics, you will run one specific game, and not all.
The parameters themselves in this tab must be set in the same way as those that I gave just above.

NVIDIA Control Panel: Software Settings
To speed up the games on your computer, I would additionally advise the following:
That's all for me, for good advice and additions - a separate merci. Good luck!


