In this article, we will cover such things:
- how to set up an FTP server on a computer that is connected to the router;
- how to provide access to it from the World Wide Web.
Configuring the FTP Server Program
Installing FileZilla Server
Download and install any FTP server you like or are used to working with. For example, we will download a free program Filezilla Server from the official site: https://filezilla-project.org/download.php?type=server
Run the downloaded installation file:

Click on Reject:

Click on Reject again:

Click on Install:

Click on I agree:

Next:

Install:

Configuring FileZilla FTP Server
Launch the program interface.

Enter settings: menu Edit -> Settings:

Now you need to configure passive FTP mode.
1) Select a section Passive mode settings;
2) Check the box Use custom port range;
3) Set a convenient range of ports for use in passive mode;
4) In the field Use the following IP register your external IP;
5) Press the button OK to save the settings.

Now you need to set up user accounts and specify home directories.
Enter the menu Edit and select Users:

In chapter General click Add:

Enter your username and click OK:

1) Check the box next to Password... This will indicate that a password will be required for this account.
2) Set a password for this account;
3) Go to the section Shared folders:
In chapter Shared folders click Add:

and select a folder that will be opened for this user for access via FTP. After selecting the shared folder, click OK:

Set permissions for this user on the folder.
In the area of Files you can enable or disable the following file operations:
- Reading;
- Recording;
- Removal;
- The change.
In the area of Folders you can enable or disable the following folder operations:
- Creation;
- Removal;
- List view;
- View subfolders.
After you set the permissions for this user in the current folder, click OK to save the settings:

Computer settings
After configuring the FTP server program itself, you need to allow incoming connections in the firewall.Go to Control Panel and choose Windows Firewall.

Right-click on Inbound rules and choose Create rule:

Choosing an option For the program and press Further:

Set the switch to position Program path and using the button Overview specify the path to the file FileZilla Server.exe.
Then, press Further:

Select option Allow connection and press Further:


Give an arbitrary name to the rule and click Ready:

Configuring a router: creating port forwarding rules
Now we need to create port forwarding on the gateway. The gateway can be a router, modem, or other device. Log in to the router's web interface (read the article on what a web interface is and how to access it :) and open the port forwarding section. For more information on port forwarding, see our article: What is port forwarding.
Create two rules.
Rule # 1: forwarding external port 21 to port 21 of the computer where the FTP server program is installed.
Rule # 2: forwarding a port range to the same port range on a computer with an FTP server installed.
Save settings.

How to remotely connect to an FTP server
To access the FTP server, you can use either an FTP client, a browser, or even an explorer. It is of course preferable to use an FTP client. We recommend the free program FileZilla client... You can download it on the official website: https://filezilla-project.org/download.php?type=client
In field Host enter either) or the external IP address of the router. Then, enter the username you created in the FileZilla Server program on the computer, the corresponding password and click the button Fast connection:
If in port forwarding in the router settings you did not change port number 21 to a non-standard one, then the field Port can be left blank - the program will connect to port 21 by default.
Successful FTP transfer requires very precise and meticulous setup. True, in the latest client programs, this process is largely automated. Nevertheless, the need to make basic settings for the connection still remains. Let's take a detailed example of how to configure FileZilla, the most popular FTP client today.
In most cases, if your connection is not made through the router's firewall, and the communication provider or server administrator does not put forward any special conditions for connecting via FTP, then it is enough to make the appropriate entries in the Site Manager to transfer content.
For these purposes, go to the "File" section of the top menu, and select the "Site Manager" item.

You can also go to the Site Manager by opening the corresponding icon on the toolbar.

The Site Manager opens in front of us. To add a connection to the server, click on the "New site" button.

As you can see, on the right side of the window, the fields have become available for editing, and on the left side, the name of the new connection appears - "New site". However, you can rename it the way you want, and how this connection will be more convenient for you to perceive. This parameter will not affect the connection settings in any way.

Next, go to the right side of the Site Manager, and begin to fill in the settings for the "New Site" account (or whatever you call it in another way). In the "Host" column, write down the address in alphabetic form or the IP-address of the server with which we are going to connect. This value must be obtained on the server itself from the administration.

We select the file transfer protocol supported by the server to which we are connecting. But, in most cases, we leave this value at the default "FTP - File Transfer Protocol".

In the encryption column, also, if possible, leave the default data - "Use explicit FTP over TLS if available." This will maximize the protection of the connection from intruders. Only if you have problems connecting over a secure TLS connection, it makes sense to select the "Use regular FTP" option.

The default login type in the program is set to anonymous, but most hosting and servers do not support anonymous connection. Therefore, we select either the item "Normal" or "Request a password". It should be noted that when you select the normal login type, you will connect to the server through your account automatically without entering additional data. If you select the "Request password" item, you will have to enter the password manually each time. But this method, although less convenient, is more attractive from a security point of view. So it's up to you to decide.

In the next fields "User" and "Password" you enter the username and password given to you on the server to which you are going to connect. In some cases, you can later, if you wish, change them by filling out the appropriate form directly on the hosting.

You do not need to make any changes in the other tabs of the Site Manager "Advanced", "Transfer Settings" and "Encoding". All values should remain by default, and only in case of some connection problems, according to their specific reasons, you can make changes in these tabs.

After we have entered all the settings to save them, click on the "OK" button.

Now you can connect to the appropriate server by going through the site manager to the required account.
General settings
In addition to the settings for connecting to a specific server, there are general settings in FileZilla. By default, the most optimal parameters are set in them, so that often users never enter this section. But there are individual cases when certain manipulations are still required in the general settings.
In order to get into the general settings manager, go to the section of the top menu "Editing", and select the item "Settings ...".

In the first opened "Connection" tab, you enter such connection parameters as timeout, maximum number of connection attempts and pause between waits.

The FTP tab indicates the type of FTP connection: passive or active. The default is passive. It is more reliable, since with an active connection, with firewalls and non-standard settings on the provider's side, connection defects are possible.

In the section "Transmissions" you can configure the number of simultaneous transmissions. In this column, you can select a value from 1 to 10, but the default is 2 connections. Also, if you wish, you can specify the speed limit in this section, although by default it is not limited.

In the "Interface" section, you can edit the appearance of the program. This is probably the only section of the general settings for which it is permissible to change the default settings, even if the connection is correct. Here you can select one of the four available types of panel layouts, specify the position of the message log, set the program's folding to tray, and make other changes in the appearance of the application.

The name of the "Language" tab speaks for itself. Here you can select the language of the program interface. But, since FileZilla automatically detects the language installed in the operating system and selects it by default, in most cases, no additional steps are required in this section.

In the section "Editing files" it is possible to assign a program with which it will be possible to remotely edit files directly on the server without downloading them.

In the "Updates" tab there is access to setting the frequency of checking for updates. The default is one week. You can set the parameter "every day", but given the actual timing of the release of updates, this will be an unnecessarily frequent parameter.

In the "Login" tab, you can enable the log file recording and set its maximum size.

The last section, Debugging, allows you to enable the debug menu. But this feature is only available to very advanced users, so for people who are just getting acquainted with the capabilities of FileZilla, it is definitely not worth it.

As you can see, in most cases, for the correct operation of the FileZilla program, it is enough to make the settings only in the Site Manager. The general settings of the program have already been selected for the most optimal by default, and it makes sense to intervene in them only if there are any problems with the operation of the application. But even in this case, these settings must be set strictly individually, taking into account the peculiarities of the operating system, the requirements of the provider and the server, as well as the installed antiviruses and firewalls.
Hello, friends.
Today I will show you how to use the FileZilla program and use it to connect to your hosting provider, so that you can then download files to your computer or upload files to your hosting.
This program should be in the arsenal of every webmaster. It doesn't matter if you have a blog or a simple one page website. Sooner or later, you will need to edit your site files. And for this you need to download them to your computer, which will help the FileZilla ftp client.
And until I began to publish articles in which very often I have to do operations for editing files that are on the hosting, I am writing an article about this ftp client so that you can always refer to this material.
We will not thoroughly study the program. I will only show you the main functions that are indispensable in my work. Download the program from the official website.
After going to the site, click on the next button.

We get to the next page, where we also click on the button.

After clicking, it will go to the next page, where the automatic download of the program will begin.

After downloading, immediately launch the installer and install the client.
The client is free, so the installation is done as usual. I will not show the installation process. Everything is extremely simple there.
After installation, we immediately launch the program and begin to deal with it.
FileZilla Basics
If you have used the file manager Total Commander, then there will be no difficulties in mastering FileZilla, since the principle of operation is the same.
The program consists of 2 main work areas:
- The area in which the computer files are displayed (local site);
- The area in which the content of the server is displayed (remote site).
As you understand, in the left area (1) you can navigate the computer, as in the standard explorer of the operating system. In the second area, everything is the same, only we are on the server and see all the folders and files located in it.
In the screenshot above, I am inside my hosting blog and go through all my plugin folders. How to connect to any server through this client, we will consider below. Now I will show you how you can upload files from your computer to hosting and vice versa.
The first way is through the right mouse button by selecting the "Upload to server" item in the context menu.

By selecting this item, the file will be uploaded to the hosting and the download process will be shown at the bottom of the program.

After the download is complete, the file will appear on the server. My file should appear in a place with the folders of all the plugins of my blog.

We can also upload files by double-clicking the left mouse button, as when opening folders in Windows. But, if we want to upload a folder, then this method will not work, since the transition into the folder will be carried out. You need to use the method through the context menu.
It is also possible to upload and download files by simply moving files and folders while holding down the left mouse button. These steps are standard for any operating system. If you actively use a computer, then there will be no difficulties.
If you want to download files from the hosting to your computer, then everything is done in the same way. You can use any method. Only when using the context menu, you must select the "Download" item.

We have analyzed the file upload management process.
Also worth noting is the program logs area. When we connect to any server, the connection process is accompanied by a record of the actions that take place. The log window is located at the very top of the program, above the workspaces of the FileZilla file manager.

This can be useful if you are unable to connect to the server while making a connection. You can look into the report and see what is wrong. There, of course, everything is in English. But, if the entered data is incorrect for the connection, then you should understand everything.
We figured out the nuances of the basics. Now let's start creating our connection in order to connect to the hosting or to any other server.
Connecting to the hosting ftp server

There are 2 options for connecting to ftp servers via FileZilla:
- Fast connection;
- Connection via the added connection to the site manager.
Let's look at fast connections first.
This option will be useful when there is no need to constantly connect to some server. You need to connect somewhere 1-2 times. Then the fast connection is the thing.
For such a connection, the ftp client provides a special panel under the main menu of the program.
When connecting in this way, you must fill in the fields:
- The host is the server address itself;
- Username - login to the ftp server account;
- Password - the password to the ftp server account;
- Port - enter the port number (21) or leave the field empty.
Check with your hosting provider for host, username and password. As a rule, this data is given immediately after registering a hosting account. For example, on TimeWeb and Makhost hosting, data comes immediately in a registration letter.
If you do not know this data, then write to the hosting support service. You will definitely be helped.
After entering the data, click on the "Quick Connection" button, which actually happens after that. If you entered everything correctly, you should see the contents of your hosting account in the right window of the program, as well as an inscription about a successful connection in the program's logs.

After that, we can deal with the necessary tasks for uploading files and so on.
One more point. After making quick connections, they will be saved in the list, which is available by clicking on the arrow next to the "Quick connection" button.

I now have this list empty, since I did not make fast connections.
Please note that as new fast connections are added, this list will change. New connections will appear in it, and older ones will disappear. Therefore, keep in mind that you may not always be able to use the list of fast connections.
Now let's move on to connecting to the server through the added connection in the site manager.
The advantages of this method are obvious.
- First, you will always have this connection at hand;
- Secondly, you will not need to enter it every time or be afraid that it will suddenly disappear by itself.
To create such a connection, under the "File" menu there is a "Site Manager" icon.

By clicking on it, a window opens in which the connection (site) is added.

I already have 3 connections that I use all the time. Now you can easily add your connection. I will describe this process on an existing connection. Let's get started.
Click on the "New site" button and enter the name of the connection (any name convenient for you).

Then select the "Normal" login type and enter all the data (host, user and password) to access the ftp server. I leave the Port field blank.


After clicking on the "OK" button, the site manager window will close. We can re-enter it and see a similar picture, as before. Our added connection will be listed. Then we can try to connect to the server by clicking on the "Connect" button.

The connection will start. If you have filled in everything correctly, the connection process will be completed successfully and in the right area "Remote Site" you will see the contents of your hosting account.
If, when creating a connection, some mistakes were made, we can always edit them by selecting a site in the list and changing the data for it. After making changes, always save the settings by clicking on the "OK" button.
As in the case of a fast connection, we can connect to our servers using the list of connections, which is available by clicking on the arrow next to the site manager icon.

At this stage, we have covered the process of connecting to an ftp server using the FileZilla client. Everything is quite simple here and, I hope, you did not have any difficulties. If something is not clear, then I wait in the comments.
Now I propose to consider another interesting function that I constantly use when working with my site. It allows you to save a little time and saves you from downloading files to an unnecessary directory.
Synchronized View
This function consists in the simultaneous movement through the folders of the file manager of the ftp client, when we ourselves do the movement only in one area (on a computer or on a hosting).
Imagine that we have a folder with the engine of my site on our computer. And it is also available on the hosting. Both of these folders have exactly the same content in the form of a large number of subfolders and files. I'll show you clearly how it looks.
I constantly need to move inside these folders, transferring files.
Let's say that I need to navigate in both areas to the wp-admin folder. For this I need to go to this folder in the left pane and then in the right. That is, you need to perform 2 identical actions.
Synchronized browsing automatically goes to the same folder in the second area, when you go to the first (or vice versa). That is, I go to the wp-admin folder in the right pane, and the synchronized view automatically picked up my actions and the program itself went to the same folder in the left pane.
It is very comfortable. Saves time. Allows you to save yourself from constant actions of the same type. And sometimes it saves you from downloading files to the wrong folder. It happens that you just forget to go to the same directory in some window.
But there is one but. This function works only with the identical name of all directories, between which you move in both areas. If I wanted to go to the "sales" folder on my computer, but the hosting does not have it, then synchronized browsing will not work.
To enable synchronized viewing, you must enable the corresponding icon on the toolbar.

When this icon is active, you will be able to move between the directories of the computer and hosting and at the same time do the movement in only one area. A very handy thing. I use it all the time.
How synchronized viewing occurs, I showed more clearly in the video below. It also showed how to use the FileZilla ftp client.
I hope that now this program will become an irreplaceable assistant for you and save your nerves and efforts.
This is where I will end this article. One of the next articles will be about the Notepad editor. A very cool thing. In addition, there is a built-in ftp client that allows you to upload edited files directly to the hosting.
In the comments, I would like to know what programs do you use to connect to the hosting, friends? Also write ideas for new software reviews and other blog material.
Thank you for your attention. Till.
Best regards, Konstantin Khmelev.
In this tutorial, you will learn how to configure the FileZilla FTP client. After completing this tutorial, you will be able to connect to your FTP server to manage your files. However, it is not only using FTP that you can manage files on Hostinger. You can also use the ‘drag and drop’ File Manager (with a convenient drag and drop). Many users find File Manager more convenient than FTP:
FileZilla is free and open source software that helps you transfer large files faster and more securely. Most web hosts have serious limitations when it comes to uploading files using PHP or scripts. However, such restrictions do not apply to FTP uploads, so the FileZilla client can be a powerful weapon in the hands of a developer.
The FileZilla client has gained popularity due to its simplicity and ease of use for the average user. It supports many operating systems such as Windows, Linux, Mac OS X, BSD, and setting up FileZilla takes less than five minutes. It has been translated into more languages and has many useful features.
Before you start this guide, check for:
- FileZilla client that you can download.
- FTP credential information.
Step 1 - Collecting FTP data
To connect using the FileZilla client, we need to find your FTP details. At Hostinger, you can find the information you need under Files→ FTP Access.
Here you will find: FTP server, FTP user, FTP password and FTP port required to configure your FileZilla client. In case you have forgotten or do not know your FTP password, press the button Change account password.

If you need to give FTP access to your friend or developer, you can create an additional FTP access account in the same section. Files → FTP Accounts.
Step 2 - Configuring FileZilla Via Site Manager
The easiest way to add your site to the FileZilla client is to open the FTP client and go to the section Site Manager... You can enter it in two ways: by clicking CTRL + S(on MAC use the keyboard shortcut CMD + S) in the client, or just click on File -> Site Manager, in the newly installed FTP client.

Step 3 - Adding a Site to the Site Manager
After you have found the Site Manager, you need to add your site there. To do this, click “ New website”In the manager window and fill in all the necessary information:
- “Host”- you can find this information from your hosting provider, however, in most cases you can use your domain as a host by entering ftp.yourdomain.ru.
- “Port”- the port of your FTP server, by default the port for FTP is 21, but this field is optional.
- “Protocol”Is a protocol for exchanging files on any network. Select FTP - File Transfer Protocol.
- FTP- FTP stands for File Transfer Protocol. It is a special Internet service designed to establish a connection with a specific server (or computer) that allows users to download files to their computer or transfer (upload) their files to a server (computer).
- SFTP- SFTP stands for Secure File Transfer Protocol. SFTP provides secure file transfer using a private and secure data transfer channel. It is the standard data transfer protocol for the SSH2 protocol. SFTP servers use port 22 by default and FTP in SSL / TLS mode uses 990.
- “Encryption”- select the type of encryption. We recommend using regular FTP (not secure) because other methods require creating certificates and other settings. Please contact your hosting provider for help if you want to use a different encryption method.
- “Login type”- type of authorization, if necessary.
- Anonymous: you cannot enter username and password. In this case, the username is “anonymous”.
- Normal: you need to enter a username and password if required.
- Request a password: The FTP client will ask for a password during authorization, it will be remembered throughout the entire session.
- Interactive: The FTP client will ask for a password and will ask for it again every time it connects to the server.
- Account: When selected, activates the "Account" field in the settings. This type of authorization is only suitable for FTP; SFTP is not supported by them.
- User: FTP username to use when connecting.
- Password: FTP user password.
Please select Login type by setting it to Normal and enter your username and password.

IMPORTANT! In case your domain is not directed to your host, the hostname ftp.yourdomain.ru will not work. An alternative would be to use the IP address of the server specified in the FTP settings.
Step 4 - Connecting to FTP Server
Once you have filled in all the required information, click “ Connect" or " OK”And connect to the server. Before that, check the spelling of your password and other data.
If the section Encryption you had an option Use explicit FTP over TLS if available then you should receive a similar TLS certificate validation message.

Click the button OK to continue. You can also check the box next to Always accept a certificate in future sessions... This way you don't have to do this every time you connect with FileZilla.
If the FileZilla setup was successful, you should see a list of your FTP server directories. Did you enter the data correctly, but the connection was unsuccessful? Please consult your hosting provider. Searching for the cause of the error on Google can help, too.

If an error occurs 530 Login incorrect. Unable to connect to server- this means that either your password or FTP username is incorrect. Try resetting your password in the control panel and re-configuring the client with the new data.
If FileZilla client stops connecting in phase Connection established, awaiting invitation ... Initializing TLS ... and does not perform any more actions, then go to the section File -> Site Manager and change the option Encryption on the Use regular FTP (insecure).
Conclusion
Congratulations, you have successfully configured FileZilla and connected to your FTP server. Now you can download, upload and manage your files in one place - the FIleZilla client. If you have any difficulties or questions, write them to us in the comments below.
Good day, dear readers! As you understood from the title, today we will talk about FileZilla Server and creating your FTP the server itself.
There have been a lot of messages lately asking me to tell you how to install your own FTP server in home (or not so) conditions.
About what is FTP, if someone suddenly does not know, you can find out in this article of mine "" or immediately start reading (within the framework of this article there are a few words about the protocol itself).
Preparing to install your FTP server
As promised, to begin with, briefly about what is FTP for those who don't know:
I would like to note right away that the article will consider the option of home use, without the tricky and subtle settings that are used in the case of full-fledged corporate servers.
To install, you need to download one of the multiple distributions that will help you deploy FTP-server. I personally recommend that you use FileZilla Server, because it, like the client I once mentioned (see the article on the link above), is extremely simple to install and configure, and also free.
Install FTP FileZilla Server
After downloading the distribution, in fact, start its installation (meaning that you need to click on the downloaded exe-file) and follow the guidelines below.
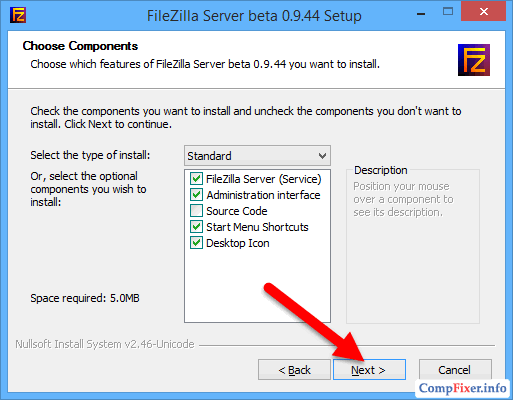
On the first window you need to agree with the license agreement, click “ I Аgree”.


- Standard(Standart) - an option for installation from scratch for the full functioning of the server.
- Full(Full) - almost the same, but the source code of the program will also be copied to the installation folder, in case you want to change something in it.
- FTP service only(Service only) - the FTP service is installed directly, without access to it through the interface. Useful if you plan to manage your file storage from another computer.
- Management interface(Interface only) - unlike the previous point, only the graphical shell for managing the server is installed, but not the server itself. Use if you want to remotely access your FTP server.
- Custom installation(Custom) - You are free to choose what you want to put on your computer.
On the next window, you must select the installation folder, for example, “ C: \ Program Files \ FileZilla Server”. After selection, go to the next window ( Next).
Now the installer will ask us to choose how to install and run the server.

There are three options:
- As a service and start at login
- As a service and start manually
- Easy installation, run manually
It is recommended to choose the first or second option. The only difference is that in the second case, for the server to work, you will need to go to " Control Panel - Administrative Tools - Service Management", find a service there in the list and start it yourself by clicking on the start button.
FileZilla Server Port and Initial Startup
In addition, at this stage, you should specify the port through which the server management interface will be connected, that is, so to speak, your administration console, which will allow you to set the settings, see who and where connected, etc. To improve security, change it from the standard ( 14147 ) to something else.
Do you want to know and be able to do more yourself?
We offer you training in the following areas: computers, programs, administration, servers, networks, site building, SEO and more. Find out the details now!
Also, by default, the Start Server after setup completes option is checked. You can leave this checkbox, or you can remove it. That's your business. Having done this, go to the last window using the button Next.
Here we select the options for launching the interface.

Again, there are three of them:
- When logging in, for all users
- At login, for the current user
- Manually
The first option will work if you are the only user of the computer where the server is installed, and you, in principle, will still launch the interface automatically under all accounts of the operating system, or under only one.
The second is suitable for those who work on a computer more than one (that is, on a computer there are several accounts used by different people) and wants no one else to manage it FTP server, that is, the interface was launched only from under the account in which the installation is now being performed.
And the third option sets the launch parameter only manually, that is, it will not start with the system at all.
Let me remind you that the interface is something like an administrative program that allows you to monitor the state of the server, start-stop and configure it.
Check mark ( Start Interface after setup completes) in this window, again, sets the launch of the interface immediately at the end of the installation.
Well, having figured out all of this, you can finally start installing the server (using, of course, the button " Install") :)
Initial FTP FileZilla Server setup
So, after installation, at the first start of the interface, a small window will appear where you need to specify the address and port for connection, as well as the administrator password (it is not there during the first installation). You can check the "Always connect to this server" option. Click " Ok".

I would like to emphasize that this is a connection to the server locally, namely, a connection to the administration interface, that is, to issue an address 127.0.0.1 and port 14147 for a friend who wants to connect is useless. External addresses, passwords, and attendances required to connect to the server will be discussed along the way.
Now let's move on to the settings. This is done by going to the address " Edit -> Settings"or by clicking on the button on the interface panel:

The settings window will open in front of you. On the first tab (General Settings), you can set the following parameters:

From top to bottom in the screenshot:
- Port on which clients will connect to the server
- Maximum number of clients
- Number of threads
- Various timeouts (three pieces)
Within the framework of this article, we are interested in the first two points. The port can be left as it is, or you can change it to improve security, but then you will have to inform everyone who wants to connect about it.
The second setting is responsible for the maximum number of connections. By default, the parameter value is “ 0 ”, This means that their number is not limited. It is worth changing this parameter if, for example, your Internet channel cannot cope with the load, because there are so many people connecting to you.
The rest can be left unchanged, because the settings are optimal for home use.
In the subparagraph “ IP Filter”You can ask IP addresses (or their range), which will be prohibited from connecting to your server, as well as set exceptions from the specified range (second field).
Ie, for example, if you want to ban someone and prohibit him from getting to your server, then indicate him in the first window. Also, if you want to grant access only to someone specific and deny everyone else, then put an asterisk in the first field and set the list IP-addresses in the second.

Tab “ Passive mode settings”Regulates the parameters for passive connection to the server and its response.
It is worth changing something here only if you are not connected to the Internet directly, but through the router on which the firewall lives and NAT... In this case, you may need to specify in the " Use the following IP"its external IP-address (you can find out from the provider or in the router interface), as well as set the port range (Use custom port range) through which the client can connect to your server in passive mode.
It's worth touching these settings, perhaps, only in case of problems with connecting users. In case of these and the impossibility to figure it out on your own, I will give you advice on the settings exclusively for you (write comments).

Settings section “ Miscellaneous”Contain settings that are insignificant for a home FTP server. For example, such as “ Do not show password in log files”(Don" t show passwords in message log), “ Launch interface minimized”(Start minimized), as well as the size of the transmit buffers. In general, you don't need to touch anything here.
On the “ Admin Interface Settings”You can ask IP-address and port through which the server management interface will be available (the same one that we initially used as 127.0.0.1 and 14147 , that is, if you wish, you can change them). Alternatively, you can specify IP-addresses that are allowed to connect to it.
Settings section “ Logging”Allows you to enable logging (Enable logging to file), configure their maximum size (Limit log file size to), write everything to one file (Log all to" FileZilla Server.log ") or create a separate one for each day (in in this case, you can limit their maximum shelf life).

Tab “ GSS Settings”Is responsible for using the protocol Kerberos GSS... This option does not require configuration for normal use.
Residual FTP server settings - speeds, encryption, etc.
Then we have “ Speed Limits”. It can help limit the speed of incoming and outgoing connections. There are two ways to limit: set a constant limit for the entire time, or create rules for a specific day and / or hour. Limits are specified in kilobytes.
Tab “ Filetransfer compression”Allows you to enable the file compression mode during transfer. In this case, you can configure the minimum and maximum compression levels, as well as specify the IP addresses for which compression will not be used. You don't have to touch anything.

To configure a secure connection between a client and a server, go to the “ SSL / TLS Settings”. Here you need to enable support for these protocols and specify the paths to the private key, certificate file and password. For the average user, this is not necessary, so this article will not be covered.
Finally, you can enable automatic banning of users after n-th attempts of unsuccessful connections, and the time of the ban. To do this, go to the “ Autobans”And, if you need it, then check the box" Enable automatic bans", indicate in the column" Ban IP adress after"the number of attempts after which the blocking will be carried out, as well as the blocking time in the field" Ban for".
This is sometimes necessary so that unwanted persons do not spam your server with their attempts to connect.
Initial setup of user accounts (users) and shares (share) in FileZilla Server
Now let's configure user access, namely their accounts, passwords, folders, etc.
As an example, let's create the most, so to speak, common user and give him access.
So, to add a new account, follow, in the main window of the interface, along the path “ Edit-> Users”. We will be presented with a window for working with users.
To add a new one, click “ Add”. Next, you will need to set its name, for example, anonymous, and group membership (in our case, we will not indicate). We set, press “ Ok”.


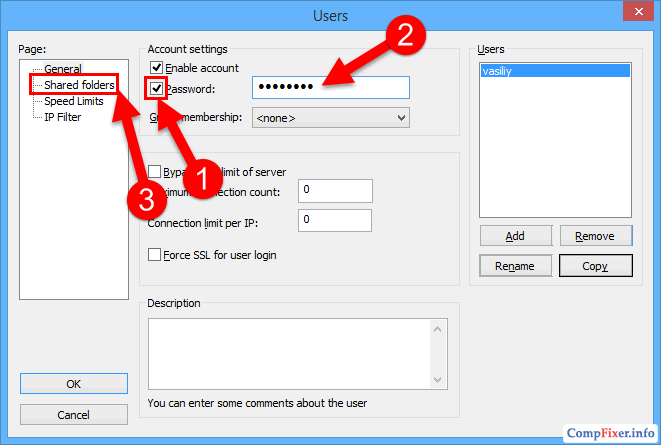
Now for our new user, you can set a password and a limit on the number of connections. If necessary, do it by ticking the " Password"and specifying it (password) in the box opposite. It is highly recommended to use passwords for users for security purposes.
Next, go to the “ Share Folders”. Here, in fact, we set which folders the user will have access to. This is done simply: click “ Add”And select the desired folder on the disk. On the left, you can set access rights to it: read-only - “ Read", Record -" Write", Deletion -" Delete"And the ability to change existing files in the directory -" Append”. Below you can allow creating, deleting, listing files and distributing permissions to subdirectories.
We set the parameters and folders you need and .. OK
This completes the initial setup. For home use, you don't need more;)
User access to the server FileZilla Server
So that your friends can use your FTP server, you need to provide them with it IP-address, as well as your specified username (s), password (s) and, if necessary, the port (if changed), which they must indicate in their,.
Learn external IP-address can be by contacting the provider, looking in the settings of the router or, simply, using one of the many services, such as (as you probably guessed, you need what is written under the text "Your IP address:";)).
Afterword
Here are the things.
Despite the fact that the article is focused as much as possible for small home use, I tried to explain in as much detail as possible all the necessary settings and nuances FileZilla Server.
As always, if you have any questions, additions, etc., then write in the comments - I will be happy to help.
PS: For the existence of this article, special thanks to a friend of the project and a member of our team under the nickname “ Kellis "y“.


