Popular database management system MySQL It is widely used for various needs, primarily as a de facto standard in the field of Internet hosting. No less widespread is the package for managing this DBMS - phpMyAdmin... Without a doubt, this is a good, convenient product, but very often it happens that the skills of working with this product completely replace the skills of working with the DBMS itself. Therefore, in this material, we decided to acquaint our readers with how to perform the main tasks MySQL administration from command line.
As our regular readers may have noticed, we consistently oppose the use of all kinds of control panels by beginners, no matter how convenient and common they are. At the same time, we do not deny their existence and we ourselves use them with pleasure in our daily activities.
But there is one big difference: a specialist who knows how to work with the command line using the panel does not replace the ability to work with the product, but only makes it easier for himself to perform everyday tasks. And a newbie, accustomed to performing all actions in the panel, in case of its inaccessibility, falls into a quiet panic, because now it is necessary to enter some "spells" into this incomprehensible black console ...
In fact, working with a DBMS at the command line level is not difficult at all, and some of the administration tasks are easier and more convenient to perform in it. Let's make a reservation right away, by administration we mean the administration of the DBMS server, and not the databases themselves. Of course, you can also work with them from the command line, but it is better to use more suitable tools for this.
Database and user management in MySQL
If you should start dancing from the stove, then working with a DBMS should start with creating databases and users of these databases. The tasks are inherently simple and beautiful, and most importantly - simple, they are solved from the console. The utility of the same name is designed to work with the MySQL server mysql, the work with which takes place in interactive mode, so first, let's connect to the server:
Mysql -u root -p
Where the -u switch sets the username, and -p indicates password authentication, the command syntax allows you to specify a password by entering it without spaces immediately after the switch, but in this case it will be saved in the command history, which is not very good, so it is better to enter the password interactively. By executing this command, we will be in a MySQL environment, as indicated by the changed command prompt.
 Working in this environment has its own characteristics: each command must end with the symbol ;
or \ g, which, by the way, is written in the first line of the greeting. The exit from this mode is carried out by the command:
Working in this environment has its own characteristics: each command must end with the symbol ;
or \ g, which, by the way, is written in the first line of the greeting. The exit from this mode is carried out by the command:
Immediately about one very common mistake: they forgot to put a semicolon at the end of the command. What to do? It's okay, just finish off the missing characters on the next line.
First, let's see the list of bases:
Show databases;
As they say, without unnecessary details, but for most administrative tasks this is enough:
 Finding out the list of users is a little more difficult, it is stored in the form of a service database table mysql, so we write a small query:
Select user, host from mysql.user;
Team select selects the specified columns user, host, the from option indicates where we select them from, namely from the user table of the database mysql.
 The first column indicates the user, the second is the host on which this user is allowed to connect, %
- denotes any value. Please note that if ivanov has in settings localhost, then when connected to mysql by the address 127.0.0.1
he will not be able to access, this must be taken into account when you specify the connection data to the DBMS server in your applications.
The first column indicates the user, the second is the host on which this user is allowed to connect, %
- denotes any value. Please note that if ivanov has in settings localhost, then when connected to mysql by the address 127.0.0.1
he will not be able to access, this must be taken into account when you specify the connection data to the DBMS server in your applications.
You can view the owners of the bases with the following request:
Select host, db, user from mysql.db;
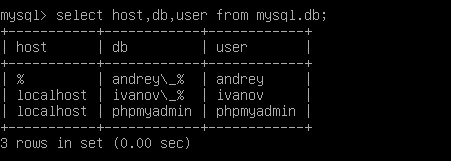 No special comments are required here. For instance, ivanov has rights to bases with a prefix ivanov_ when connected via localhost, and andrey for bases with a prefix andrey_ on any host. You can view user privileges with the command:
Show grants for "ivanov" @ "localhost";
We wrap the username and host in single quotes.
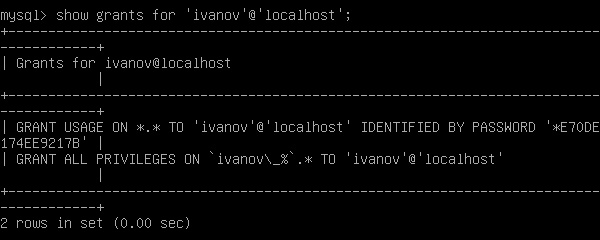 The first line says that the specified user has no privileges ( USAGE) to any table of any base ( *.*
), the second line says about all basic privileges for all tables of all bases with the prefix ivanov_.
The first line says that the specified user has no privileges ( USAGE) to any table of any base ( *.*
), the second line says about all basic privileges for all tables of all bases with the prefix ivanov_.
A detailed analysis of the MySQL rights system is far beyond the scope of this article, let's just say ALL PRIVELEGES gives the user all rights to their databases, but does not allow managing access rights for other users. For this, a set of rights is used ALL PRIVELEGESWITH GRANT OPTION which has by default root... For a simple user, this set of rights is redundant.
Let's try to create a new user:
Create user "petrov" @ "localhost" identified by "password";
The command syntax is simple, we provide a username and hostname, and credentials in the form of a password. All passed values are wrapped in single quotes. Having created a user, you need to set him rights, this is done by the command GRANT... First, we will explicitly deprive him of privileges to other people's databases:
Grant usage on *. * To "petrov" @ "localhost";
Then we can set the rights at our discretion, for example, issue full rights to databases with a name template petrov_:
Grant all privileges on `petrov \ _%`. * To "petrov" @ "localhost";
Note that the template should be wrapped with symbols gravis (` ), which are located on the key with the Russian letter Ё.
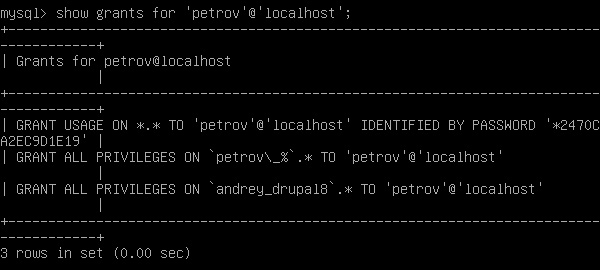
 You can issue the rights to a separate database as follows:
Grant all privileges on andrey_drupal8. * To "petrov" @ "localhost";
To select rights, use the REVOKE command, which has a similar syntax, only to (to whom), we replace it with from (who). For instance:
Revoke all privileges on andrey_drupal8. * From "petrov" @ "localhost";

In order for the MySQL server to apply the rights, you must force it to reload the privilege cache with the command:
Flush privileges;
You may also need to change the user's password:
Set password for "petrov" @ "localhost" = password ("newpassword");
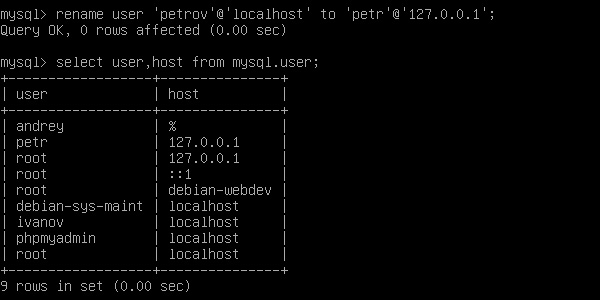
Rename it, and renaming does not necessarily mean changing the username, you can change both the name and the host, in any combination:
Rename user "petrov" @ "localhost" to "petr" @ "127.0.0.1";
 Finally, delete the account:
Drop user "petr" @ "127.0.0.1";
Let's move from users to databases, in the simplest case, the command is enough to create a new database:
Create database petrov_newdb;
This will create a database with the default codepage and comparison encoding. If the DBMS server has not been configured separately, then this encoding will most likely be latin1_swedish_ci, which in some cases can cause problems, if not now, then in the future, therefore, it will be a good practice to explicitly indicate the encoding when creating the database. For UTF-8 it would be like this:
Create database petrov_newdb default character set utf8 collate utf8_general_ci;
For Windows-1251:
Create database petrov_newdb default character set cp1251 collate cp1251_general_ci;
To remove the base use:
Drop database petrov_newdb;
Checking, optimizing, fixing errors of MySQL databases
As MySQL is actively working, databases can become fragmented and contain errors in table data. We are not talking now about serious failures, such situations should be considered individually, but about the simplest errors that are successfully eliminated by the means of the DBMS itself. It is convenient to use the mysqlcheck utility for checking, repairing and optimizing.
To check the database execute where andrey_drupal8- base name:
Mysqlcheck -u root -p --check andrey_drupal8
All databases can be checked at once with the command:
Mysqlcheck -u root -p --check --all-databases
And since the entire output will most likely not fit on the screen, it makes sense to redirect it to the command less:
Mysqlcheck -u root -p --check --all-databases | less
note that less allows you to scroll the output both down and up using the arrows, to exit press q.
If errors were found in any of the databases, it is worth trying to fix them, to do this, specify:
Mysqlcheck -u root -p --auto-repair andrey_drupal8
For optimization, use the key - -optimize, you can optimize a separate base or several, to do this, list them after the key --databases:
Mysqlcheck -u root -p --optimize --databases andrey_drupal8 petrov_newdb
and also all at once:
Mysqlcheck -u root -p --optimize --all-databases
Dumping and loading MySQL database dumps
Another common task in the administration of any DBMS, database dumps are used both for backups and for transferring or creating copies. If backup- the process is automated, then the creation of copies for transfer to another server or before any significant interventions in the structure of the database have to be done manually.
And when it comes to large bases, then here phpMyAdmin bad helper, limitations on the execution time of scripts, the size of the uploaded file, available memory etc. And if you can still upload a large dump using it, then uploading it back may not work.
Let's start by creating dumps, for these purposes the utility is used mysqldump whose syntax is the same as the syntax mysqlcheck... To dump the dump, use the command:
Mysqldump -u root -p andrey_drupal8> ~ / drupal8.sql
To unload several databases at once, use the key --databases or --all-databases to create a dump of all databases at once. The output of the command should be sent to a file and its location should be specified, in our case it is a file drupal8.sql in your home directory. You can also pipe the output to the archiver and get the archive immediately:
Mysqldump -u root -p andrey_drupal8 | gzip> ~ / drupal8.sql.gz
In general, we do not recommend using one dump for several databases at once, the best option there will be a dump for each database, at the same time using the key --all-databases justified in cases where you need to quickly do backup the entire server, for example, when updating or reinstalling the DBMS, so that you can quickly restore information if something goes wrong.
In order to restore the database, you need to send a dump to the input of the mysql utility; for single dumps, you should always specify the receiver base, for example:
Mysql -u root -p andrey_drupal8< ~/drupal8.sql
The target does not have to be the source base, but keep in mind that if the base already exists, all of its contents will be replaced by the contents of the dump.
For dumps containing more than one database, just specify:
Mysql -u root -p< ~/all.sql
In this case, each base will be loaded into its source, if the source base does not exist, then it will be created.
As you can see, creating and restoring dumps using the command line happens literally in one line and is much easier and faster than using phpMyAdmin or similar tools.
Recover forgotten MySQL root password
Another very popular challenge. Let's say right away that you cannot recover the MySQL superuser password, like any other user, but you can change it. To do this, you must have the superuser rights of the operating system. First, let's stop the DBMS service:
Service mysql stop
Then we run it in safe mode, bypassing the privilege tables:
Mysqld_safe --skip-grant-tables &
Please note that after executing this command, the command prompt will disappear, leaving one blinking cursor. We write directly there:
Mysql -u root
and we get into the mysql environment with as root without entering a password.
 It seems to us that many have already guessed what to do next, but complete set password in this mode it will not work, so you have to go the other way. Remember that user information is stored in a table user service database mysql... Then we will execute the following request:
Update mysql.user set password = password ("newpassword") where user = "root";
Important! In new MySQL versions instead of a column password tables user column used authentication_string, so instead of set password should indicate set authentication_string.
This request will install New password newpassword for all rows in a column user which is listed root.
 Let's update the privilege cache:
Flush privileges;
Let's exit the mode:
Stop the service and start it normally:
Service mysql stop
service mysql start
We hope that after reading this article, you will acquire the initial skills in working with MySQL from the command line and will be able to feel confident even when phpMyAdmin is not available, and maybe even appreciate the convenience of console commands and will log into the panel less and less, preferring to manage the server directly.
Tags:
Last update: 22.12.2017
Typically, databases are used as data storage. PHP allows you to use different system database management, but the most popular today in conjunction with PHP is MySQL. MySQL Introduces Free software that allows you to interact with databases using SQL commands. We have already covered the process of installing and configuring MySQL.
To make it easier for yourself to work with databases MySQL data install a special set of phpMyAdmin scripts. phpMyAdmin provides an intuitive web interface for managing MySQL databases. Using this tool, it is much easier to work with databases than to manage MySQL from the console.
To install phpMyAdmin, download the archive and unpack it into the folder C: \ localhost where docs for php are. Rename the unpacked folder to phpMyAdmin for brevity.
In the unpacked phpMyAdmin directory, create a file config.inc.php with the following content:
And to make sure everything is configured correctly, in the browser, go to phpMyAdmin, for example, http: // localhost: 8080 / phpmyadmin:
In the left column, you can see all the databases available on the MySQL server. Even if you haven't created any databases yet, the server already has a set of default databases.
The right side of the phpMyAdmin interface contains the basic database management tools as well as various configuration information.
Creating a MySQL database in phpMyAdmin
To exchange data with the MySQL server (save, modify, delete, receive data), we naturally need a database. We can create a database from the MySQL console, as well as from the phpMyAdmin visual interface.
Let's open the phpMyAdmin interface. Let's go to the Databases tab. Under the label Create a database enter some name for the new database, for example, compstore and click on the "Create" button.
And after that we will receive a message about successful establishment a new database, and it will be added to the database lists.
The new database is currently empty and contains nothing. Let's add a table to it that will store the data. To do this, click on the name of the database and we will go to the "Structure" tab, where we will be offered options for the new table. In the "Name" field, enter the name of the new table. Let the tables store data about smartphone models, so let's enter the name "phones", and enter the number 3 as the number of columns:
To create a table, click on the "Next" button. After that, we will have a set of cells for setting column parameters. Let's specify the following for the column names in sequence: id, name, company. For the id columns, we specify the INT type, and for the name and company columns, the VARCHAR type. For the columns name and company, in the "Length / Values" field, we will specify the number 200 - it will indicate the maximum string length in characters. Also for the id column we will indicate PRIMARY in the "Index" field and in the "A_I" (AutoIncrement) field we will check the box:
Thus, the table will have columns for the unique identifier, phone name, and manufacturer name. And then click on the "Save" button at the bottom.
After creating the table, we will be able to see the table and its columns in the database column:
Is not the only way create tables in phpMyAdmin, since here we can manage the database using SQL queries. So, select our database in the list of databases and go to the "SQL" tab. It displays a field for entering a command in the SQL query language. Let's enter the following command into it:
CREATE Table phones1 (id INT NOT NULL AUTO_INCREMENT PRIMARY KEY, name VARCHAR (200) NOT NULL, company VARCHAR (200) NOT NULL)
This is a standard SQL command to create a table. The CREATE Table keywords are followed by the name the table being created and then the column definitions are comma-separated in parentheses.
Each column definition contains the name of the column, its type, and a number of additional values. For example, in the definition of the id column (id INT NOT NULL AUTO_INCREMENT PRIMARY KEY), the name of the column is indicated, the type is INT, and also that the column must have a value - NOT NULL, that its value will automatically increase by one with the addition of a new object - AUTO_INCREMENT, and that it plays the role of the PRIMARY KEY.
In general, the table created in this way will be equivalent to the one that was created earlier. Press the "Next" button and the second table phones1 will be created.
Hello dear blog reader, now is the time to change the usual phpMyAdmin, with a more brutal database management tool. Today we will touch the MySQL console and learn how to execute standard commands, as well as commands for restoring databases. MySQL console Is a standard DBMS (Database Management System) for MySQL supplied with the product.
When the MySQL console comes in handy
From the point of view of a novice web programmer, phpMyAdmin performs all the functions necessary for normal operation. Imagine that you are not only a web programmer, but, in part, a system administrator who is obliged to restore the database after a failure.
In this case, you cannot do without the skills of working with the MySQL console. A little later, we will look at the commands for restoring the database using the console, but for now, let's start with the basics.
How to start the MySQL console
You can start the console through windows explorer by finding the mysql.exe utility in the MySQL folder. It is usually located at: [path to folder] \ mysql \ bin \ mysql.exe... In the case of using denver, MySQL console, it is worth looking in this direction:
C: \ WebServer \ usr \ local \ mysql \ bin \ mysql.exe
In addition to windows explorer, you can use the command line:
- Run cmd.exe
- Write the full path to the mysql.exe file
- Hit enter
You should observe the following picture:
The error says that to start the mysql console, you must enter the username and password. When working with denver, the default database user is root with an empty password.
Run the same command with additional parameters specifying the credentials.
C: \ WebServer \ usr \ local \ mysql-5.1 \ bin \ mysql.exe –u root –p

If everything is done correctly, you will receive the message " Welcome to the MySQL console ..."
You can verify that you are successfully connected to the database server by entering the show databases command; ... As a result of its execution, a list of the databases present on the server will be displayed.
Let's try to select one of the databases and see the list of tables in it:
use test; show tables;
In my example, I refer to the test database, if yours does not exist, refer to any of the available ones.
As an experiment, you can try to create the test database using the command:
create database test;
To which you will receive the message: " QUERY OK, 1 row affected", indicating the successful creation of a database named test.
Now let's create an order table in the test database.
create table test (`id` int (11),` content` varchar (255));
And again, run the show tables command; , which will show that the table has actually been created and is available for working with it.
You can also try to display a list of columns in the table:
show columns from test.order;

Well, at the end of the acquaintance with MySQL console, let's execute some request:
SELECT * FROM test.order;

So, dear readers, I congratulate you, now you can work with MySQL in spartan conditions without phpMyAdmin. I will give some list of everyday commands:
- CREATE DATABASE DB_NAME; - create a new database;
- SHOW DATABASES; - viewing available databases;
- USE DB_NAME; - select a database;
- SHOW TABLES; - viewing all tables;
- SHOW COLUMNS FROM TABLE_NAME; - viewing columns and their properties;
- CREATE TABLE TABLE_NAME (`ID` INT (11),` NAME` VARCHAR (255));- table creation;
- ALTER TABLE TABLE_NAME ADD COLUMN_NAME INT (11);- add a column to the table;
- ALTER TABLE TABLE_NAME DROP COLUMN_NAME;- remove a column from the table;
- MYSQL -UUSERNAME -PPASSWORD -HHOST DB_NAME - upload the database;
- MYSQLDUMP -UUSERNAME -PPASSWORD -HHOST DB_NAME> FILE_NAME.SQL- make a dump of the database;
- QUIT; - exit from the MySQL console.
Commands for restoring tables via MySQL console
As I promised at the beginning of the article, I am posting commands for restoring tables. These commands can come in handy after a server crash.
Good day, colleagues 🙂
Yes, exactly colleagues, because a mere mortal MySQL command line (or MySQL Shell, as the developers still like to call it), as well as working with MySQL in the console, is hardly useful.
In order for this topic to be interesting, you need to be, at least, or a novice system administrator who does not use phpMyAdmin and other interfaces in principle.
Launching the console on different OS
Since I will be demonstrating working with the MySQL command line in the server console, it would be nice to start it for a start.
The action is simple, familiar to many, for which knowledge of "hot keys" is enough.
Launching the console on Windows:
- Win + R to open command Windows strings with administrator rights;
- Enter the command cmd
- Push Enter on keyboard
Running the console in Linux distributions (terminal): in Ubuntu I was working with, the system shortcut is enough Ctrl + Alt + T... I can't say anything about other Linux-based OSs.
Launch Console on MacOS: I myself have not done this, tk. I haven’t got a Mac yet and I’ll hardly get it as unnecessary, but as far as I was able to find out, there are no “hot keys” for calling the terminal in this OS. So if you are a user of Apple products, then launch the console through the OS interface, since there are a lot of manuals on the network.
It is a little embarrassing even to publish such information in case some professional system administrator with bearded experience accidentally stumbles upon this article. he will think: "The author considers his readers to be programmers, but at the same time he teaches how to run the console ... Some nutcase :-)".
Yes, it is quite logical 🙂 But I just take into account situations that, along with professional developers, beginners can also get here. Therefore, I try to make the information complete and accessible to all categories of users, which I have already mentioned.
Basic MySQL Console Commands
So, first of all, we need to access the MySQL command line in the console. To do this, open the server console and, if you have MySQL installed globally as a service, then to "check the connection" we write the following:
Mysql -V
Console command mysql allows us to run the MySQL command line utility of the same name.
This will allow us to find out the version of MySQL installed on the computer and make sure that it is installed as a service at all. If so, you will see the following text in response in the console:.
Yes, I'm not a "true coder" because I'm sitting under Windows 🙂 But, not the point. On the Unix systems the procedure will be the same.
If suddenly MySQL is not installed globally on your computer or you need to work with several versions of MySQL, in which there are only directories with files and MySQL libraries, then starting MySQL through the console will look like this.
In the console, go to the directory where the executable file MySQL (on Windows, at least mysql.exe) with the following command:
Cd C: \ OpenServer \ modules \ database \ MySQL-5.7-x64 \ bin
The path to the distribution kit, of course, may differ. As an example, I decided to run one of the MySQL versions included with OpenServer.
And we start MySQL, checking its version along the way:
Mysql.exe -V
As a result, a message similar to the first case should have been displayed in the console mysql Ver 14.14 Distrib 5.7.16, for Win64 (x86_64).
We figured out everything with starting the MySQL command line through the server console, now we will connect directly to the MySQL server.
Connecting to MySQL Server in Console
The MySQL server may not necessarily be on the same machine that you are trying to access it on in the console. Therefore, in order to connect to remote server MySQL through the console was possible, the mysql utility has many parameters with which you can specify the necessary settings.
In order to start the MySQL command line in the console, we just need to write the following in the server console:
However, in this case, you will receive the following error: ERROR 1045 (28000): Access denied for user ‘ODBC’ @ ’localhost’ (using password: NO)... This is how the error message looks on my Windows. If you are using Linux, then instead of ODBC there will be the name of your system user under which you perform actions in the system.
All this is because by default, when connecting to a MySQL server, an ODBC user on Windows without a password and a system user on Linux with his password are used in the console. The default host is localhost, i.e. this user can only connect from the local machine.
Therefore, you have two ways out: either use a different user to enter the MySQL command line, or create a MySQL user with the required account. But for the second method, we still cannot do without the first 🙂 Therefore, first, we connect to the MySQL server as a standard user root which is created when installing MySQL to a computer and for which access from localhost is allowed by default:
Mysql -u root -p
When prompted to enter a password, just press Enter (if you did not enter it, of course, when installing MySQL). You will then be connected to the MySQL server, assigning you a connection ID and accessing the MySQL command line.
If you want to connect to a MySQL server with a specific hostname or IP, or want to log in as a different user, then use the command in the following format:
Mysql -u user_name -p user_password -h host_or_IP_MySQL_server
Instead of Cyrillic characters with an underscore, of course, you need to enter your data in Latin letters. By the way, if you wish, you can write this command in a slightly different format:
Mysql --user = username --password = username --host = host_or_IP_MySQL_server
If for some reason you do not want your MySQL connection password to be displayed in the console (which is correct, in fact), you can use the following command:
Mysql -u username -h host_or_IP_MySQL_server -p
Since the password is not explicitly specified, you will be prompted to enter it in the next step. Moreover, the characters you entered will not be displayed even in the form of asterisks (wildcards), instead there will be just an empty string.
In addition to specified settings connection, it is possible to use the following parameters, the values of which will be indicated in the same way as the above:
- -Port or -P - to specify the port for connecting to the MySQL server;
- —Protocol — protocol used for connection ( possible options: TCP for Windows and Linux, SOCKET for Linux, PIPE and MEMORY for Windows);
- —Socket or -S - this parameter is useful if you want to connect via sockets, therefore, the parameter value will be socket;
- -Pipe or -W - the parameter is needed if you want to use named "pipes" or "pipes" for connection;
- —Shared-memory-base-name - this parameter is useful for MEMORY connections via shared memory on Windows;
It is clear that the list of all parameters for connecting to the MySQL server is not limited to this. In reality, there are many more of them.
If for some reason standard version specifying the host, user and password will not work for you, then the following information will be useful to find out the full list of connection parameters - https://dev.mysql.com/doc/refman/5.7/en/connecting.html
How to create a database in MySQL console
Once we have connected to the MySQL server and launched the MySQL command line, it's time to start life cycle our website database, which starts with its creation. To create a MySQL database through the command line, enter the following command:
CREATE DATABASE dbname;
The same action can be done using a special MySQL utility mysqladmin... It runs in isolation from the MySQL command line, i.e. to use it you will need to exit it or open new console server.
And then call the following command:
Mysqladmin create dbname;
By the way, using the mysqladmin utility, you can not only create and delete databases without going into the MySQL console, but also operate server configuration, MySQL processes, manage replications, ping servers and do much more interesting things.
How to create a MySQL user on the command line
Not often, but sometimes you need to create a new MySQL user. Moreover, in console mode.
On the MySQL command line, this is done as follows:
CREATE USER "username" @ "host_or_IP_machine" IDENTIFIED BY "user_password";
The user has been created. Parameter host_or_IP_machine means that when creating a user, you need to specify the IP from which he can connect to the server, or the host name (the domain name is suitable working machine online).
By the way, when specifying the host to connect to the MySQL server, you can use the percent symbol - % which means that created user can connect to MySQL server from any IP address or host.
It should be borne in mind that in in this case localhost is not included in the list of addresses specified with%, since localhost denotes a UNIX socket connection instead of standard TCP / IP. Those. if the created MySQL user will connect to the server not using sockets, but using a different protocol specified when connecting to the MySQL server in the console, then he will need to create two user accounts:
CREATE USER "username" @ "%" IDENTIFIED BY "password"; CREATE USER "username" @ "localhost" IDENTIFIED BY "password";
We figured out how to create a MySQL user in the console. Now we will set the user rights to perform any actions with our newly created database with the following command:
GRANT ALL PRIVILEGES ON db_name. * TO "user_name" @ "host_or_IP_machine";
Option ALL, as you understood, just indicates that the user is allowed any actions with a specific database. A complete list of rights that can be granted to users using the command GRANT, can be found here (although the description of the parameters is in English) - https://dev.mysql.com/doc/refman/5.7/en/grant.html#grant-privileges
By the way, you can use several parameters of privileges, specifying them when invoking the command, separated by commas.
If you want to create a superuser, i.e. with global privileges to perform various actions with all databases on the server, then use the following command call:
GRANT ALL ON *. * TO "username" @ "host_or_IP_machine";
By the way, it will not be superfluous to clear the MySQL server cache after setting the privileges. If you change them, then also do not forget to do it by calling the following command:
FLUSH PRIVILEGES;
And if you want to change user rights, then first use the following command to reset all rights:
REVOKE ALL PRIVILEGES ON *. * FROM "username" @ "host_or_IP_machine";
And then install the ones it needs with GRANT as described earlier.
If in the future you need to change the password of the MySQL user, then for this it is enough to execute the following commands in the MySQL Shell:
SET PASSWORD FOR "username" @ "host_or_IP_machine" = PASSWORD ("new_password"); FLUSH PRIVILEGES;
Resetting the MySQL server privilege cache is needed for the same purpose as when changing rights - without this action, changing the MySQL user's password may not be counted, so do not be lazy to use 🙂
By the way, the Internet is full of examples of using the following command to reset a user's MySQL password:
UPDATE mysql.user SET Password = PASSWORD WHERE User = "username";
But this option did not work for me on MySQL 5.7, giving an error ERROR 1054 (42S22): Unknown column ‘Password’ in ‘field list’... Its reason turned out to be the absence of the Password field in the mysql.user table.
From which we can assume that this option works only for old versions of MySQL, where this field existed in the users table. Therefore, to be sure, use my first option, unless, of course, you are forced to work with antediluvian software without the possibility of updating versions 🙂
This completes the creation of a new MySQL user and the overview of actions with his rights and passwords. Let's go further.
Choosing a database when working with MySQL via the command line
Now, after creating a user in MySQL Shell and assigning him rights to work with the database, we need to select this very database so that we can operate the database itself and the data stored in it.
To do this, use the following command in the MySQL console:
USE dbname;
If everything went well, then a message will be displayed in the console Database changed, which will signal that we are logged into the MySQL database through the console. By the way, when connecting to the MySQL server, you can initially specify the database with which you will need to work. To do this, you need to write the following command in the server console:
Mysql --user = user_name --password = user_password --host = host_or_IP_MySQL_server --database = database_name
Or the same thing, only asking for the MySQL user password:
Mysql -u user_name -h host_or_IP_MySQL_server_db_name -p
That's all. I think that now you will not have any difficulties with connecting to the MySQL database via the console 🙂
Working with MySQL tables through the MySQL console
So, we have created a MySQL database through the console. Now it would be nice to learn how to work with it for the case when the MySQL command line will be the only means of accessing the data stored on the server (as it was with me, as I talked about at the beginning of the article).
As you know, it consists of tables, inside which information is already stored in the form of records with several fields. Therefore, following the hierarchy of information placement, we will first learn how to perform typical CRUD operations with tables.
CRUD operations, if someone is not in the know, are operations to create, read, update and delete data from English. “Create, Read, Update, Delete” (you may need this during interviews).
Let me remind you that to perform actions on tables, you must first connect to the MySQL database using the command USE.
So, the first on our agenda is the command to create a MySQL table in the database via the command line, which looks like this:
CREATE TABLE table_name (field_name_1 field_type_1, field_name_2 field_type_2 (field_size_2), INDEX (field_name_1), ...);
As you can imagine, there can be as many fields as you like, their types can be different, as well as the presence of indices and keys is optional.
By the way, if you want to copy a table to another database or just create a copy in the current one, the following commands will help you:
CREATE TABLE new_table_name LIKE old_table_name; INSERT new_table_name SELECT * FROM old_table_name;
These commands allow you to copy the structure of a table and its data along with indexes and table triggers. If you just need data and structure (names of fields and their data types), then you can get by by calling one command:
CREATE TABLE new_table_name AS SELECT * FROM old_table_name;
The next operation from the CRUD block is reading. In the case of tables, reading will be the display of their structure. There are four commands for this:
SHOW FULL COLUMNS FROM table_name; DESCRIBE table_name; EXPLAIN table_name; SHOW CREATE TABLE table_name;
The first one displays information about the fields of the database table in tabular form to the MySQL console indicating the field name, data type, availability of keys, default value, etc. When using the keyword FULL you can get extended information, including privileges for each of the fields for current user, comments for each of them and the value of the encoding.
The second and third commands are simply abbreviated forms of the first command with no extended information. Why did I have to produce them - I can't even imagine ... Is it that there was something to ask at job interviews? 🙂
The fourth command, in addition to the name, field types and their default values, allows you to get the values of the keys of tables, table engines (InnoDB, MyISAM), encoding, etc.
Update operation in the case of tables is a change in their structure, i.e. various actions with MySQL table fields:
ALTER TABLE table_name DROP COLUMN field_name; ALTER TABLE table_name ADD COLUMN field_name VARCHAR (20); ALTER TABLE table_name CHANGE old_field_name new_field_name VARCHAR (50); ALTER TABLE table_name MODIFY field_name VARCHAR (3);
The first command allows you to delete a specific field in the table, the second - to add, the third allows you to rename the field and simultaneously change the type of data stored in it, and the fourth - to change only the data type.
The same can be done with table indexes using many similar commands:
ALTER TABLE table_name ADD UNIQUE INDEX index_name (field_name_1, ...); ALTER TABLE table_name rename INDEX old_index_name TO new_index_name; ALTER TABLE table_name DROP INDEX index_name;
The above commands allow you to add, rename and delete indexes from MySQL tables via the command line. To add and remove indices, there is, by the way, an alternative option of using independent commands, and not doing it through ALTER TABLE... Therefore, if you want, you can use them:
CREATE UNIQUE INDEX index_name (field_name_1, ...) ON table_name; DROP INDEX index_name ON table_name;
The above commands are equivalent to the first and last from the previous block. Unfortunately, there is no separate command for renaming the index. Unfortunately, there is no way in MySQL to change the type of index. The only way out is to drop the index and create it again with the desired type.
Well, finally, we got to last operation from the CRUD block - to be deleted. Removing MySQL tables from a database is very easy. It is enough to run the following command in the MySQL console:
DROP TABLE table_name;
Sometimes, in practice, situations arise due to which it is impossible to delete a table or change its structure. As a rule, this is due to the use of foreign keys in the database for linking tables with each other. I personally came across this situation more than once, as I spoke about at the beginning of the article.
Therefore, if, when deleting or updating the structure of a table or its data, MySQL returned you an error with the text Cannot delete or update a parent row: a foreign key constraint fails, then the following information will come in handy for you.
In order to implement our plan, we need to temporarily disable the check for the existence of foreign keys, make required operation, and then turn on the scan again, because it is really needed and allows you to protect against data integrity violations in most cases.
Strictly speaking, MySQL foreign keys are needed for this purpose.
So, to delete data, which is interfered with by foreign keys, you need to perform the following actions in the MySQL console:
SET FOREIGN_KEY_CHECKS = 0; # required_mysql_command SET FOREIGN_KEY_CHECKS = 1;
By the way, if you want to delete a foreign key, then the procedure will be the same as when deleting an index:
ALTER TABLE table_name DROP FOREIGN KEY external_key_name;
To find out the name of the foreign key of a MySQL table, use the familiar MySQL console command SHOW CREATE TABLE.
Working with MySQL table data via the command line
For CRUD tables, we have covered the operations in the MySQL console. For a complete picture, this cheat sheet lacks only commands for working with the data itself, stored in the database tables. I think many people know these commands and have used them in practice, but I will remind them again.
CRUD operations for working with data from MySQL tables will look like this:
INSERT INTO table_name (field1, field2, ...) VALUES (field_value_1, field_value_2, ...); SELECT field1, field2, ... FROM table_name; UPDATE table_name SET field1 = field_value_1, field2 = field_value_2; DELETE FROM table_name WHERE field1 = field_value_1;
The above commands correspond to the operations of creating, reading, updating and deleting data from MySQL database tables. At using SELECT and UPDATE, it is also possible to use the qualifying WHERE clause, with which you can specify the selection of data in the manner described in the case of using DELETE.
Also, when fetching data from a database using SELECT, you can use the following option to get the values of all table fields:
SELECT * FROM table_name;
Naturally, these operations can use other operators besides WHERE. There are especially a lot of them when fetching data using SELECT: here and UNION for combining the results of several queries, and various types of JOIN. To list everything is very long and tedious both for me and for you to read this.
Therefore, let's agree: if you want to learn more about something, just write about it in the comments, and I will try to answer you. Or other knowledgeable members of our community will do it. OK? 😉
So for now, we will not dwell on this block.
If you need to delete all data from the table, you can use the following MySQL command:
TRUNCATE table_name;
Before calling it, as mentioned earlier, you may need to disable foreign key checking if there are linked MySQL tables, which may prevent you from performing the required action.
Another interesting point to consider here is that given command does not reset the AUTO_INCREMENT counter, which is used, as you know, to automatically generate a field value without the need to manually set it.
Fields of this type are most often used to generate values for the main key field id, which is used to establish relationships between data in different tables.
That is, if before deleting the table data using TRUNCATE the maximum value of the counter was 1200, then the first record after this procedure will have the identifier value 1201. In principle, it's okay. If you have specified a size sufficient for of this field, then the overflow of values will not threaten you soon.
However, in some cases, when there is some binding to the field value in the application code, this behavior can be inconvenient.
To avoid this, use this option instead of the command above:
TRUNCATE TABLE someTable RESTART IDENTITY;
This option command call TRUNCATE will allow you to reset the field counter value from AUTO_INCREMENT... Therefore, the field value of the first added record after this deletion will be 1 instead of 1201, as in the example above.
How to delete MySQL database via command line
The life cycle of working with a database comes to an end and ends quite logically - its deletion. In order to do this operation in the MySQL console, you need to run the following command (in this case, the database to be deleted may not be selected by the command USE):
DELETE DATABASE dbname;
The same action can be done using the MySQL utility mysqladmin, which I already mentioned at the beginning of the article when creating a database:
Mysqladmin drop dbname;
When the command is invoked in the server console, the following message will appear:
Dropping the database is potentially a very bad thing to do.
Any data stored in the database will be destroyed.
Do you really want to drop the ‘database_name’ database
In short, this is a warning that dropping a MySQL database is a very bad idea. Confirmation of the action is also requested. If you agree - write y and press Enter on the keyboard, after which the following message will be displayed on the screen (if everything went well, of course):
Database "dbname" dropped
Like this 🙂
How to delete MySQL user in console
Now the same fate will befall the MySQL user we are creating to show you how. But for a start, it would be a good idea to check whether the required user actually exists before deleting it.
As of MySQL 5.7, there is one command for both of these actions:
DROP USER IF EXISTS username;
Earlier versions of MySQL required two separate commands:
GRANT USAGE ON *. * TO "username" @ "host_or_IP_address"; DROP USER "username" @ "host_or_IP_address";
Unfortunately, in this case, the message about the execution of the operation in the MySQL console is traditionally not very informative 🙁 Therefore, to find out that the MySQL user has been deleted, you can use the following command, which displays a list of all users existing on the current MySQL server:
SELECT User FROM mysql.user;
This version of the command will print only usernames. If you need to see the hosts from which users can connect to the server, and the list of privileges, you can call the command in the following form:
SELECT User, Host, Grant_priv FROM mysql.user;
Also in the mysql.user table there are many other fields that store other types of privileges and other information, a complete list of which can be found here - https://mariadb.com/kb/en/library/mysqluser-table/
Don't be confused that this is the MariaDB documentation. Technically, this is the same as MySQL, since MariaDB is just a fork or fork from the English "fork" - a fork, a fork.
Why did it have to be done - again without a clue 🙂 Unless to proudly declare to everyone that “I have my own DBMS”? .. But, frankly, I am not very aware of the exact motives and differences between MySQL and MariaDB. Therefore, if you know something about this, it would be interesting to read about it in the comments.
Exiting MySQL Console
That's all, the life cycle of the database and the user, which began with their creation and ended with their deletion, has come to an end. Therefore, the MySQL command line, with which we worked in the server console using the utility mysql, we don't need it anymore.
It remains only to get out of it ...
It would seem that the action is trivial, but many in a situation where you need to exit the MySQL command line simply close the server console and open it again. You can, of course, act like that, but it takes up extra seconds of working time and makes you annoyed every time you need to do it.
The correct behavior in this situation is just to call the command exit on the MySQL command line, after which the service will politely say goodbye to us 🙂
And that's all 🙂 So next time you don't need to spawn consoles and reopen them every time you need to exit MySQL in the console and get access to it again to manage the server.
That's all I wanted to tell you today. I hope that my cheat sheet for working with the MySQL command line through the console will be useful not only to me, but also to you.
Speaking about the practical application of the information presented in the article, I would like to remind you that the given constructions can be used not only in the MySQL command line and the server console, but also in the phpMyAdmin console and other software that provides such an opportunity.
Whether you use it or not is up to you. But, as I said at the very beginning of the article, there are situations when using the MySQL console can save you time and hassle. Whether to use the command line every day or not is a matter of taste and individual preference.
Leave a comment about which commands you use most often. And, perhaps, you know some other tricks. In any case, share your opinion with others and keep conversations in the comments of other users.
I promise that in the process you will learn a lot of new things, as I did when writing each of my articles 🙂
That's all! Good luck and see you soon 🙂
P.S.: if you need a site or need to make edits to an existing one, but there is no time and desire for this, I can offer my services.
More than 5 years of experience professional website development. Work with the PHP, Opencart, WordPress, Laravel, Yii, MySQL, PostgreSQL, JavaScript, React, Angular and other web development technologies.
The development of information technologies is one of the leading directions of human activity. Therefore, a huge amount of funds are invested in this area. From the beginning until today, many different tasks have been solved, which have made the daily life of many people much easier. However, with the development of technology, a number of problems have arisen, one of which is the excessive amount of information to be stored. The databases were designed to resolve the situation.
A quick tour of database management systems
Since the problem of storing a large amount of information is relevant today, there are several ways to solve it. Each of them is focused on tasks of a certain orientation. Together, however, they form a complete complex that simplifies the problem of data storage.
There is a certain classification that determines the need to use a particular database and DBMS (database management system). The most common are currently considered to be client-server data storage technologies. These include the following types: Firebird, Interbase, IBM DB2, Sybase, Oracle, PostgreSQL, LINTER, MySQL. We will be interested in last option- MySQL, the commands of which are fully compliant with SQL standards. This technology is one of the most popular and often used for solving both local applied and production tasks small scale.

Predecessors client-server technology are file-server DBMSs that have lost their positions due to a number of existing shortcomings, among which they highlight the need to distribute the DBMS kernel on each computer and a significant load on local area network leading to an increase in time costs. This group includes Borland Paradox.
New technologies gaining popularity
However, a few years ago appeared advanced technology, which is gaining popularity and is in demand when solving small local problems. This is about embedded database management systems. The main feature of the considered DBMS is the absence of a server part. The system itself is a library that allows you to work in a unified manner with large amounts of information located on local computer. This method eliminates disadvantages file-server funds, and also significantly surpasses in speed client-server technologies.

As examples we can consider OpenEdge, SQLite, BerkeleyDB, one of the variants of Firebird, Sav Zigzag, Compact, LINTER, as well as one of the variants of MySQL, the commands of which are no different from those used in client-server DBMS. but embedded systems can easily lose their relevance if the task is no longer local in nature.
Main advantages of MySQL DBMS
The MySQL database management system is one of the most demanded technologies, as it can be used to solve huge amount tasks. If we compare it with modern counterparts, then we can highlight a number of main advantages.
The main plus on Russian market its availability is considered as it is free in most cases. The second feature is performance. One of the most popular systems is MySQL. Commands are executed quickly, with minimal response time. Connection to the server of several clients in multithreaded mode does not affect the speed of command processing due to the use of the InnoDB mechanism for quick support transactions.

The presence of an ODBC driver makes it easier for developers to solve many problems. The advantages also include the ability to implement records of fixed and variable length. But the main function, which is very much appreciated in the circle of programmers, is the interface with the C and PHP languages. The capabilities provided by MySQL made it possible to use given DBMS for a huge number of internet hosting service providers.
And for a simple layman who is interested in modern technologies storage of information, it is necessary to study MySQL, and their syntax, because specialists in this area are widely demanded and highly paid anywhere in the world. Therefore, if anyone is interested in this direction, do not hesitate. You need to move on to studying right now.
What you need to study
At first glance, it may seem that this area difficult in self-study and requires constant communication with a specialist. However, this is not the case. You can study the architecture and peculiarities of MySQL, the basic commands of the query language and everything related to this on your own, without resorting to the help of a consultant. For this, it is enough to have a desire and make efforts in order to move on. Only self-development and study of this area will allow you to acquire new knowledge, consolidate the acquired skills and, possibly, start building a career and move in this direction.

For studying main teams, first of all, you must have on hand free version console utility MySQL. It is with her that the learning process begins. You can download it from the official MySQL website. It can be easily installed on any operating system, forming a server and a client on one computer, which is very convenient.
Then you need to look for a tutorial that provides basic information about the MySQL environment. for basic learning, as a rule, they also contain. There is a lot of information on this matter. However, the choice must be taken seriously. Information should be presented consistently and clearly structured.
In case you have initial knowledge in English, you can use the console's built-in support. For this there is a special command help to help you understand how to use the MySQL utility.
Basic console commands
Smoothly moving from the main features, capabilities and advantages, we got to the list of the main commands. The MySQL utility initially contains only one user, which is used for learning. This is a user named root, the password for which is completely identical to the name.
On the first and subsequent start of the MySQL console, the user will need to enter a password root for further work with MySQL DBMS. Console commands will only be available after being authenticated.

After a successful check, for convenience, you can display the existing commands using the command help... After that, the console will present all existing commands and short description to them.
and display
Now you need to go to next step... To do this, you must select an existing one or create new base data. To select an existing base, you must use use command... And after a space enter the name of the database. Initially, only one exists in the utility - with the name test... Therefore, the request will look like this: use test.
To create a database, you need to use the command create by giving it the keyword database and giving an appropriate name. The structure will take the following form: create database Name_of_database... To work with the created database, you need to contact it using the command use.

The environment provides a function designed to display existing bases data, tables, primary keys or external links and displaying the information available about them on the MySQL console. Commands in this case should always start with a sentence show... For example, to display a list of available databases for the current user, just enter the following query: show databases... To display the table, it is enough to change the display object after the keyword by entering tables.
Table Commands
Before moving on, it is necessary to remind once again that compliance with the SQL language standards provides ample opportunities for developers, regardless of the DBMS and operating systems used. Queries developed in any environment that supports the SQL standard will work successfully (provided the database and tables are available) in the MySQL environment. Commands windows consoles do not differ from those used in other operating systems.
There are a number of specific commands for working with tables, which, if translated from English, speak for themselves. About the team create was mentioned above. It can also be used to add tables to a previously created database. To delete database objects, in particular tables, use the command drop to which the name of the object to be destroyed is appended. Example: drop name_ of_ your_ table.
The syntax for calls to the database server always has general structure... Therefore, a query developed in Windows will also work successfully in the MySQL Linux console. Commands processed by the server without errors in one operating system cannot lead to errors in others.
Select command
But the most important command for working with tables, the syntax of which is quite simple, is the command select... It is she who is used to select data from the database. The original syntax is structured as follows: select * from table_ name... By sending such a request to the database server, the client should retrieve all the records stored in the table.

Many people never think, but when browsing the Internet, they constantly use MySQL commands. PHP queries use the syntax of the SQL language to display the contents of catalogs of online stores or news on social networks. Instead of the "*" after the sentence select, as a rule, a list of the main fields of a table or several tables is given, the data from which must be processed. In the case of a selection from several tables, a special link is used join, which serves to connect them by existing external connections. However, this condition can be changed by yourself specifying which fields should be linked.
Setting sampling limits
Sometimes a situation occurs when the response received from the database server contains duplicate data. To ensure that only unique records are visible to the user, the distinct clause is used. It is placed in front of the list of requested fields and serves as an aid for hiding duplicates.


