Installing a second hard drive on your computer can improve system performance and generally increase the amount of storage space you need to store the information you need. Most mainstream computers have built-in IDE (PATA) or SATA (Serial ATA) support for connecting hard drives to the motherboard.
Modern operating systems support any kind of hard disk, regardless of the type of hard disk already installed on the computer. Contrary to popular belief, installing a second hard drive does not require professional technical training, but requires minimal skills in disassembling the computer and replacing its components.
In fact, installing a second hard drive requires only an additional cable (if not available) and a screwdriver. In the event of a malfunction, professional assistance may be required. Remember, there is always the opportunity to refer to the reference guide.
To install a second hard drive on your computer, follow these steps:
1. First of all, back up the data stored on the primary device.
2. Turn off the computer and disconnect all power cords from the computer. Before opening the case, touch something metallic to discharge any static electricity.
3. Before buying a second hard drive, find out what type of drives your computer supports. IDE drives use 2-inch flat cables with three or more connectors. SATA drives use thin and round cables.
4. Refer to the instructions printed on the hard drive sticker for instructions on how to set the jumpers correctly. Jumpers are tiny connectors that can be found on IDE drives. They help identify the primary drive. Set the jumper to the Slave (ide2) option on the second drive. Also, don't forget to set jumpers on your primary hard drive to set it to "Master (IDE1)." If you purchased a SATA drive, skip to step 5. SATA drives do not require a jumper.
5. Locate an empty bay to accommodate the second hard drive. Insert the new hard drive carefully into the bay. Use the two machine screws on both sides to secure the new hard drive to the metal case. Connect the IDE drive to the second connector located on the main cable. For SATA, connect one connector to your primary drive and the other end of the cable to the SATA connector on your motherboard.
6. Replace the computer cover. Connect the power cords to it. Turn on your computer. Press F1, F2, F10, or the Delete button to enter the BIOS menu. Check if they are detected by the system. If not, then check again that all cables and loops are connected correctly.
Then configure the hard drive to run on the operating system. If it is new, then first of all you need to assign a letter to it. You can also break down into sections. Using a second hard drive as the main drive for installing applications and storing virtual memory is one way to improve system performance. This will also free up space for the operating system.
Additional;
Select which of the hard drives will be the primary, that is, the active one from which the operating system will be loaded. Determine the order by placing the small jumpers in the appropriate positions in accordance with the diagrams shown directly on each hard disk.
Turn on your computer and go to BIOS settings. If hard drives were not detected automatically, perform their manual identification using the appropriate command. Then save the changes and exit the BIOS.
Related Videos
Sources:
- how to install a second hard drive
- How to connect a second hard drive
To connect to computer as the second hard disk an external device designed to operate via a USB port, you just need to insert the connecting wire into the corresponding connectors on the bodies of both devices. The process of installing a stationary rigid disk as the second main drive in the system unit of your computer. The sequence of actions for this particular option is described below.
Instructions
Shut down the operating system, shut down the computer, and disconnect its network cable. Position the system unit so that you have free access to both of its side surfaces.
Remove both side panels. As a rule, for this it is enough to unscrew two screws that connect them to the back panel, and then move 5 centimeters back and remove somewhere not very far.
Install the new hard drive into one of the free slots in the chassis. Do this carefully so as not to accidentally disconnect the wires, which are abundant inside the case. The connectors for the power supply must be on the side of the motherboard, and the hard drive is secured with four screws - two on each side of the case of the system unit. Use an existing hard drive as an example of placement and fastening.
Connect the power cable and data cable (ribbon cable) between the new hard drive and the motherboard. These wires differ depending on the type of hard drive being installed (IDE or SATA), but in any case, their connectors are asymmetrical and there is only one way to insert connectors, so you cannot make a mistake. An already installed hard drive will help you find the right slots on the motherboard - the connectors you are looking for should be located next to those used to connect it. On the cases of hard drives that use the IDE bus, there are jumpers, with the help of which the hierarchy of disks installed in the computer is established - one of them should be designated as primary, and all the others - as secondary. However, in most cases, there is no need to use them, since the BIOS is able to figure out the device configuration itself with the default jumpers.
Make sure that you did not break anything inside the case of the system unit during the installation process and did not forget tools in it. Do not rush to close the case - you should first check the result of the operation performed. Connect all necessary wires, the last of which should be the network cable. Then turn on your computer and go to BIOS settings to make sure it can recognize the new device. After that, turn off the computer and reinstall the side surfaces of the system unit.
Sources:
- how to connect disk to computer in 2019
Sooner or later, any user is faced with the fact that his data no longer fits on the existing hard disk. The solution to this problem can be a second hard drive. In this article, we will show you how to install a second hard drive on your computer.
Step # 1. Prepare your computer to install a second hard drive.
First, you need to prepare your computer. First, you need to de-energize it and disconnect all cables from it. A simple shutdown with a button on the power supply is not enough; the computer must be completely disconnected from the power supply.
Secondly, you need to open access to the insides of the system unit. To do this, remove both side covers. Typically, the side covers are fixed to the back of the system unit with four screws. Unscrew these screws and carefully remove both side covers.
Step # 2. Install the second hard drive and fix it.
After the computer is completely disconnected from power and the side covers are removed, you are ready to install the second hard drive. Hard drives are installed in a special compartment of the system unit. It is quite easy to identify this compartment. It is located on the lower right side of the system unit and is exactly the right width for 3.5-inch hard drives.
In inexpensive computer cases, this compartment is usually turned with a hole towards the motherboard (as in the photo below). In more expensive models of computer cases, the hard drive bay faces the side cover.

It is better to keep the system unit in an upright position while installing the hard disk. Insert the hard drive into the hard drive bay (as pictured below). In some cases, in order for the hard drive to enter the compartment without problems, you will need to remove the video card or RAM. You can read about how this is done in our articles: and. If your system unit has a lot of space for hard drives, then try to install the second hard drive away from the first. This will cool them better.
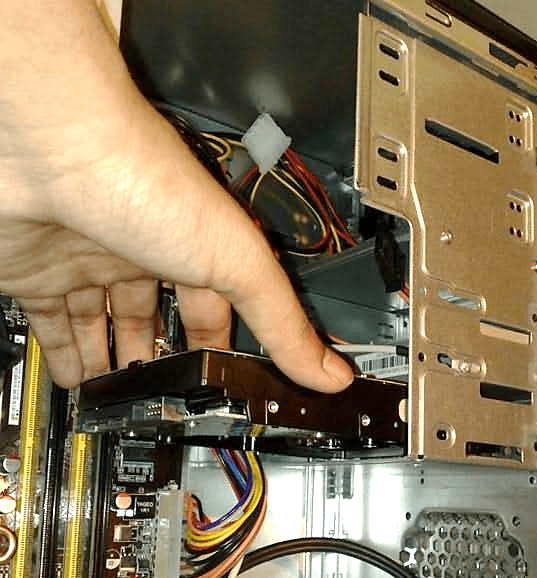
Once the second hard drive is in the hard drive bay, it must be secured with four screws, two on each side of the hard drive (see photo below). Don't skimp on screws and only fix the hard drive with two or three. In this case, it will vibrate and create a lot of noise.

Step # 3. Connect the second hard drive to the computer.
After the second hard drive is installed in the computer and securely fixed, you can begin to work on it. Hard drives are connected using two cables: one goes to the motherboard (this cable transfers data), and the other goes to the power supply (which is used for power supply).
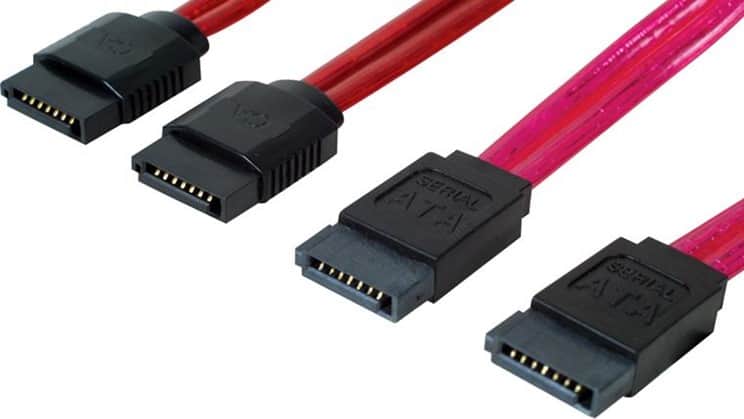
A cable is used to connect the hard drive to the motherboard (see photo below). This cable usually comes with the motherboard. If you do not have such a cable, you can purchase it separately.
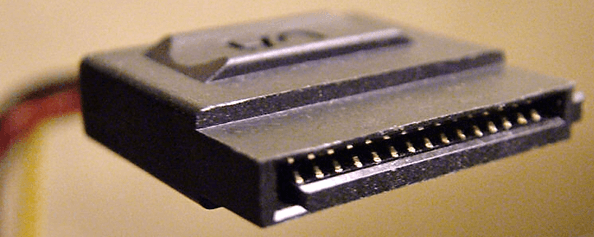
A cable with a similar connector is used to connect the hard drive to the power supply. (photo below).
If you are having difficulty connecting a second hard drive to your computer, then look at how the first hard drive was connected and proceed by analogy.
Step number 4. Assembling the system unit.
After the hard drive has been installed, securely fixed and connected, the system unit can be closed. Replace the side covers and secure them with the screws. After installing the side covers, the computer can be plugged in and started. If everything was done correctly, then after starting the computer, a second hard drive will appear in the system.
Unstable work of a computer is often associated with a lack of free space on the hard disk. To solve this problem, you can delete unnecessary files, but if there are none, you need to install an additional HDD on your PC. This article provides instructions for connecting a second drive and describes some of the pitfalls that a user can expect when performing this operation.
Motherboard support
So how do you connect a second hard drive to your computer? "Are the SATA or IDE ports soldered on the motherboard?" - the first question to be answered before installing the HDD. You need to find out which model of the motherboard is installed in the system unit. This can be done by installing the AIDA64 program on your computer. This utility shows complete information about the computer. On the left side of the main application window, just click on the text "Motherboard" to find out the model. After that, you need to find the documentation for the motherboard and find out which connection ports for drives are installed on it: SATA or IDE.
If you can't find the documentation, you will need to study the computer hardware yourself. To do this, you need to remove the left cover of the system unit, having previously unscrewed the fastening bolts on its back side. Hard drives are located at the front of the PC case in special pockets. Pay attention to the ribbon cable that goes from the motherboard to the HDD. If it is wide, it means that the drive connection interface is IDE, narrow - SATA.
After a visual inspection, there are still doubts about what type of connection is used on the motherboard? In this case, disconnect the cables from the drive and pay attention to their cut. If the connector has a slot in the form of the letter "L". If it is an IDE, the connector will look like a rectangle with two rows of holes.
Pay attention to the area of the motherboard where the ribbon cable goes from the drive. Are all ports busy? If there are no free ports, you will not be able to connect the hard drive in the classic way. Also take a look at the cable itself if the HDD connection interface is IDE. Usually it has two connectors for drives, and one of them can be free.

Before connecting a second hard drive to a computer, see if there are free pockets in the equipment case for installing drives. If they are not there, the hard drive can be put on the bottom of the system unit, but this is unsafe for the equipment. When you move the computer, the hard drive will dangle, and there is a possibility that it will damage the elements of the PC or fail itself.
Hard disk selection
Before connecting a second hard drive to your computer, you must first purchase it. After defining the connection interface, you can start selecting the drive. Remember that 3.5-inch hard drives work best for your computer. Smaller samples are designed to fit into laptops. Although, if you find a 2.5-inch HDD suitable for the parameters, you can install it in a special adapter case and use it in a desktop PC.
Also determine which one you need. If only documents will be stored on it, it is enough to purchase a 320 GB HDD. If you intend to store high-definition movies and computer games, it is better to choose a hard drive with a capacity of at least 1 TB.

It makes sense to pay attention to the characteristics of the speed of reading and writing data. The rule is one: more is better. Although, if the computer is used only for work in office applications, it makes no sense to overpay for this feature.
Correct position of the jumpers
Users whose motherboard has only IDE ports must configure the jumpers. How to connect the second hard drive to the computer, where to put the jumper? So, if only one HDD is connected to the loop, the jumper must be set to the Master position, and the drive itself must be connected to the outermost connector of the cable. If two drives are connected to one wire, then on the additional hard disk the jumper should be in the slave position, and it should be connected to the connector located at a distance from the edge of the loop. There is no need to set jumpers on the SATA drive, as there is a separate cable for each drive.

How do I connect a second hard drive to my computer?
The order of HDD installation for drives with any interface is the same. Regardless of the type of hard drive, to mount it, follow these steps:
- De-energize the system unit.
- Unscrew the bolts holding the left housing cover and remove it. Usually, pull it back to do this.
- Install the drive into the pocket of the system unit. When installed correctly, the screw slots where the hard drive is attached and the holes on the HDD will match.
- Tighten the fixing screws.
- Before connecting the second hard drive to the computer, pay attention to the connection of the cables to the first one. Connect the wires to the additional drive in the same way as to the main one.
- Replace the case cover and turn on the computer.
BIOS setup
After the second hard disk is connected to the computer, a few changes should be made in BIOS, since sometimes the newly installed HDD is assigned as the first boot device. This leads to the impossibility of loading the OS. To configure "BIOS":
- Turn on the computer by pressing the power button.
- As soon as the screen lights up, immediately start pressing the DEL or F8 key. Different motherboards use different buttons to enter the BIOS setup utility. To understand which key to press, follow the messages on the screen or read the instructions that came with the motherboard.
- After entering BIOS, go to the Boot tab.
- In it, use the arrows to select and press "Enter".
- In the menu that opens, move the cursor to the First Drive item, press ENTER and select the hard drive on which the system is installed. If you are not sure which HDD to choose, please move the switch to the random position.
- Return to the previous menu by pressing ESC.
- Here, navigate to the First Boot Device line and press "Enter". Sometimes, to see it, you have to move to the Boot Devices Priority submenu.
- Select Hard Drive from the drop-down menu. Sometimes, instead of this inscription, the full name of the hard disk will be displayed.
- Press F10 to save your changes and then press ESC to exit the setup utility and restart your computer.
If after the performed manipulations the PC does not boot, return to step 5 and select another drive.
External hard drive
How do I connect a second hard drive to my computer if the SATA and IDE ports on the motherboard are busy? In this case, the best option would be to use an external storage device. Usually such devices are connected to the USB port. Less often - to FireWire. In the first case, the drive can be installed on any PC, in the second - only on the one equipped with a special port. The main advantage of an external HDD is portability. It can be easily connected and disconnected without turning off or disassembling the computer. However, these devices are usually slower than those installed in a PC case.
Operating system settings
What system settings should I make after connecting a second hard drive to my computer on Windows 7? SATA or IDE - drives that are often not detected by the system in the file manager after installation.

To display the new HDD in Explorer, follow these steps:
- In the search bar on the Start menu, enter the text Manage.
- Click on the item with the text "Computer Management".
- On the left side of the snap-in window, select Disk Management.
- Right-click on the disk that is not displayed in the explorer. You can find out which HDD to work with by comparing the indicated volume with the real one and examining the partition labels.
- In the expanded list of actions, click on "Create Simple Volume", then specify the file system and cluster size, and then click on "OK".
- After completing the operation, right-click on the HDD again, and select the "Change drive letter" line from the menu.
- In the window that opens, click on the "Add" button and enter the desired letter.
When the first computers appeared, all programs, games and other files practically did not take up disk space. Now things are quite different, and it is often necessary to install an additional storage medium. Therefore, every user should know how to connect a second hard drive to a computer. In fact, this is not difficult to do, you just need to follow simple instructions.
The device must first be purchased from a store. Please note that the hard disk has several connection interfaces. After purchasing the purchase, you can proceed with the installation of the device.
Preparing for installation
- How many hard drives are already connected to the motherboard? Most often, a computer has only one hard drive, so installing a second drive is not difficult. In most cases, the HDD is located directly under the DVD-ROM, so it won't be difficult to find it;
- Is there extra space for installing a second hard drive? In the event that it is not possible to install a second or third disk, then you will have to purchase a USB drive;
- What type of cable is used to connect the hard drive to the computer? If the purchased device does not have the same interface as on a PC, it will be difficult to install.
Please note that you need a 3.5-inch hard drive. You don't need to buy small drives designed for laptops.
Physical disk connection
If the system unit has not yet been disassembled, disassemble it. It is now recommended to get rid of static electricity. This is done by any means known to you. If you wish, you can purchase a special grounding wristband in the store.

After small manipulations, the hard drive will be fixed in the case, now all that remains is to connect the hard drive. Before plugging in the power cable and ribbon cable, it should be noted that the procedure is slightly different for the IDE and SATA interface.
IDE interface
When connecting a disk with an IDE interface, it is recommended to pay attention to such a nuance as setting the operating mode:
- Master (main).
- Slave (slave).
If an additional hard disk is installed, then you need to enable the Slave mode. To do this, you need to use a jumper (jumper), which is installed in the second place. The first row turns on the Master mode. It is important to note that on modern computers, the jumper can be removed completely. The system will automatically determine how hard the master is.

At the next step, you need to connect the second or third hard disk to the "mother". For this, the IDE interface is connected to a ribbon cable (wide, thin wire). The other end of the cable is connected to the IDE 1 Secondary socket (the main drive is connected to the zero connector).

The final stage of connection is power supply. To do this, a white chip with four wires is connected to the corresponding connector. The wires go directly from the power supply (box with wires and fan).
SATA interface
Unlike IDE, a SATA drive has two L-shaped connectors. One is for power connection and the other is for data cable. It should be noted that such a hard drive lacks a jumper.

The data cable plugs into a narrow connector. The other end connects to a special connector. Most often there are 4 such ports on the motherboard, but there are only 2 ports with an exception. One of the slots can be occupied by a DVD drive.
There are times when a SATA disk was purchased, but no such connectors were found on the motherboard. In this case, it is recommended to additionally purchase a SATA controller, which is installed in the PCI slot.
The next step is to connect the power. The L-shaped wide cable is connected to the corresponding connector. If the drive has an additional power connector (IDE interface), just use one of the connectors. This completes the physical connection of the hard drive.
BIOS setup
When all manipulations with the hard disk are completed, turn on the computer, and then enter the BIOS. It is important to note that the BIOS is launched on each computer in its own way. To do this, use the key:
- Delete;

After entering BIOS, you need to go to the configuration setting. It is important to assign boot from the disk where the operating system is installed. If the priority is set incorrectly, the system simply will not boot.
If one of the disks is not displayed in the BIOS, it means that the hard drive was connected incorrectly or the ribbon cable was damaged. It is recommended that you inspect all wires and reconnect (remember to turn off your computer).
As soon as the BIOS setup is completed, you can boot with the operating system. After that, all that remains is to assign a letter to the disk.
The final stage
Since connecting a hard drive to a computer is not enough, you need to make the final settings directly from under Windows. On some computers, a similar procedure is carried out automatically. To check this, you should open "My Computer" and then see if a new disk appears.
If nothing happens, you need to start the control panel. Then select "Administration". As soon as a new window opens, you will need to select "Computer Management". In the left column, you need to find the "Disk Management" tab (on some computers "Disk Manager").

- At the bottom of the window, select disk 1 (if more than 2 hard drives are connected, select the disk with the highest number). This will be the new hard drive;
- You must assign a letter to the logical volume. To do this, right-click on the disk, and then select "Assign letter";
- As soon as a new drive letter is assigned, it needs to be formatted. The procedure can take a long time, it all depends on the size of the hard drive. It is important to choose the NTFS file system when formatting.
When the formatting process is complete, a new disk will appear in the root directory "My Computer". If for some reason it is not possible to connect the HDD using the built-in manager, it is recommended to use third-party programs.
Partition Manager is an excellent tool for working with hard drives. In addition, such a utility allows you to partition a disk into several logical volumes.
Conclusion
Attaching a hard drive takes no more than 15 minutes. If you follow the instructions, difficulties should not arise. Modern computers do not need additional BIOS setup, of course, if the disks are not installed in a completely new computer. Also, do not forget that the operating system depends on how large the plug-in hard drive can be.
Video review: connecting a hard drive


