- Note: To view mail on an existing account, select this service, enter your name, email address, password, and account type, then click Next. After verifying the email address, you can add various components, including mail, contacts, calendars, and more. At the end, just click "Save".
-
Create a new iCloud account. At the very bottom of the iCloud control panel, click Get a Free Apple ID. At the bottom, enter your birthday, then at the top-right corner of the screen, click Next.
- Enter your first and last name in the First Name field, then click Next.
- On the Create an Apple ID screen, to enable it, tap Get an iCloud mailbox, then Next.
-
Create your mailing address. Enter a username. It will be used with @icloud.com. You will then be asked to verify the address. Once created, the ability to make any changes will no longer be available. To create your new Apple ID/email address, click "Create".
Access to your mail. Go to http://www.icloud.com and click on the Mail icon. Any changes you make on any iCloud device will be reflected in your account. All your actions will be reflected on icloud.com, whether it be creating new folders or viewing your mail from another device.
Access to your contacts. To connect the "Contacts" service, you need to set the On / Off switch in the iCloud control panel to the On position. Any contacts you add on one iCloud device will be visible on all other iCloud devices.
Set up your contacts. In the control panel, in Contacts, Mail and Calendars, you can make the following settings:
- Sort: Sort contacts by first and last name.
- Display Order: Sort your contacts by first and last name. Sort contacts first by last name and then by first name, for example, Zilla Adams will always come before Aaron Zizki, and Brian James before Jesse James.
- Information about yourself: set a personal contact in the address book.
- Default account: Specify which account will be used for contacts.
-
Access to calendars. To connect the Calendars service, you need to put the On / Off switch in the iCloud control panel to the On position. Any calendar activity done on one iCloud device will automatically show up on all iCloud devices.
-
Calendar settings. On the control panel, in Contacts, Mail and Calendars, you can make the following settings:
- New Invite Notifications: Toggle notifications of assigned new invitations with the on/off toggle.
- Time zone support: Enabling time zone support means that events set in a different time zone will be shown according to the time zone set at that time in the calendar. For example, if your calendar is set to Paris time and you live in Chicago, events will be shown in Paris time. And when the time zone support function is turned off, then events will be shown in Chicago time (or in the time zone in which you are located).
- Synchronization: allows you to synchronize events from two weeks ago with all events. The more you sync, the more memory will be used for past cases.
- Default Alerts: allows you to create reminder presets for Birthdays, Events, Daily Activities. When you create a new event in one of these categories, the reminder will be set to the time of the new event.
- Default Calendar: When you create a new calendar event, it will automatically be assigned to this calendar category. Customize this for the category you use the most.
- Shared Calendars Signal: This is an on/off switch. If the On position is selected, then you will receive notifications every time changes occur in the shared calendars - creating, changing, and deleting events.
Set up your mail. iCloud gives you a free iCloud.com email address that is constantly updated across all iCloud devices. You can also access your mail on the iCloud.com website.
Open Settings on your iOS device. Click the Settings icon, then to check your settings, in Control Panel Settings, click the Mail, Contacts, Calendars button.
Add an iCloud account. At the top of the control panel, in the Accounts section, where "Mail, Contacts, Calendars" is located, click on "Add Account".
Select iCloud. iCloud provides a lot of different services that you can subscribe to, you can view your mail from any mailbox. To set up a new mailbox, click on the iCloud button located at the top of the list.
On October 12, Apple launched the long-awaited iCloud service. I propose to understand in detail what's what.
So, iCloud is a cloud service from Apple that allows you to synchronize various kinds of information between devices (PC, Mac, iPod Touch, iPhone, iPad). It requires iOS 5, Windows Vista SP2/7, OS X 10.7.2. There is also a web version at , but more on that later.
Opportunities
—
iTunes in the cloud. Allows you to automatically download purchased music, applications or books to any of your devices. There will probably be more videos in the future.
—
iTunes Match. If you have a lot of music and don't want to buy it from iTunes, then this feature will come in handy. iTunes Match scans songs from your library, if it finds a match, it uploads a song from the iTunes Store to your virtual library. If it doesn't find it, it copies the song from your computer. A total of 25,000 songs can be stored. The cost is $25/year, and it's the only paid feature in iCloud besides buying more space.
—
Photostream. Taking photos on an iPhone is really easier than carrying a camera around all the time. And since the camera allows you to take good quality photos, a lot of people take photos on it. But what if you need to transfer photos to your computer/iPad/Apple TV? This is where Photo Stream comes in handy - after a photo is taken, it is automatically uploaded to Photo Stream and transferred to other devices. Storage of up to 1000 photos is available, new ones are overwritten in place of old ones. All photos are stored on the computer, not just 1000. And absolutely nothing needs to be connected anywhere, only the Internet is needed.
—
Documents in the cloud. Imagine this situation: you have a working file (document / presentation / spreadsheet) that needs to be uploaded to an iOS device, but iTunes is not at hand. And that's where iCloud comes in. We go to the iWork section on the site, upload a file to the necessary application, go to this application on iOS and in a couple of seconds the document is on your device. And no more quickoffice and crutches for it in the form of a dropbox. Everything is convenient and simple. When you edit a document on iOS, its "version" is automatically updated on all iOS devices and iCloud web version. So no changes to the document will be lost.
—
Backups. For me personally, the most important and necessary thing in iCloud (in addition to the previous paragraph). You no longer need to connect your phone to iTunes every time in order to make a backup copy and not lose all your data. Thanks to iCloud, backups are created automatically when you connect to the charger and the Wi-Fi connection is on. What's included in an iCloud backup: device settings, icon layout, messages (iMessage, SMS, MMS), app data, photos and videos taken with the device's camera, ringtones, purchased music, apps, books, and TV shows.
—
Mail, calendars, reminders, contacts, notes, bookmarks. When creating an iCloud account, you can create a mailbox like
What is its beauty? The fact that iCloud mail accounts are the only ones that have instant push notifications when a message arrives on the server. Synchronization of calendars, reminders, contacts, notes and bookmarks will allow you to keep all your information up to date on any device.
—
Find Friends and Find iPhone. The Find My Friends service allows you to see the location of your friends on the map (if they have allowed it) and get directions from your location to them. And Find My iPhone shows the location of your iPhone/iPad/iPod Touch or Mac on a map. If your device is lost, you can remotely lock it or display a message on the screen asking you to contact you.
Migrating from MobileMe to iCloud

When moving from MobileMe to iCloud, a small part of the features of the former will be lost. These features are: iDisk, gallery, publishing sites in iWeb, synchronization of Dashboard widgets, keychains, Docks and system settings. I don't know the stats, but syncing the keychain, settings, and iDisk were pretty helpful.
During migration, these options disappear, so if you need them, but you don’t have analogues, don’t rush to migrate. MobileMe accounts are valid until June 30, 2012. After this period, the service will cease to exist.
It is worth noting that when migrating from MobileMe to iCloud, you are given an additional 20GB of space for 1 year for your data.
Setup and use
Let's start with the web version. Its interface is almost identical to the interface of these applications on iOS.

There are 5 main points here:
Mail. Your mail account on me.com. You could call it the web version of the Mail client on the iPad.

Contacts.

Calendar.

Find iPhone (I think it's time to rename the service to find a device).

iWork. You can upload your iWork, MS Office documents and they will automatically appear on iOS devices. Editing documents on a computer is done only after downloading and opening in the office suite. On iOS, documents are edited and uploaded back automatically as you work on them.

When you make changes to the web version of the calendar, contacts, mail, all changes instantly appear on your iOS device. And vice versa.
You can also delete photo stream data in the web version. To do this, you need to click on the account in the main menu, click Advanced, then Reset Photo Stream.

Setup on OS X and Windows very simple - we turn on the necessary services and the service itself starts working and synchronizes everything.


For OS X, as I said at the very beginning, you just need to update the system to version 10.7.2. And with Windows it is a little more difficult.
First, there is no support for Windows XP. Secondly, you need Windows Vista SP2 or Windows 7 with MS Office 2007/2010 installed. Earlier versions are not supported.
Setting up on iOS no less simple - update the device to iOS 5, go to Settings - iCloud, put the slider in the necessary services to the "On" position and agree to the inclusion request.

A backup can be created in two ways: either automatically, while on a Wi-Fi network and connecting the device to charge, or manually.

It is possible to select applications for which you want to copy data.

If you do not have enough standard 5GB of space, then you can buy an additional one. My backup copy of 1 device takes an average of 170-200MB, so I don’t see the need for additional space for myself.

The pricing plans are:
$20/year - 10GB;
$40/year - 20GB;
$100/year - 50GB.
If you want a refund, you have 15 days to contact Apple.
The main purpose of the iCloud cloud service is to synchronize information between PC, Mac, iPod Touch, iPhone and iPad devices. This will especially make life easier for owners of several devices from Apple. Thanks to iCloud, all new information from your iPhone is automatically and instantly distributed to all other devices if they are connected to the same iCloud account.
Now you do not need to connect each device to your computer and sync with iTunes to transfer applications, photos, contacts and more back and forth. As soon as you have purchased or added something, for example, on the Iphone, through the "cloud" this data will immediately go to, for example, the iPad. No clutter or confusion - the same content on every device. You can also use iCloud on computers, there are versions for Mac and Windows...
What can be synced through iCloud?
1. iTunes content. iTunes in the cloud automatically downloads purchased music, apps and books to any of your devices.
2. Mail, calendars, reminders, contacts, notes, bookmarks also synced via iCloud.
3. Photostream(Photo Stream). All photos taken from Apple devices are automatically uploaded to Photo Stream and transferred via iCloud to other iOS devices as soon as you close the Camera app and are connected to Wi-Fi. (Photos are not sent to the cloud over the cellular network.)
Please note that you can store up to 1000 photos in the "cloud", and all subsequent ones will be overwritten in place of the old ones.
But on the other hand, all photos are stored on the computer, and not just 1000. You can view them on a Mac computer - through the iPhoto or Aperture programs, on a PC - in the Photo Stream download folder, by default this folder is C:\Users\Apple\Pictures\Photo Stream\My Photo Stream.
4. Documents(iWork). If you work with texts, tables and presentations through the Pages, Numbers and Keynote applications, then they can also be synchronized with all iOS devices, as well as with documents in the Mobile Documents folder on Mac computers. When editing a document on iOS, its "version" is automatically updated on all iOS devices.
5. Backups. Backups are now automatically created when an iOS device is connected to power and connected to Wi-Fi and sent to iCLoud. The backup includes device settings, the location of icons on the screen, messages, application data, photos and videos, ringtones, purchased music, programs, books and TV shows. If you want, you can use a backup copy so as not to lose data.
6. Family Sharing. With this option, users can share content from the iTunes Store, iBooks Store, and App Store with up to six family members.
All in all, iCloud allows you to keep all the information on all your iOS devices and connected computers up to date, quickly and easily transfer new applications and files between them. The iCloud service was introduced in the middle of 2011. Over the past time, the Cupertinites have significantly expanded its functionality.
Information deleted from iPhone is stored in iCloud for 30 days. Read how to recover deleted files.
How much to pay for using iCloud
All Apple ID account holders automatically receive 5 GB of free iCloud cloud storage. It can be used to store backups, application files, important documents, and more.

If necessary, users can expand the available capacity by 50 GB, 200 GB or 1 TB. Depending on the package chosen, the cost of the service will also change. When buying an additional 50 GB, users will need to pay an additional 59 rubles per month, and in the case of buying 1 TB, 599 rubles per month.
It is worth noting that relatively recently the company has somewhat reduced the cost of "packages". Last year, one additional TB of cloud space cost 200 rubles more.
How to set up iCloud
How to use iCloud and how to set it up. There is nothing complicated here. However, depending on the platform, it has its own nuances.
Set up iCloud on iPhone
1. On a smartphone or tablet, go to Settings - iCloud.


2. Enter your Apple ID login and password. Instruction.
3. Choose one of the two proposed options - merge or not merge Safari data on a mobile device and in the cloud.


4. Activate location for Find My iPhone.
Set up iCloud on Mac
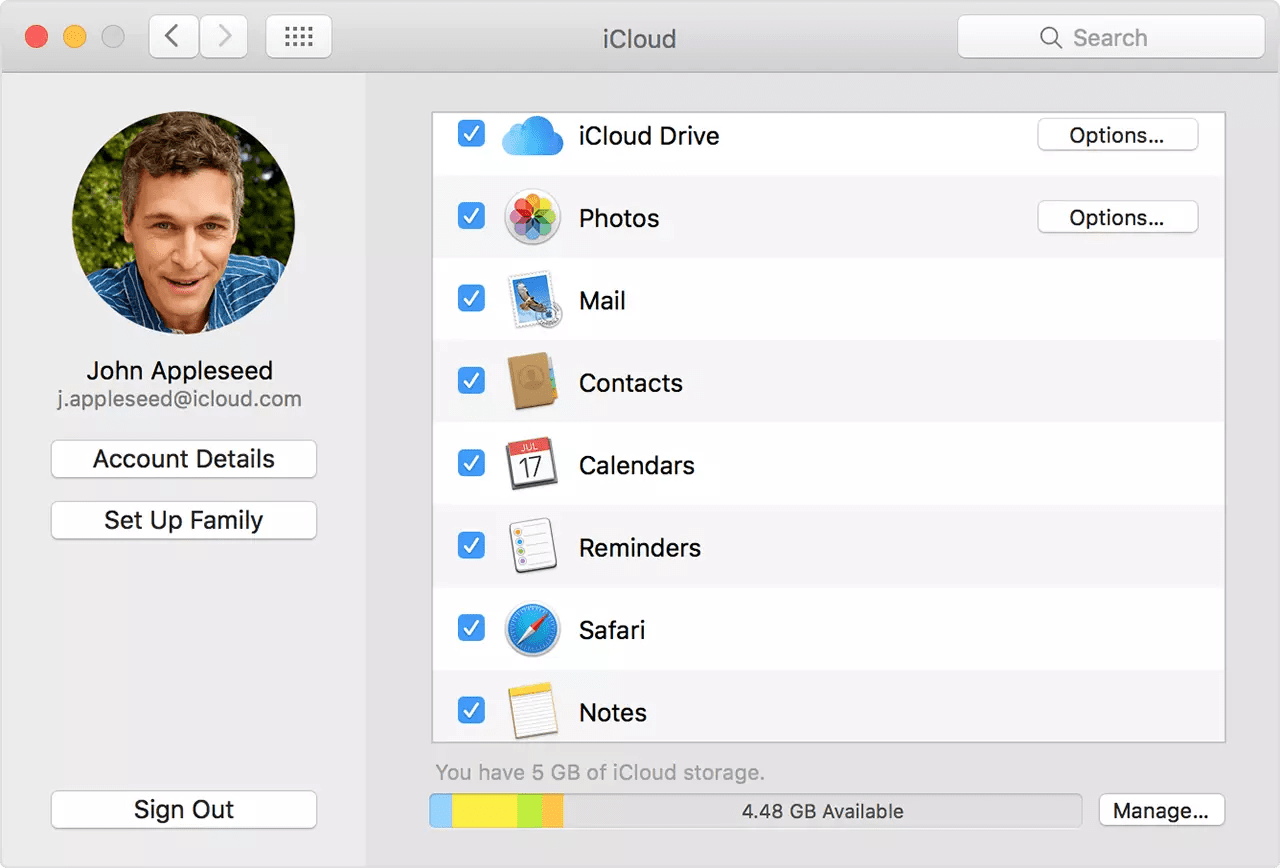
1. In OS X, open System Preferences - iCloud.

2. Enter your Apple ID login and password and click Sign in.

3. If necessary, activate the "Find Mac" function, as well as transfer contacts, calendars, reminders from Mac to iCloud.
Setting up iCloud on Windows
How to make iPhone photos available in iCloud
As mentioned above, iCloud can act as a cloud storage for pictures. Moreover, photos can automatically move to the cloud and become available both on other apple devices and in the web version of iCloud - this feature is called "iCloud Media Library".
To use iCloud Music Library, you need:
On a mobile device running iOS 8.3 or later, go to Settings - iCloud - Photos and activate the item " iCloud Music Library».


On a Mac with OS X 10.10.3 or later, go to System Preferences - iCloud - Options, then select iCloud Music Library.

After activating all the necessary options, photos and video recordings will start uploading to the cloud. This requires a permanent Internet connection. It is worth noting that the speed of downloading files and their appearance in the Photos app on iOS and OS X, as well as in the Cloud web version directly depends on the speed of the Internet connection.
iCloud also has a web version - iCloud.com, you can access all synchronized documents from this site.
Sign in with your Apple ID account. The five main sections include Contacts, Calendar, Documents, Find My iPhone, and Mail Account. Through the web service, you can fully use iCloud: upload documents and edit information in the calendar, contacts, mail. All changes will immediately be transferred to your iOS devices participating in the "cloud".

You can also delete photo stream data in the web version. To do this, click on the account in the upper right corner, select "Advanced" and "Delete photo stream data". This action will remove all photos from iCloud, but they will remain on all your iOS devices and computers. And iCloud will free up space for a new 1000 photos available for synchronization via the "cloud".
And Apple's cloud service has also made a serious step forward. iCloud cloud storage has evolved into iCloud Drive, bringing users a completely new way to host files on the Web and manage them. Let's dwell on these issues in more detail.
Basic settings
So, to use iCloud Drive, you must have iOS 8 on iPhone, iPad, or iPod touch, and OS X Yosemite on Mac. You can even access iCloud Drive from a browser and using Windows, but more on that later - for now, everything needs to be prepared. If compatible operating systems are installed, then pay attention to the status of the cloud service in the settings:
For iOS 8: Settings -> iCloud -> iCloud Drive- the function must be activated. Here, pay attention to the list of applications - they have access to iCloud Drive.
For OS X Yosemite: System Preferences -> iCloud -> iCloud Drive- again, check for a checkmark indicating that the service is activated. When you click the Options button, you can view the apps that have access to iCloud Drive.

At this preparatory stage is almost completed. One detail. If you refused to switch from iCloud to iCloud Drive after updating the operating system, then do not forget to do it now using the options indicated above. Now that's all for sure.
File types and available space
iCloud Drive largely follows the tradition of Apple, laid down back in OS X. By default, there is no dump of various files, and each application has its own folders in which it stores working documents. However, the key difference between iCloud Drive and regular iCloud is that now the user can create folders and absolutely any type of files in the cloud. In other words, now Apple provides us with a full-fledged cloud storage for files.
Flight of fancy rests solely on free disk space. Initially only 5 GB available- There are no changes in this regard. Extensions are much cheaper than it was in the case of iCloud:

Please note that the price of cloud space has also changed slightly.
In this simple way, you can increase cloud storage up to 1 TB. This will be sufficient for most users. With large amounts of data on the Web, it is worth thinking about specialized solutions. As a bottom line, we have an exhaustive amount of free space in the cloud and the absence of restrictions on file types - a fairy tale.
Access to iCloud Drive
1. The first way to access iCloud Drive is on your Mac computer. Just open Finder and go to tab iCloud Drive. Everything! Absolutely all files and folders are available to change to your taste - nothing complicated.

If it didn’t work out with a poppy, but there is a personal computer running Windows, then everything is also quite simple. You need to download and install iCloud 4.0 for Windows. After that, right in the explorer on the left, in the "Favorites" menu, a shortcut to iCloud Drive will appear. Everything works almost as elegantly and conveniently as on Mac.

2. The second method is in a sense even simpler, but often not so convenient for long-term use. Imagine the situation that you are at someone else's computer or you need one-time access to iCloud Drive. Accordingly, there is no desire or opportunity to configure cloud storage or install additional software. Help will come browser.

Documents 5 is a kind of swiss knife for iOS files. The application creates its own folder in the device's memory, where the user can place any desired files. Moreover, you can get them even by downloading from the Web using the built-in browser. In addition, there is support for all known cloud services and the ability to connect various servers. Of course, you can access iCloud Drive.

Access to the cloud is possible at the launch level of the corresponding applications for each type of file, as well as the ability to add files to storage from the internal memory of the device. However, we are talking about those files that are available to the Documents 5 application. In general, using the application, you can listen to music, watch a video, edit a document or image - the main working moments are available, and this will be enough for most users.

Unlike many of the new services and features Apple launched this fall, iCloud Drive is stable and performs well on its own. With the help of this material, you now know everything you need to effectively use cloud file storage for your own benefit and, in many situations, refuse additional services, remaining within the framework of a single Apple ecosystem.
Let's take a closer look at how to create iCloud on iPhone. Every owner of Apple equipment must have an account in this cloud storage.
Thus, you will get access to all the additional features of your device.
Users of other operating systems can also create their own personal page in the system and store their data on a virtual disk or simply use the mail service.
What is iCloud?
iCloud is the largest cloud storage environment that has the features of an email client.
The site launched in 2011 and was designed as a more advanced replacement for MobileMe.
In addition to storing information and messages, with the help of Apple device owners, they can store backup copies of gadget settings in the environment, synchronize data with other devices, and work with the Find My Phone function (quick search and).

Rice. 1 - iCloud logo
Benefits of iCloud
The main feature of the service is that it is designed specifically for iOS and Mac OS, so there is simply no better and more stable storage than iCloud for your iPhone.
Other popular "clouds" will not be able to provide a more organized and thoughtful storage and processing of data.
iCloud Benefits:
- Free registration. After creating an account, you get 5 GB of free space on a virtual disk. If you want to remove this restriction, you must subscribe to a paid subscription;
- No ads. Compared to clouds from or Yandex, on iCloud you will never see advertising banners or annoying pop-ups;
- The storage is well integrated with the IOS mobile platform and Macintosh computers. This allows you to achieve stable operation with a minimum percentage of errors. Data synchronization between devices is instantaneous (if there is a good Internet connection);
- Anti-spam and anti-spam system. You can create virtual mailboxes that are linked to an existing account. Unnecessary letters will be sent to them, which allows you not to load the main page with letters with unnecessary information.
iCloud - All in the details
iCloud Features | How to use | Why do you need | 2017
Create a mailbox in iCloud
ICloud mail with the identifier "@icloud.com" can only be created by owners of Apple devices.
The mailbox creation feature is available on mobile devices, tablets and Mac computers.
Rice. 2 - mailbox @icloud.com
The function of storing information in the cloud appears immediately after registration or Apple ID.
Owners of other phones and computers can use an existing mailbox by linking it to their Apple ID account.
Thus, you can get the opportunity to use several features in iCloud for free:
- Contacts;
- Apple Numbers - for working with tables;
- Keynote - creating presentations;
- Notes;
- Pages is a simplified version of a word processor.
It's worth noting that storage for non-Apple device users is only 1 GB.

Rice. 3 - Cloud settings window
You may also be interested in:
Create iCloud on iPhone or iPad
Registration requires an active internet connection.
It is advisable to connect the iPhone to a router or 3G network to ensure a normal data transfer / receive speed.
If you suddenly forgot your Apple ID password, then you.
Now go to the gadget settings window and follow the instructions:
- Open a tab "Mail, calendars, addresses";

Rice. 4 - the starting window of settings in IOS
- In the window that appears, information about all synchronized accounts and notes will appear. Since we need to create a new account, at the bottom of the window, click on "Add account";

Rice. 5 - window of synchronized accounts
- Next, a page will appear with a list of service logos, an account in which you can create/add. Select iCloud;

Rice. 6 - adding a service
- You can't create iCloud mail without an Apple ID. Therefore, next you need to click on the button "Create Apple ID". You need to provide your date of birth and contact details. Please note that you should only enter valid information about yourself. If you plan to make purchases in the app store in the future, it will not be possible to do this with fake data. Likewise, the caliper will not properly support fake users.

Rice. 7 - create an Apple ID
- After entering the name and date of birth, the page for linking the mailbox to the Apple ID will appear. Select "get email in iCloud", as it shown on the picture:

Rice. 8 - get a mailbox in iCloud
- In the new window, click on the text box and enter a name for the email address. The resulting string, for example, My [email protected]- this is the created identifier in the Apple ID system. The selected email name may already be taken. In this case, the system will automatically detect a match and notify you about it. You will need to come up with a new name.

Rice. 9 - enter a new iCloud address
- At the next stage of registration in the system, you need to set a password to access your account. Remember that to reduce the likelihood of hacking, you should specify a complex password. The passphrase must be at least eight (8) characters long and contain numbers, lower/upper case letters and special characters;

Rice. 10 - create an account password
The created email address and password will be both login data for both the system and the page of the mail service (cloud storage).
After registration is completed, the system prompts you to select three questions (from an already existing list). For each question, you must write a short answer.
This action is mandatory. If you forget your account login information, by answering one of the questions correctly, you can instantly regain access.

Rice. 11 - create security questions for iCloud and Apple ID
Don't forget to enter a backup email address. This can be the address of any other mail service that you have access to.
If you forget answers to security questions or cannot remember your login, recovery information will be sent to the additional address you specified.

Rice. 12 - page for creating a backup email
If you want to configure automatic service updates, activate the corresponding slider in the Updates window that appears.
Along with the latest updates, you will receive up-to-date information from Apple.
You can cancel the subscription at any time, the function is disabled in the settings of your personal iCloud account.

Rice. 13 - connect automatic updates and news from Apple
Before completing the iCloud registration procedure, please read the user agreement.
Further use of the service implies full compliance of your actions with all established rules.

Rice. 14 - window with the text of the user agreement
After pressing the "Accept" button, iCloud will be created. Linking your account to your iPhone and data synchronization will be performed automatically.
It remains only to confirm the entered backup address. Thus, the system checks if you have access to another mailbox.
A letter with a code will be sent to the backup email, which must be entered in the registration confirmation window. If everything is done correctly, the following message will appear:

Rice. 15 - iCloud registration confirmation
Registration completed, however, the account is still inactive on your phone.
You need to turn on the iCloud service in the iPhone settings in order to start automatic synchronization of your account with the gadget.
Go to the Settings-iCloud window. In the window that opens, activate all the items and processes to synchronize your account and phone.

Rice. 16 - activating an iCloud account on an iPhone
Using the data of the created account, you get access to all official services and services from Apple, namely:
- App Store App Store;
- iCloud Drive storage;
- mail [email protected] ;
- Find My Phone function;
- Means of communication FaceTime, iMessage and others.
Using the iCloud email service as your Apple ID creates better information security.
The risk of profile hacking is minimal, and data recovery occurs instantly, however, without knowing the unique information (answers to questions, backup mail), it is almost impossible for an attacker to do this.


