Rhythm modern technologies forces us to stay online all the time. Otherwise we will miss all the news, several letters to email, Viber call, Facebook invitation, new status on Twitter and so on. Technology keeps us informed of all events, and this forces us to constantly be online.
Internet signal transmission methods
There are two most obvious way Internet signal transmission: via wires and using WiFi technologies. The first implies the bulkiness and stationary nature of the network access point: we need an Internet port connected to our PC. It, in turn, cannot be moved around the apartment, due to which the device becomes stationary in some way.
The second method is now more common. It is designed very simply - a transmitter is installed somewhere in one place, which wirelessly distributes a signal to access the Internet in the space around it. Thus, every device that falls within this zone can connect to the network without any restrictions on movement. That is why today connecting the Internet via a WiFi router is more popular than creating access using wires.
Creating a wireless network
Anyone can create their own wireless network. To do this, you only need the appropriate equipment - a signal transmitter that will create that same wireless zone wired connection around you. This is a WiFi router. Working with it is quite simple and comfortable - you only need to configure it once in order for it to continue to work on a permanent basis in the future without any changes.
Start an organization wireless network It is necessary to purchase the router itself and connect it to an access point - the source of the Internet signal. Most often these are wires going to your apartment or office. Through them, the router receives the signal, converting it into waves. For this reason, Internet speeds over WiFi may be slightly slower, especially if we're talking about about many devices. True, if you buy powerful router, you will not notice any speed restrictions.
Setting up the router
Of course, except easy connection device to the point where the wires exit, you also need to take care of adapting it, in other words, setting the parameters of your connection. This is due to the fact that there are different technologies Internet signal transmission, which is why each router must be configured individually. In addition, this should also include the data of the wireless network itself - the access key (password required to connect), as well as the name (how the Wi-Fi network will be displayed on different devices).

Home WiFi Internet, accessible through a router, only needs to be configured once to use it in the future without changes. You can do this too with the help of a special assistant built into the device itself at the software level. And to do this, you need to connect the router to your PC and load the installation disk (or drivers downloaded from the Internet) so that your computer recognizes it. After this, you can go through the setup stage - go to the “Administrative Center” of the device (this is done from the browser by going to 192.168.0.1 or 192.168.1.1). Then you can simply follow the assistant’s instructions - and you won’t go wrong.
Transfer via laptop
Of course, there is a connection using a router worthy alternative. This is a signal distributed through your laptop. Why not a desktop PC? Yes, because the main condition in this scheme is the presence of a Wi-Fi adapter, which may not be included with a stationary one computer unit. Therefore, we answer the question of how to distribute the Internet via WiFi from a laptop. Again, make sure your model has this adapter. Well, read the instructions that we outlined in this article to be able to do the same.

In general, the Internet through WiFi laptop opens up a lot of possibilities. For example, you can use your computer as a signal receiver from a wired connection and subsequently transmit it wirelessly as a Wi-Fi network to other devices. This will allow you to use your tablet and smartphone without restrictions without turning off your laptop.
This kind of Internet distribution significantly saves money - you can pay for access to one device, while ensuring the connection of several at once. Or distribute the network to friends, for example. Therefore, remember the techniques that can help organize this.
Distribution on Windows
First of all, we will describe the method that the developers of the Windows operating system themselves offer as the simplest and most convenient for transmitting a Wi-Fi signal. Understanding how to distribute the Internet via WiFi from a laptop using this method is not that difficult.
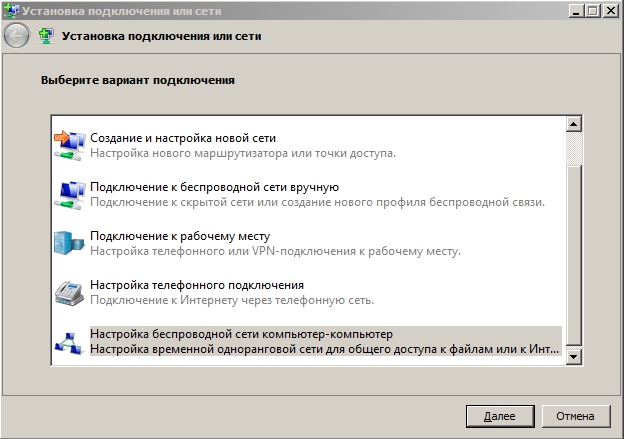
First you need to go to the “Network Center”, where there will be an item “Set up a new connection”. This is what we need, after which the system will offer to run the “Network Connection Setup Wizard”. Select it, then click “Next”. We get the menu “Setting up a wireless network Computer-Computer”, where there are no settings or fields to fill out, just a bunch of information.

We skip it and click “Next” until three fields are highlighted. The first is called “Network name” - here we will enter the name of our Wi-Fi network, which will be seen by other devices. The second field is the Security Type drop-down menu. Just remember that we need to select WPA2-Personal. Even lower is the third field - this is the password. It serves to ensure that no one else can connect to the Internet via the WiFi we created. After that, click “Next”. The last step there will be a choice of access level. We need the item “Enable Internet connection sharing”, then click close. As you can see, our network is ready. Anyone who knows the password can log in.
Additional programs
We looked at how to distribute the Internet via WiFi from a laptop, but there are several more ways. It is very convenient to work with third-party programs. IN Lately There are a lot of them released - for example, Connectify, MyPublicWiFi, mHotSpot and others. Among these programs there are a lot of both paid and free options, but they all share similar functionality and a goal - creating wireless networks for your devices. The advantage of using such software is a simplified interface and a more understandable device compared to the solution from Microsoft Windows. Such programs can sometimes offer more advanced functionality than standard tool operating system, due to which they are suitable for solving more tasks.
Command line
Another option for turning your laptop into a Wi-Fi router is to launch a special combination via the command line. This method has both its pros and cons. A clear advantage is simplicity for those who are used to working with text commands. You don't need to look for shortcuts, go to the menu, download some programs - just enter a few lines, and the access point is ready. On the other hand, the disadvantage of this method is clear to those who have never encountered such a tool as the command line in their lives. It is definitely better for such users to skip this point.
So, first of all, go to the command line. You can do this by pressing Win keys(the one with the Windows checkbox at the bottom of the keyboard) and R at the same time. A window will appear in which you need to enter ncpa.cpl. Click "Ok".
A list of Wi-Fi connections will open in front of you. Click on one of them right click mouse and select "Properties". Look for the “Access” tab, click on it, then check the box “Allow other network users to use the Internet connection” this computer».

Next, launch the command line again, but this time as Administrator. To do this, in the “Start” panel, find the “Command Prompt” item, then right-click and click “Command Prompt (Administrator”).
Now you need to check if your Wi-Fi signal is supported. To do this, enter the command “netsh wlan show drivers”. If a lot of information on drivers appears, then everything is fine. If not, alas, nothing will come of it.
Now enter the connection commands. The first is "netsh wlan set hostednetwork mode=allow ssid=Name key=Pass" (without quotes, where Name is the name of the network and Pass is the password for it). Information should appear on the screen that all services have been successfully activated, then write “netsh wlan start hostednetwork”. That's it, that's all for setting up an Internet WiFi connection using command line. To stop the network, repeat the command, replacing "start" with "stop".
We distribute Internet on Mac
Since we're on the topic Wi-Fi distribution from a Windows laptop, it would be a good idea to raise the same problem with Mac OS devices. True, everything is much simpler here.
The first thing you need to do is share your Wi-Fi connection. This is done in the settings of the “Sharing” service (this is all located in “ System settings"), namely in the paragraph “For computers using...”. It is in this menu that you need to check the box next to Wi-Fi.

After this, you should configure “ Shared Internet" To do this, you first need to select Ethernet, Thunderbolt or VPN from the drop-down menu - depending on what kind of Internet you have. Next, click “ Wi-Fi Settings" and write down the network name and password. You can leave the channel and security type alone.
That's it, when the settings are finished, all that remains is to activate the distribution. You can do this by pressing the “Enable” key.
How to connect?
When you have created your own connection from your computer, this network can be seen in the general list of wireless connections. Accordingly, you can access the Internet through it from any device. To do this, it is enough, as noted earlier, to know the security key (password) for entering the network and, of course, its name. If everything is done correctly, in theory, you should have the Internet on your tablet, smartphone, or the device from which you surf online.
Typical problems
Of course, even in such a simple operation as creating a wireless connection, a number of problems can arise. The two most common are the lack of connection, provided that the Wi-Fi network is created correctly, and the inability to connect to the network, since it is missing.
Most common solutions
This can be solved in several main ways. The first thing you need to do is check whether your device meets the requirements. This means whether you have a Wi-Fi adapter on your laptop, whether the most fresh drivers, is it enough new version adapter for working with a Wi-Fi network and similar issues. You can find them out by accessing the command line (see instructions above). It is also recommended to go to the official website of your laptop manufacturer and download the latest software.

At the second stage, you need to make sure that the settings you entered when creating your Wi-Fi network are correct. In particular, we are talking about the type of Internet connection, the connection method (VPN or Ethernet connection - each of them requires special connection parameters).
Third, check the restrictions! Since a laptop is not a WiFi router, its default settings may have some restrictions to ensure the safety of the device. This is, for example, the Windows firewall, antivirus program or some other deterrent software that recognizes your network as a threat. Before distributing the Internet via WiFi from a laptop, check whether it is the reason why you are unable to distribute a signal.
Nowadays, not a single person can do without the Internet. Cable Internet is available in almost every apartment. However, it is convenient to use desktop computer or on a laptop. However, what if there are other mobile devices in the house, such as a tablet, smartphone, etc.? Mobile Internet It is quite expensive, and the speed is lower. Because of this, the question arises, how to distribute the Internet via WiFi on a computer with Windows 7?
It is worth noting that the easiest way to create a virtual WiFi network is to purchase wireless router, but what to do if this is not the case? Everything is very simple.
How to distribute WiFi using a laptop
First of all, it should be said that today there are two ways to distribute WiFi Internet from a computer with Windows 7:
- Using built-in windows tools.
- Using special software.
It is worth noting that creating a virtual WiFi group using the built-in operating system tools can be done in two ways:
Read also
- Using the Network Sharing Center and shared access.
- Using the command line.
We will consider all these methods in detail.
How to distribute WiFi in Windows 7: Video
Setting up a network environment for distributing WiFi from a computer
It is worth noting that any modern laptop supports the Virtual WiFi function, which makes it possible to distribute the Internet via WiFi. But now let's look at how to organize Internet distribution by setting up the network environment (Network and Sharing Center).

To do this, go to the Start menu and launch Control Panel. In the window that appears, you need to launch “Network and Internet”, and then go to the “Network and Sharing Center” section. Or click on the network connection icon in the tray and launch the Network Control Center.

Here you should run “Settings for a new connection or network”, then click the “Computer-to-computer setup” button and click “Next” and “Next” again. In the window that appears, you must fill in all the fields and save the settings.


Fill in the fields to configure the virtual network:
- The name of the wireless network: can be anything at your discretion (you can use letters and numbers, as well as a combination of them).
- Password: can also be anything you want. It is required to connect to the group.
- Security Type: It is recommended to select "WPA2-Personal" here.
After filling out all the fields, you must check the “Save settings for this network” checkbox and click “Next”. After this, the system will create virtual network. In the window that appears, click “Turn on Internet connection sharing.” Close all windows.
Read also

- In the Network and Sharing Center menu, select Change adapter settings. Here you need to find the connection through which the computer accesses the Internet and right-click on the shortcut. In the window that appears, select "Properties". Next you need to go to the “General” tab. Here you need to check the box “Allow other users to use this computer’s Internet connection”, and below select “wireless network connection 2" (this is the created virtual network) and click the "OK" button;
- After that, you should return to the "Network and Sharing Center";
- Next, select "Change" Extra options public access";
- In the window that appears, check "Enable network discovery", as well as "Turn on file and printer sharing";
- After that, click the "Save Changes" button.
Articles on the topic


This completes the configuration of Internet distribution via WiFi in windows 7. If everything is done correctly, then other devices will be able to connect to the virtual network and will have access to the Internet.
Setting up WiFi distribution using the command line
First of all, it must be said that this method is only suitable if the wireless adapter driver supports the Virtual WiFi function.
You can create a virtual WiFi network using the command line. To do this, you need to launch notepad and write the following line in it: netsh wlan set hostednetwork mode=allow ssid=My_virtual_WiFi key=12345678 keyUsage=persistent.
Here ssid is the group name and key is the password. That is, in the example, the group name is My virtual WiFi, and the password for connection is 12345678. Any password can be used. After that, the file must be saved. Next you need to change the extension and file name.
To do this, you need to right-click on the saved file and select “Rename file”. It is recommended to name the file the same way you named your network. After the file name we put a dot, and after the dot, instead of .txt you need to write .bat. Next, you should run the file with administrator rights. To do this, right-click on the file again and select “Run as administrator.”
All of the above actions can be performed on the command line itself. You can do it like this. In the “Start” menu, enter “Command Prompt” in the search and run it as an administrator by right-clicking the mouse. A command line will appear in which you need to enter netsh wlan set hostednetwork mode=allow ssid=My_virtual_WiFi key=12345678 keyUsage=persistent as shown in the photo.


Thanks to this, the system will install this command. It is worth noting that the new hardware should appear in the task manager. It's easy to check. In point " Network adapters» a device called “Mini Port Adapter” should appear virtual WiFi Microsoft.”

Next, you need to go to “Network and Sharing Center” and select “Change adapter settings.” A shortcut called “Wireless Network Connection 2” should appear here. The label should show the status “No connection” as shown in the picture.

The next step is to launch the network. To do this, call the command line again and write in it: . This will launch the created network. At the same time it should earn virtual point access (SoftAP). In this case, the “Wireless network connection 2” label will change its status to “My virtual WiFi”.


In order to provide other group members with the opportunity to access the Internet, you should perform the following steps:
- Go to the Network and Sharing Center.
- Go to “Change adapter settings”.
- and find the connection through which the computer (or laptop) is connected to the Internet, right-click on it and select “Properties”;
- Here in the “Access” tab do the following:
- In the “Connection” section home network” you should select the created virtual group (in our case, “Wireless network connection 2”).
- After that, check the box “Allow other network users to use this computer’s Internet connection.”
- Click “Ok” and that’s it. The network is fully configured and ready to use.

To manage a virtual group, there is a set of simple commands that must be entered on the command line:
Read also
- Allow or deny network use – netsh wlan set hostednetwork allow|disallow.
- Setting up the group – netsh wlan set hostednetwork persistent|temporary. Instead of the words “passphrase” you enter your password, and instead of “SSID” you write the name of your group (in our case My virtual WiFi).
- Group properties and status – netsh wlan show settings.
- Security Settings virtual group– netsh wlan show hostednetwork setting=security.
- Start the virtual group – netsh wlan start hostednetwork.
- Stop the virtual group - netsh wlan stop hostednetwork.
As you can see, distributing the Internet via WiFi from a computer with Windows 7 using the command line is quite possible. Moreover, everything is quite easy and simple. The main thing is to write the commands carefully.
How to distribute WiFi on a laptop using the command line: Video
Distributing WiFi from a computer using special software
The easiest and simple method distributing the Internet via WiFi from a computer means using third-party software.
There are a huge number of such programs. They can be paid or free. In this case, setting up all these programs comes down to three main parameters - the network name, password, and the choice of connection through which the computer accesses the Internet. Moreover, you must come up with a name and password yourself. After making these simple settings, click the “Start Hotspot” button.
Here are some of the programs that are most popular:
- Connectify.
- My Public WiFi.
- mHotSpot.
- Virtual Router Plus.
How to distribute WiFi in Windows 7 using Conectify Hotspot: Video
Which of the above methods of WiFi distribution to use is up to you to decide. Certainly, third party programs much easier to configure, but the built-in tools are more stable.
How to distribute Wi-Fi from a computer without a router
How to distribute Wi-Fi from a laptop on Windows 7
How to distribute Yota over Wi-Fi with windows 7
How to distribute Wi-Fi from windows laptop XP
bezprovodoff.com
Setting up WiFi distribution from a Windows 7 and XP computer
- 1 Laptop as a router on an old OS
- 2 Settings on the current OS
You don't have to buy a router to have WiFi in your home. A laptop connected to an Ethernet cable can also distribute the Internet throughout an apartment. There are plenty of instructions online on how to do this on Windows 7 and older, but if you have XP, don’t rush to do it complete reinstallation operating system.
Laptop as a router on an old OS
On any operating system from Microsoft Internet distribution via WiFi can be organized using both built-in tools and third party utilities. But why litter HDD extra programs? On Windows XP, follow these steps step by step:
- Open “Start” and go to “My Computer”.
- In the left panel, select “ network”.
- Next, go to the “Show network connections” section.
- Click on the “ Wireless connections” right-click and open the “Properties” item.
- Next, go to the address "Wireless networks" - "Advanced".
- Here, select the “Computer to Computer” option and confirm your choice.
- Click "Add" and enter the details the network being created(name, password, encryption method) and confirm.
- Next, open the “General” tab and highlight the IPv4 item, click on the “Properties” button.
- In this window, set the indicator to “Use the following IP...” and enter the following data:
IP - 192.168.1.1
Subnet mask - 255.255.255.0
The distribution has been created, all that remains is to enable the ability to connect to it from other devices within the range of the wireless network. To do this, go back to the window network connections and right-click on the local connection and open its properties. You need to put an indicator next to the “Allow other network users...” item.
Now WiFi distribution should be fully functional.
Settings on the current OS
Similar actions can be done with Windows 7. In order for Wi-Fi to be distributed from a computer or laptop, you can, as in the previous example, step by step create a new virtual network. The only difference is in some steps.
- You need to look at the “Network and Sharing Center”.
- Run “Set up a new connection...”.
See also: Windows 7 won't restart
- Then go to “Setting up a wireless network “Computer-Computer” and click the “Next” button.

As you can see, the actions are similar. In the new window, enter the network name, encryption type and password. Save the changes and click “Next”. Here all that remains is to apply the “Enable sharing...” setting.
But that is not all. To be able to connect to WiFi from other devices, return to the “Network and Sharing Center” and on the left side of the window, find the line “Change advanced settings...”.
After opening this menu, make active the items highlighted in the screenshot:
Ready! But Windows 7 offers another, more advanced and simpler way to organize WiFi distribution from a computer or laptop equipped with wireless adapter. This is using the command line. Find it in the list of all Windows programs and open it with administrator rights (right-click on the shortcut and select the appropriate item).
In the window that opens, enter a command of this type:
netsh wlan set hostednetwork mode=allow ssid=”name new network(at least 8 characters)" key="password"
and press Enter. This is a quick way to create a distribution, and to start distributing the Internet from your laptop, use the command:
netsh wlan start hostednetwork
All that remains is to go to “Network Center...” - Properties Local connection(the same one that is the wire through which the Internet “gets” into the apartment). Open the “Access” tab and check both boxes. Now WiFi sharing works.
(Visited 15,041 times, 42 visits today)
windowsprofi.ru
How to distribute Wi-Fi from a computer to a phone? | Your networker
Connecting your phone to your computer via wifi will help you significantly save expensive 3G traffic and create your own wireless network even without access to a router. And in this article we will look at how to distribute wifi from a computer to a phone, and also touch on technical features such a non-standard Wi-Fi network.
So, among the most common ways to connect your phone to a computer via wifi, you can note creating a Wi-Fi connection using windows and using the command line. By the way, the computer here acts not only as an access point, but also as a repeater.
How to distribute Wi-Fi from a computer to a phone via the Windows 7 interface?
To begin with, let's look at the option of connecting via Wi-Fi using Windows 7: this is the simplest and universal method creating a network between a computer and a phone.
Please note that the names of folders and files for other versions of Windows may be slightly different.
- - To transfer files from a computer to a phone via wifi, the PC must have an active Internet connection;
- - Create a new connection “Wireless computer-to-computer network”;

- - Fill in the network name (for example, let’s call it “MyNewNetwork”), security type (WPA2 - PSK) and key (create a password) for the created network, and click “Save settings” - “Next”;
- - Click "Turn on connection sharing." This completes the transformation of the computer into an access point. In the "Sharing Options" section, set "enable" to all required items

Now from your phone search available wifi points, find the network you created (“MyNewNetwork”) and connect to it by entering the security key.
How to distribute Wi-Fi from a computer to a phone via the command line?
To distribute the Internet from a computer to a phone via wifi:
Open "Command Prompt";

Enter “netsh wlan set hostednetwork mode=allow ssid= wifi phone key=000000 keyUsage=persistent” (accordingly, all commands are entered without quotes);

- - a notification will appear indicating the successful placement of the network you created (“MyNewNetwork”);
- - in the “Device Manager” (“My Computer” - “Manage”) a device called “Microsoft Virtual WiFi Miniport Adapter” will appear;
- - click on the created connection and open “Property” - “Access”;
- - set both parameters to share and select a new connection from the list.

To enable the network, open Command Prompt again and type “netsh wlan start hostednetwork”.
This command must be entered every time you turn on the computer - thereby you determine when to provide access to your network.
To disable - “netsh wlan stop hostednetwork”.
To change the name or password - “netsh wlan set hostednetwork mode=allow ssid=”WifiNewName” key=”New password” keyUsage=persistent”.
To recover your password - “netsh wlan show hostednetwork setting=security”.
In addition, to simplify connecting your phone via wifi to a computer, you can make a mini-utility that will contain a command to start the network:
Open Notepad or Notepad++ editor and enter the command to start the network;
Save the file with the extension .bat in the “File name” column, for example - new-wifi.bat;

After saving the program, to start the network just open this file.
.bat files, and especially .vbs files, require that English layout keyboards.
However, such a network has significant drawback: the computer will distribute Wi-Fi to the phone and other devices only in the “active” operating mode, but the network will become unavailable even if the PC simply goes into sleep mode. Therefore, it is recommended to immediately disable the “Hibernation” mode.
How to connect a phone to a computer via wifi: automatic network mode
Can also be customized automatic switching on and turning off the network if the Internet needs to be distributed for a limited time.
Create 2. bat file: one with the on command, and the other, respectively, with the shutdown command. For this:
- - “Start” - “Control Panel” - “System and Maintenance” - “Administration” - “Task Scheduler” (or maybe “Scheduled Tasks”);
- - Set each file (on/off) to its own task: let’s say you will distribute the Internet every day from 12:00, and the second file with shutdown will be launched every day at 16:00.
Sometimes the error “Failed to connect to the network...” occurs, or it simply “permanently” obtains an IP address without access to the Internet.
The reason that Wi-Fi does not work on the phone (but works on the computer) may be:
Blocking connection " Windows firewall»

Blocking the connection by antivirus.
tvoi-setevichok.ru
How to distribute the Internet from a computer via Wi-Fi? detailed instructions
Windows can turn your computer or laptop into a wireless access point if you allow it to distribute the Internet via Wi-Fi. Setting up Internet distribution on Windows 7, 8 and 10 is somewhat different. Therefore, to install Internet distribution via Wi-Fi, we will consider for each operating system windows separate instructions. Go.
Opportunity sharing wired Internet connection of your computer or laptop to connect wireless devices available in Windows 7, 8 and 10 without installing additional components. Creating such connections, which are an example of peer-to-peer networks, is as easy as shelling pears. In general, a classic example of a peer-to-peer network is a network of the form computer - switch - computer, and the computers have the same rights in this network. And in our case, wireless network interface Wi-Fi will be responsible for the role of the switch.
Please note that when setting up a peer-to-peer network using Wi-Fi adapter and your computer for Internet distribution via Wi-Fi, current WiFi connection, if present, will be disabled. Since the Wi-Fi adapter will be used to distribute the Internet and will no longer be able to receive it.
I would like to inform you that I do not show here how, after all the settings, you can find the resulting access point on your smartphone or laptop and connect to it. Due to the flourishing of the smartphone market, I think that everyone can connect to a Wi-Fi network.
How to share the Internet with Windows 10
1. Launch Settings in any way convenient for you: by pressing + I on the keyboard, through the START menu by clicking on the icon. On home page settings, click the Network and Internet button.


4. In the edit network information window, set the network name and enter your password, consisting of at least 8 characters.

That's all you need to do in Windows 10 to distribute the Internet from your computer via Wi-Fi. This is one of best features anniversary update windows 10.
We distribute the Internet via Wi-Fi from a laptop or computer in Windows 8
Unfortunately, Windows 8 does not have GUI to set up a peer-to-peer network, so we will use some steps to set up the Internet via Wi-Fi Command string.
It must be said that this method of distributing the Internet via Wi-Fi, described for windows8, is also suitable for windows 7 without any additions. All steps are completely identical.
1. Open Network Connections in a way convenient for you, for example, by pressing the combination + R on the keyboard and typing ncpa.cpl in the Run window, click OK.


3. Switch to the Access tab and enable the Allow other network users to use this computer's Internet connection option. If the second option is Allow other network users to control Internet connection sharing. Then click OK.

4. Next, you need to run the command line with administrator rights. Open the START menu and type cmd. In the search results for Command Prompt, right-click and select context menu Run as administrator.

5. At a command prompt with administrator privileges, enter:
Netsh wlan set hostednetwork mode=allow ssid=" " key=" "
Where is the name of your network and the password for connecting to the network, which you will need to enter to connect to the access point. In this case, the connection will be based on WPA2-PSK (AES) encryption.
Netsh wlan start hostednetwork
From this moment on, your computer or laptop is ready to distribute the Internet via Wi-Fi.
7. At any time you can view connection information, where you can find out which channel your connection is using, access point name, authentication type, wifi type and the number of clients connected to the network.
Netsh wlan show hostednetwork
8. Stop broadcasting the hand Wi-Fi Internet you can use the following command:
Netsh wlan stop hostednetwork
Internet distribution via Wi-Fi in Windows 7
As mentioned earlier, you can set up Internet distribution in a way that is suitable for Windows 8. But we will consider using a computer-to-computer network (Ad-hoc) to distribute the Internet via Wi-Fi. This method is interesting because you do not need to use the command line to configure distribution.
1. Open Network and Sharing Center in Control Panel. In the Change section network parameters Click on Set up a new connection or network.

2. Then in the window that opens, select Setting up a computer-to-computer wireless network and click Next.

- Network name - we come up with it to your taste;
- Security type – select WPA2-ptersonal;
- Security key – set a password that will need to be entered to connect to the network.

4. The system will automatically configure Internet distribution via WiFi and display a window that is ready to connect to Wi-Fi networks With specified parameters. In the window that appears, click Turn on Internet connection sharing.

We distribute wired Internet through the application

Install, launch, indicate the network name (SSID), set the desired password, and select our wireless connection that we want to distribute. Click the Start Virtual Router button, and you're done. Below you can see a list of connected devices. It just couldn't be simpler.
Setting up Internet distribution via Wi-Fi may seem like a hassle to some, but in reality it is not that difficult. It all depends on what windows version You are using. In addition, you can always use the application third party manufacturer, working with which comes down to an even simpler way to make an access point out of your computer or laptop.
Now you can always use this article to distribute your Internet channel via Wi-Fi, even if you don’t have it at hand Wi-Fi router.
userello.ru
How to distribute Wi-Fi from a computer - without a router, to any device

Many of us, now at home, have not only a TV and a computer, but also a phone, tablet and other electronic devices. And there is only one Internet connection. In this regard, the following questions arise: How to distribute Wi-Fi from a computer without a router? Is it possible and how to distribute the Internet from a computer to a phone and other devices?
How can we access the Internet from all the devices we have at home? How to distribute Wi-Fi from a computer? How to make Wi-Fi on a computer without a router?
Are you answering that distributing wifi from a computer (laptop) is only possible thanks to a router? Then this post is for you. But is it possible to make a computer or laptop distribute Wi-Fi without a router? Can a computer distribute Wi-Fi without a router? Undoubtedly!!!
Most likely, you know what it means to distribute wifi, so we will not describe it in detail, but will answer the questions above.
How to distribute Wi-Fi from windows computer 7, 8,10, without a router for any devices?
As is known, in the “classical” way of creating wireless point access is the connection of additional network equipment– a router, which will be a kind of connecting link between all nodes local network.
By the way, hardware method creation WiFi zones is the only one the right decision when setting up a more or less serious local network: it provides stable long-term connection of any mobile devices, and also supports many additional functions.
And in this article we will look at how to make a laptop distribute Wi-Fi without a router, and what Windows setup 7 is required to connect to the Internet.
As a rule, the need to distribute wifi from a laptop arises when connecting to worldwide network via USB modem or working with wireless peripheral devices( etc.).
However, not every modern laptop is capable of such a network feat: this function directly depends on the capabilities network card your PC.
The easiest way to find out whether a laptop can distribute wifi without a router is to use the Command Line. To do this, go to “Start” -> “Run” -> “cmd”, in the window that opens, enter netsh command wlan show drivers and press the Enter key (for Windows XP/Windows 7).
If the system gives you the message “The AutoConfig Service is not running,” then this PC does not have the module necessary for a wifi connection.
If the command “passes” without errors, then find the line “Hosted Network Support,” which characterizes your laptop’s ability to distribute wifi.

If “Yes” is indicated here, you can safely proceed to further configuration of your laptop;
Otherwise, update the network card driver to the latest version (it is recommended to download the software only on the manufacturer’s official website) and again check the capabilities of the network adapter via the command line. If the result is unsatisfactory, then you will not be able to distribute the Internet from your laptop.
How to make a laptop distribute Wi-Fi?
If everything is in order with the adapter, and the hardware capabilities of this PC allow you to create a wireless access point based on the computer, then you can force the laptop to distribute wifi in three different ways:
- - through the “Network and Sharing Center”;
- - using the command line;
- - by using special software(through Connectify program etc.)
In this article, we will look at how to distribute wifi from a laptop without programs, i.e. with help manual settings Windows 7 OS.
How to distribute wired Internet from a laptop to another computer?
Most in a simple way to make the laptop distribute Wi-Fi is to create a new network through the “Control Center” on Windows 7.
This method allows you to distribute wifi from a laptop only to other computers running Windows. In other words, a simple peer-to-peer network is created (the so-called ad-hoc mode), and you will not be able to “share” the Internet on Android with its help.
So, to distribute wifi without a router via a laptop:
1. Go through the “Start” menu -> “Control Panel” -> “Network and Internet” to the “Network and Sharing Center” subsection.
2. Select “Set up a new connection or network” in the main window.
3. In the window that opens, select “Set up a wireless computer-to-computer network,” click “Next” and “Next” again (in the information section).

4. In the next window, enter the settings for the new local network:
- - Network name (SSID) – wifi name access point, which will be reflected in the “search available connections» other computers;
- - Security type – select the “standard option” WPA2-Personal;
- - Security key – a unique password for connecting to the local network.
5. In the new window, click “Turn on Internet connection sharing” and close the wireless network setup wizard.
Now the laptop is capable of distributing the Internet and exchanging information with other computers. To connect to wifi on a third-party PC, just go to the “Network Control Center”, select by SSID desired point access and enter the established authentication data.
Unfortunately, this is far from universal method, since in most cases you need to distribute Wi-Fi from a laptop to various android devices (to save mobile traffic) or connect to peripheral functional nodes ( network printer etc.).
How to distribute Wi-Fi through a laptop on Android?
In addition to the above method, you can distribute wifi from a laptop using the command line. The advantage of this connection is that you can distribute the Internet without being tied to the operating system of the receiving device: to a tablet, phone, etc.
However, when you reboot (or “fall asleep”) the laptop, such an access point stops working, and for the network to work, you need to either regularly maintain the PC in operating mode, or after a reboot, repeat all stages of setting up the local network.
So, in order for a laptop with Windows OS to distribute Wi-Fi, you need to:
Through “Start” -> “All Programs” -> “Accessories”, go to the command line in administrator mode.
Enter the command here:
netsh WLAN set hostednetwork mode=allow ssid=“name of your network” key=“password”
(for example, netsh WLAN set hostednetwork mode=allow ssid="setka" key="horowiikluch")
to create a new wireless access point.
Enable the created network using the command: netsh wlan start hostednetwork

(If this operation completed successfully, it will occur system message: "The hosted network is running")
Grant all network devices the right to access the Internet. To do this, go to “Control Panel” -> “Network and Internet” -> “Network Center” -> “Change adapter settings”, right-click on the shortcut once active connection to the Internet and select the “Properties” menu item.

In the window that opens:
Go to the “Access” tab;
Place the checkbox next to “Allow other network users to use the Internet connection”;
Select the new connection you created in the “Home network connection” column;
After following these instructions on all computers in the zone wifi actions of your laptop when “Searching for available wireless connections” will appear new point access with the SSID you specified.
So that after a reboot the laptop automatically distributes Wi-Fi over a given local network, you can autoboot the command line. For this purpose in text document save the netsh wlan start hostednetwork command, change the file extension to .bat and copy it to the Windows7 (Windows8) startup folder.
Users prefer laptops personal computers mainly due to their portability. One of the important advantages of a laptop, providing it free movement, is the presence of a built-in Wi-Fi adapter that allows you to connect to the Internet via wireless technologies. Therefore, information on how to turn on wifi on a laptop will be useful to all laptop owners who want to feel confident and free in any conditions.
Connecting a laptop to wifi requires a few simple steps that can be done by any user with basic Windows skills.
The problem of how to turn on wifi on your laptop can be solved by two methods: hardware and system. Systemic means correct installation drivers, setting up the router and connection, etc. The hardware is to use special keys, which are equipped with some laptop models.
Before learning how to set up wifi on a laptop, you need to check whether there is a switch on the laptop case or function keys, which are responsible for access to wireless networks.
If there is a switch, make sure it is in the On position. The same situation with “hot keys” - for example, on Windows 8, the combination Fn + F2 activates the Airplane mode, in which access to wireless communication absent.
Checking drivers.
Let's move directly to setting up the system. Solving the question of how to enable wifi on your laptop must begin by checking the availability of drivers. To do this, open Device Manager and find in the list installed devices Network adapters item. It must contain at least two lines - Ethernet Controller and Wi-Fi adapter.
If the Wi-Fi adapter is not in this list, or there is an icon with a yellow exclamation mark next to the device, then wifi driver for a laptop is outdated or not installed at all. To fix this situation, update it or reinstall it. This can be done either automatically or manually. You just need to look at the model of the built-in adapter to find internet wifi driver for your laptop.
Also necessary for correct operation The software must be on the disk that came with the laptop.
Are the drivers ok? Then next step For wifi connections The adapter itself will be checked through the laptop. Naturally, it must be turned on. To check, you will have to go to Network Connections through the Control Panel. Typically, a Wi-Fi adapter is called a Wireless Network Connection. If its status is Disabled, right-click on it and select Enable.
Checking your network connection
So, the adapter is turned on and ready to go. To continue connecting home laptop to wifi, you need to establish a connection with an access point. This is done as follows:
- Click on Wi-Fi icon, which is located in the system tray panel;
- In the window that appears, select the point to which you want to connect and click the “Connect” button;
- If the connection is password protected, you will be asked to enter it in a special window, after which the laptop will connect to your wireless home network.
Connection problems and solutions
You are about to surf the Internet for a while, but suddenly you encounter a problem - the laptop does not see wifi networks. It seems that all the settings are correct, but the message “Unable to connect to the Internet” persistently pops up in the browser.
What to do if the laptop does not connect to wifi? To begin with, determine the cause of the malfunction. There may be several of them:
- You haven’t paid for the Internet and your provider has disabled access;
- You are trying to connect to someone else's network, the owner of which has set a password;
- The router is not configured or is simply frozen and requires a reboot;
- There are problems with the device through which you are trying to connect to the network.
There may be other reasons why wifi does not work on a laptop, but the most common ones are listed above. The solution to the first two problems lies on the surface - pay or stop trying to connect to someone else’s network.
Router
In order to exclude incorrect operation router, due to which the laptop stubbornly does not connect to wifi, you need to check the connection with the source wireless internet. It is quite possible that the problem is not with you, but with the provider - do not be lazy to call technical support first.
A simple reboot of the router can be a solution. If special button no, you can simply unplug it for 30 seconds and then turn it back on.
Drivers
Most often, the reason that the laptop does not see wifi networks at all is incorrect installed drivers. This becomes especially relevant if the system has been reinstalled. There is only one solution to the problem - download necessary drivers from the official website and correct installation.
But no matter what the problem is, you will definitely need the knowledge of how to properly connect wifi on a laptop. After all, then you will be able to quickly trace where exactly the error was made in order to quickly eliminate it.
You don't have to buy a router to have WiFi in your home. A laptop connected to an Ethernet cable can also distribute the Internet throughout an apartment. There are plenty of instructions on the Internet on how to do this on Windows 7 and older, but if you have XP, do not rush to completely reinstall the operating system.
Laptop as a router on an old OS
On any operating system from Microsoft, Internet distribution via WiFi can be organized using both built-in tools and third-party utilities. But why clutter your hard drive with unnecessary programs? On Windows XP, follow these steps step by step:
- Open “Start” and go to “My Computer”.
- In the left pane, select “Network Places”.
- Next, go to the “Show network connections” section.
- Right-click on the “Wireless Connections” shortcut and open “Properties”.

- Next, go to “Wireless Networks” - “Advanced”.
- Here, select the “Computer to Computer” option and confirm your choice.
- Click “Add” and enter the details of the network to be created (name, password, encryption method) and confirm.
- Next, open the “General” tab and highlight the IPv4 item, click on the “Properties” button.
- In this window, set the indicator to “Use the following IP...” and enter the following data:
IP - 192.168.1.1
Subnet mask - 255.255.255.0
The distribution has been created, all that remains is to enable the ability to connect to it from other devices within the range of the wireless network. To do this, return to the network connections window and right-click on the local connection and open its properties. You need to put an indicator next to the “Allow other network users...” item.

Now WiFi distribution should be fully functional.
Settings on the current OS
Similar actions can be done with Windows 7. In order for Wi-Fi to be distributed from a computer or laptop, you can, as in the previous example, step by step create a new virtual network. The only difference is in some steps.
- You need to look at the “Network and Sharing Center”.
- Run “Set up a new connection...”.

- Then go to “Setting up a wireless network “Computer-Computer” and click the “Next” button.
As you can see, the actions are similar. In the new window, enter the network name, encryption type and password. Save the changes and click “Next”. Here all that remains is to apply the “Enable sharing...” setting.

But that is not all. To be able to connect to WiFi from other devices, return to the “Network and Sharing Center” and on the left side of the window, find the line “Change advanced settings...”.

After opening this menu, make active the items highlighted in the screenshot:

Ready! But Windows 7 offers another, more advanced and simpler way to organize WiFi distribution from a computer or laptop equipped with a wireless adapter. This is using the command line. Find it in the list of all Windows programs and open it with administrator rights (right-click on the shortcut and select the appropriate item).
In the window that opens, enter a command of this type:
netsh wlan set hostednetwork mode=allow ssid=”new network name (at least 8 characters)” key=”password”
and press Enter. This is a quick way to create a distribution, and to start distributing the Internet from your laptop, use the command:
netsh wlan start hostednetwork
All that remains is to go to the “Network Control Center...” - Properties of the Local connection (the same one that is the wire through which the Internet “gets” into the apartment). Open the “Access” tab and check both boxes. WiFi distribution is now working.
(Visited 21,556 times, 3 visits today)