Hello, I have a mini pc ug 802, how can i install linux on it? teltar
This is a very interesting topic for me, friends, since I professionally administer Linux servers. On servers it's interesting, but for me it's already everyday and ordinary. But installing Linux distributions on devices with ARM architecture is an order of magnitude more interesting.
What is the difference between a computer and a smartphone or tablet?
At the most conceptually, the difference is small - both mobile and desktop devices, or even servers, are made according to the same principles. However, mobile devices use a different processor architecture. Desktop CPUs are designed on x86 or amd64 architectures. And in most mobile devices, a processor is installed on the ARM architecture. Historically, this is due to the fact that such processors have significantly lower power consumption, which is a vital necessity for mobile devices.
What OS can be installed on mobile devices?
So, all programs, including the operating system, must be developed specifically for this architecture in order to work on this equipment. Therefore, regular versions of Linux installed on desktops or servers will not work here. Fortunately, there are many distributions and versions for this architecture. Starting with the notorious Android, which most smartphones are equipped with, and ending with exotic distributions, such as specialized Backtrack (now Kali Linux). But of more interest, of course, are some more well-known distributions.
What is Android?
Android is an operating system based on Linux developed by Google for mobile devices. The world's most popular mobile operating system. It should be understood that in fact LInux is just the kernel of the operating system. And based on it, many operating systems are built, and Android is just one of them.
The kernel is the basic functionality that allows you to use all the devices and options of the hardware platform - that is, drivers and device management. Also included in the kernel are some basic programs and command-line utilities. The fact is that in the Linux family (it is in this meaning that it is most often understood - the family of operating systems on this core, and not the kernel itself) - the graphical shell is a separate part, its own level of abstraction.
And the minimum configuration of these operating systems is without a graphical shell, only a text-based command line interface. This allows you to embed these OS in the most unusual places. For example, in network equipment, machine tools, computers and other complex devices, such as aircraft and cars. Even your washing machine and microwave can have something similar :)
This is an android device. Accordingly, Android should be installed in it by default. Which, in fact, is Linux. But with some serious limitations. Installing some other Linux can greatly enhance the capabilities of a mobile device. The possibilities of use are virtually limitless. Well imagine using your mobile phone as a server! Lots of tools become available. If this is a tablet, by connecting peripheral devices to it via an OTG cable, you can use it as a full-fledged computer! What for? This is another question. I hope our reader will share his ideas in the comments.
How to install Linux on an android device?
So, installation.
There are two options - you can make a full-fledged installation, as they say - on hardware. This is actually a flashing of the device. At the same time, we lose the native functionality of the device provided by the manufacturer. And this may not be what we wanted. For example, the UG 802 mini-computer, for which our reader is interested, is a device designed to expand the functionality of TVs. For it can be inserted directly into the HDMI port of any TV, turning it into Smart.
Fortunately, there is a second way to install Linux - right inside the main operating system of the device, in this case Android. This allows you to run a so-called chroot environment inside Android. In this case, you will get two related operating systems running in parallel on the same core - Android. And you can switch between them.
This approach is convenient for smartphones and tablets, but may not be suitable for UG 802. In the case of it, you may need to flash the desired operating system. And this is already some risk that you can ruin the device.
Unfortunately, I have no experience of such experiments. But there is enough information on the net about this. Learn, try to install.
Therefore, I will provide a few links from which you can start your acquaintance with the world of mobile device hacking :)
Who are hackers?
Yes, yes, do not be surprised, this is exactly hacking - non-standard intervention in the operation and arrangement of systems and programs, changing them and expanding functionality. That is the original meaning of the word. And a hacker is not a hacker or a virus writer, as most people are used to thinking. It is primarily a researcher. Yes, he breaks systems, reveals what was not intended to be opened, but he does it with the aim of knowing, not harming.
https://xakep.ru/2012/10/22/android-tablet-linux-install/ - an article about installing Linux on smartphones in the oldest magazine, which is just a reflection of the essence of hacking.
https://habrahabr.ru/post/221543/ - habr, no less old and even more famous resource. And the article here is fresh, and describes in great detail the experience of installing Arch Linux on top of Android, in the form of a chroot environment.
https://geektimes.ru/post/44220/ - geektimes - a site from the creators of Habr, and it found a detailed manual for installing Debian over Android on a smartphone. Although the article is very old, it touches on fundamental things that must be understood before embarking on such an operation. This, if it does not help you to establish, but it will help you gain knowledge, without which it is impossible to further develop the topic and solve the problem. And after studying such articles, you will already feel more confident and will be able to search for information on the topic more precisely, on specific issues that will need to be addressed during installation.
For example, for sure, on the aforementioned sites, these articles on the topic are not the only ones. You can always try to look for more articles about this on such specialized resources. I found and looked through a couple of topics about installing linux on mobile devices on w3bsit3-dns.com like this, for example
That's all I have for today. But it can always turn out that I want to continue the banquet of this topic :)
If you have problems (and they will arise with a 99% probability :)) you can also ask questions here, we will collect information, solve problems together, this is also very interesting to me.
Linuxoid! my friend Yuri Geruk
The second part is about how to install Ubuntu on your Android smartphone or tablet on this platform.
Good day users of the Linuxsoid site! Yesterday an article was published, with the installation of the Ubuntu Linux operating system for a smartphone or tablet, this was only the first way I could do it. I wanted to say again that I did not delete the Androd system, but launched the second one on top of the other. I wouldn't inquire further or even attempt to install it myself until my friend Yuri Geruk he gave me a good idea to install the system and only after that I became interested and I started my work.
Warning! The site administration and the author of the material do not bear any responsibility if your device stops working while performing the described manipulations! Everything that is written in the instructions, you do at your own peril and risk. There may be failures, as it was with me, then for a long time I could not turn on my smartphone. There is no hurry, we do everything carefully by reading this manual!
In the first part (Method # 1) I wrote how to install the system through a program called Complete Linux Installer. The full procedure was told when working on this program, what to download, how to install, and all the others. Today I wanted to bring to your attention the second method (Method No. 2). You and I will be installing Linux Ubuntu on a device running Androd through a mobile application called Linux Deploy. The application is also available for you in free access on the Google Play Market, where absolutely any user can download it.
In this application, you do not need to register and activate, after installing it on your device, you will need to launch it and close it again. What do we need to start the system through Linux Deploy. ?
- Smartphone and computer with Internet access (preferably using Wi-Fi), the better the connection, the faster the download will be.
- USB cable (for connecting your device to a desktop computer or laptop)
- The battery is preferably charged at 100%, but not less than 50%
- Let's get started on our mission! In order not to get very long, I will skip the points that were indicated in method number 1. The first and simple step for us is to get root rights on the device, in the previous article I showed in detail how this is done.
- Whoever has Root rights obtained can proceed to the next step, namely, enable USB debugging on their device (the last article also describes how to achieve this). We pick up our smartphone and go to the official Play Market store, where we have to download an application called Linux Deploy. If you have an account set up, you can follow the link with the name of the program and install the application using a computer. After installation, open the application and look further!
- As you can see in the screenshot above, we are shown a program with a simple and not complicated interface. When you first start the program, it shows us a little help, a list of how to start using this program. After fulfilling these requirements, we proceed to the configuration. To set up our program, you need to translate it into Russian (we do it for someone who has not automatically translated the program) We put the Russian language and check the box next to the item do not turn off the screen.
We look as shown in the figure below:
After setting the language and checkbox do not turn off the screen, we smoothly proceed to the next step, namely:
- Let's create a new profile for our new Linux account. To do this, you need to return to the main screen of the program, yes, exactly to the one that shows the help for further actions and click on the program header (where the penguin is drawn). After that, you will automatically be transferred to a new window, where you are required to click on the plus sign and create a profile. As a copycat of the example, I created a profile called Linuxsoid.com . You can name it whatever you like!
- When you have entered the profile name, press the OK button. After that, just select the desired profile.
- After all this, I turn off the bench and go to bed, and you, as you wish, continue on your own, of course I was joking! We turn off the application and return to the Play Market and download the Es-explorer (you don’t need to re-download from anyone and you won’t succeed :-D). Open File Explorer and create a folder called Ubuntu. After you create a folder, you need to find out the path to it. I will have a memory card like yours, I don’t know.
- When creating, click on the yellow plus sign, after that you will see a pop-up window where we stick out the creation of the folder and smoothly flows in the name of the folder (it is better to write in English, you should not tempt the fate of your smartphone, I will say one thing for good, this will not lead to verified from my own experience ). At the end, I click on the history log and look at the path to our folder with you. I got it like this: /sdcard/ubuntu/.
Was the initial setup successful? Then we proceed to download and install the distribution kit to our devices, to the newly created folder. To do this, you need to open the Linux Deploy application and click, as it were, on an arrow that looks like a download, where you should be transferred to a new window with the information we need. What do we see there? The program prompts us to install the system, but for this you need to select it. In this window, click on the distribution kit and you will see all the available selection of systems (Which may go on your device). I choose Linux Ubuntu. After I have chosen, I click on install and you should start installing (downloading), it takes about one hour. Therefore, it is better to power the smartphone to charge!
- At the end of the installation, click on the start button and you should be connected to the necessary servers. The beauty of this application is that it does not need to additionally prescribe a terminal and give commands, the application will automatically prescribe the necessary commands. At the end you will see as shown in the picture! This is in the event that everything went like clockwork for you and no other errors came out.
- After such inscriptions, you need to download and install an additional application on your device called VNCViewer as in the first installation method. In the server, we create a new connection where we write the address localhots and specify any name in the name and click connect. The application will connect and if possible ask you for a password! The password on all servers is always the same (changeme) well, if you connect via a computer, the password will be different, I can’t tell you because I don’t know it.
At the end of all this, you should end up with something like this:
That's all if you have any problems, write them in the comments, we will help you fix them as far as possible. The material was prepared by Alexander Makarenkov for Linuxsoid.com.
In this article, we will explain in detail how to install linux to an Android device. To install and fully operate an alternative system, you will need: a smartphone or tablet, a software emulator, root rights and several gigabytes of free space.
1. Installation applications complete linux installer
We enter the word “emulator” in the Google Play search menu and get a list of several dozen approximately the same utilities. All of them are good, but we stopped our attention on the Complete Linux Installer application. It's completely free, perfectly localized, and comes with detailed instructions for beginners.
The program can be downloaded at http://goo.gl/5C6Xa. The installation algorithm of the Complete Linux Installer is no different from installing any other software, so we will not stop at this point.
2. Working with Complete Linux Installer
Before starting to work with the program, I would like to emphasize once again: what we are describing in this article is not a Linux installation instead of Android, and emulation of the work of one system in another.
So, we launch the application and agree to install additional software components. It is the work with these modules that will subsequently greatly facilitate your use of the Linux operating system.
As mentioned earlier, Complete Linux Installer requires root permissions for full operation, which the application will remind you of in a pop-up window. We give the program full access to the system functions of the mobile device.
This completes the initial preparation of the emulator for work. The main menu of the application will open in front of you. Go to the subsection "Installation Guide".
The emulator will scan the hardware of your gadget and give you a list of operating systems that are guaranteed to run on your mobile device. Let's choose Ubuntu 13.10 as an example.
From this moment on, the program begins to "guide" you through the stages of installing the operating system, accompanying each necessary action with detailed instructions. For example, after reading the requirements of the emulator in the first step, be sure to install “Terminal” and “VNCViewer” in the second. Only after that select the item “Download image”.
Read the description of the differences between distributions of the Linux operating system and choose the right one for you.
Create a folder with the name of the future system in the root of the gadget's external drive. This will make it much easier for the program to find the necessary files. In our case, we are creating the “ubuntu” directory. Unpack the downloaded archive into this folder.
As a result, two files should appear in the “ubuntu” directory. One of them has the .img extension. This is the image of the running Linux system.
After completing the above steps, go to the “Start” sub-item of the Complete Linux Installer main menu and click the “Settings” sub-menu in the upper right corner of the window. By selecting the “Change” option, provide the application with the full path to the system executable file. Confirm your choice by clicking on the "Save Changes" button.
This completes the next stage of installing an alternative operating system in the memory of your gadget. You can safely select the option “Run Linux”.
The application will launch a terminal in the background to execute test commands and request root access to the device's system functions. We allow.
Now your smartphone or tablet will be able to work as an emulator of the Linux operating system and you will have access to all the features of the operating system with a penguin on the logo - from executing the simplest commands in the terminal to installing a full-fledged graphical environment. Linux installation on Android is complete.
Most Android users know that this platform is based on the Linux operating system, but despite this, many of its programs are not available. That is why a great way out is to put a Linux shell called Ubuntu on the tablet. It runs through the Emulator and runs in parallel with Android, providing a wide range of applications that are not usually loaded on devices with this operating system.
Both operating systems can run in parallel
We will look at how to install it yourself without the help of special applications, using only an emulator and the VNC Viewer program.
Installing Ubuntu on a Tablet
What parameters are required for this shell? We need root rights, free memory in the amount of 2.5–3.5 GB. It requires a minimum clock speed of 1 GHz or more, and requires support for the Ext2 file system. As a means of facilitating the installation, we need several programs, including an emulator - it will be useful for further running the software.
What are root rights, and how to get them? They represent administrator rights. In this case, the presence of such rights will allow you to change the system parameters of the tablet, so installing Ubuntu for Android will not work without them.
You can get these rights through various applications, a large number of which you will find in the Play Market. Download one of them, activate administrator rights and then proceed to the direct installation of Ubuntu on the tablet.
To do this, do the following:
- Log in to the system settings of your tablet and in the "For Developers" section, enable USB debugging mode. If you do not have this function, go to the "About device" menu and find the line with the build number - quickly click on it 5 times in a row, after which a message will appear that you have become a developer and should appear in the list;

- Create a folder called Ubuntu in the card's memory;
- Download the script to start Linux and one of the software builds - there are only two of them. The first one is minimal, contains only separate, most popular applications and has a size of half a gigabyte, after installation it takes up 2.5 GB of free space on the memory card. The second is a complete assembly, has an extensive set of programs, respectively, has an initial size of 1.5 GB and after unpacking it will take 3.5 GB of memory;
- Next, you should download two programs: Terminal Emulator for Android and VNC Viewer;
- Open the Emulator application and run the following commands in it:
- cd /sdcard/ubuntu
- sh ubuntu.sh.

Note. Before entering commands, the emulator will require the first time you start it, and, of course, you need to give consent to this action.
- Next, you need to specify your screen resolution details and desktop environment type in the same Emulator application.
- After a few minutes, if installed correctly, a message will appear in front of you with the text [email protected]:/# - this means that the Linux shell in the emulator was successfully launched.

How to install on Android on Linux? This question came to me after unsuccessful attempts to set up . No, everything worked, except for one thing: the network and the Internet. No matter how much I read the manuals on port forwarding, nothing worked out for me. On Android 2.3, the network works immediately, but not on Android 4. So I decided to go the other way and install the Android emulator on Linux. How to install Android on Linux?
In fact, I will now describe the experiment, so I don’t know what will eventually work out and whether something will work out at all, therefore, before repeating my actions, read the article to the end. So, let's begin!
To begin with, we go to the site and download the package we need from Android and everything that comes with it. I downloaded the version under linux, certainly.

While everything is swinging, we will install additional components in Linux to run the Android SDK - Java machine, through which everything will work. Open a terminal and run the command:
sudo apt-get install openjdk-7-jre
cd android-sdk-linux
After that, we execute the command, as it is written in the manual, which was in the archive:
Tools/android update sdk --no-ui
After that, the program connects to the Google service and starts downloading and installing the files it needs. It took a VERY long time to download, as it downloads more than 2 gigabytes of different packages for developers. maybe this step could be skipped and immediately launch the SDK manager. To do this, use the cd command to change to the tools directory:
Cd android-sdk-linux/tools
After that we run the command:
./android
As a result, the program starts:

It turns out that with the command tools / android update sdk --no-ui I installed all the packages. But in fact, I don’t need them, since I will not be developing in Android, so I will delete the excess later. How to Run Android on Linux?
Now you need to go to the menu in the tab Tools - Manage AVDs. A window will appear in which you will need to set the parameters of Android and its working environment. I asked these:
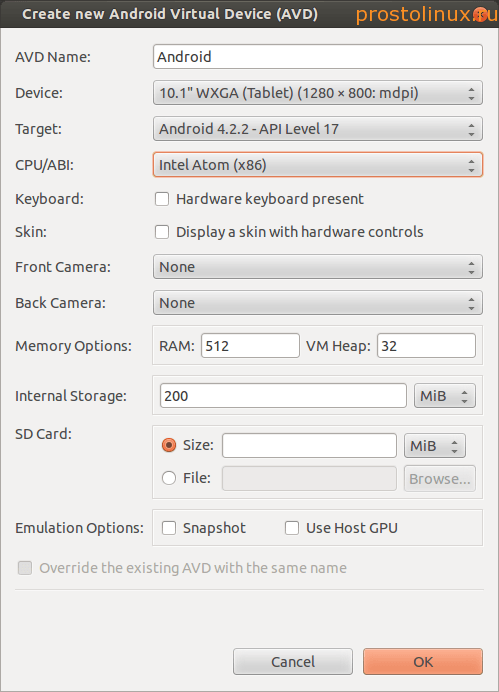
After setting the parameters, click OK and our virtual machine with Android appears in the manager.

Now we press the button start and launch our Android.

As you can see, everything worked, and most importantly, the Internet works right away, and for the sake of this, everything was started. Now you can try setting up your Android account and start installing apps from Google Play.
The only negative is the strong brakes during operation. But I think here you just need to experiment a little, installing different versions of Android and setting different installation parameters. This is how you can install Android on Linux for developing applications in it, and just for tests.
If you know how to improve the performance of Android in Linux, then share your experience in the comments.
The other day my old netbook returned to me, small, weak, I bought it back in 2010. And I thought: both Linux and Windows will be on it ...
You probably immediately had a question: - "Why even install Android on VirtualBox (virtual machine)?" And the reasons can be different, but the main ...


