The device on which files are recorded for further storage is called a hard disk. There are two main types of such storage media: HDD and SDD. Their design and principle of operation are significantly different. There always comes a point when you need to format your hard drive.
Formatting is the procedure for deleting and labeling a digital entry on a data storage device. This procedure can significantly speed up the work of the hard disk, reduce the likelihood of losing files.
With proper maintenance, the storage device can work stably for two years (it all depends on the intensity of the recording of information), but many experts recommend that this procedure be carried out once a year.
Data storage in modern operating systems
Operation of modern operating systems (Mac OS and Windows) leads to the appearance of a large number of unnecessary files. The use of even modern programs for deleting files and cleaning the registry does not give 100% of the result.
The computer starts running at a slower speed, errors appear, files take longer to read, and so on. HDD makes a lot of noise, behaves incomprehensibly, which is associated with the presence of mechanical elements in the structure.
Often, formatting is performed and, since only in this case it is possible to significantly increase the speed of the computer.
Before reinstalling the operating system and cleaning any partition, a backup is made. There are programs that allow you to recover files even after they have been completely deleted, but they do not always give the desired result.
Hard disk formatting process
Hard disk formatting methods:
Low-level disk formatting
Basic markings are being applied. This method is used when there is a fear that top-secret information will be made public. That is, absolutely everything is erased without the possibility of recovery. Low-level formatting is done where the HDD was made - at the factory.
It is very difficult to fully implement this method at home ... And why? Although if you play spy then you will like this HDD Low Level Format program. Of course, it does not do low-level formatting, but rather imitates it, which is enough to preserve confidential data.
Partitioning a disk
This method is used quite often, since it is extremely inconvenient to store information on one volume. Also, the division into several sections can significantly increase the operating time of the device.
You can divide a virtual volume into partitions using special programs from various developers or a built-in Windows function. If you want to know how to properly partition a disk, then you HERE.

High-level disk formatting
The formatting we are accustomed to is NTFS or FAT. Right-click on the disk and click format.
But keep in mind that you cannot defeat the local disk (C :) in this way! We will not go into terminology, this is how it looks:

Formatting a disk using built-in Windows programs
The screenshot above shows that the formatting settings can be selected:
- The quick method of formatting a hard disk takes less time, but it has a lot of nuances. An example is the fact that digital information in the system is overwritten with zeros, but is still stored. This allows you to restore files if necessary. However, if there were serious mistakes in the structure, then it will not be possible to fix them.
- The usual formatting method is longer, but has a profound effect on the structure. During the process, all information is deleted, and the structure is checked for errors and the possibility of their correction.
Formatting a regular disk
There are no problems here, since the system is installed on a local disk. Formatting can be done without rebooting the system.
The hard disk is formatted as follows:

The time it takes to clean a storage device depends on its size, condition, and the selected removal method. The process is quite long, so you can go and have some tea.
At the time of uninstallation, computers with low power may freeze. It is worth remembering that disconnecting from the power supply or another way of interrupting the process can lead to irreparable consequences.
You can come across a situation where part of the hard drive or it becomes completely unusable.
Command line formatting
A less popular method is strings. If the operating system has significant violations, then only through the command line actions are performed. In this case, you should:
- Call the command line.
This can be done in a number of ways. But we will consider the most universal, since the OS is all different:
- press the button with the windows logo on the keyboard and, without releasing it, press the “R” key, that is, the combination Win + R is obtained; 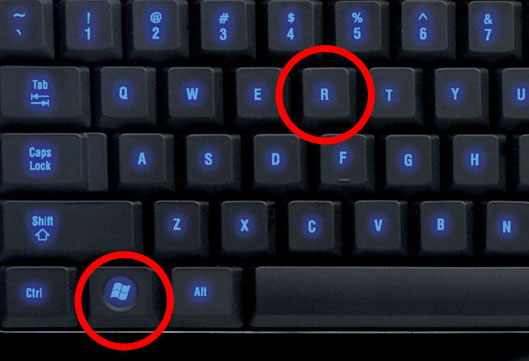
- such a wonderful thing appears;

- in it we enter the command "CMD" and our long-awaited command line opens. For more information on how to work with the command line,.

- When you start the command line, a black window appears in which commands are entered.
- The formatting command is called "format". Just write this word without quotes and press the Enter button.
All information is entered manually, an error can be displayed if the entered data does not match the valid one. An example of how and what information should be entered is below. (Figure 5)
Formatting the local disk
The system partition is the volume that contains Windows or Mac OS files. Formatting the hard drive causes problems when it is necessary to delete information from the system volume.
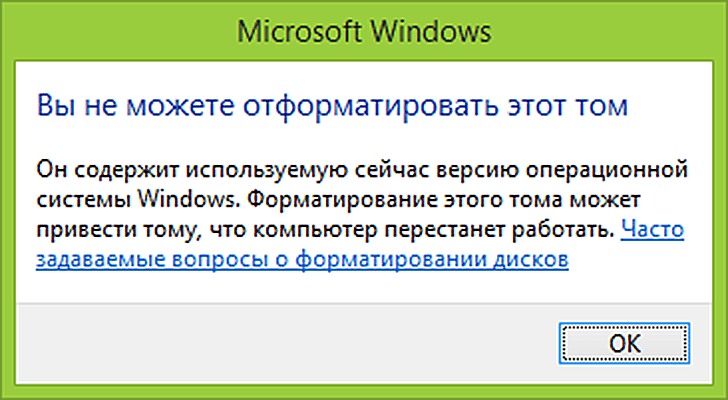
This is because the operating system cannot delete the volume on which it resides. There are also certain restrictions that relate to booting a computer: it is their system volume that is set to autoload in the BIOS.
Immediately, we note that the system volume is changed only if it is necessary to reinstall the operating system. You cannot change volume "C" without installing a new operating system.
You can edit the C drive as follows:

Sometimes, to start the media with the installation files, you must press a certain key combination or one key (depending on your BIOS), after which the BIOS opens. It should be set in the "Boot" tab and in the "Boot Device Priority" section to automatically boot from external media.
After that, a reboot is carried out and the computer downloads the installation package. New computers are configured so that the external media is initially checked, after which the information from the hard drive is only read. If a black screen appears after the logo of the computer manufacturer, press "Enter", otherwise the download will not be carried out.
It should be borne in mind that installation is possible only when all information is deleted from the hard drive. Formatting and installing Windows 7 is now much easier than using an earlier version of XP. This is due to the addition of a menu, which is created by providing a choice of one of the functions.
FAT32 or NFTS

The file system is responsible for the process of storing and accessing virtual storage on a physical storage device. The basic concept is a cluster, which defines the minimum size on disk.
If the structure is poorly formed, the distance between individual clusters can be quite large. In other words, the file will be scattered across different segments, device type HDD it will take quite a long time to move the head to read the entire volume.
If you choose between FAT32 and NFTS, you should give preference to the latter option, since there are no restrictions on the partitioning of the hard drive. Formatting in NFTS can significantly reduce the time it takes to find a file. Compression of information at the level of the file subsystem allows faster organization of all work processes.
To conclude, large external drives should always be cleaned in NFTS. Otherwise, the OS may not correctly read the entire volume of the physical drive.
This article will focus on formatting hard in various systems. We will get acquainted with the concept of formatting, what is it for at all, and in what ways can this be achieved? Well, friends, let's get started. Let it be known to you that disk formatting is a useful and necessary thing. In fact, this is a process in which the hard drive is split into logical drives for storing data. In the course of such actions, information takes up a certain place on the sectors of the disk. And after formatting, programs that request access from the hard drive to this or that information receive an exact answer about its location. Also, this process is actively used if it is necessary to change the file system to FAT32, NTFS, or exFAT. Advanced users know exactly how to format a hard disk correctly, because this operation helps to reinstall an existing system, or install a completely new one, as well as destroy viruses that have deeply rooted in the hard disk. So, let's talk about how hard drives are formatted in the Windows operating system.
How to format a Windows 7 drive?
Several methods are used for formatting. Each of them has both advantages and disadvantages. Let's take a closer look at the main ones.
The easiest way to format a hard drive is considered to be using the operating system tools. To apply this method, follow the following sequence of actions:
- Open "Computer" located on the desktop;
- On the disk that you plan to format, right-click and select "Format ...";
- Next, a window opens, in it you should select the required parameters and click on the "Start" button. If you do not know which parameters are best for you to set, then leave everything as it is, that is, by default.
There is another simple way of formatting using administration. So, repeat everything in this sequence:
- Open the "Control Panel" by clicking "Start";
- Then we go to the item "System and Security", select "Administration";
- Double-click to open "Computer Management";
- In the left part of the window that opens, we find "Disk Management";
- Well, then, on the disk selected for formatting, right-click on "Format ...";
- In the window that opens, with the formatting settings, you can choose the parameters yourself, or you can leave them by default.
- Next, click on the "Start" button.
How to format a hard drive via BIOS?
To format the hard drive in this way, you will need the help of third-party programs. Today there are a lot of similar programs, but we will consider a program that is considered one of the best and with which it is very easy to work, this program is called Acronis Disk Director.
Before you start formatting your hard drive using BIOS, you need to have a bootable disk or a USB flash drive with Acronis Disk Director.

How do I format a hard drive via the command line?
So, let's go straight to the action:
How to format correctly?
Before proceeding with the description of formatting an SSD, we will tell you a little about what an SSD is. This is a solid-state information storage device that does not have mechanical elements, the work of which is based on the functioning of microcircuits.
Now let's take a look at how such media are formatted if the SSD is an external drive:
- First of all, click "Start" and go to the "All Programs" section, in which we select the "Standard" folder, and then "Run";
- In this window, enter the command compmgmt.msc and click "OK";
- The "Computer Management" window will appear, on the left side of it, select "Disk Management", a pop-up window appears asking you to define an SSD drive;
- Next, select MBR (Master Boot Record) and click "OK";
- Right-click on the container and select "Create a new volume";
- The "Wizard Assistant" will appear, follow "Next";
- Leave the "Specify Volume Size" option unchanged (maximum) and click "Continue";
- Select the drive letter and click "Next";
- A window appears, where in the line "Formatting partitions" write the name of the disk and click "Next".
How to format a Windows 10 drive?
There are several ways to format your Windows 10 hard drive. Basically, this procedure is similar to formatting with Windows 7 installed. Let's take a quick look at how to do this in version 10.
So, the easiest way is using "My Computer":
- Open "Computer" and right-click on "Format ...";
- In the window that opens, select the required parameters or leave them by default and start the process by clicking on the "Start" button.
Let's look at the second method, using the Windows Disk Management tool:
- Click "Start", open the "Control Panel", go to the item "System and Security", select "Administrative Tools", and then "Computer Management";
- On the left side of the window we find "Disk Management";
- Right-click on the disk you want to format and select "Format ...";
- Choose your options and start formatting.
Another way using the command line:
- We go along this path: "Start", select "All programs", open the "Standard" folder, and, finally, "Run";
- In the line, write cmd and press "Enter";
- On the command line, write format and the letter of the drive to be formatted, for example format e:
Well, you can also format the hard drive using the BIOS, we talked about this above.
How do I format the C drive?


Formatting can be complete (in this case, absolutely all data is deleted from the disk, but it often takes a lot of time) and fast (a lower-quality method, in which the table of contents of the disk is cleared, but the data remains and is overwritten only as new information is written to the disk).
You can perform this operation in Windows 7 using both standard tools and special programs.
How to format a C drive using Windows 7
- First, click "Start" and select "Run ..."
If there is no such item, you can get into the "Disk Management" window by selecting "Control Panel" in "Start", then the "System and Security" tab, then - "Administrative Tools", and then - "Computer Management". - After that, write the command "diskmgmt.msc" in the "Open" field, click "OK".
- The "Disk Management" window will open in front of you, in which you will need to select the disk you need to format - that is, drive C.
- Right-click on it and select the "Format" option in the context menu that opens.
- After that, a window will open in front of you, in which you will need to choose a formatting method: in fact, fast or full. Choose the method that suits you best (in the event that there are obvious problems with the disk, you should choose the second one).
- After that, wait until the end of the process: when it is completed, you can use the blank C drive as you like: install the operating system there or drop the necessary files.
Formatting with Acronis Disk Director
Now you can find many programs that allow you to quickly and efficiently format hard drives. Perhaps the most famous and widespread such program is Acronis Disk Director.
Formatting a hard disk using such software is carried out through the BIOS. First, you need to purchase a bootable Acronis Disk Director disc or burn it yourself.
After that, run the disk through BIOS. To do this, you will need to insert it into your floppy drive and restart your computer. As soon as it starts to boot again, start the BIOS: this is done by pressing the "Del" button on the computer keyboard or "F2" on the laptop keyboard.
Important! In more rare cases, the BIOS on laptops is started using other buttons. If pressing "F2" did not work, look for the button you need to start in the instructions of your device, or try using the methods from the article.
If everything is done correctly and you pressed the correct button in time, you will see the BIOS screen.
You need to find the "Boot" item in it (this is done using the "right" and "left" arrows on the keyboard, the item is selected by pressing "Enter"). After that, you will have a Boot menu, where you will need to select the "Boot Device Priority" option (this is done using the "down" and "up" arrows on the keyboard).
When you see the list of bootable devices, select "CD-ROM" and move it to the first line of the list. Save changes and close BIOS. Then you will be able to boot from the Acronis Disk Director.
- When the boot disk menu opens in front of you, select the advanced version of the program: Acronis Disk Director Advanced.
- In front of you you will see the Bootable Program Agent window, where you will need to select an item called "Start Management Console".
- Then you will see a window that displays all available physical hard drives, as well as the logical partitions created on them.
- Select the C drive and right-click on it, after which a context menu will be displayed in front of you. In it you will need to select the "Format" item.
- Additional formatting options can be specified in the program. So, in the list under the name "File system" you will need to select NTFS, and the cluster size is best left as Auto. The volume label is the name of the partition, which will then be displayed in Explorer. This field can be left blank. After all the changes have been made, click on "OK".
- After that click on the "Apply scheduled operations" button. You will see a window containing a list of operations to be performed on the disk. Click on "Continue".
- This will start the formatting process. After completing it, click on "Close".
- The disk is now fully formatted. You will need to close the program window and click on the "Restart" button to restart your computer.
To avoid rebooting Acronis Disk Director, remove the disk from the drive or change the boot device priority again in the BIOS.
Formatting is the process of completely cleaning and partitioning a local disk. Most of the owners of computer and any other digital technology have repeatedly resorted to a similar procedure. Basically, a similar procedure is carried out in order to delete unnecessary data from the hard disk or change the file system (NTFS, FAT, FAT32). But the most common option, without a doubt, is formatting, as preparing a place for reinstalling the operating system. If you look at it, formatting hard drive D does not require any special intelligence. Another thing is system C. Here, inexperienced users will have to tinker with it. The problem is that it is impossible to delete all data from the C drive while in the Windows XP, 7, 8, 10 interface.
But don't worry, the procedure is not as scary as it seems. Indeed, in fact - "to break, not to build." So move all important files first. CDs, flash drives, even a local screw D are perfect for these purposes. If he does not face the same fate. While dummies are thinking about how the non-system hard drive is formatted, let us remind them of this.
In order not to get confused in this complex process, we will analyze everything point by point.

In this way, both any removable storage device and already forgotten CD-RW "discs" can be easily cleared. Four simple steps and mission accomplished. Believe me, you shouldn't download unnecessary programs, this method is quite reliable and effective. But on the formatting methods, let's dwell in more detail.
Cleaning up the system local disk
Cleaning the system hard drive (C) will remove your operating system. In other words, you will not be able to go to your usual desktop. Therefore, it is necessary to carry out such a process only if you know what to do next. But today is not about that.
To clean up the operating system, you will need:
- Bootable USB stick or CD;
- Superficial knowledge of the bios-environment;
- Smooth hands.
If all of the above is available, we say goodbye to the old Windows XP, 7, 8, 10 and restart the computer. At the very beginning of the computer boot, press the Delete key, after which we get into the BIOS. In different operating systems, this environment may differ slightly, but if you wish, you can figure it out (see the third point). Go to the Boot tab, then press Enter in the Boot Device Priority line.

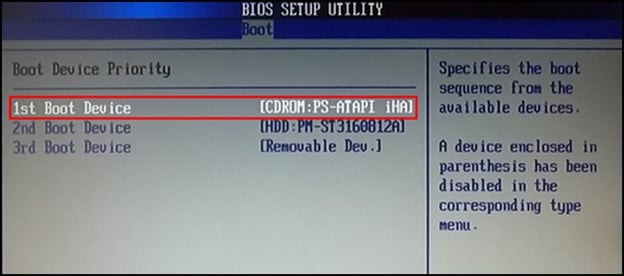
The order of their arrangement determines the moment when your computer accesses them. That is, in the first line, you need to select from the devices the one in which there is a bootable cloud and through it the system will try to boot. In our case, this is a CD-ROM. After completing this simple action, we look for F10 on the keyboard and exit the BIOS, saving the changes made.
Now you know how to set BIOS parameters to boot a computer from a hard disk image that is installed on removable media. Please note that such actions are equally effective in all versions of Windows, including the new 10.
After exiting the BIOS, the download via the removable drive will start automatically, the following actions depend on which method described below you choose.
Acronis Disk Director
Having booted through a similar utility, you won't be able to install Windows XP, 7, 8, or 10, but you can format the hard drive without any problems. But there are also exceptions. Basically, the boot disk for Windows of all versions (even 10) contains an extensive list of various utilities. Acronis Disk Director can easily be in it.
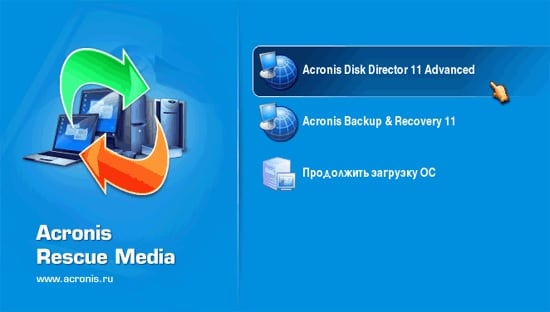
One way or another, having launched the application, select the line "Start the management console".

After that, the contents of our computer will appear with all the available screws.

Next, nothing new! By hovering over the drive of interest and pressing the right mouse button, an extensive context menu will appear. Here are slicing, renaming, and much more, but we choose what we were looking for - "Formatting". And we see the following.

The familiar parameters are not true. After setting the settings as in the picture, click "ok". To start formatting, you need two more clicks. Apply scheduled operations first.

Second, actually start formatting by clicking on "Continue".

After a few minutes, the disk will be cleaned up. And once the deed is done, then we say goodbye to the utility.
Formatting using OS pseudo-install
If you do not know how to reinstall Windows XP, 7, 8, 10 operating systems, then you will have to explain several steps of the procedure to you. After all, it is here that you can cheat and achieve the same goal - to clean the C drive.
In fact, such a process requires a minimum of steps. We boot through the cloud hard drive and see the following.

If you hold down the "Shift + F10" combination at this stage, you will have access to the command line. And here some commands will come to the rescue:
- “Format / FS: NTFS X: / q”;
- “Format / FS: FAT32 X: / q”.
First, it will do a quick format on the NTFS system. The second, respectively, in FAT32, instead of X, enter the drive letter and press "Enter". However, be careful, because the BIOS environment may display incorrect drive designations. Entering the following command will solve this problem - "wmic logicaldisc get deviceid, volumename, size, description".

If this method is too problematic, then when choosing the language of the installed OS, click "Next". Then "Full installation" and we get to the destination.

Selecting the required hard disk and clicking on the line "Disk settings", there will be some possibilities applied to it. Here you can either format or delete the disk, or expand its volume.
ERD Commander
Another tool with which you can quickly clean up the system hard drive. To do this, boot through the hard disk image and go to the MicroSoft Diagnostic and Recovery Toolset section. Next, in the windows that appear, click "next" (2-3 times) and get into this menu.
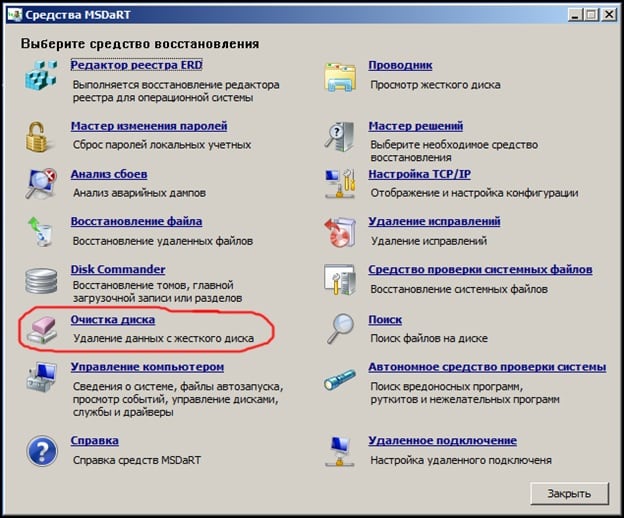
Selecting the "Disk Cleanup" item, select the disk, after which it is formatted.
That's basically it. In addition to those listed, there are many more utilities of this specialization, but the principle of their operation will not change much. The main thing to understand is that the next step after formatting the system hard drive will be to install Windows XP, 7, 8, or even 10th version. Therefore, take care of its presence on the bootable media in advance, because you cannot install the OS through the formatting utility.
In contact with


