Many of us have long fallen in love with smartphones based on the Android operating system. They have always won over with their unpretentiousness, good reliability, as well as convenience and ease of use. The same can be said, in particular, about the well-known smartphones, which are also based on this operating system. The company from the Middle Kingdom always keeps up with the times and equips its phones with the latest versions of the operating system and multifunctional firmware, trying to keep up with the generally recognized leaders of the android smartphone market.
However, few of us know that the already quite comfortable Huawei phones can be made even better with the help of fine tuning "for yourself". What we can customize in the main menu of the phone is only the tip of a huge iceberg, the rest is hidden from users in order to avoid the failure of the device. However, people who deal with mobile phones not just at the user level, but, for example, work in the service, easily get access to advanced settings on almost any phone, resorting to the help of the engineering menu.
Running a little ahead of myself, it's worth saying that inexperienced users really shouldn't go to this "forbidden forest", so as not to ruin their device through carelessness. But if you are confident in yourself and think that you understand the technology at a sufficient level, then the Huawei engineering menu is exactly what you need for the most delicate settings of your device.

The engineering menu provides the user with access to manual configuration of almost all phone parameters. Usually, the engineer mode is used by developers at the stage of final configuration of the device before it goes on sale. With its help, they check the device for various errors, malfunctions, and also check the operability of all systems of the device. In addition, the engineering menu contains detailed information about the capabilities of the device and its programs.
The engineering menu is sewn directly into the Android program, however, on some phone models, developers deliberately remove it from the phone after the final check. In such cases, the owner will find it difficult to customize the device "for himself" right from the phone and he will either have to use special programs that can be downloaded, for example, on Google Play, or use third-party firmware.

The engineering menu for Huawei smartphones is usually always in place and is never deleted, so if you did not manage to get into these settings the first time, then most likely you simply did not take into account the unique features of your device. It will also not be superfluous to repeat once again that if you are not sure of what you are doing, and working with such menus is new to you, then you should carefully consider this step. Remember that unsuccessful settings in the engineering menu may not improve the functioning of the smartphone, but, on the contrary, make it much more inconvenient, while if you change the system settings, you lose the warranty and bear full responsibility for the device yourself.
How to get to the engineering menu?
In order to get into the engineering menu of a phone based on the Android operating system, you need to enter a certain secret code in the phone dialing menu. Most often, on Android devices, you need to dial the combination * # * # 3646633 # * # *. This code is suitable for most android smartphones, but sometimes developers can change it, for example, entering the Huawei engineering menu most often occurs using the codes * # * # 2846579 # * # * or * # * # 2846579159 # * # *.

Also, codes can very often change depending on the specific model of the device and the type of single-chip system used in it. Also, it often depends on the single-chip system of the phone whether the smartphone has a built-in engineering menu at all or not. So, on devices with MTK processors, there is such a menu on almost every device, and on devices equipped with Kvalkom processors, on the contrary, in most cases this menu is completely absent.
The code should be applied as soon as you type it on the call screen, but on some phones, sometimes you also need to press the call button for the code to work normally. It is also worth noting that the code must be entered, and not copied, since otherwise it will not work. It is also very useless to save such codes in the phone book, that is, manual input is a prerequisite for the code to work.

Commands for accessing the menu
If you do not know how to enter the Huawei engineering menu — smartphone, or you can't do it, then this is not a reason to be upset. Most Huawei devices support the so-called "service codes", which partially duplicate the functions of the engineering menu.
Service codes have been used in mobile phones for a very long time, and many of them appeared long before the first android smartphones came out. However, although such codes repeat some of the functions of the engineering menu, using them is not at all so convenient and completely unsafe. Some of them can literally delete all data stored on the phone or disable certain functions of the device. So, if you are one hundred percent not sure what this or that code means, we do not recommend you to use it for the simple reason that they can disrupt the normal functioning of your phone.

Now let's see some examples of the most useful engineering codes in our opinion:
- *#06# - using this code you can find out your IMEI address.
- *#*#4636#*#* - this code provides you with some information about the phone, namely: data about the device, information about the battery, statistics on the battery and statistics on the use of the phone.
- *#*#7780#*#* - this code resets to the factory settings such as: Google account data, system data and settings, downloaded applications.
- *2767*3855# - this code performs full formatting of the smartphone. So think twice before using it.
- *#*#34971539#*#* - this code is used to obtain information about the smartphone camera.
- *#*#7594#*#* - used to change the modes of the on / off button.
- *#*#273283*255*663282*#*# - with this command you can open the file copy screen and use it to back up your most valuable photos or audio recordings.
There are also many other service codes that allow you to check and tune your telephone very carefully. However, due to the rather large number of them, this, perhaps, will be a topic for a separate article, and we are moving on.
Engineering menu functions
The Huawei engineering menu offers a wide variety of settings for advanced users. On most models of phones from the company from the Middle Kingdom, volume control, camera settings, navigation, telephony and many other functions are available, which you can alter at your discretion.

In fact, there is nothing complicated in the adjustment itself. Just search for the parameter you want, such as the volume level, open it and experiment with the values until you achieve the result that is perfect for you. However, we remind you once again that you should only change those parameters in which you are sure, otherwise you risk getting not a perfectly fitted smartphone, but a piece of annoying plastic.
Telephony
One of the main points that catches your eye when you first enter the engineering menu of the Android smartphone Huawei , this is the telephony menu. In this menu, you will have access to many useful settings, including such important items as:
- Auto Answer... Here you will be able to enable or, conversely, disable automatic answer to an incoming call.

- Band Mode... Here you can manually select the frequencies for the GSM module. This menu will show all frequencies supported by your phone. You can uncheck the bands that your mobile operator does not provide, which will ultimately save your battery power.
- CFUSetting... This option enables or disables conditional call forwarding.
- AT Command Tool... A developer utility that supports AT commands.
- Modem test... Fine-tuning compatibility with various types of devices.
- Network selecting... Here you can also select the mobile communication standards (GSM, WCDMA, LTE). For more power saving, turn off unused ones.
- NetworkInfo... A very convenient option for checking the quality of services of a mobile operator.
- GPRS... Setting up connections to the mobile Internet. An active SIM card selection is also available.
- HSPA Info... Information about the 3G network if this type of service is supported by your telecom operator.

- Mobile data service preferred... Using this item, you can increase the priority of the Internet over voice traffic. However, be careful, as incoming calls may sometimes not be received in this case.
- Fast dormancy... Allows you to save some of your phone's energy on 3G networks.
- RAT Mode (Phone Info). With the help of this menu you can select the most used communication standard. Use with caution, however, as these settings will override the Network Selecting item.
- RF De-sense Test... Selecting a frequency range and a specific channel for testing the quality of communication.
- SIM ME Lock... Allows you to manually configure the regional parameters of the GSM module.

Wireless interfaces
This is also a very interesting section, which is intended for testing a wide variety of modules designed for wireless transmission of information, for example, Wi-Fi or Bluetooth:
- Bluetooth... Offers a very wide range of settings and tests for the bluetooth module in order to test the receipt and transfer of information, as well as to start the debug mode.
- CDS Information... Data on the parameters of wireless interfaces.
- FM Receiver... FM module check.
- Wi-Fi... Testing the Wi-Fi module for receiving and transmitting data on a specific frequency channel.
- Wi-Fi CTIA... Recording of logs of testing wireless technologies.

Hardware Testing
This service menu of Huawei smartphones offers ample opportunities for testing and configuring the main equipment of the phone. In this engineering submenu, the user will have access to such items as:
- Audio... Allows you to fine-tune the parameters of sound playback.
- Camera. Adjustment of parameters for still images and video recording, which are not included in the standard camera application.
- Driving Current Camera... Reads amperage data from sensors in camera circuits.
- CPU Stress Test... Testing of all processor subsystems of the device.
- Deep Idle Setting... Using this tab, you can disable the use of sleep mode when the machine is in standby mode.
- Sleep Mode Setting... Adjust sleep mode settings.
- ChargeBattery. Detailed information about the battery and its charge.
- Sensor. In this tab, the user can fine-tune the device sensor.
- Multi-touch... In this menu you can check and adjust the number of points of simultaneous pressing of your screen.
- Location Engineer Mode... Here the user can check the data of the GPS module.
This, perhaps, is all, dear friends. We hope this article was useful to you and answered most of your questions. We wish you a great customization of your phone, and may it only bring you pleasant emotions.
Users of mobile devices often confuse the Android engineering menu with the developers' menu, although the vast majority of users do not know anything and do not even know about its existence.
But those who do not pursue new products and do not buy smartphones / tablets with each new version of Android, also dream of expanding the capabilities of their device.
In order to solve the problem, you can go in several ways:
- get superuser privileges (root-rights);
- install several applications that add new features and provide access to features hidden from the user's eyes;
- use the developer menu (mainly for a comprehensive check and testing of the device);
- go to the internal system menu (engineering)
Let's talk about the purpose, capabilities of the latter, having previously learned how you can get into it on various gadgets, firmware and editions of the mobile OS.
How to enter
The most common call option on an Android device is to enter the combination "* # * # 3646633 # * # *".
Attention! There are a couple of nuances here:
- firstly, after entering the combination, you do not need to press the call button, after a couple of seconds after entering the last asterisk symbol, the required interface will appear on the smartphone screen;
- the method is applicable to most, but not all devices and firmware versions, especially to Chinese devices;
- appearance and functions provided on different devices may differ (number of categories, names, differences in versions, etc.).
On other models, try entering *#*#4636#*#* or *#15963#* ... The combinations for mobile devices from the most popular manufacturers are shown in the table below.
| Samsung | [*#*#4636#*#*] [*#*#8255#*#*] |
| Lg | [*#546368#*818#] |
| Sony | [*#*#7378423#*#*] |
| Huawei | [*#*#2846579#*#*] [*#*#2846579159#*#*] |
| Acer | [*#*#2237332846633#*#*] |
| Htc | [*#*#3424#*#*] [*#*#4636#*#*] [*#*#8255#*#*] |
| Fly philips alcatel | [*#*#3646633#*#*] |
If you can't call
It is very rare, but it may be that none of the given combinations led to the call of the required window. In this case, download the Mobileuncle MTK Tools application (removed from the Play Market).
It works similarly to the methods described above, with the difference that it sends commands for entering codes to the mobile operating system automatically, determining its version and model of the gadget after calling the “Engineer Mode” command.
Before using the program, it is strongly recommended to create a backup of the firmware, it is not for nothing that it has been removed from the application store - many dozens of users “killed” the firmware of their devices due to inept and careless handling of the software. In addition to calling options, the program allows you to:
- free up permanent and random access memory;
- restart recovery;
- manage autostart;
- backup, restore and edit IMEI;
- display detailed information about the hardware of the smartphone.
To get access to all the features of Mobileuncle MTK Tools, as well as the options, you should acquire root rights for your mobile device.
Extended interface composition
Engineer Mode for the user is presented in the form of a multi-tab window, where certain types of functions are collected on each of the tabs.
Telephony
The first tab contains functions for performing general phone settings: testing the network and obtaining information about the network technologies used, changing GPRS parameters, configuring the camera and a lot of sub-items that are incomprehensible to a beginner.
Connectivity
Responsible for changing parameters and displaying information about ports for communication:
- Bluetooth;
- Wi-Fi module;
- FM receiver if available.
You can request comprehensive information about each module, test its operation, change the configuration and browse through the logs.
Hardware Testing
The title of the section indicates that there are tools for working with hardware: testing it, extracting any information about hardware components, changing their operating modes.
On Android, it supports more than a dozen audio playback modes for various conditions (games, call, alarm).
As for the camera, a huge range of parameters are available here, which include changing the preview of clips and specifying the default video frame rate and many other items.
To check the stability and performance of the CPU, you can run a CPU stress test through it.
Changing its voltage and operating frequency in order to overclock or save the battery should be extremely careful and aware of the possible risks.
The processor has the option of putting it into sleep mode under certain conditions, as well as turning off the display.
Also, Engineer Mode contains a huge variety of items for retrieving information and debugging the operation of the processor, touch screen, RAM, sensors.
There are functions for stopping removable flash memory and changing the operating mode of the USB port.
Location
For those who like to use the GPS capabilities, who sometimes lack its settings, an abundance of items is available in this tab.
Resetting to original settings
It has never happened to anyone that the thirst for experimentation led to small disasters.
If something went wrong during use, everything can be returned back, especially if a backup copy of the firmware was made.
Even if you haven't got one, you shouldn't lose heart, we will reset the device to the factory options and that's it.
- The first and most reliable way is to roll back the system state to the reserved one.
- Reset firmware via recovery (BackUp and Wipe).
- Download Mobile Uncle, call "Restart to Recovery mode" and click on the item "BackUp"
The engineering menu is a really indispensable tool for fine-tuning a smartphone / tablet, allowing you not only to take full control of your gadget, but also, sometimes, to return one of the non-working functions. However, careless use can lead to problems.
In order for developers and testers of software and mobile devices to get some system information and debug smartphone functions, Android OS contains some hidden features. Among them - connecting to a PC in developer mode, viewing detailed information about networks and hardware, etc. One of the tools for this is the engineering menu.
The engineering menu is a special settings menu that contains tools for testing and calibrating smartphone hardware. By default, it is hidden, and in order to get into it, you must perform a certain procedure. The appearance of the engineering menu differs on different smartphones, depending on the manufacturer and SoC model. The customization options will also vary.
There are several ways to enter the engineering menu, which differ depending on the smartphone manufacturer and chipset model. You can try to start by entering one of the codes in the dialer application:
- * # * # 3646633 # * # * - smartphones with
- * # * # 6484 # * # * - some smartphones with Qualcomm;
- * # * # 54298 # * # * - some smartphones with MediaTek;
- * # 0 * # - some Samsung smartphones;
- * # * # 7378423 # * # * - some Sony smartphones;
- * # * # 4636 # * # * - on some devices opens only the network menu;
- * # * # 2846579 # * # * - some Huawei devices.
If none of the codes helps, on a smartphone with MediaTek, you should install the program "Launching the MTK Engineering Menu" from the market. On Xiaomi devices, you can enter the menu if you go to "Settings", select the "About phone" item and press the "Kernel version" line five times in a row.
What can be configured on a smartphone in the engineering menu
The engineering menu is different on different platforms, in many cases it only allows you to test some parameters. On Xiaomi Redmi Note 3 Pro and Note 4X, built on Qualcomm chips, the engineering menu allows you to test various functions. Among them are the screen, sensor, sensors, cameras, sound and microphone, communications, battery, navigation, etc. There is no possibility to change something, you can only find out if everything is working correctly.
Much richer opportunity is on the MediaTek platform. In Oukitel U7 Plus (MT6737 chipset), the engineering menu allows you to configure the network, sound, communication modules, and other modules. On Redmi Note 2 with MTK Helio X10, the menu was identical, and on other devices with MTK it is not particularly different. Using his example, we will describe the possibilities.
Telephony tab
This section is responsible for configuring the cellular modem. Here, interesting possibilities are provided by the BandMode, Network Selecting and GPRS options.
BandMode
In this menu, you can select the communication standards that will be active on the phone when connecting to mobile networks. In the menu item, a choice of frequency ranges for each SIM card is available, if there are two SIM cards - the complete list is usually available only on the main one (as a rule, the first one). Having found out exactly what frequencies your operator uses in the region, you can uncheck all the rest. This will slightly increase the battery life due to the fact that the device will not look for the operator's towers in these ranges, spending extra energy on scanning the air.
Sometimes some communication standards (especially LTE) are supported at the chipset and core level, but disabled in the firmware. By checking the box next to them, you can activate the support for these networks. It is worth warning that it does not work everywhere: on the same Redmi Note 2 (Chinese version), TDD-LTE was turned on in this way, and on Oukitel U7 Plus these items are not activated.
Network selecting
The name speaks for itself: this item is also responsible for the choice of networks. Only in this case the user can choose which types of networks he uses. The goal is the same as in the previous paragraph: to reduce the load on the cellular modem, thereby reducing the charge consumption. You can choose to work only in 2G, 3G, 4G, or combine several standards.

If your operator does not have 3G or 4G at all, these items can be disabled so that the smartphone does not try to constantly search for LTE networks, thereby speeding up battery drain. You can also turn off 3G and 4G if you need constant communication (for example, for chatting on the Internet), but traffic is limited and uncontrolled use of WCDMA and LTE by background processes can quickly waste it.
GPRS
Despite the name, this item is not interesting for the GPRS communication settings, which many no longer need, and the settings themselves are not recommended for "mere mortals" to change. The main feature is the ability to record the IMEI of the smartphone. In the corresponding item, you can enter the identification number of the device and click Write to save it.

The ability to write IMEI is often required after an unsuccessful flashing, when it "flies" and the device cannot register in the operator's network. By rewriting this code from the smartphone box, you can restore functionality. Attention! illegal change of IMEI of a smartphone in many countries (including Russia, Ukraine) is a crime! In addition, by rewriting this code to a random one belonging to another subscriber of your operator, there may be communication problems due to equipment conflict. Therefore, we recommend that you always keep the box or sticker with the IMEI in case of unsuccessful firmware. Indeed, on devices with a non-removable cover, this identifier is not written under the battery.
Connectivity Tab
In this tab, the functions of testing and fine tuning, radio receiver and Wi-Fi are available. The overwhelming majority of users have nothing to do here, since there are no settings interesting for a layman, but it is easy to disrupt the normal operation of Bluetooth by entering something wrong.

Hardware Testing Tab
This setting item in the engineering menu is responsible for the hardware configuration. The items Audio and TouchScreen are of interest to users. The latter contains HandWriting and MultiTouch items. It's easy to guess what these parameters are responsible for.

Using the first one, you can check the accuracy of the touchscreen operation, check for the presence of "blind spots". This menu is especially useful when buying a smartphone, in particular, from hands without a guarantee. The second point allows you to do the same, but with the participation of several fingers. With it, you can test how well the smartphone handles multiple finger gestures at the same time.
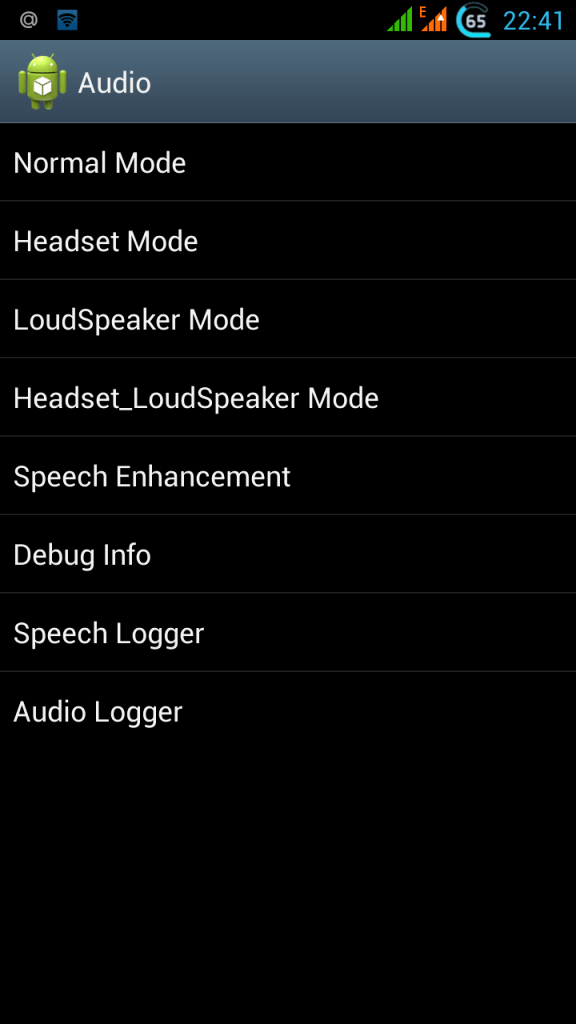
Audio
It is this cherished item that is needed by those who are looking for how to increase the volume in the engineering menu. The upper items allow you to control the volume of the device, and are responsible for different modes.

Normal Mode is a normal use mode that outputs music or video sounds to the music speaker. Headset Mode is responsible for headphone volume control. LoudSpeaker mode allows you to adjust the call volume when using the speakerphone. The last point is a combined one, it is responsible for the speakerphone when the headphones are connected. In order to change the sound in the engineering menu, you need to choose which device you want to configure.

- Sip - settings for Internet telephony;
- Mic - microphone sensitivity
- Sph - spoken speaker;
- Sph2 - the second earpiece (a rare beast among smartphones);
- Sid - after changing this parameter, an echo of your voice may appear during a conversation, so you do not need to touch it;
- Media is a multimedia speaker that most people need.
In order to adjust the volume, you need to enter the required mode (for the volume of the multimedia speaker, this is Normal Mode), select the Media item and set the volume value in the specified range.

The Level parameter is responsible for the volume value set by the rocker at each division. Level 0 is the lowest value (one division), the highest Level is all divisions, on Oukitel U7 Plus it is 14, on other smartphones it may differ. The value can range from 0 (speaker is silent) to 255 (full volume). It makes little sense to change the value, but if after a certain division it seems to you that the sound becomes much quieter abruptly, you can increase the values by a couple of units for this division (and lower levels). The main thing is that the conditional Level 6 does not turn out to be louder than Level 7, because the value is too high.
But in order to increase the maximum volume in general, you need to change the value in the Max Vol item. The maximum level corresponds to 160, but manufacturers often set less (on the tested device it was 128). Setting the number to a higher volume will increase the volume, but side effects such as gurgling, noises and wheezing are possible. The optimal value should be selected by the "scientific poke method": increase the value by several units, save, check the sound on video or music, and if everything is fine, increase it still.
Conclusion
It is worth repeating again that the engineering menu is different on different smartphones. What is available on the MediaTek platform cannot be done on Qualcomm. Codes for entering hidden settings may also not work in some cases, we cannot guarantee their 100% performance. In addition, everything that you do with your smartphone is done at your own peril and risk, since incorrect settings can affect its performance. In such cases, only a general reset or flashing will help. So if you really want to experiment with the settings, the meaning of which is not completely clear to you, it is advisable to take screenshots before that, in order to enter the factory values in case of anything.
For many people, buying a new tablet or smartphone is a real event. Each owner expects that the new gadget will delight him for many years with reliable operation and the absence of problems associated with its operation.
Moreover, in this case, it does not matter who is the assembler of the device and what operating system is installed on it. But it often happens that modern mobile devices can hardly be called ideal.
Some time after the start of use, moments appear that the owner will most likely want to fix in one way or another. Some are trying to finalize the software part of the mobile assistant to a perfect state. It all depends on what is considered ideal. One of the most readily available tools in the Android mobile operating system is the engineering menu.
Android engineering menu: setting secrets
At the final stage of configuring the software shell of a mobile device running on the Android operating system, the developers use the so-called Android engineering menu. The engineering menu refers to the interface of a special program that allows you to make changes to the operation of the device, as well as view information from sensors and perform technological tests. Reckless use of this element can lead to unpredictable consequences. Most often, access to the engineering menu is hidden from users. However, his secret is in fact already known to many. To understand how you can call the engineering menu, you just need to spend a few minutes looking for recommendations.
Important points
Exit to the engineering menu "Android" can not be performed on all mobile devices. In order to take advantage of its capabilities, you need to make sure that the gadget meets a number of requirements. First of all, the central processing unit of the device must be produced by MediaTek. On many inexpensive Spreadtrum models, the popular Snapdragon from Qualcomm and various Tegras from Nvidia and Intel, it is useless to try to launch the engineering menu, since it is missing. You will not be able to get it working even if the corresponding application is provided.
In addition, various modified operating systems, such as the popular CyanogenMod, do not allow the configuration program to run. This is due to the fact that these systems were originally developed for devices with a Qualcomm processor that do not support the Android engineering menu.
It is also desirable that the operating system be original, or at least created on a basic basis. The application file itself must be present among the programs, being hidden from the standard explorer. So, for example, some manufacturers of mobile gadgets, after making the necessary settings for the software part, simply delete the Android engineering menu. In this case, recommendations for using the engineering menu are useless.
Using secret combinations
To get into the settings of the engineering menu in the Android operating system, you can use several methods. Which one is better to say, since a direct comparison would be incorrect. Let's consider each of these methods in turn. One of the oldest options, which was used in the "ancient" models of tablets and smartphones, is that in a special program - a dialer, the user had to dial the engineering menu code. The operation was carried out in the same way as checking the balance on the account. If the device recognizes and accepts the combination, the setup application starts. Some mobile device manufacturers use their own modified code. Therefore, the standard set will not work here. In other situations, to call the engineering menu, you must dial the following combination of characters "* # * # 36 46 63 # * # *". That's all.
The familiar way
The use of a secret combination of signs may not be convenient in all cases. The user may simply forget the correct order of the numbers. In the case of a changed set, it will be easier to use the program instead of finding the correct order of characters. One of the best known applications is Mobile Uncle Tools. This application is distributed free of charge, so the user will not have any problems finding and installing it. At the time of this writing, the current version was 2.9.9 or build 3.1.4, which has additional support for new processors.
For the program to work correctly, the user will first need to get root-rights on their gadget. To obtain root rights, you can use various applications, for example, SuperSu or KingRoot. In this article, we will not talk about the features of working with a rooted device, since this is a separate rather voluminous topic. When the application is launched, you will need to select the third item, which is called Engineer Mode. Next, in the window that opens, you need to select "Work with MTK". When a question about granting root access appears, you need to confirm the operation.
Restoring access to engineering mode
In the event that the manufacturer of the mobile device decides to prudently remove the configuration software in order to ensure the security of the operating system, it will be possible to install it again. To do this, the user will need to find an installer on the Internet that restores EngineerMode.apk. When you find this component, you just have to install it. Due to the abundance of analogous clones, we will not indicate the exact name. You can just copy the specified file to the system folder (system \ app). After completing these operations, you can use any of the following methods to access the engineering menu: you can dial the number or call the menu directly from the program interface. It is worth noting that to perform this operation, the user will need root rights.
Miracle program and its capabilities
Setting up Android through the engineering menu opens up the opportunity for the user to solve several important tasks at once. In particular, here you can adjust the microphone sensitivity and speaker volume, reduce power consumption, limit the scanning of unnecessary ranges and reduce the search time for satellites. Let's take a closer look at the above functions.
How do I increase the volume?
The volume of the call can be increased quite simply with the help of the engineering menu. To do this, select the "Audio" section. You will see a list of available modes. The Ring subsection of the LoudSpeaker Mode section is responsible for the system speaker in the system. Do not change the value of the parameter in the first window. In the second window, you can set a higher value for the parameter. After finishing editing, click on the Set button, which is located here. Next, you need to restart the device, while correctly exiting the program.
Operator frequencies
To optimize the power consumption of your mobile device, you can try disabling the scan for unnecessary frequency bands. The standard frequencies for 2G and 3G networks in our country are 900 and 1800 MHz. A pair of 850 and 1900 MHz is responsible for the American standard. To enable or disable the band you do not need, you need to use the Band Mode item of the engineering menu. Here you need to go to the settings for both SIM cards one by one and put a checkmark in front of the desired items. Pressing the Set button confirms.
How to improve GPS?
To improve the performance of the global positioning system, you must select the Location item in the Android engineering menu. Next, use the Location Based Service item and open EPO. Here you need to make sure that the Download and Enabled items are checked. Then you need to return to the YGPA item, select the information section and click in turn "Full" - "Cold" - "Restart". Then you need to select the item Satelites or "Satellites". Until the answer is recorded on the map. This entire procedure will take 2 to 5 minutes. You just have to exit the engineering menu, close the program and reboot the device.
Almost all phones experience software glitches, the source of which may be in the firmware. To identify them and determine the type of breakdown, there is a special service menu through which you can test each module in the phone and identify the essence of the problem.
In this article, we will tell you what the xiaomi engineering menu is, how to enter, as well as the main functions that may be useful to you.
What is the engineering menu and the main functions
These are hidden smartphone settings aimed at testing and fixing errors. In the usual menu, these settings are not available, tk. inexperienced users can knock off the correctly set parameters, after which the phone may stop ringing, the connection may be lost, etc. Therefore, be very careful not to harm the system.
The engineering menu on the xiaomi redmi 3 phone performs the following functions:
- Sound adjustment in the main speaker;
- Adjusting the sound in the conversational dynamics;
- Microphone setup;
- Setting up networks;
- Camera setup;
- GPS testing;
- Repair IMEI;
- The ability to optimize the system for less battery consumption.
These are not all functions, but rather the main ones that are in the greatest demand.
How to enter the engineering menu
Consider the ways to enter the engineering menu using the example of Xiaomi Redmi note 3 pro. There are only two standard ways. The third option is through applications, which is worth using if the standard methods do not work.
Through settings
Note that this method is universal, it is also suitable for Xiaomi redmi 3s. So, let's go to the smartphone settings. Scroll down, tap on "About phone". We are looking for the line "Kernel version" and slowly click on it three times. Perhaps the inscription "It remains to press two more times" will appear at the bottom. In the same way, slowly press two more times.
The "secret settings" look like this (depending on the phone, the view may differ slightly):
With the help of a special code
Open the dialing, and dial the code * # * # 6484 # * # *. The same will appear as above in the screenshot. This code must be suitable for all Xiaomi devices. If nothing happens when dialing this combination, you should try the following codes: * # * # 3646633 # * # * or * # * # 4636 # * # *.
On some other models, the engineering menu looks like this:

If you can't open the engineering menu
If Xiaomi redmi note 3 pro does not enter the engineering menu, then you should use alternative ways of entering, namely special software. Consider two programs that will help you: MTK Engineering and MobileUncle Tools. You can find many more similar applications on your own.
MTK Engineering is a fast and convenient program, it looks like this:

The Android Testing item contains the android settings, namely:
- Phone information;
- Battery information;
- Usage statistics;
- Wi-Fi information.
We need the MTK Engineer Mode item - this is the engineering menu itself. The look may be slightly different, but the essence will not change.
MobileUncle Tools is a more powerful program than the previous one, in that it additionally allows you to perform many other operations with the system, however, only for devices with MTK processors, which are not found in all Xiaomi devices.

First, you need to click "Engineering Mode" and then select "Engineering Menu (MTK)". It should be added that this program requires root rights. At the present time, this program has been removed from the Play Market, but it is not difficult to find it on the Internet. Since this application is being developed by a Chinese author, you may come across an English or Chinese version.
Conclusion and translation of functions
In conclusion, we want to warn you that you handle the numerous system settings wisely. If you need to repair or check any module in your phone, you should not immediately change the parameters of the engineering menu yourself, it is better to first look for instructions on our website or on the Internet just for your case. For convenience, we have made a translation of all functions (Xiaomi Redmi Three smartphone was taken as an example).

We are all familiar with the rich settings of Android devices - each smartphone or tablet can be customized by activating or deactivating certain functions, adjusting certain parameters. But few people suspect the existence of such a thing as the Android engineering menu. It is hidden from view, since there is not much to do here for a simple user. But if you are an experienced user or want to get experience in fine tuning the device and the operating system, then this menu will come in handy for you.
Service menu features
Let's see what the engineering menu is for in a smartphone? The answer is simple - for very fine tuning of the device. For example, increasing the volume on Android is possible only through the engineering menu. Here you need to visit the audio settings item and play with the presented parameters. Here it is possible to manually adjust the sound volume in different modes and at different volume levels. Let's consider an example:
- You find that at maximum volume the speaker of your smartphone starts to wheeze;
- We go to the engineering menu using one or another command;
- We go into the audio settings and change the volume in a given mode and in a given gradation;
- We exit the engineering menu and check the results - the volume should decrease.
Is it possible only such a fine adjustment through the standard setup menu? Naturally, there is nothing of the kind here.
Here you can adjust the sound in the headphones, adjust the microphone sensitivity, and perform other actions with the sound. Before going into the settings, you need to find those that will help you make the adjustments as correctly as possible, without the risk of damaging the speakers with a microphone or completely depriving your smartphone / tablet of your voice.What other functions are there in the engineering menu? Checking network modules, adjusting the reception range, setting up auto answer, testing the modem, setting up connections with other devices, setting up the receiver, testing the camera, sensor, screen, battery and other modules. Geolocation settings are placed in a separate hidden menu - here you can check the functionality of the GPS chip, enable / disable A-GPS, check other settings. It is also possible to adjust the fonts, play with the USB settings and perform other actions.
Please note that the service menu on Android is intended for professionals who are aware of their actions. If you got here out of idle curiosity, try not to touch the parameters you do not understand and do not rearrange the sliders with the settings.How to enter the engineering menu on Android

The entrance to the engineering menu on Android is most often carried out using special commands, similar to the most common USSD commands. The difference is that you do not need to press the call button at the end - after typing the command, an automatic transfer to the specified menu will occur. The universal code for the engineering menu on Android is the code * # * # 3646633 # * # *. It works on many phones and allows you to instantly enter service settings.
Some smartphones and tablets do not respond to the above command. Therefore, you can try the following options:
| Device manufacturer | Team |
| Sony | *#*#7378423#*#* |
| *#*#3646633#*#* | |
| *#*#3649547#*#* | |
| Philips | *#*#3338613#*#* |
| *#*#13411#*#* | |
| ZTE, Motorola | *#*#4636#*#* |
| Htc | *#*#3424#*#* |
| *#*#4636#*#* | |
| *#*#8255#*#* | |
| Samsung | *#*#197328640#*#* |
| *#*#4636#*#* | |
| *#*#8255#*#* | |
| Prestigio | *#*#3646633#*#* |
| Lg | 3845#*855# |
| Huawei | *#*#2846579#*#* |
| *#*#14789632#*#* | |
| Alcatel, Fly, Texet | *#*#3646633#*#* |
| Smartphones and tablets with MediaTek processor (most Chinese devices) | *#*#54298#*#* |
| *#*#3646633#*#* | |
| Acer | *#*#2237332846633#*#* |
The entrance to the engineering menu on Android is performed immediately after entering the command. There is no dependence on the version of the operating system - the codes are valid for Android 2.2, Android 4.4 and other versions of Android OS. If the code does not fit, you should look for other combinations.
Some commands lead not to the service menu, but to the testing menu - it allows you to check the screen, sound, wireless modules, microphone and much more. Menus for testing can be English or Russian.Some manufacturers deprive smartphones and tablets of access to the engineering menu, replacing it with numerous commands for testing modules or setting certain parameters. For example, this is what Samsung does - many new models lack a single service menu. Information about the available service commands can be found on specialized resources and on the sites of service centers.
You can use special applications to access the engineering menu. A typical example is the Mobileuncle MTK Tools application. It will allow you to get separate access to device settings and operating system settings. The app is really handy, but it has a drawback - it works exclusively on devices with MTK processors.

Setting up Android through the engineering menu is fraught with certain risks. For example, beginners always have the opportunity to accidentally disable this or that functionality. Understanding the purpose of certain items, you need to familiarize yourself with the appropriate instructions. Failure to do so could result in hardware failure. If you are afraid to damage or break something, do
And interesting features hidden from prying eyes.
Why are they hidden? Firstly, so that an inexperienced user does not break anything, and secondly, they are needed in very rare cases and are not used regularly. Today we will talk about the engineering menu.
What is it and why is it needed?
We are talking about a special program that developers use at the final stage of configuring the software platform of a mobile device. With its help, they make the latest changes to the operation of the device, check the functioning of various sensors and carry out testing of system components.
Also, hidden functionality is used to obtain a large amount of system information and conduct various tests (about 25 pieces).
Attention! This section is intended for advanced users who are solely responsible for the consequences.
The engineering menu is available on smartphones and tablets powered by the MediaTek processor... On the Qualcomm chipset, it is either truncated or absent altogether.
How do I open the engineering menu?
To enter the engineering menu, in the dialing application you need to enter a special command: * # * # 3646633 # * # *. On some versions the code * # * # 4636 # * # * or * # 15963 # * may work.
If the code did not work or you do not have a dialer application (relevant for tablets that do not support calls), the MobileUncle Tools or MTK Engineering applications, which can be downloaded for free from Google Play, will help.
When writing the article, we used a Lenovo TAB A10-70 tablet with the MTK Engineering application installed.
The engineering menu opens up huge possibilities, each of which we will consider in detail.
- SAR Test - determination of the level of harmful radiation from a smartphone or tablet.
- Connections - tests the available wireless connection types: Bluetooth, Wi-Fi, WLAN CTIA and FM receiver.

- Audio - adjust the sound for speakers, microphone and headphones.

- Camera - configure various camera settings.

- Turning on the current camera - the indicator of the working current of the camera is displayed (in our tablet it is 2 mA).
- CPU (central processing unit) load test - checking the stability of its operation, identifying errors in the processor-memory channel, testing the cooling system and power supply of the processor.
- Device Manager - Activate SMS automatic registration, manage configuration settings.
- Disable detection — adjust the signal frequency.
- Display - Sets the PWM metric cycle, which affects the perceived brightness of the screen by quickly turning the backlight on / off; backlight setting; the controller behind the vertical and horizontal display lines.

- Wakefulness mode - its activation will not allow the device to "go" into sleep mode.
- IO - control of data input / output operations.
- Memory - detailed information about the RAM module.
- To the degree - detailed information about the battery (the strange name of the section is most likely explained by errors in the automatic translation of names in the application, but there is no way to switch to English).
- SD card test - the name of the tab speaks for itself.
- Touchscreen - checks the sensitivity and response of the display when pressed, as well as setting its additional settings.
- USB - testing the operation of the USB port.

- UART / USB switch - switch between two data transfer modes.
- Sensor - calibration (adjustment of clarity and sensitivity) of the touch screen. The standard methods are here.
- Location - Testing GPS performance and finding an accurate location.
- Battery log - detailed information about the battery and the ability to activate the recording of battery consumption information.

- MTKLogger - collection of system logs (MobileLog, ModemLog and NetworkLog).
- Temperature sensor - Shows the temperature of the battery and processor.
- Parameter Font - Change the font size.

When installing the application, some functions may not be available without.
Xiaomi engineering menu
Despite the fact that our test Redmi 2 is powered by a Qualcomm Snapdragon 410 processor, it also has the functionality we are interested in. To enter it, you need to tap the "Kernel version" item several times in a row.

The menu is represented by five items:
- Automatic Test. Automatic test of all device parameters.
- Single Item Test. Each of the 25 tests is taken separately. We will discuss this in detail below.
- Test Report. Report on the passed texts and their results.
- SW add HW version. Information about the version of the smartphone, IMEI and other numbers.
- Device View. Smartphone hardware data.

Of course, the most interesting point is the Single Item Test, where you can pass a huge number of tests.

Let's make a reservation right away that there was no way to configure something in the device we tested - only a test of its operability. At the end of each procedure, you should note its status: successful (success) or not (failed).
- Key - the performance of the physical buttons. Interestingly, it did not work through successfully, since when checking the power button, the smartphone goes out.
- Backlight - display brightness.


- TFlash. Testing the memory card with two results: either everything is in order, or the card is damaged.
- Bluetooth. It searches for available devices.
- SIM Card. Test for the presence of SIM cards.

- Vibration. The gadget vibrates - everything is ok.
- RTC (Real Time Clock) - the functioning of the built-in clock.
- Speaker. Speaking dynamics testing. We did not understand how to pass it. We would be grateful if you could tell me in the comments.
- Receiver. Translated as receiver, receiver, but music plays during testing.
- Headset. Test 3.5mm jack for headphone detection, sound playback, and headset control button support.


- Wi-Fi. Finding nearby access points. There are no settings.

- Torch (flashlight): on / off.
- The loopback test includes a spoken microphone test. Click Recording first, then Playing.
- LCD. Screen colors.
- GPS. Detection of available satellites.
- Gyro (gyroscope). Three parameters - X, Y, Z - change depending on the position of the device in space.
- G-sensor (Accelerometer). Twist the gadget in all planes and turn it over. Three parameters must be ok.
- Proximity Sensor Usually it is located near the earpiece and is designed to turn off the screen of the gadget during a call, thereby excluding accidental presses.
- Optical and Magnetic Sensor (optical and magnetic sensors) - points we do not understand, share your knowledge in the comments.
After passing all the tests, you can go to the Test Report section. As you can see, our "animal" is in excellent shape and has passed all the tests, which is very pleasing.

Above, we have listed the main sections of the engineering menu available on the tested devices. Now let's summarize what features the user gets during installation:
- Formatting, rollback to factory settings.
- Testing the performance of individual elements of a smartphone or tablet, such as sensors, touchscreen sensitivity and calibration accuracy.
- Detailed information about the device and its parts. For example, you can track the battery consumption since the last charge and view the statistics of the programs used.
- Optimization of energy consumption. Alternatively, unnecessary frequency bands are turned off. In Russia, the standard indicators for operation in 2G and 3G networks are 900 and 1800 MHz, while in the USA - 850 and 1900 MHz.
- Setting more, such as changing the font size or speaker volume.
The engineering menu can be of great service for experienced users and developers - it can be used to revive the device (for example, returning the system to), solve the problem of an overly quiet speaker or microphone, and monitor and check various system components. But you need to use it extremely carefully and competently, so as not to turn your gadget into a "brick".
Some smartphone owners complain that they cannot hear the interlocutor well, the music is played quietly through the speaker. There are several ways how you can increase the speaker volume on Android. The volume swing is not the only possible method.
Smartphone owners who can hardly distinguish the words of the interlocutor during conversations will be helped by information on how to increase the volume on Android through the engineering menu. In it, you can adjust the volume of the earpiece, headphones.
Initially, the engineering menu is hidden from users. This is explained by the fact that it is necessary only for experienced smartphone owners, who fully assume responsibility for possible problems with an electronic device.
The engineering menu is available only for owners of smartphones with a MediaTek processor. To activate it, there are special codes that may differ depending on the brand of the device. 
Entering codes is required as a regular number or USSD request. There is another way how you can call the engineering menu - using special applications.
- The most popular is MTK Engineering Mode.
- There is another free application - "Launching the engineering menu of MTK".
The choice of the method will practically not in any way affect the algorithm of actions, how to increase the volume of the speakers. After entering the engineering menu, you need to enter the MTK Settings section, then select Hardware Testing Audio. This will open a list of 8 categories. Of these, 5 are categories for increasing or decreasing the volume of sounds.
- Normal mode. In it, the phone works constantly when no peripheral devices are connected to it.
- Headset mode, it is activated when speakers or headphones are connected.
- Hands-free mode, the android starts using it when nothing is connected to the smartphone and the user switches to the loudspeaker mode when making a call.
- Hands-free headphone mode. The activation of the mode occurs when a person enters the loudspeaker mode with headphones connected to an electronic device.
- The volume during a call. Its activation occurs when a person is talking to someone in the usual mode and no additional devices are connected to the phone.
In any of the above categories, when you select them, several sections will open.

- Microphone (Mic)
- The first and, in some smartphones, the second hearing speaker. (Sph, Sph2)
- Sid - it is not recommended to change the values of this parameter, otherwise you can achieve the effect when the person during the conversation will hear himself, and not the interlocutor.
- Regulation of multimedia. (Media)
- Volume control for incoming calls. (Ring)
- Some smartphones have a radio volume setting. (FMR)
Examples of
For example, if the interlocutor practically does not hear you, you need to increase the microphone volume.
To do this, select Mic and the maximum Level, which denotes the maximum step of the volume swing, then change the values in the Value section, thereby increasing the microphone volume. After that press Set. If the Setting success window appears, the values have been changed and can be tested.

If a person's smartphone does not have a high volume of incoming calls, you need to do the following. You will need to go to the engineering menu of the electronic device, go to the Audio section, then go to the LoudSpeaker and select the Ring value. After that, for each step of the volume swing, you need to increase the values. It is not recommended to set the maximum, for example, with a maximum of 160, it is advisable to set no more than 156. Otherwise, the speaker will emit wheezing and noises when you call.
Finally
After any changes to the Value values, do not forget about the Set button, otherwise the actions will not be recorded and applied. Also, after applying the new settings, some smartphones need to be restarted and only then test the new values.
Experienced smartphone users recommend rewriting the default values before making any changes. This will allow you to return everything to its place in case of an unsuccessful smartphone volume setting.
If the article was useful to you, do not forget to bookmark (Cntr + D) so as not to lose it and subscribe to our channel!
The engineering menu provides access to manual configuration of the "hardware" part of the smartphone. To enter, you need to enter a special code or install an application, but there are a number of features that you should pay close attention to. If you could not enter the engineering menu the first time, then you did not take into account the features of the device. It is worth clarifying right away that any interference with the operation of the device can lead to its inoperability and loss of warranty.
Hidden system capabilities
At the last stages of setting up a smartphone, developers test the system for errors and check the operation of all sensors on the device. Especially for this, a special subroutine is sewn into Android - the engineering menu, which provides access to the hidden settings of the Android OS and allows you to reconfigure them yourself. In addition, the menu contains detailed information about the device. The full list of menu options is known only to platform developers, so you should make your changes with caution.
Secret paths of developers
To enter the engineering menu, dial the code * # * # 3646633 # * # *. On some models, you additionally need to press the call key. It is worth considering the peculiarities of phones: there are different combinations of numbers for different brands. The Android version does not affect the functionality of the engineering menu.
 We enter a special code to enter the engineering menu
If there are no problems, then you will be taken to an additional menu for fine-tuning your smartphone.
 We enter the subsection of the menu
Depending on the system version and processor model, the engineering menu may be incomplete or missing. In the photo above, there is a subsection of the menu with elements of testing smartphone sensors, setting up a USB connection, performing tests of internal and external memory.
If it didn't work the first time
Not on all devices it is possible to enter the engineering menu. Let's take a look at a number of common problems and how to fix them.
Android is a complex Unix-based operating system. If something cannot be done, you have not taken into account all the nuances of the functioning of this or that subroutine.
List of special codes
One of the common reasons for blocking the entrance to the engineering menu is an incorrect special code. The combination of numbers depends not only on the device model, but also on the type of processor. For example, most devices based on the MTK chip are equipped with an engineering menu. If we talk about Qualcomm, not all smartphones based on this platform have an engineering menu. The list of combinations is given in the table. If the one you want does not suit you, try entering a different combination.
Table: code options for different Android models
DIY engineering menu
If none of the special codes came up, don't be upset. There are many applications on the network with the functionality of the engineering menu. It is worth noting that the MTK postscript in the names speaks volumes about compatibility only with MediaTek processors.
The first option is Mobileuncle MTK Tools. In addition to the required set of settings, this program has several additional functions: firmware update, recovery update, GPS receiver improvement mode, and much more.
 Mobileuncle MTK Tools provides a set of settings
Another program is MTK Engineering Mode. The program completely repeats the standard engineering menu.
 MTK Engineering Mode repeats the standard engineering menu
For those who do not have a device equipped with an engineering menu, there is another option: installing third-party firmware. In assemblies of third-party developers, there is often a wide range of customization options.
Where to begin
When you first enter the menu, you can get lost in the jungle of parameters.
Engineering menu settings
The settings open up tremendous possibilities for users.
Some items may be unavailable or missing depending on the hardware platform.
In this section, you can configure the mobile settings.
- Auto Answer. You can enable / disable automatic answer to an incoming call.
- Band Mode. Allows you to manually select the frequency range for the GSM-module. You will see all technologies and frequencies for them supported by your smartphone model. If you wish, you can uncheck the bands that are not used by your service provider. This will significantly save battery power. To save the settings, press the set button.
- CFU Setting (Call forwarding Settings). This option enables or disables conditional call forwarding. It must be supported by the operator.
- AT Command Tool. A developer utility that supports AT commands. This menu item will be interesting for programmers and developers. Using this menu, you can execute various requests directly to the system without visual add-ons.
- Modem Test. Configuring the compatibility of the "access point" option with various types of connected devices.
- Network Selecting. Here you can select the mobile communication standards (GSM, WCDMA, LTE). For additional energy saving, turn off unused ones.
- NetworkInfo. We select one or several options for displaying information about the state of cellular communication parameters. After selection, open the additional menu (three dots in the upper right corner) and click Check Information. This option is convenient for checking the quality of the cellular operator's services.
- GPRS. Setting up a connection to the mobile Internet, choosing an active SIM card (if there are several of them).
- HSPA Info. Information about the 3G network if supported by your mobile operator.
- Mobile data service preferred. Internet will be prioritized over voice traffic to increase data transfer speed. Incoming calls may not go through.
- Fast Dormancy. Allows to save battery power in third generation networks. The option must be supported by your service provider.
- RAT Mode (Phone Info). Allows you to select the priority communication standard. You should change the parameter carefully, it locks the settings of the Network Selecting item.
- RF De-sense Test. You can select a frequency range and a specific channel to check the quality of the connection.
- SIM ME Lock. This subsection allows you to manually configure the regional parameters of the GSM-module (MNC, NCC).
Photo gallery: mobile parameters
We get to the main window of the subsection Turn on or turn off auto answer Turn on or turn off conditional forwarding Set up the "Modem" mode Display information from the GSM module Set up the mobile Internet Set the priority of the connection type Set up the 3G mode Select the type of mobile connection Check the network power Set the regional communication parameters
Wireless interfaces
The section is intended for testing wireless data transmission modules (Wi-Fi, Bluetooth, FM).
- Bluetooth. A wide range of settings and tests for the module of the same name in order to check the reception and transmission of data, start the debug mode.
- CDS Information. Information about the parameters of wireless interfaces.
- FM Receiver. Checking the FM module of the device.
- Wi-Fi. Testing the module for transmitting and receiving information on the specified frequency channel.
- Wi-Fi CTIA. Recording of logs of wireless technology tests.
Photo gallery: wireless data transmission
Select the section for checking the wireless modules of the device Checking the bluetooth operation mode Finding information about the wireless interfaces Configuring the FM module Checking the WiFi module's operation Write the data about the WiFi module check in the log file
- Audio - fine tuning of the audio playback parameters.
- Camera - a set of parameters for shooting photos and videos that are not included in the Camera application.
- Driving Current Camera - takes current readings from the sensor in the camera circuit.
- CPU Stress Test - Performs tests of all CPU subsystems.
- Deep Idle Setting - disable sleep mode in standby mode.
- Sleep Mode Setting - sleep mode settings.
- ChargeBattery - View battery information.
- Sensor - sensor calibration.
- Multi-Touch - Checks the number of points available to simultaneously tap on the screen.
- Location Engineer Mode - check the parameters of the GPS module.
Photo gallery: equipment testing
Go to the section for checking electronic components Adjust the volume of the earpiece speakers Adjust the camera power supply Adjust the standby mode Adjust the CPU frequency Adjust the sleep mode Adjust the battery information Adjust the touch screen Test the multitouch function Adjust the GPS module
Adjusting the speaker volume
In the subsection, you can adjust the overall volume, headphone and speakerphone playback volume.
Changing the volume parameters should be considered carefully. All parameters are individual for a specific device model. Incorrect configuration can result in poor audibility.
There are a number of common parameters:
- MaxVol - general volume level. Values range from 0 to 160. The higher the number, the higher the volume.
- Sph - volume during a telephone conversation.
- Mic - microphone sensitivity.
- Ring - speaker volume for an incoming call.
- Media - volume level when watching movies, listening to music and playing games.
Very often users are dissatisfied with the speaker volume during a conversation. To improve audibility, go to the Normal Mode menu and change the Sph parameter to a value of 150. If the phone quietly rings with an incoming call, then you need to increase the Ring parameter value. We advise you not to set the value higher than 200, this may damage the speaker. To hear you better, change the Mic parameter from 100 to 172. This will increase the speaker sensitivity.
ROOT - a panacea for a smartphone
On a smartphone without root-rights, the functionality of the engineering menu is limited: some items are not displayed, changes made are not saved. Any interference with a smartphone requires open access to the system. Do not forget that getting root access can harm your gadget, the warranty for the device will be void. We strongly recommend that you back up important information to a memory card and synchronize with a google account and retrieve it to avoid data loss. To unlock full access to the system, you can use one of the existing methods.
Installing the application directly on the device (KingRoot)
Superuser access can be opened from a smartphone using special programs. Let's consider the sequence of operations using the KingRoot program as an example:

After that, you can safely change the parameters in the engineering menu, all changes will be saved. In case of a negative result, go to the next method.
Obtaining superuser rights via PC (Kingo Root)
This method differs in slightly more preparatory activities:

The engineering menu is used to configure the device and test the operation of the "iron filling". It is a built-in system subroutine that is an indispensable tool for both advanced users and newcomers to the world of mobile devices. However, it should be borne in mind that manipulations with the engineering menu can render the gadget unusable.


