Windows 10 users have the ability to change the default display settings that the system chooses by default. Sometimes problems can arise during the process of setting up or using the monitor, but they are very easy to fix.
Screen setting
Personalizing your screen settings helps you customize any screen for the most user-friendly experience. Remember the settings that were specified before your intervention, so that in case of unsuccessful changes, you can quickly restore everything.
Brightness control
There are several ways to change the brightness: by changing the system settings or using the functions of the screen itself.
Through screen capabilities
Look for brightness control buttons on your monitor and use them to increase or decrease the light. But please note, these buttons are not present on all monitor models. If not, use the methods described below.
Use monitor buttons to adjust brightness
Via keyboard buttons
After examining the shortcut keys, that is, from F1 to F12, you can find the button responsible for adjusting the brightness. Click or hold it to get the result.
This button may sometimes be missing or not working. In this case, use the methods described below.
Use shortcut keys to adjust brightness
Quick way
By clicking on the battery icon or the message icon, you will see the "Brightness" block. Use it to adjust the brightness level you want.
Click on the battery icon and change the brightness
Through system parameters
- Expand System Options.
Open system settings
- Go to the "System" block.
Click on the "System" block
- In the "Display" tab, find the item "Brightness level" and move the slider. Click on the "Apply" button.
Move the slider to change brightness
Video: How to Adjust Brightness and Other Display Settings
Through power settings
- In the system search bar, write "Power supply" and open the proposed page.
Open the Power Options tab
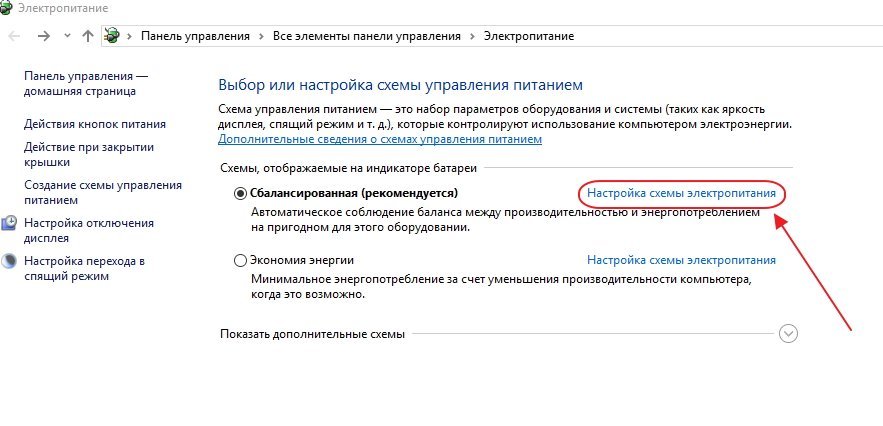
- Open the settings for the plan you are using.
Click on the "Power Scheme Settings" button
- Find the line "Brightness" in the list of parameters and move the slider to the appropriate value.
Adjust brightness in power options
What to do if brightness options are unavailable
Your screen may not support changing the brightness, but this problem only occurs on older devices. Most often, the reason lies in the lack of the required driver:
- Go to "Device Manager".
Open "Device Manager"
- Find the "Monitors" section and expand it. If you have a "Generic PnP Monitor" sub-item, right-click on it and use the "Enable" function. Done, restart your computer, go to the instructions above and try changing the brightness again.
Highlight a monitor and use the "Engage" function
- If there is a Generic Non-PnP Monitor sub-item or an icon indicating that there are no drivers, manually find and install them. To do this, find the website of the monitor manufacturer, download the drivers for your model from it, return to the "Device Manager", right-click on the monitor and select the "Update drivers" function.
Download and update monitor drivers
- Select "Search for drivers on this computer" and complete the procedure, and then return to the above instructions and change the brightness. You may need to restart your computer first.
Select manual search and specify the path to the drivers
Video: How to Update Drivers in Windows 10
Contrast settings
The easiest way to change the color ratio is by using automatic adjustment, which can be triggered by the following actions:
- While in the system parameters, select the "System" block. In the "Display" tab, go to the advanced options.
Click on the "More screen options" button
- Click on the "Color Calibration" button.
Open the "Screen Calibration" section
- Read several pages of instructions, each time clicking the "Next" button.
- Go through the process of adjusting the screen gamma.
Calibrate gamma
- Go through the brightness adjustment process.
Adjust brightness
- Go through the contrast adjustment process.
Adjust contrast
- Go through the color balance process.
Customize the display of colors
- Save or discard your changes.
Save the screen adjustment results
Video: How to Calibrate Your Monitor in Windows 10
Change resolution
The number and density of pixels involved in displaying a picture depends on the screen resolution. Each monitor model has its own recommended resolution value, it can be found in the instructions for the monitor or by enumerating all the resolutions suggested by the system:

Video: How to Change Screen Resolution in Windows 10
Change orientation, scale, add multiple monitors
Going to the screen settings (the first step of the previous subparagraph), you can change not only the resolution, but also the scale, due to which all fonts and icons will become either larger or smaller.
Adjust the screen scale
The orientation immediately changes from landscape to portrait or portrait and vice versa. This feature is only useful if you have a monitor with a non-standard aspect ratio, for example, stretched in height rather than wide.
Choose the right orientation
If several monitors are connected to the computer, then each of them will be configured separately. But first, you need to recognize them by clicking on the "Detect" button. Once the search is complete, the options for each monitor will become available.
Click on the "Detect" button to recognize the new screen
Solving Monitor Problems
If you run into problems while setting up or using your monitor, you should try to fix them yourself.
Blinking screen
If the screen starts flickering only in a certain application or game, this means that the program is incompatible with your assembly and the problem is in it. If the monitor blinks constantly, then there may be two reasons: a problem with the cable or drivers.
First, make sure that the cable connecting the monitor and the computer unit is not pinched or detached. This is usually a VGA or HDMI cable. Pull it out of both connectors, plug it back in and check if the problem goes away. If possible, test the monitor with a different cable.
Check if the unit and monitor are well connected
Secondly, if you are convinced that the problem is not with the cable, update the drivers:

Games do not open in full screen
Some games may open in a window by default instead of full screen. If you want to fix this, there are two ways. The first is to use the Alt + Enter combination, which gives the command to stretch the active window to full screen, the second is to go into the settings of the game itself and set the value "Open in full screen mode". Usually, the second method works one hundred percent, the game either opens immediately to full screen, or does it after restarting.
Turn on full screen mode in the game settings
Screen Calibration
Windows 10 tablet or digital pen users may experience that the system does not quite correctly respond to finger or stylus taps. In this case, you need to resort to screen calibration:

Deactivating sleep mode and turning off the monitor
By default, if there is no user action for 15 minutes, the computer turns off the monitor. After another 15 minutes of inactivity, the system goes to sleep. This is necessary to save energy. However, the power saving function can be deactivated or adjusted:
So, a computer monitor can be customized by changing its extension, format, brightness, contrast and scale. If you have problems with the screen, it is worth updating the drivers, checking the cable, or performing a calibration. The computer's hibernation can also be configured or disabled.
Often, after printing digital photos on a color printer, users are faced with the problem of incorrect display of colors.
Those. the photo after printing looks very different than when viewed on the screen.
Calibrating the laptop screen is used to fix this problem.
Calibrating a monitor is the procedure for adjusting its color gamut in order to approximate the colors displayed on the device screen as closely as possible to the actual colors that the user will receive after printing.
After completing the calibration procedure, the image will be almost the same on different computers with different displays.
Display calibration is mainly used by people in the video and photomontage industry (both professionals and amateurs), artists and designers, as well as web designers.
The disadvantages of uncalibrated displays include:
- inaccurate representation of colors and shades,
- loss of detail in light and dark areas,
- incorrect values of brightness and gamma,
- incorrect display of the design of web pages,
- eye fatigue after working with a computer.
It should be noted that the displays on the IPS matrix, albeit to a lesser extent, but also need to be calibrated.
Typically, special software is supplied with the monitor to perform calibration.
What if these articles will be also interesting to you:
- Why might the monitor not turn on? - Common causes
- Top Tips: How to Change Your Monitor Screen Resolution
Screen Calibration Methods
There are two approaches to calibrating a display - hardware and software. The software calibration method is the most accessible for the average user.
Software calibration usually does not achieve the level of hardware calibration, but this method should not be neglected either.
The hardware method is more expensive both in terms of money and the qualifications of the person performing the calibration. The hardware approach can be divided into 3 key steps:
The monitor setting (color, brightness, contrast) is performed in such a way that, in the adjusted position, it meets the requirements of the equipment (spectrophotometer and calibration software).
Setting the video card to linear mode.
Test the system and save the changed settings to the monitor color profile.
Advice! For simplified hardware calibration, you can print a picture on a color printer, and then change the display parameters to achieve maximum similarity between the digital and the printed picture.
Preparing to calibrate the screen
The first thing to start with is resetting the video card settings, all settings should be restored to their standard form.
The temperature of the die is a very important indicator before performing a calibration.
To achieve a uniform temperature, it is necessary to select a video sequence with a total duration of about 4–5 hours, with a dynamic picture, having previously expanded the viewing window to full screen.
These manipulations will allow uniform heating of all areas of the display matrix.
The next step is to find the right lighting level. Initially, we recommend that you work on the stability of the lighting.
This can be achieved by performing the calibration on a sunny fine day in the afternoon.
At this stage, our task is to obtain the most calm, stable and soft light. Also, keep in mind that LCDs tend to distort colors depending on the viewing angle.
- Instructions: Connect the phone to the TV - favorite photos on the TV screen
Calibrating the screen using programs
Calibrating the screen using Windows is pretty trivial and is more suitable for desktops than laptops.
To configure, you need to go to Start, write "calibration" in the search bar, and then go to the appropriate menu.
To start the calibration, you must click the "Next" button, after which the setup will be performed using the Calibration Wizard, each step of which is provided with detailed explanations in Russian.
There are quite a few programs available for performing screen calibration.
In this article we will look at just one of them - Atrise Lutcurve.
The program is paid, but has a 30-day trial version, a Russified user interface, as well as clear instructions for working with each mode of the program.
The installation of the program is unremarkable, so we will not dwell on it, but proceed directly to the calibration.
Important! To improve the quality of the calibration, before performing it, follow the recommendations described in the previous paragraph. When making adjustments, you need to fix your gaze and try not to change it until they are finished.
We start the program, go to the first tab "Black point" and perform the settings.
The essence of the setting is to change the parameters "Black" and "R" "G" "B" until the squares "2,2,2" and "3,3,3" are visible, and the background should remain as black as possible, and the square "1,1,1" should be on the verge of distinguishability.
When setting up, you should first use the ability to adjust the hardware brightness (in laptops, this is a combination of the Fn key and the function keys from F1 to F12) and only then, after the hardware capabilities are exhausted, you should configure the program.

Go to the "White Point" tab and adjust the contrast so that you see the squares "252,252,252" - "254, 254, 254".
When making the adjustment, you should get the most neutral white color, no shades.

We adjust the gamma in the appropriate tab. In this setting, we need to get the color of the vertical columns to differ as little as possible from the background.
Ideally, everything should be gray, although easily distinguishable colors are acceptable.
It is permissible to leave the top and bottom of the columns painted, but their middle must be completely gray.

If your monitor supports sharpening, you can adjust it in the Gamma and Sharpness menu.
The essence of the adjustment is to make the squares less visible, both among themselves and in the background.
The sharpness of the monitor is incorrectly adjusted if the stripes of the squares differ sharply in brightness.

In the next tab "Color balance" you can fine-tune the color temperature of the image.
To do this, you need to make the light, dark and mid gray tones as discolored as possible.
After that, you need to return to the previous settings, making a compromise on all parameters.

The "Adjustment points" tab allows you to adjust the brightness transmission curve from black to white (0 ... 255).
Moving the position of the curve from 0 to 255, you need to find the points at which a color tint appears in the center of the image and adjust them from color to gray.

We pass to the last tab - "All regulators". It is necessary to make sure that the luminance transmission curve is not kinked and does not cut off the edges of the range.

Monitor calibration from A to Z. Calibration quality criteria. Alexey Shadrin
Instructions: Calibrating the laptop screen - adjusting the color reproduction
Information visualization on a monitor is one of the main criteria for the convenience of working on a computer device. The options installed for monitors (screens) can affect the user's comfort both positively and negatively. In this regard, even despite the fact that the operating system initially offers its own parameters and options set by default in automatic mode, all the same, most users sooner or later have questions about how to customize the screen on Windows 10, and so, so that when working with a computer you do not have a feeling of discomfort, your eyes do not get tired, graphic shells are displayed correctly, no third-party interference appears, etc. Such problems may seem so mundane and trivial to many that users sometimes simply do not attach importance to them, but in fact In fact, setting the necessary parameters for the screens of stationary monitors and laptops is far from being as simple as it might seem at first glance.
How to customize the screen on Windows 10: basic settings
First, let's see what options are available for change to users on computers and laptops which have one of the latest modifications of the Windows 10 system installed. Immediately it is worth warning readers that we will only consider systems for which all outgoing update packages are installed in automatic mode. This is only due to the fact that some of the methods that were previously used to access certain parameters may not be available after installing updates, since they have been moved to other sections.
So, what should all users, without exception, need to pay attention to when setting up a screen? The main methods involve setting the following options:
- brightness;
- contrast;
- color scheme and color saturation;
- the size of the work area, fonts and panels;
- image scaling;
- update frequency;
- options for using additional monitors, etc.
As additional settings, we can single out some important actions in relation to graphics adapters, since they are directly involved in the process of displaying visual information on the screen of a monitor or laptop. We'll talk about some of the settings a little later, but for now let's dwell on some standard methods that allow you to configure the above options for optimal operation with your computer.
Screen settings directly on the monitor
First, let's see how to customize the screen on a Windows 10 computer, not yet resorting to system tools, but starting from those parameters that are available for adjustment directly on stationary monitors. Apparently, every user knows that any (even hopelessly outdated) monitor has a built-in menu with several important settings.
To open the menu, as a rule, use a special button on the front panel or on the side wall, and to navigate through the options and to configure each parameter, use the arrow buttons or plus and minus signs.
The good thing about standard menus is that they allow you not only to change the brightness, contrast or color saturation, but also arbitrarily resize the window or position the image. How to adjust the screen size of the monitor (Windows 10, for obvious reasons, is not yet taken into account)? To do this, you can use the appropriate item, but it is precisely the resizing that can be done in several ways. So, for example, you can increase or decrease the size proportionally, or you can stretch or shrink the window in the vertical or horizontal direction.
Brightness Adjustment: Standard Method
However, let's get back to how to customize the screen on Windows 10 using the tools of the operating system itself. Please note that earlier (even before the release of the Redstone upgrades) to change the main options, you could use the corresponding sections either in the options menu or in the "Control Panel". Now the screen setting item in the "Control Panel" has disappeared, and the necessary modes can be set exclusively through the parameters menu (and even when using the setting item in the RMB menu in the free space of the "Desktop").

A special slider is used to change the brightness. Along the way, you can use the setting of the night light options when the lighting of the room in which the monitor or laptop is located is reduced by setting the transition time to the appropriate mode.
Brightness options in power settings
Now let's see how to customize the laptop screen on Windows 10 using the options presented in the current power plan. This section can be called either from the "Control Panel", or through the RMB on the battery icon, and then go to the parameters of the currently used scheme.

There are two sliders here. One adjusts the brightness when working on AC power, the second is for setting options when using only the battery. If you go to the advanced settings, you can set your own values for the main screen parameters and for dimming or turning it off, for example, when the system is idle.
Quick brightness adjustment via the notifications section
Another simple technique for quickly changing the brightness settings is to use the menu called up by clicking on the notification icon in the form of a square located in the lower right corner of the system tray.

The first click on the corresponding tile decreases the brightness to the minimum value, and all subsequent ones increase it in steps of the same 25%.
How to adjust the screen resolution on Windows 10 using the system?
With brightness, everything seems to be clear. Now a few words about how to adjust the screen scale and resolution on Windows 10. Again, for this you need to use the above section of the settings, and then select the preferred scale to change all elements of the graphical interface. Unfortunately, you don't really have to choose here, since only 100 or 125% of the set values are available, however, speaking about how to adjust the screen size in Windows 10, it is worth noting that when you go to the additional options using the link below, you can set the scaling up to 500 %.

To set the permission, use the drop-down list located just below. By default, it will be set to the recommended value from among all those supported by the laptop or desktop monitor. Generally speaking, there is no need to change these options, however, sometimes such settings can be useful when setting a specific resolution for some computer games.
What parameters should be taken into account additionally?
Among the additional parameters, special attention should be paid to the screen refresh rate. What is it for? You have probably noticed more than once that when you move away from the screen for some distance, a blink appears on it in the form of rapidly changing horizontal stripes, although this is not noticeable from a close distance? The described parameter is responsible for their smoothing. It is believed that the higher its value, the more comfortable it is to work (the eyes do not get tired so much). The optimal range is 60-100 Hz. If your monitor supports higher values than those set by the system, it is best to change them. But you shouldn't get carried away either, because when you set the threshold options, the monitor can simply burn out.

You can change the resolution through the properties of the adapter, calling up a list of all supported modes.

You can change the refresh rate, if it is really necessary, on the monitor tab. In this case, only the standard supported schemes will be shown in the list itself.
Change orientation, font and other options
As for additional elements, the same orientation of the screen can also be changed in the described section of settings, and if necessary (if only your screen is touch-sensitive) you can also use some parameters of the tablet mode. To change the used fonts, the contrast of the sizes of controls, etc., the personalization section is used, which can be called through the usual RMB menu on the "Desktop". Everyone is free to experiment here. Here you can also apply some settings for the background or display panels necessary for operation, as well as customize the system and user icons that will be displayed in the tray.
Finally, let's take a look at how to adjust the screen in terms of color calibration on Windows 10. To do this, in the main section with available options through the properties of the graphics adapter, go to the color management tab. Also, the transition can be made directly from the "Control Panel".

After clicking the color adjustment button, you should use the tab with detailed characteristics, and then click the screen calibration button, after which a special "Wizard" will start, following the instructions of which you can set the optimal personalized parameters for yourself.
Options Configurable for Screen Projection and When Using Multiple Monitors
Now let's take a quick look at how to set up screen enlargement on Windows 10 to use multiple monitors or when using projection modes.

First, in the main section that was described above, you need to search for a connected device. After defining it and the list of modes, you need to select the one that will be used to display the contents of the main display (duplication, expanding the image on several screens, their position relative to each other, etc.). In general, when a device is detected, the system independently sets the necessary parameters for it, but sometimes, for example, when a laptop is connected to a TV panel, the same “Desktop” may look completely different from the original. How to set up a second screen in Windows 10? You can change the required options in the same way as for a regular screen or monitor, but please note that the appropriate drivers must be installed for the connected device, as well as for the main graphics adapter or PnP monitor.
But in the case of remote access to another computer device, if the main terminal or laptop from which the connection is made has a weaker configuration, it is sometimes advisable to change the default options for displaying content.

Additional tools and utilities
It is not always advisable to use the tools of Windows 10 itself, despite the abundance of the proposed settings. If we are talking about graphics adapters, the options of which directly affect the graphics displayed on a laptop or desktop monitor, it is better to turn to special utilities from manufacturers (for example, use Intel graphics control panels or programs like Catalyst for AMD video cards, etc.). ). In such control applications, there are much more options available for editing, which allows you to perform more fine-tuning for the personal needs of each user. In addition, the use of professional calibration utilities is not excluded, however, since we are talking exclusively about the means of the operating system, they were not considered. For an ordinary user, for the first time, what is there is enough.
During the development of Windows 10, Microsoft redesigned the experience of Display Settings. It has become simpler, allowing users to make various settings intuitively. The determination of the optimal screen parameters occurs already during the installation of the system in automatic mode. All that remains is to configure them for a specific user, if the need arises. The parameters set should correspond to the maximum capabilities of the display screen and video adapter. This achieves the clearest drawing of graphics and colors.
Adjusting the screen resolution
Customizing the screen on a Windows 10 personal computer, tablet or laptop is not a big deal for any user. Its interface is simple and intuitive, which allows you to modify the screen to your liking in a few mouse clicks. To configure:
- Click on the "Parameters" icon. From the Start menu, click on the Settings icon
- Click on the "System" icon in the "Options" window.
 In the "Options" window, click on the "System" icon
 - Open the "Display" tab.
 Review your screen options
 - Check your screen resolution. It must match the recommended resolution of the device.
- If the resolution is set correctly, then click on the "Graphics adapter properties" button.
 Click on the "Graphics adapter properties" button
 - Make sure that your adapter is selected in the "Adapter type" tab.
 Check if the video adapter is installed correctly
 - Close "Graphics adapter properties" by clicking on the "OK" button.
- Change your screen resolution if necessary.
- Close the system settings window.
- The screen setup is complete.
The rest of the screen parameters can be adjusted as needed.
When installing Windows 10, all screen settings are usually configured automatically. The exception is rare or outdated types of video adapters, drivers for which are not available in the database on Microsoft servers. In this case, the driver is downloaded from the manufacturer's website or installed from the optical disc supplied with the computer or laptop upon sale. It contains distributions of all drivers for installed devices.
Video: How to Change the Screen Resolution on a Windows 10 Computer, Monitor, or Tablet
Increase or decrease screen brightness and contrast
Brightness and contrast are some of the main screen settings. Each user adjusts them individually to suit their own requirements.
Contrast on laptops and tablets is automatically adjusted. On monitors and displays of personal computers there is a Menu button, with which you can adjust the contrast using the device menu.
There are several options for changing the screen brightness settings that you can apply.
Change screen brightness in system settings
There are two ways to call the screen parameters:

Video: How to Change Screen Brightness via Windows 10 Settings
Changing the screen brightness using the keyboard
Almost all modern types of keyboards have the ability to change the screen brightness without resorting to system settings. Previously, only laptops had this feature, but now this function is inherent in many types of personal computer keyboards. As a rule, you can change the brightness using two keys, which are marked with a sun icon and an arrow, indicating an increase or decrease in brightness. They are most often found in the upper or lower case of the keyboard.
 Adjust the brightness level of your screen with the keys
 In some cases, to change the screen brightness, you must press the Fn key with these keys.
If the keys do not respond to commands to change the brightness, download and install the keyboard driver from the manufacturer's website.
Change the screen brightness through the "Action Center"
In the "Notification Center" you can set the screen brightness level only in fixed positions. Follow the steps below to change the brightness level:

Changing the screen brightness using the battery indicator in the taskbar
Laptops and tablets have a battery indicator on the taskbar, which can also be used to change the brightness of the screen:
- Left-click on the battery charge indicator.
 Click on the battery indicator
 - Click on the tile for changing the screen brightness.
 Adjust the brightness level of the screen
 - You can change the brightness level at fixed values from 0 to 100% in 25% steps.
- Click on the Power & Sleep Settings tab.
 Click on the Power & Sleep Settings tab
 - Click on the line "Additional power settings" in the right side of the opened "Settings" window.
 Click on the "Advanced Power Options" tab
 - In the "Power supply" window, set the required brightness using the "Screen brightness" slider.
 Adjust the brightness level of the screen using the slider
 - Click on the Power Scheme Setup tab.
 Click on the "Power Scheme Setup" tab
 - In the opened panel "Changing the parameters of the scheme" using the slider "Adjust brightness" achieve its optimal level when powered from the mains and from the battery.
 Adjust brightness on AC and battery power
Changing the screen brightness from the start menu
You can also use the Start key to navigate to the panel for changing the screen brightness settings. To do this, you need to do the following:

What to do if the screen blinks
Frequent screen blinking in Windows 10 can be caused by two problems:
- using outdated video adapter drivers;
- incompatibility of the software application installed on the computer and system requirements.
The problem is not as common as it was during the period when Windows 10 was just beginning to spread.
This is due to the fact that the main companies that produce components for computers have brought their software applications to the required parameters. On those computers where video adapters made 6-7 years ago are installed, incompatibility is possible, since their drivers were developed without taking into account modern requirements.
To fix the error, you need to find out if the driver or software application is the source that creates the screen blinking. To solve the problem and restore normal operation of the display and video adapter, you must use the following method:
- Right-click on the "Taskbar".
- Click on the "Task Manager" line.
 In the menu, click on the line "Task Manager"
 - Check for blinking in the Task Manager pane. If the panel blinks along with the screen, then the reason is in the old video adapter driver. If this does not happen, then the reason is in one of the installed software applications.
 Check for blinking of the Task Manager panel
 - Double-click the Control Panel icon on the Desktop.
 On the Desktop, double-click the Control Panel icon
 - Click on the "Administration" icon in the "All Control Panel Items" window.
 Click on the "Administration" icon
 - Double click on "Computer Management" in the "Administrative Tools" window.
 Double click on "Computer Management"
 - Expand the Event Viewer tab in the Computer Management window.
 Expand the Event Viewer tab
 - Expand the Windows Logs tab.
 Expand the Windows Logs directory
 - Check the Application and System tabs for errors.
- If a software application compatibility error is found in the Application tab, uninstall it. Then download the latest version of the application from the developer's website and install it on your hard drive.
 Click on the Application tab and check for errors
 - If an error in the System tab indicates that an updated video adapter driver is required, perform the replacement operations in the same way as for the software application.
 Click on the "System" tab and check for errors
Video: How to update video drivers in Windows 10
What to do if apps or games don't open in full screen
All modern programs automatically adjust to the size of the screen. If you install an application or game that was developed many years ago for old Windows editions, then they can be deployed in a reduced size. In this case, it becomes necessary to expand them to full screen. There are several ways to solve this problem:
- Application of "hot" keys:
- press the Alt and Enter keys on the keyboard at the same time;
- the application will expand to full screen;
- pressing the keys again will return the application to its previous state.
- Changing launch parameters:
- right-click on the game or application icon on the "Desktop";
- select "Properties" in the drop-down menu;
 In the drop-down menu, select the line "Properties"
 - in the panel that opens, click on the "Compatibility" tab;
 Click on the Compatibility tab
 - click the Run Compatibility Troubleshooter button;
 Click on the Run Compatibility Troubleshooter button
 - if the application has not expanded to full screen, then put a check mark in the "Compatibility mode" box and select the required Windows edition from the drop-down list. Please note that Windows 10 edition is not listed. Last on the list will be Windows 8.
 Select the required Windows edition
 - click the "OK" button.
- Updating the video adapter drivers:
- determine the model of the video adapter in the "Device Manager";
- go to the website of the manufacturer;
- download and install the new driver.
- Changing the graphics settings of the game:
- start the game;
- go to settings;
- find the item to change the screen parameters;
- set full screen mode;
- restart your computer.
- Changing the screen resolution:

If a game or application requires a screen resolution of 640x480, then you can set it in the "Options" block on the "Compatibility" tab. But it must be a very old game or application that was created during the introduction of Windows into the software market.
Video: How to Run an Application in Compatibility Mode in Windows 10
Calibrating the touchscreen on Windows 10 tablets
You must calibrate the touchscreen for the tablet to respond appropriately to finger touches. If the device is not calibrated, then instead of the pressed letters, others will appear on the screen or the image will rotate one hundred and eighty degrees.
To calibrate the touchscreen, follow these steps:

Disable screen off or dimming
With prolonged inactivity, the display screen goes out after a certain period, and after a few minutes the computer goes into sleep mode, completely shutting down. In the system parameters, you can set the option when the transition to sleep mode and screen dimming will be turned off. To turn off the energy-saving mode, you need to carry out a number of operations:
- Click the left mouse button on the "Start" button.
- Open Options.
- Select the "System" section.
- Click on the Power & Sleep icon.
- Click the Advanced Power Options button.
- In the Power Options window, click on the Power Scheme Setup button.
 Select "Customize Power Scheme"
 - In the "Disable display" line, turn off screen dimming when operating on AC or battery power. To do this, select "Never" in the drop-down lists.
 Select "Never" in the drop-down list
 - Likewise, in the fields next to the "Put the computer to sleep" icon, disable the transfer of the computer to the off state.
 In the drop-down list, click on "Never"
 - Click "Save Changes".
Video: a non-standard way to turn off screen dimming
Brightness, contrast and color gamut are considered one of the main criteria of a graphical interface. The clearer the display of graphic objects looks, the more comfortable the work will be for the user. Therefore, you should not neglect the waste of a few minutes in order to achieve maximum effect when displaying graphics and text documents. It should be remembered that incorrect adjustment of the screen parameters also affects the user's visual apparatus and can lead to a gradual deterioration of vision. You can use the methods provided in this article to adjust the screen and fix minor image problems. If they also do not lead to the desired result, then it is worth contacting the specialists of the service center.


