Despite the development of the Internet, e-mail has not gone away since its inception and is still necessary. This material describes setting up Yandex mail on iPhone.
Communication via email is very successful and to this day cannot be replaced by any other method of interaction. Mail is used for work and to communicate with family. It has migrated even to the most modern and advanced devices.
Setting up Yandex mail on iPhone
Yandex is a fairly popular postal service in Russia - a kind of domestic Google. A large audience of users has been using its products, including mail, for a long period of time.
After purchasing a new device, such as an iPhone, there is a need to connect your already favorite mailbox in order to save all the necessary data and not lose many years of correspondence. It is also quite convenient to use email on a smartphone due to its constant availability, because such a gadget is always at hand, which means your mailbox is always with you.
There are several different ways to set up Yandex mail on iPhone. There are options for full-fledged work with outgoing and incoming mail, as well as for receiving email from a Yandex mailbox.
Setting up incoming mail using the forwarding method
The one on the iPhone 6, as well as on other models in the series, is identical. The first and easiest way to set it up is to forward it to another mailbox, for example iCloud, which is already connected to your smartphone. To do this, you need to visit the Yandex.Mail website, go to settings and find the “Create rules” item. There you can specify what kind of mail will be forwarded (for example, messages from a certain circle of people or with a certain topic). Next, select the “Forward to address” option and indicate the mailbox that is already connected to your phone.
Full connection to the Mail client on iOS
Setting up Yandex iPhone is somewhat more complicated. For full operation, you will need to connect the box directly to the iOS client.
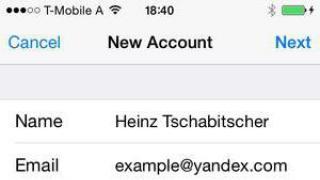
Setting up Yandex mail on the iPhone 5s, as on other modern models with iOS 9 installed, is done in the same way. To do this, go to the "Settings" of your device, go to the "Mail" item. At the top of the display there will be an option to “Add a new account.” From the entire list, select "Mail". The first problem you will encounter is the absence of “Yandex” among the options for selecting a mailbox, so go down, select “Other” and fill out the fields provided.

- Name - enter any name you like.
- Email address (e-mail) is your mailbox registered with Yandex.
- Password for your mailbox.
- Description - describe the box. For example, work, personal, and so on. Sometimes the domain name is indicated here, in our case it is Yandex.ru.
This should be enough for the box to work, but it may not, so you will need to fill in some of the data manually.
- The host name is imap.yandex.ru.
- Username is your Yandex email address.
- Password.
To configure POP, the same data is used, only POP is specified instead of IMAP.

Now, if necessary, you can configure ports for two servers. To do this, find an already connected mailbox in the settings, go to the SMTP settings, and then to the smtp.yandex.ru node. Here you need to perform two tasks: the first is to enable SSL, the second is to register port 465. Usually all this data is registered automatically, and manual configuration is not required, but if suddenly this does not happen, then now you are ready to independently specify the necessary data and get the mail to work.
Setting up Yandex mail on iPhone 6 using the official application
The last and easiest option for comfortable and full-fledged work with Yandex mail is to use an application developed by the company that created the mail service. In the AppStore you can find an email client that was developed with a special interface and convenient authorization (you just need to enter your login and password).

The application also has one big plus - support for push notifications, that is, messages from the server. As soon as a letter arrives in your inbox, you will immediately know about it. The standard one cannot do this and checks mail through sampling (checking occurs in a certain, specified period of time).
Instead of a conclusion (other possible options)
This material describes the main, optimal options for setting up Yandex mail on an iPhone. But there are also a lot of applications for this in the AppStore. In some, the installation process is the same as in the official application, and there should be no problems.
28.09.2018
To ensure secure transmission of your data, Yandex.Mail uses encryption of this data using the SSL and TLS protocols. If encryption of transmitted data is not activated in the settings of your email program, then you will not be able to receive or send letters using this program.
Instructions for activating encryption in different email programs:
When activating SSL encryption in your email program, you may receive errors about an incorrect certificate. The main causes of such errors and how to resolve them are listed in the article I receive errors about an incorrect certificate.
Microsoft Outlook
- Open menu File → Setting up accounts, select an account from the tab Email and click the Change button.
- Click the button Other settings.
- Go to the Advanced tab and specify the following parameters depending on the protocol you are using:
- IMAP server - 993;
- SMTP server - 465.
In this item, select SSL for the IMAP and SMTP server.
Click OK button.
- POP3 server - 995;
- SMTP server - 465.
Enable the option Encrypted connection required (SSL) and select in Use the following encrypted connection type SSL value.
Click OK button.
- To complete your account setup, click in the window Change account Next button - your account settings will be checked. If the test is successful, click Finish. If not, make sure all parameters are specified correctly.
Outlook Express
Mozilla Thunderbird
- Right-click the account name and select Settings.
- Go to section Server settings
- Connection security- SSL/TLS;
- Port - 993.
Click OK button.
- Connection security- SSL/TLS;
- Port - 995.
Click OK button.
- Go to section Outgoing mail server (SMTP), select the Yandex Mail line and click the Change button. In the SMTP server window, specify the following parameters:
- Port - 465;
- Connection security- SSL/TLS.
The Bat
- Open menu Box → Mailbox settings.
- Go to the Transport section and specify the following parameters depending on the protocol used:
Sending mail
- Port - 465;
- Connection - .
- Port - 993;
- Connection - .
Click OK button.
Sending mail
- Port - 465;
- Connection - Secure on a special port (TLS).
- Port - 995;
- Connection - Secure on a special port (TLS).
Click OK button.
Opera Mail
Apple Mail
- Open menu Mail → Settings → Accounts → Account Properties. Select in section Server outcome. mail (SMTP) paragraph Ed. list of SMTP servers.
- Enable the Use SSL option in the Use random port enter the value 465.
Click OK button.
- Go to the Add-ons tab and specify the following options depending on the protocol you are using:
- Port - 993;
- Port - 995;
- enable the Use SSL option.
iOS
- Open menu Settings → Mail, addresses, calendars.
- In the Accounts section, select your account.
- At the bottom of the page, click the More button.
- In chapter Inbox settings Specify the following parameters depending on the protocol used:
- Server port is 993.
- Server port is 995.
- Return to the Account menu. entry and in the section Outgoing mail server Click the SMTP button.
- In chapter Primary server click on the server line smtp.site.
- In chapter Outgoing mail server specify the following parameters:
- enable the Use SSL option;
- Server port - 465.
Click Finish.
- Return to the Account menu and click Done.
Android
Windows Phone
- Go to section Settings → mail+accounts.
- Select your account.
- At the bottom of the page, click and specify the following parameters depending on the protocol used:
- Incoming mail server - imap.yandex.ru:993
Check the boxes Incoming mail requires SSL And.
Save your changes.
- Incoming mail server - pop.yandex.ru:995
- Outgoing mail server - smtp.yandex.ru:465
Check the boxes Incoming mail requires SSL And Outgoing mail requires SSL.
Save your changes.
Other
If you have another email program, activate in its settings encryption of transmitted data using the SSL protocol (TLS) for receiving mail (IMAP or POP3) and for sending mail (SMTP). After this, change the port values for connecting to the servers to the following:
- IMAP - 993;
- POP3 - 995;
- SMTP - 465.
The importance of an established email message in the field of Internet communication cannot be disputed, so setting up Yandex mail on Android will be the topic of our conversation. You can follow one of the following paths:
- Achieve convenient handling and correction of writing using standard mobile device applications.
- Download and install a program that will help you manage piles of correspondence on your smartphone.
In order to choose the method that is most convenient for you, we will consider each of them in more detail.
How to set up Yandex mail on Android using built-in programs
Not all Android-based devices include native software for operations with mail servers. However, if you are the happy owner of such a phone with an application built into the standard shell, then you will not need any additional programs to set up Yandex mail on Android. First, choose which protocol is best for your needs:
- POP3. With it, a copy of the letter will be sent to your phone, and any editing of the correspondence will be reflected only in the phone, and not in the real mailbox.
- IMAP. Aerobatics for mail servers, not all of them work with this protocol, but serious Yandex supports it. IMAP allows you to edit your email directly from your phone.
If you chose POP3 to set up Yandex mail on Android, proceed as follows:
- Go to the Mail application, select the protocol (POP3).
- In the window that appears, enter your login and password, the POP3 server will display the line POP.YANDEX.RU, if not, enter manually, select port 110, security type - none, delete messages - never. Click “Next”.
- The mailbox will open, you can already use it.
If you chose IMAP:
- In the Mail application, select the IMAP protocol.
- In the window, fill in the fields: SMTP server – SMTP.YANDEX.RU, port – 587, require account login – check the box, enter your login and password, click “Next”.
- Now you can use your mail with editing capabilities.
Setting up Yandex mail on Android: Video
Setting up Yandex mail using additional programs
As soon as you figure out that the developers did not embed an email program into your mobile device in advance, you can start looking for one of the following useful software that will help you set up Yandex mail on Android.
- K-9 Mail.
You can download a program with carrier pigeon functions from the link, it is quite convenient, and also completely free. With providers who were tested for joint work, the application behaved friendly and did not enter into conflict. A simple design without bells and whistles, but it performs the basic functions of the mailer perfectly.
- Profi Mail.
You can download the application from the link. There are both paid and free trial versions. Initially, the program was written for Windows Mobile devices, and only then it was completed for Android, as a result - the interface of the old Windows. However, if this fact does not bother you, then you can install Profi Mail on Android, especially since this is the only version of email software that normally scales messages with hypertext markup.
- Mail. Droid.
How to set up Yandex mail on Android according to the latest fashion? You will find the program that matches this request at the link. Perhaps, of all those reviewed, it has the most stylish design; there are two theme options - dark and light; you can install a paid or free version to choose from.
This software has message filters and sorting of incoming correspondence, which will allow you to track important messages even with a large flow of information.
Installing and configuring QIP mail on Android: Video
Mail client for Android system: Video
Settings Yandex.Mail is not as simple as it might seem at first glance, there are nuances and subtleties that will be discussed in the article. Email setup will be carried out on mobile devices Android, iOS, Windows Phone.
Many users believe that Yandex mail is one of the best email services, it’s worth understanding what this is connected with. Yandex.Mail is a free email service created and launched on June 26, 2000 by Yandex. An important feature of this email is the “Self-Defense” function - automatic spam filtering. All emails from the Yandex service are scanned using anti-virus software Dr.Web.
Educational information from the site
How to set up Yandex mail on Android
In order to take full advantage of the electronic Yandex.Mail you need to install the application Mobile Yandex.Mail from Play Market. To work with the application, no knowledge of how the application works is required, the interface is designed and implemented completely to suit the user's needs, all useless interface elements have been removed. When opening the application, the user immediately gets to the “Inbox” section; if you swipe the screen to the right, a sidebar will appear, with which you can go to different sections and customize your email.
Pay special attention! If two-factor authentication is used, to authorize into the software "Mobile Yandex.Mail" the user will need a one-time password, which can be generated by the Yandex.Key application.
Important information from the site
Benefits of the application:
- Automatic checking of new emails;
- Receive notifications and alerts about new emails;
- Grouping emails by subject;
- Interaction with the Yandex. Disk application
If for some reason the user does not like the Yandex application, you can configure the standard software. Opening the menu Applications, you need to find the application " Email" (This wording is most often found) and launch it.
In the running application, open the settings and click " Add account", after which the application will provide a selection of email resources, in the list we find Yandex, if there is no such name, select the option " Other". The email account settings open:
- Email address - in this item you must enter your email address (you must always add @yandex.ru);
- Password - you must enter a valid password for your email;
- If the application version or mobile device model does not support automatic setup, click " Manual setting";
- Account type - you must select an option POP3;
- Setting up incoming messages - you must enter the username, password, in the POP3 server item pop3.yandex.ru, port - 110, security type - no;
- Setting up outgoing messages. SMTP server - smtp.yandex.ru, port - 25, security type - none, enter the username and password (passwords must match the entered data).
- Click accept settings, after which you can use mail on your mobile device.
How to set up Yandex mail on iPhone and iPad
Password: password for your Yandex mailbox.
After entering all the data, click on the “Continue” button.
5. In the window Outgoing mail server You must re-enter the account descriptions as for the incoming mail server. Then into the field Outgoing mail server Specify smtp.yandex.ru as the address and check the “Use only this server” checkbox.
After this, it is necessary to note that the server requires mandatory user identification, and specify a login and password, as in the case of an incoming mail server:
To continue the setup, click on the “Continue” button.
6. The next window lists all the details of the account to be created. They can be adjusted through the mail program settings:
Check the “Connect account” checkbox and click the “Create” button to complete the setup.
7. Now, for more correct operation of your account, you need to go back to its settings through the Mail menu, selecting “Settings...”:
8. In the window that opens, select the newly created account and on the “Account Properties” tab, click on the “Outgoing Mail Server” menu. Then select “Edit SMTP server list”:
9. Once in the SMTP servers control panel, select the account you just created from the list. Establish a connection to the server via SSL and specify that you need to connect via port 465. To do this, select “Use a custom port” and enter its number:
Apply the settings by clicking on the “OK” button.
In this section of the settings, indicate that this account should be taken into account when automatically checking new messages by checking the appropriate box, and also that you need to connect to the POP server via SSL on port 995. After this, be sure to uncheck the box “Delete” a copy from the server after receiving the message."
Now you can apply all the settings. The program is ready to work with Yandex.Mail.
Do you use the Yandex mail service and have purchased an Android smartphone? Then you will definitely enjoy having access to mail from your device. For this, various email programs are used, both original and third-party. Setting up Yandex mail on Android is simple and does not cause any difficulties for owners of smartphones and tablets. Let's see which programs you can use to access your mailbox.
Yandex Mail via browser
The easiest way to access your mail is to use a browser and open the Yandex mail interface. Next, enter the login and password for your mailbox, click on the login button and find yourself in a pleasant and convenient web interface. But on the screen of a mobile device it may not be so convenient.
Here are the disadvantages of this method of organizing access to mail:
Nevertheless, many users continue to use the web interface without knowing that other tools are available. Therefore, we decided to talk about them in our review.
Yandex.Mail application
Yandex provides its users not only with an email service, but also with convenient tools for working with mailboxes. Such a tool is the Yandex.Mail application, located in the Play Market. Setting up Yandex mail on Android comes down to installing this application and its initial configuration.
After installing and launching the application, fields for entering your login and password will appear on the screen. We enter the data, wait for the connection to the servers, click on the “Go to Mail” button and go to the main interface of the program. Here you can see outgoing and incoming letters, a folder with drafts, a folder with spam, and also a folder with deleted letters. Sorting elements are available - this is the display of important emails, unread emails and emails with attachments.
To protect letters from access by unauthorized people, PIN code protection is provided– it is configured in the application settings. Sound notifications can also be configured here (it is possible to set an alert schedule). There is another important item in the settings - adding another mailbox, which is very convenient.
The application works online, without downloading letters and their subsequent synchronization. Thanks to this, users can work with mail from several devices - for example, having started writing a letter on a computer, you can continue writing on a smartphone or tablet by going to the drafts folder. Notifications about new emails in the application are carried out in real time.
Third Party Applications
In order to set up Yandex mail on Android, you can use more universal solutions. Such a solution is the Mail.ru Mail application. It allows you to work with mailboxes from many other mail services. These included the Yandex mail service. Accounts are added both when you first start the application and in the future. There is no need to make any additional settings - just enter your login and password, and the program will do the rest itself.
A nice addition will be the presence of online checking of new letters, as is implemented in the “native” mail application from the Yandex company.
The Play Market store offers many other applications for working with Yandex mail. But in this case, you will have to enter manual settings into them - the addresses of POP3, SMTP and IMAP servers are indicated here, the necessary ports are set, logins and passwords are registered. For an untrained user, this may seem complicated, so we recommend that you use the applications described above - they have excellent functionality and user-friendly interfaces.
Every mail client has its own interface for configuration.
Some client programs require you to enter all settings manually, while others receive settings automatically from the provider database.
Let's look at the basic steps that are performed when setting up any email client. This information can be used to settings for most email programs.
To use mail services, you need to register a mailbox on the mail provider’s website, enter your username and password to access your mail, the password must be remembered or written down. Your email address will look like - your-login@site-provider.
In this article you will find information about settings for several popular email providers.
To receive or send mail, authorization is required; for this, you must indicate your login and password in the appropriate fields when setting up the client. You may have to do this when setting up an incoming mail server and a server for sending messages, but most email clients remember the data you enter and subsequently use it automatically.
- Let's define the terminology used in this article:
- SMTP - Simple Mail Transfer Protocol, literally - a simple mail transfer protocol. Allows you to transfer messages from the user’s computer to the server and further along the chain of servers.
- POP3 - Post Office Protocol 3, literally - post office protocol. Contains commands for connecting to the server and downloading messages to the client computer.
- IMAP - Internet Message Access Protocol, a protocol for accessing email. Provides the ability to access emails stored on the server without downloading the email contents and attachments to your local computer.
- Mail provider (ISP) is the email address of a site that provides a mail service, for example mail.ru. As a rule, incoming and outgoing mail servers are run on its subdomains.
- Incoming mail server - the email address of the server to which the mail client must connect to receive mail, for example pop.yandex.ru or imap.yandex.ru.
- Outgoing mail server - the email address of the server to which the mail client must connect to send mail, for example smtp.meta.ua.
Setting up incoming mail:
There are two protocols used to receive mail - POP3 and IMAP, select the protocol you need, preferably select IMAP if your mail provider supports it.
If the client program supports traffic encryption, install the SSL/TLS method for greater security.
Enter the incoming mail server address and port number; the necessary data for this can be found in the table below:
| Provider | POP3 Incoming Mail Server | POP3 Port No. | IMAP Incoming Mail Server | IMAP port no. | ||
|---|---|---|---|---|---|---|
| Normal | SSL | Normal | SSL | |||
| rambler.ru | mail.rambler.ru | 110 | 995 | mail.rambler.ru | 143 | 993 |
| yandex.ru | pop.yandex.ru | 110 | 995 | imap.yandex.ru | 143 | 993 |
| gmail.com | pop.googlemail.com | 110 | 995 | imap.googlemail.com | 143 | 993 |
| bigmir.net | pop.googlemail.com | 110 | 995 | imap.googlemail.com | 143 | 993 |
| meta.ua | pop3.meta.ua | 110 | 995 | --- | --- | --- |
| mail.ru | pop.mail.ru | 110 | 995 | imap.mail.ru | --- | 993 |
Setting up outgoing mail:
The SMTP protocol is used to send mail; you just have to choose whether to encrypt the traffic or not. It is preferable to use SSL/TLS if your email client supports encryption.
To fill in the fields corresponding to the outgoing mail server address and port number, use the information in the table below:
| Provider | Outgoing mail server SMTP | SMTP Port No. | |
|---|---|---|---|
| Normal | SSL | ||
| rambler.ru | mail.rambler.ru | 587 | 465 |
| yandex.ru | smtp.yandex.ru | 25, 587 | 465 |
| gmail.com | smtp.googlemail.com | 25, 587 | 465 |
| bigmir.net | smtp.googlemail.com | 25, 587 | 465 |
| meta.ua | smtp.meta.ua | 25, 587 | 465 |
| mail.ru | smtp.mail.ru | 25, 587, 2525 | 465 |
Save your settings and test your email client.
is a free service from Yandex, with which you can create an email based on your domain. At the same time, you will have access to all the features of regular Yandex.Mail (type [email protected]). If you have a domain name “mydomain.ru”, you can connect it to Yandex.Mail and create the required number of mailboxes based on this domain like [email protected].
Share your opinion
Hello! We are the help team and want to make articles better!
If the article helped, click Yes.. If it doesn’t help, click No and tell us how we can improve the article.
Thank you! Enjoy reading.
How to connect Yandex.Mail?
note
For Cyrillic domains, you cannot activate the Yandex.Mail service.

Ready! To further configure and work with the service, you will need an account in Yandex.
- If you do not have an account in the Yandex system, create one on the registration page.
- If you have forgotten your login, contact Yandex technical support.
How to confirm domain ownership and set up Yandex.Mail

If the domain has ns1.site And ns2.site, copy the TXT record value and paste it into the domain zone according to the instructions: . Then return to the Yandex admin panel and click Run scan. After this, the setup will complete automatically within 15-20 minutes.
If you see a message that says you need to add MX records, check to see if the domain resource records have an entry mx.yandex.net. with priority 10.
If the entry is missing, add it according to the instructions: . Then wait 15-20 minutes. If Yandex.Connect still displays an error, contact Yandex technical support.
If the domain has ns1.hosting.site And ns2.hosting.site, further configuration takes place in the hosting control panel.
Delete the specified MX, TXT and CNAME records according to the instructions: .

Then add the following resource records:
| Entry name | Record type | Record value | A priority |
|---|---|---|---|
| mysite.ru. | MX | mx.yandex.net. | 10 |
| mysite.ru. | TXT | v=spf1 a mx include:_spf.hosting..yandex.net ~all | |
| mail.mysite.ru. | CNAME | domain.mail.yandex.net. |
Save the changes and wait 15-20 minutes for the resource records to update.
If DNS servers are registered for your domain ns5.hosting.site And ns6.hosting.site, to configure Yandex.Mail, delete and add the above resource records according to the instructions:
Wait 15-20 minutes for resource records to update.
If DNS servers other than those listed above are registered for your domain, go to the domain zone editor (the site where your domain is served) and add resource records for Yandex.Mail to work.
To find out which records need to be added, go to the list of services, click on the name of the service “Yandex.Mail for a domain” and select “Information about manually setting up the service”.
Important: If you recently changed the DNS servers and then registered resource records, Yandex will not be able to see them immediately, but when the DNS servers are updated.
If you have any additional questions about setting up Yandex.Mail, please contact.
Ready! After the resource records are updated, Yandex.Mail will be ready for use. Further settings are described in the article.
The mail works, use the information below: .
Removing email domains
Skip this step if before Yandex. If you used, delete the local mail domain to avoid a conflict between Yandex.Mail and hosting mail.
How to check if Yandex.Mail is configured correctly?
Write down the required resource records. They can be found at the link “Information about manual server configuration”. Instructions for adding are given above. Information about entries will be updated within 15-20 minutes.
Yandex.Mail service is inactive
Please note that the service status does not affect the operation of the Yandex.Mail service. If in the list of services your service is displayed as inactive for a long time, and the Yandex page indicates that the domain is connected, write, our specialists will establish the correct status.
What to do when an error occurs: there are no MX records for this domain?
This error means that MX records for the domain are not registered. In order for your mail to be processed by the Yandex server, you need to add an MX record pointing to it:
| Entry name | Record type | Record value | A priority |
| mysite.ru. | MX | mx.yandex.net. | 10 |
How to set up DKIM for Yandex.Mail?
Using the specified method, all letters sent from mailboxes will be signed using DKIM. Messages sent using php mail from the site will not be signed with DKIM. If you want emails from the site to also be signed with DKIM, configure mail sending via SMTP in the site settings.

How to disable Yandex.Mail in your Personal Account?
Before disabling Yandex.Mail in your Personal Account, delete mailboxes created for the domain to which the service was connected. Removal is carried out on the Yandex website.
To disable Yandex.Mail in your Personal Account, in the section. go to the Yandex.Mail service management page and click Delete service. Confirm disabling Yandex.Mail. After this, the service in your Personal Account will be disabled.