First, we need to make sure everything is ready for recording. So, we need: a DVD burner with the ability to set the booktype mode for discs DVD+R DL in DVD-ROM. The second thing and it is the most necessary - double layer DVD+R DL, preferably from Verbatim or Philips. The actual disc image with the game on your computer. The image consists of two parts - game name.iso And game name.dvd.
Attention! If the image being written has the extension game name.nrg, then such an image it is forbidden write through the program CloneCD. To record the image of the game game name.nrg the option using the program looks preferable ImgBurn. All settings for this program should be set exactly as shown in the figure below.
Recording with CloneCD
Now we will describe the basic techniques for burning a disc image with the game point by point.
Point 1. First, we need a program with which we will burn the image to a disc - CloneCD. We download it from developer site .
Point 2. Install the program CloneCD on the computer and run. Choose from four options - Write from ImageFile. We will burn a CD-DVD from an existing image file.

Point 3. Now click the button Browse(Overview).

Point 4. The next step for us is to find a folder with the right image. Find and select a file with the extension filename.DVD. For example, we took the name - IMAGE.DVD, but the file that we will write does not have to be called that. Instead of a name, there may be completely different inscriptions. Next click open(Open).

Point 5. We have selected the image to be recorded, now you can press Next(Further).

Point 6. So, we have come to the choice of a DVD drive for recording. There may be several if they are installed on your computer. Choose the one you want and click Next(Further).

Point 7. Image writing speed is very important, so read on carefully.
Attention! For excellent recording without errors, you need to set the recording speed - 2.4x. Remember, the lower the speed, the fewer errors will occur after recording, and this results in a slightly better readability of discs by the console. XBOX 360.
Until recently, to burn discs for LT3.0 firmware, specially flashed drives were required, but now using the BurnerMax Payload Tool program, you can use a regular drive to burn an XGD3 image.
So what do we need:
- Recording Drive (Models compatible with the program are listed below)
- BurnerMax Payload Tool (download link)
- ImgBurn program (link to download site)
- 8Gb blanks (here are models that fit)
Verbatim MKM001 (excellent)
Verbatim MKM003 (good)
Ritek (satisfactory)
SmartTrack (satisfactory)
If all of the above is available, then proceed to the recording.
If you want to purchase a drive for burning games under LT3.0, then you should choose a model that is supported by the BurnerMax Payload Tool:
Here is a list of drives that work with the program:
ASUS DRW-24B1 ST/LT
ASUS DRW-24B3 ST/LT
ASUS DRW-24B5 ST/LT
ASUS DRW-20B1LT
DELL DH-16ABS
LITE-ON iHAS/iHAP 122-04C
LITE-ON iHAP 122-04W
LITE-ON iHAS 122 B/C
LITE-ON 122-04D
LITE-ON iHAS 322
LITE-ON iHAS x24 (A)/B/C/DU/D
LITE-ON DH-16ABSH11B
LITE-ON eTAU108
Optiarc AD-7580S
Optiarc AD-7640A
Optiarc AD-7740H
Optiarc BC-5500S
PIONEER DVR-110D
PIONEER DVR-111D
PIONEER DVR-118L
PIONEER DVR-219L
PIONEER DVR-TD10RS
Plextor PX-880SA
Plextor PX-L890SA
Slimtype DS8A5SH
Slimtype DS8A8SH
TEAC DV-W524GSB
TSSTcorp SH-S202
TSSTcorp SH-S203D
TSSTcorp SH-224BB
TSSTcorp SN-208AB
TSSTcorp SN-208BB
TSSTcorp SE-084CTS1
TSSTcorp SH-243N
TSSTcorp TS-L633B
TSSTcorp TS-T633C
TSSTcorp TS-L633J
TSSTcorp TS-H653G
List of drives that the program does not support:
HL-DT-ST GA32N
HL-DT-ST GH15F
HL-DT-ST GH20NS10
HL-DT-ST GH22NS50
HL-DT-ST GMA-4082N
HL-DT-ST GSA-E10N
HL-DT-ST GSA-H31L
HL-DT-ST GSA-H42N
HL-DT-ST GT30N
HL-DT-ST GA32N
HL-DT-ST GT51N
LITE-ON iHAS x24 (A)/Y
LITE-ON SHW-160P6S
MATSHITA UJ160
MATSHITA UJ860H
MATSHITA UJ880AS
MATSHITA UJ8A0AS
MATSHITA UJ8A2AS
MATSHITA UJ8A7
MATSHITA UJ8B0AS
Optiarc AD-5200S
Optiarc AD-5260S
Optiarc AD-5280S
Optiarc AD-7200A
Optiarc AD-7561S/7561A (physical limitations)
Optiarc AD-7711H
PIONEER DVR-115D
PIONEER DVR-212
PIONEER DVR-218L
PIONEER DVR-KD08L
PIONEER DVR-S19LBK
PIONEER DVR-TD08
Slimtype DS8A1H
TSSTcorp SH-S182D
TSSTcorp SH-S222A
TSSTcorp SH-S223C
TSSTcorp TS-H652D
So the drive is purchased, the program is installed, we start recording.
First of all, you need to configure the ImgBurn program, do the following:
1. Run the IMGBurn program and select Write Image file to disk
2. Select your drive and click the Change Advanced Settings button.

4. Here you need to set the options for recording. Using the Change For… menu, select options (for example, Force HyperTuning). And below in the New Setting line, change the value to Enabled and click change! And we are waiting for a message about the application. After that, we also go through the following parameters:
Online Hypertung - set Disabled. Just like in the previous step, do not forget to click change!
Smartburn - set Enabled, click change!
Overspeed - set Disabled, click change!

The order of installation does not matter. Finally, you should have the following values set:
Force Hypertuning: Enabled
Online HyperTuning: Disabled
OverSpeed: Disabled
SmartBurn: Enabled
5. Click OK and restart the ImgBurn program.
6. We enter the disc recording mode again and insert the disc. On the right in the window we can see the characteristics of the blank. We are primarily interested in the size and model.
the size as we can see is 8 547 991 552 bytes and the type can be seen below. In this case it is MKM-003-00.

7. But the fact is that disk images for LT3.0 have a larger capacity, this is protection from Microsoft to avoid copying licensed disks. And to solve this problem, there is a program BurnerMax Payload Tool, run it!
8. Select our drive from the list and press the BurnerMax button

9. The program patches the profile of the disk inserted into the drive and changes its size to 8,738,897,920 bytes. Please note that the program squeezes out the record BurnerMAX IS enabled!- this is a message about a successful patch, if this message is not issued or the program reports that the drive is not supported, then you can not write!

10. We return to the ImgBurn program and press the F5 key on the keyboard, forcing the program to update the information. We see that the size of the blank has changed.

If the size has not changed, try clicking the mouse in the box where the size and other disk data are displayed and press the F5 button again.
11. Select the image you want to burn and be sure to uncheck the disk check (Verify).

12. It is better to leave the speed at 2.4x, but you can also try 4x. It all depends on the quality of your discs and drive. It is better to disable anti-virus while recording.
13. Click on the record and wait until the image is written.
14. If the image was recorded without reporting an error, then you did everything right and the quality of the discs is good. But we need to check the burned disc - we press the button so that the tray with the disc leaves, close the ImgBurn and BurnerMax programs.
15. Insert the disc back into the drive, run Img Burn and select Check Disk (Verify Disk)
16. Select your drive and disk image and click on check. If the check was successful, the disc can be inserted into the console!

It is quite difficult to make a decision about buying a particular computer game for your console if you have not tried this game in action before. And for those who don't want to buy a licensed copy at random, we offer detailed instructions on how to burn an Xbox 360 disc. This guide will help you create game discs that your console can read.
How to burn a disc on Xbox 360 - the basics
In order for us to get a fully functional disk, several conditions must be met. First, you need to find and download a game package on the Internet (archive or image with a particular game). Finding such files with games is not difficult. Use, for example, this link. Secondly, you will need the actual disk and a special program with which you can burn the downloaded image to disk and make it so that the set-top box can read it.
As for the discs, I would like to draw your attention to the fact that for the Xbox 360 you only need to buy DVD+R Dual Layer discs. Practice shows that other types of discs are almost never read by the prefix. Here someone may object: what about DVD-RW? Their Xbox 360 also reads. That's right - it reads, but with each such disc read, the life of your set-top box will inexorably decrease due to damage to the drive (the reason is the different structure of the discs). Also, I do not advise you to save on the quality of the disk - it is better to buy a few pieces from a well-known manufacturer than several dozen disks of incomprehensible quality.
Next, a few words about the principle of recording. He is like this: one game - one disc, and nothing else. No matter how hard you try, you will not be able to burn several small games on one disc. More precisely it will turn out, but the prefix will not read such discs. Choose disk images with *iso/*dvd or *nrg extensions.
How to burn a disc: necessary programs
For the record, I recommend that you download the Astroburn program (in the free Lite or Pro version). Astroburn Lite can be downloaded directly from the manufacturer's website. Well, a copy of Astroburn Pro “cured of greed” can be found. When installing, do not forget to uncheck the Yandex browser installation box (where they just don’t shove it now!), And install the demo version first, and then activate the program - no one will ask you for the key. Our instructions will be for the light version of the program, although there are no special differences in the process of burning an image to disk between Lite and Pro.
So, after installing Astroburn, launch the program and select the "Image" tab. Next, select the path to our image (the icon to the right of the path line) and click "Open". Our further actions will depend on the extension that the image file of the game being recorded has. If the *nrg extension is indicated there, then you need to select it, and for *iso / *dvd, select the second option - with the *dvd extension. Next, insert a brand new DVD-R and mark in the program the drive into which the disc is inserted. Let me remind you that you can not use rewritable discs for the Xbox 360 if you want the console to serve you for a long time. After the disk is loaded, information about it will appear in the program window on the left side - free space and the size of the recorded image.
I note that almost any modern game will fit on an empty DVD+R Dual Layer disc. If, for some reason, the size of the image turns out to be larger than the size of the disk, you will see the corresponding information in the same window - although such information will most likely appear only if you inserted not a blank disk, but with already recorded information. In this case, change the disk to a blank one.
Now we choose a suitable write speed, and here I advise you to choose the minimum speed. The fact is that when recording at high speeds, it is possible to create low-quality discs that either will not load or will create problems already during the game (freezes, etc.). Therefore, it is better to wait a few extra minutes than to perform this procedure again, acquiring a new disk.
After setting the speed settings, check the box next to "Check" and click "Start Recording". As a matter of fact, this article could have ended, but sometimes the Xbox may not see the recorded discs. What to do in this case? The answer is obvious - try other programs.
Other Xbox 360 disc burning software
I will note right away that there is no ideal program for burning discs in general and on the Xbox in particular, since too many factors can affect the operation of such programs. These are the characteristics of the operating system, and various configurations of computer hardware. That is why I want to offer you a couple more good programs, from which it remains to choose the most suitable one. Well, it’s quite possible to practice for compatibility on not too expensive discs (only the type you need is DVD-R): if a set-top box or other device sees discs recorded using any of the described programs, then it will read the rest flawlessly .
CloneCD
The current version of the program is available at this link (download will start automatically from the manufacturer's website): Install the program and click "Write from ImageFile", then click "Browse" and specify the path to our image. There you will also see the item "Delete after a successful write" - if you want to delete the image after writing, check the box. After selecting the image, click on the bottom right “Next” (“Next”), after which we select the drive and also click “Next”. Now select the speed, press OK and wait for the end of the recording. At the end, the program will give us the inscription “Writing finished” (“Recording is over”) - all that remains is to confirm, and the disk is ready! As you can see, burning discs in this program is as easy as shelling pears.
ImgBurn
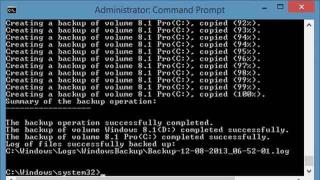
The working version of this program can be found on all familiar rutrackers. It also contains a guide to burning discs. Let's note some points. After installing and running the program, check the settings and compare them with those indicated in the pictures at the link (look under the plus sign with the name "Fak according to imgburn 2.5.6.0 version"). After that, click on "Write image file to disc" and select the image file in the upper left menu "Source" ("Source"). Then you need to select the required speed (on the bottom right "Write speed") and click on the icon with the image of disks on the bottom left. In the next menu, check that the checkmark is on the bottom item “Write until end of disc”, and click OK. Next, in the small menu (if it appears), select the right window “Continue” and wait for the end of the recording, which will be reported to us by the inscription “Operation Successfully Completed” in the window that appears.
Often, console owners are in no hurry to give n-th amount of money for a licensed game, especially if they are not 100% sure that they will like it. Can record free download game from the Internet or make a copy of a licensed game that a friend has.
Preparation for recording
Burning an Xbox 360 game to disc isn't hard at all, but you need to be smart about it very responsible so as not to spoil it.
Produced in our workshops xbox 360 firmware. You can safely trust the many years of experience of our specialists. Call and sign up!
First you need to download the game from any free source. It can be GOD content or an image in .iso, .nrg format. Next you need buy a suitable disk and download the necessary software.
Xbox 360 Game Burn Disc
Games need to be recorded only on two-layer DVD-R Dual Layer (DL). When writing, they do not need to be turned over to the other side to add some information to them.
You should pay attention to the quality of the discs. As they say, "the miser pays twice", which is very suitable for our case. Better buy some good quality discs than to buy a few dozen of those that are unlikely to survive more than one launch.
It is believed that Verbatim and TDK discs are the highest quality so it's best to buy them.

Games burned to disc using a computer
It is possible to burn two or three games on one disc, but, unfortunately, their prefix will not launch. Box-hint One disc - one game!
Through what to record games on the Xbox 360
There are a lot of recording programs, and they may differ in some functions, but they all have the same goal - write data from computer to disk which they are successfully doing.
Here are some names of programs that will help burn the game to disk:
- CloneCD;
- ImgBurn;
- Astroburn Pro or Lite
- Nero and others.
How to use this or that program, you can watch on YouTube or read the manual / user manual on the official website of the developer. The only thing I want to focus on is that it is best to record a disc at slow speed. The recording process will take longer, however, in the long run, the chance of unexpected errors will be much less.
XGD3
Some readers may not know, but to record XGD3 games, you will need special drive.
XGD3 (Xbox Game Disc 3) is a new disc format that was created during the developers' fierce fight against piracy. In simple terms, blank XGD3 discs cannot be bought at the nearest store, which means that it will be even more difficult for pirates to record them at home. To date, a method for copying such discs has nevertheless been invented, but this requires drive for computer on which is installed special firmware.
To run a copy of the XGD3 game, the console must have drive firmware version LT+ 2.0 or 3.0. Older firmware versions are not suitable.