Sometimes it becomes necessary to deny access to certain sites, it does not matter whether you decide to protect your child from unnecessary information, restrict work colleagues, or just make fun of a friend. There are a lot of ways, let's consider three main ones:
- Modifying the "Hosts" file.
- Configuring Windows Firewall.
- Configuring antivirus.
The method is a standard feature of the operating system. Does not require installation of third-party software packages. The hosts file is a special section of system caching. It is designed to speed up access to sites bypassing domain name servers.
Step 1. Enter the directory where the required file is stored.

Step 2. Enter the properties and uncheck the "Read-only" attribute, then click "OK".

Uncheck the "Read-only" attribute and click "OK"
Step 3. Open hosts. In the drop-down window for selecting a program, use "Notepad".

Choosing the "Notepad" program
Step 4. Add the lines you want to the file. The syntax is described in the commented lines of the file, but we will give its description in the article: in a new line, specify the IP address of the desired host (for the local computer, specify the address 127.0.0.1), write the site address separated by a space (either in the form of IP or in verbal form).

Important! Please note that the # sign at the beginning of a line indicates that the line is a comment, that is, when the program is executed, it does not affect the latter in any way.
Step 5. Save your changes and close the file.
On a note! If you have to do this procedure several times, it is more expedient to create a special file with the extension.bat. In it, you should specify a list of sites to be blocked and run it as an administrator on each computer. Thus, you can avoid mistakes when writing sites and speed up the process of changing the filehosts. When using two body shirts, you can turn on and off blocking of sites by time. For example, you can create a task through the scheduler to execute a batch file to add tohosts records at 12.00. Schedule the second task at 15.00, specifying the batch file with the deletion of the previously entered lines. Thus, from noon to three o'clock, access to the necessary web pages will be blocked, and from 15.00 to noon - open.

Configuring the firewallWindows
Does not require installation of third-party software packages. Helps to understand fine-tuning for all network profiles. The work with specific ports and protocols should be noted separately.
Step 1. To configure the firewall, you need to open it through the "Control Panel". Go into it, change the view mode to "Large icons", and open the link "Windows Firewall".

Open "Windows Firewall"
Step 2. In the window that opens, use the "Advanced options" option.

We use the option "Additional parameters"
Step 3. In the left frame, click to mark "Outbound Rules".

We mark with a mouse click "Rules for outgoing connection"
Step 4. In the right frame, start the procedure for creating a new rule.

Step 5. Select the "Custom" option and go to the next page.

We select the option "Custom and go to the next page"
Step 6. The rule must be applied to all programs.

On a note! If you want to restrict access to the site through a specific browser, then use the "Program path" option and specify its launch file.
Step 7. It is better not to change any settings in the "Protocol and Ports" window.

On a note! Generally browsers use two protocols -http andhttps, numbered 80 and 8080, respectively. But if you want to block, for example, Skype or torrent, then exclude all possible ones.
Step 8. To block specific sites, select the "Specified IP Addresses" option at the bottom of the window. If you need to block access to the Internet completely - specify "Any IP-address". The upper part of the window is necessary for those who have several network cards on their computer, here you need to specify those from which you want to block the output.

We select the option "Specified IP-addresses" to block specific sites
Step 9. Specify "Block connection" as the action.

We indicate "Block connection"
Step 10. By default, the rule applies to all connection profiles.

Step 11. Give the rule a name and complete blocking.

Configuring antivirus
Some antivirus programs allow you to restrict access to websites. Let's take a look at Kaspersky Internet Security as an example.
Step 1. Launch the program and on the main interface window enter the "Parental Control" menu.

Launch the program and enter the "Parental Control" menu
Step 2. Set a password. This function is used to avoid unblocking sites.

Step 3. Select the account on your computer for which you want to configure restrictions.

Step 4. Go to the "Internet" tab.

Go to the "Internet" tab
Step 5. Set the necessary settings for access time, file uploads and go to the "Select site categories" item.

Go to the item "Select site categories"
Step 6. Check the boxes for blocking.
On a note! Opposite each item are links to web pages that describe the option.

Step 7. To block access to the Internet, fully mark the corresponding menu item.

Step 8. Define exceptions to the blocking rule. To specify the site, use the "Add" button.

Step 9. Specify the path to the exclusion site, select the rule mode.

Step 10. Close the window after forming the list.

Step 11. Move the "Control enabled" slider to start blocking.

Turn on "Control is on"
Important! Note that the antivirus allows you to create both black (blocking individual sites and their categories) and white (blocking Internet access completely, except for the specified sites) lists. This greatly simplifies the work of creating stop sites.
Video - How to block any website without unnecessary programs
Conclusion
We have covered different methods of blocking sites in the Windows operating system. Two of the methods described are standard Windows tools, one requires additional software to be installed. The evaluation of each of the methods is shown in the summary table.
| Information / Name | Hosts file | Firewall | Antivirus |
|---|---|---|---|
| License | Delivery with Windows | Delivery with Windows | Paid, has a trial period |
| Russian language | Depending on the version of Windows | Yes |
|
| Browser blocking | Yes | Yes | Yes |
| Blocking other network programs | Yes | Yes | Yes |
| Distribution by users | Not | Not | Yes |
| Distribution by network profiles | Not | Yes | Yes |
| Blocking according to the schedule | Yes | Not | Not |
| Password protection | Yes | Yes | Yes |
| Convenience of the interface (from 1 to 5) | 3 | 5 | 5 |
Users, thinking about how to remove remote access to a computer in order to protect themselves from outside attacks, install third-party programs, not even suspecting that the bulk of all hacking occurs due to the standard windows settings. The operating system allows remote connections to the computer by default. In an effort to make things easier for users, the windows developers have included the ability to remotely configure and provide assistance in the system. Such help is suitable only for large corporations that have a system administrator who can fix computer problems in seconds while in another location. For home users, remote access can only make it easier for attackers to hack into someone else's system.
How to get to the remote access setup menu?
In just a few minutes, any user can independently remove remote access to a computer.
- For users working under an administrator account, follow these steps in sequence - "Start", select "Control Panel". In the window that appears, select "System".
- For users who work under a different account or do not have account information, you need to open the "System" window with administrator rights. Press the button "Start", "All Programs", "Standard". After finding "Explorer" in the list, run "with administrator rights". To do this, while holding down the Shift key on the keyboard with one finger, right-click on the File Explorer icon. If the user works with the mouse with his left hand, it means that you need to press the left mouse button. In the list that appears, select the "Run as administrator" field. In the window that opens, on the left panel, find and click on "+" to open "Control Panel", then "All Controls" and select "System".
Disable remote access in the system menu
Once in system management, before removing remote access to a computer, you need to find the appropriate section. On the left side of the panel, click "System Protection". On the bookmark bar, at the top, select "Remote Access". In the "Remote Assistance" section, uncheck the box next to "Allow the connection". In the "Remote Desktop" menu, check the box next to "Do not allow connections." Click "OK" and close all system windows. Restart your computer via the Start menu. After rebooting, you need to check if the changes are saved in the system. To do this, you need to re-enter the system properties and make sure that remote connections are not active. If nothing has changed, you need to carefully study the instructions on how to disable remote access, paying attention to obtaining system administrator rights.

The pitfalls of virtual private networks
All windows users should make sure that the computer is not included in virtual private networks, except for situations when the provider provides Internet services only through the virtual network, which is reported upon connection. You must open the "Control Panel" with administrator rights and select "Network Control Center". Select "Change adapter settings". Before removing remote access and windows 7 virtual private networks, you need to find out which connection is used to operate the Internet, otherwise you can cut off your access. If there is more than one connection in the list, it is better to disconnect first, select the Disconnect menu before deleting. If the disconnection did not affect the work of the Internet, you can delete the icon.

Another loophole - remote windows registry
Questions related to how to remove remote access to a computer are closed by the banal disabling of remote assistance, but few people remember about the remote registry. But if you think about it, having connected remotely to the registry, you can write in it any commands that, when the system is restarted, will not only re-enable the assistant, but also cause additional damage to the computer. With administrator rights in the control panel, select the "Administrative Tools" - "Computer Management" menu. In the left pane of the snap-in that opens, select "Services and Applications" and start "Services". Find "Remote Registry" in the list of services and right-click on the labels. Select properties. In the "Startup type" field, select "Disabled". Save and restart the computer through the "Start" button.

Disable remote access using the command line
Users familiar with the powerful tool "Windows Command Prompt" will definitely be interested in how to remove remote access to a computer without unnecessary transitions between windows of the operating system. There are two ways: you can enter commands yourself or using an executable file with the .bat extension.
It is recommended to write pause in the executable file after each command, since without terminating the work with one service, the command is passed to another service, which can cause an error in the system with a denial of execution. If, after disabling the necessary services, you do not want to restart the computer, you can immediately stop the services from the command line.
fb.ru
Windows 7 remote desktop
Remote desktop in windows 7, as its name implies, is a service that allows you to connect to your computer's desktop remotely over a network. If you think that this function is needed only by administrators, then you are wrong. For ordinary users, a remote desktop can also be useful:
- If you need to use a program that cannot be installed at work. You can connect to a home computer on which programs are installed
- You forgot a document at home that you want to find on your computer. Of course, you can search for a document directly on a shared folder on your home computer, but there is one difficulty here - searching on a remote folder, with a slow connection, is very ineffective.
- If you have your own servers, you can configure them from anywhere on the planet where there is Internet access.
In order to enable remote desktop in windows 7, you need to do the following:
Go to the Start menu - Right-click My Computer - select Properties from the context menu.
In the window that opens with system information, on the right side, click Configure remote access.
You have opened the System Properties dialog box, the Remote Access tab. Here, in the Remote Desktop section, you need to set the radio switch to Allow connections to your computer. There are two options for enabling Remote Desktop:
- Allow remote connection to your computer from any computer on which the Remote Desktop client is installed. This option is less secure, but you can connect from computers that do not have windows installed, such as Linux or iOS.
- Another option for enabling Remote Desktop is to only allow connections from computers that use RDP with Network Level Authentication support, that is, windows 7 and newer.
I will include a less secure method, since I use Ubuntu Linux on my laptop, and if you plan to use only windows 7 and newer, use the second option.
If it is not possible to be physically near the computer, remote desktop connection can be enabled remotely, namely, by connecting with the registry editor to the remote machine and changing the appropriate settings. This procedure is relevant for computers that are members of the domain.
Once you've enabled Remote Desktop, it's very easy to connect to it. Windows Remote Desktop makes it possible to connect not only to windows users, but also to other operating systems:
- windows comes with Remote Desktop Connection (mstsc.exe)
- On Linux, the RDP client needs to be installed, for example Remmina, RDesktop and many others.
To connect to a remote desktop from under windows 7, you need to open the Start menu - All Programs - Accessories - Remote Desktop Connection, or type mstsc.exe in the search bar.
In the Remote Desktop Connection dialog box, in the Computer field, enter the Name or IP address of the computer on which you enabled remote desktop. Click the Connect button.
In the dialog box that appears, enter your username and password.
Please note: You need to enter the username and password of the user of the remote machine, not the one from which you are connecting.
That's all. You see the remote desktop and you can work at the remote computer as if you were sitting at it.
One more small note - you may notice that Remote Desktop does not display all the visual effects of the desktop. This is due to the default settings for the Remote Desktop client. If you work in the same local network, and the connection speed is 100 megabits or more, you can change the settings. To do this, before connecting to a remote desktop, click the Show options button.
Then go to the Communication tab and specify the speed of your network connection, according to which the optimal parameters will be determined.
profhelp.com.ua
How to allow remote connection to a computer in windows 7 / 8.1 / 10
Enabling a remote connection to a computer is very simple. Start-Right click on the icon my computer in windows 7 or This computer in 8.1, properties. Setting up remote access.

How in windows 7-8.1-10 to allow remote connection to computer-01
We put the switch Allow remote connection.

How in windows 7-8.1-10 to allow remote connection to computer-02
If you want, you can immediately add users or a group to whom you can do this, through the Select users button.

How to allow remote connection to computer-03 in windows 7-8.1-10
In addition to the "classic" way to enable Remote Desktop support on a windows 7 desktop or server, you can do the following:
In the registry key HKEY_LOCAL_MACHINE \ SYSTEM \ CurrentControlSet \ Control \ Terminal Server, add the fDenyTSConnections key of dword type with a value of 0.
"fDenyTSConnections" = dword: 00000000
Nov 22, 2014 00:13 Ivan Semin
pyatilistnik.org
Standard windows tool for remote access via RDP protocol inside the local network

The windows system has been providing the possibility of remote access via RDP for a long time. Such a standard tool appeared in the Windows NT 4.0 version, released in 1996. More or less functionally, it was improved in the windows XP version, and found its completeness already in windows 7. Versions of windows 8 / 8.1 and 10 inherited remote access via RDP from windows 7 without functional changes.
Below we will take a closer look at the work of remote access via the RDP protocol in versions of windows 7, 8.1 and 10.
7. Connection settings
1. Remote access via RDP protocol
Connection via RDP protocol is carried out between computers located in the same local network. This type of connection is intended primarily for IT professionals who service company computers that are integrated into their production network. Without leaving their workplace, connecting remotely to the computers of enterprise employees, system specialists can solve problems that do not require intervention in the hardware of the machines, and take preventive measures.
Connecting to a remote computer using the RDP protocol is also possible outside the local network, via the Internet. But this will require additional steps - either forwarding port 3389 on the router, or combining it with a remote computer into a single VPN network. In view of this, it is much easier to connect to a remote computer via the Internet using other software tools that do not require unnecessary actions. This is, for example, the standard windows utility "Remote Assistance" for providing computer assistance over the Internet. It works by sending an invitation file to a user who will provide computer assistance. Its more functional counterparts on the windows software market are programs like TeamViewer.
RDP is also used to connect to Hyper-V virtual machines. Remote connection via RDP protocol can offer more possibilities than the standard connection window of a standard hypervisor. The Hyper-V connection window does not provide for sound playback in the guest OS, does not see the connected USB storage media, and cannot offer more connection with a physical computer than pasting the text copied into it. Whereas a RDP connection can provide a virtual machine with a visibility of various devices connected to a physical computer, a better image of the guest OS desktop, work with sound, etc.
To connect via RDP, the remote computer must meet the following requirements:
- It must have a password-protected account;
- The system must be allowed remote connections;
- If you do not want to change the access data every time you connect with a constantly changing dynamic IP address, you must assign a static IP address in the network settings.
Remote access is possible only on computers with windows Pro, Enterprise or Ultimate installed. Home versions of windows (Home) do not provide remote access via RDP.
2. Password on the remote computer
If you work with a Microsoft account on a remote computer and use a short PIN code instead of a long password, when connecting via RDP, you must enter the same long password, not the four-digit PIN code.
If a non-password-protected local account is used on the remote computer, and there is no special need for a password, as, for example, when connecting to Hyper-V virtual machines, at least a simple password like "777" or "qwerty" will have to be created.
3. IP address of the remote computer
When connecting via RDP, you will need to enter the IP address of the remote computer. The internal IP address is visible in the network parameters of the system. But in windows 7, 8.1 and 10 versions, these are three different paths. In windows 7, this is a section of the control panel, and in windows 8.1 and 10, this is the Settings application, with each version having its own organization. Therefore, we will learn the internal IP address in a universal way suitable for each of these systems - through the command line. The shortcut to launch the command line in windows 7 is available from the start menu. In windows 8.1 and 10, the command line is launched from the context menu on the start button.

In the command line window, enter:
After pressing Enter, we will get a summary of the data, where the internal IP address will be visible.

4. Allowing remote connections
Permission for remote connection in windows systems is usually disabled initially. In any case, this definitely applies to licensed assemblies. The ability to connect via RDP on a remote computer is activated in the system settings. We need a "System" section. In windows 7 version it can be accessed by searching on the Start menu. And in windows 8.1 and 10, the "System" section can be accessed from the context menu on the "Start" button.
You may be interested: Looking for vulnerabilities in windows 10 - getting money

Click on "Configuring Remote Access".

In the system properties window, you must set the option to allow remote connections active. Don't remove the authentication option. To apply the changes, click "Apply" at the bottom.

Such settings will open the path to the remote connection, but only for the administrator account. Users of regular accounts do not have the right to independently provide a computer for remote control. Such a right can be given to them by the administrator.
Below the option to allow remote connections is the Select Users button. We press it.


In the field below, enter the name of the user who is allowed to connect to him via the RDP protocol. For local accounts, this is their name, and for Microsoft accounts, this is the email address used for authorization. Click "Ok".

That's it - now the account of this user will be accessible from any computer within the local network.
5. Connecting to a remote computer
All the necessary actions on the remote computer are done, we go to the main computer from which the connection and control will be carried out. You can run the standard RDP connection utility by finding its shortcut using a search within the system. In windows 7, this is the Start Menu search.

In versions of windows 8.1 and 10, press the Win + Q keys.

A small connection window will appear. In the future, it will be possible to connect to remote computers using just such an abbreviated form. But for now, click "Show parameters".

In the "Computer" field, enter the IP address of the remote computer. In the field below - "User" - respectively, enter the username. If a Microsoft account is connected to the remote computer, enter the email address.

If you are working on a computer with a regular local account, the username must be entered in the format:
Computer \ User
For example, DESKTOP-R71R8AM \ Vasya, where DESKTOP-R71R8AM is the computer name, and Vasya is the username of the local account.

Below the username there is an option to save authorization data on a remote computer. Connection parameters - IP address, username and password - can be saved as a separate RDP file and used to open it on another computer. Click "Connect", and then "Connect" again in the new window.

Enter the password for the remote computer account.

Click "Yes" in the certificate error window.


More settings for connecting via the RDP protocol will be obtained in the utility window initially, before the connection is established.
6. Connecting to another account on the remote computer
Below the column for filling in the username of the remote computer, if the "Always prompt for credentials" checkbox is not checked, options for deleting and changing access data are displayed. By clicking the "Change" option, in addition to the authorization form in the existing account of the remote computer, we will see the possibility of connecting to another account that is present on the same computer.

After entering a new username and password, the authorization data for the specific IP address will be overwritten.
7. Connection settings
In the opened window for connecting to a remote computer, we will find tabs with customizable parameters. The first two relate to the convenience and functionality of remote access.
"Screen" - in this tab you can set the screen resolution of the remote computer, with this resolution the utility window will open after connecting. If you are accessing from a weak computer, you can set a low resolution and sacrifice color depth.

"Local resources" - here, in order to save system resources, you can disable sound playback on the remote computer. Or, on the contrary, you can also install sound recording from a remote computer. In the column of local devices and resources, after clicking the "Details" button, we can, in addition to the active printer, select other devices of the main computer that will work on the remote computer. These are smart cards, separate sections of the hard drive, flash drives, memory cards, external hard drives.

An obstacle to using the RDP protocol can be its blocking by antiviruses. In this case, the operation of the RDP protocol must be enabled in the anti-virus program settings.
The Internet is fraught with a lot of dangers, especially for the immature minds of the younger generation. But few parents manage to protect their child from harmful information by means of prohibitions and admonitions. 90% of schoolchildren easily deceive mom and dad and continue to visit non-child resources.
Adults also “sin” by using the Internet for inappropriate purposes. The mistakes of office workers often occur because 50% of the time they are busy not with business, but with social networks.
There is only one solution that radically helps to solve the problem - blocking unwanted resources. Read on to learn how to block a website from children and negligent adults in eight proven ways.
The method of blocking web resources through Hosts - a local database of IP addresses and associated domain names, is designed for the most inexperienced. Since even younger schoolchildren know about Hosts today, it will not be difficult for many to reset the setting and nullify your efforts. Therefore, you should take measures to protect it. For instance:
- Create a limited account for the user you are going to block access to unwanted sites. Then he will not be able to fix anything in the Hosts file if he wants to.
- Use tricks to hide blocking records.
The blocking technology itself is very simple:
- Log in to Windows under the administrator account.
- We go into the folder % Windir% \ System32 \ drivers \ etc, find a file without an extension named "Hosts" and open it with Notepad or a program that replaces it. To avoid problems with saving changes, you can do this: run Windows Notepad (file notepad.exe, located in the Windows folder) with administrator rights, go to Hosts through the File - Open menu and load it into the program.
- Add an entry to any place in the file on a new line 127.0.0.1 site, where instead of "site" we write the address of the blocked resource.

- We save the file in the same place. To prevent notepad from assigning the txt extension to it, write the name "hosts" in quotes, and select "all files" from the file types.

After that, the site will stop opening in browsers, since the computer will look for it not on the Internet, but on itself.
Tricks to prevent a user from deleting your Hosts entry
The first option is to hide the entry itself in the file. It is impossible to make it invisible, but between comments (lines starting with #) and it you can insert 2-3 hundreds of blank lines. The user, when opening the file, most likely will not pay attention to the document scrollbar and will not see your entry, since it will be far below.
The second option is to move the Hosts file to a different, more private location. Where to put it, decide for yourself, but so that the system does not lose it, you will have to make a small edit to the registry. Open the HKEY_LOCAL_MACHINE \ SYSTEM \ CurrentControlSet \ Services \ Tcpip \ Parameters branch in the RegEdit editor and in the parameter value DataBasePath write a new path to Hosts.

Through DNS
The traffic of a computer connected to the Internet goes through DNS servers (which, like hosts, map website names to their IP addresses). In addition to the DNS provided by your ISP, you can use others, such as the free public ones.
Some public DNS have a content filtering system, that is, they do not download sites with certain content to a computer.
Unfortunately, you cannot block resources of your choice using DNS, but if you want to block access to adult content or potentially malicious websites, the method is very effective. To use it, you just need to register the required DNS addresses in the properties of the connection and protocol version IPv4.

In this example, Yandex public DNS with an adult content filter is used.
There are other blocking options:
- Yandex: 77.88.8.88 (main) and 77.88.8.2 (alternative) - filtering phishing and fraudulent resources.
- Norton ConnectSafe (Symantec): 198.153.192.40 (primary) and 198.153.194.40 (alternative) - Filters phishing, fraud, malware.
- Norton ConnectSafe: 198.153.192.50 and 198.153.194.50 - ditto plus adult content filter.
- Norton ConnectSafe: 198.153.192.60 and 198.153.194.60 - the same plus the blocking of any "non-childish" topics.
In browsers
Modern browsers contain a lot of useful information, but most of them do not have user-selectable site blocking features. It remained, perhaps, only in Internet Explorer.
For the ability to block sites to appear in your favorite browser, you just need to install a special extension in it, for example, Block Site. This link leads to the Chrome store, from where you can download such a plugin (not even one, but three with a similar name) for Google Chrome and Yandex Browser.

The way these extensions work is very simple. They add a blocking feature to the context menu. By right-clicking on any link (including downloading a file) and choosing the "Block" command, you will blacklist the site. Moreover, as a whole, and not a separate page.

Some of the presented extensions also allow you to manually replenish the blacklist and create custom filters for blocking by content.

Plugins with web resource block functions are released not only for Chrome, but also for Opera, Mozilla Firefox and other less popular browsers.
Using Windows firewall or third-party firewall
Windows Firewall can only block websites by IP addresses. This is not the best way, since one IP is sometimes shared by several resources, and large portals, such as VKontakte and Odnoklassniki, occupy entire ranges of addresses. Third-party firewalls are more flexible - they allow you to block access even to a single page. To do this, it is enough to specify its URL in the program, and not IP, which is much more convenient for the user.
Since each firewall is configured in its own way, and we cannot consider all of them, we will study the principle of configuring a universal tool - Windows 10 Firewall.
To create a blocking rule, we first define the IP of the site. For this it is convenient to use the command ping_URL(for example, "ping ya.ru") or whois services.

- Let's open the firewall. In the left pane, select "Outbound rules", and in the "Actions" list - "Create rule".

- In the next window, check "All programs" (if the site should be blocked in all browsers) or "Program path" (if in one). When choosing the second option, we will indicate the path to the browser executable file.

- Skip the next window. After it, we have to specify the IP to be blocked. In the lower part of the "Scope" window, mark the item "Specified IP-addresses" and click "Add". We do not touch the top field, since it is intended for creating rules in local networks.

- Enter the IP address or website address range and click OK.

- Next, select "Block connection".

- Let's mark the network profiles for which we are going to use the rule.

- And the last step is to give the rule a name.

After clicking "Finish", the rule will take effect.
On a router
Access control settings on routers of different models are not the same, but their algorithm is largely similar. Let's figure out how to block access to unwanted sites using TP-Link as an example.
TP-Link access control (and not only) operates in black and white lists. In the first case, access is allowed to any web resources other than those indicated. In the second, it is prohibited to all, except, again, those indicated. Let's consider creating a blacklist as an example, as it is used more often.
- Go to the admin panel, open the "Access Control" section and click "Settings Wizard".

- In the new window, select the "IP-address" mode, specify the name of the host for which we are creating the rule, and write its IP or address range.

- Next, select the "Domain name" mode, write an arbitrary target name (for which a rule is created) and list the prohibited sites.

- The next step is to create a blocking schedule.

- Then we set the name of the rule, check all the parameters and click “Finish”.

- The last step is to select a filtering mode (in our case, prohibit packets from the specified domains to pass through the router) and save the rule. Also, do not forget to check "Enable Internet access control management".

This completes the setup.
Parental Controls
Parental control is now being built in wherever possible. It is found in many routers, antivirus programs, and even in the operating systems themselves. Prior to the release of Windows 7, parental controls were a separate system feature. In Windows 10, it became "family safety with settings through the Microsoft site", but its essence has not changed from this. Parents still have the ability to use it to restrict the child's access to network resources.
However, what are we all about Windows and Windows? Let's take a look at how parental control works in Kaspersky Internet Security.
- Restrictions are configured through a dedicated section.

- The first thing to do after entering it is to set a password to disable the function and change the settings.
- Next, you will see a list of user accounts for which you can use parental controls. Click next to the selected account "Configure restrictions".

- Access restrictions to web content are set in the "Internet" section. There are 2 blocking modes: sites for adults (black list) and all sites except those allowed (white list).

- When you select the blacklist mode, you can specify the categories of content to be blocked, but without specifying specific sites. When you select the whitelist mode, allowed sites must be added to the exclusions. Everything else will be blocked.

The control enable / disable slider is located at the top of the settings window in the user list.
Using static routes
A static (persistent) route is a hard-coded path for packets to travel from one network node to another. For example, from your computer to the server hosting the website. By registering a false route to an Internet resource (more precisely, to its IP address) in the Windows registry or in the router settings, you will prevent it from opening.
How to do it:
- Define with the command ping_URL The IP address of the site you want.
- Without closing the command line (it must be run from the admin), execute one more instruction: route -p add target_site_IP mask 255.255.255.0 192.168.1.0 metric 1.

An “OK” answer means that a route to site 213.180.193.3 has been created. Now, ya.ru will not open on this computer.
In the Windows registry, all static routes are located under HKEY_LOCAL_MACHINE \ SYSTEM \ CurrentControlSet \ Services \ Tcpip \ Parameters \ PersistentRoutes.

To remove from there an entry that has become unnecessary and resume access to the site, right-click on the entry and select "Delete". Or run the instruction on the command line route - f... The latter method removes all existing persistent routes. If you want to remove only one of them, run the command route delete target_host_IP, For example, route delete 213.180.193.3... After that, the site ya.ru will become available again.
Using Local IP Security (IPSec) Policies
Using IP Security Policy (IPSec) to restrict Internet access is not a trivial method. Very few people know about the existence of such a possibility (unlike Hosts), and the one for whom you block a certain web resource will never guess how you did it.
Using IPSec, you can block both an individual IP site and a pool of addresses. The only drawback with this method is that the Policy Management snap-in is not available in all editions of Windows. So, it is absent in home editions.
Creating an IP Security Policy may seem daunting, but only for the first time. After several attempts, it will not take you more than 2-3 minutes. Moreover, every configuration step is accompanied by a Wizard.
- So, to access the snap-in, open the "Administration" section in the control panel, click "Local Security Policy" and select "IP Security Policies on Local PC".
- Right-click an empty area in the right half of the Local Policies window and select Create IP Security Policy. The first Setup Wizard starts.

- In the window that opens next, specify the name of the new policy and briefly describe its purpose. You can leave these fields by default, but it's better to fill in them so that you don't get confused later.

- Then click "Next" without changing anything.

- Complete the wizard by checking Modify Properties and clicking Finish.

- In the properties window of the future IPSec policy, click "Add". This will launch the next Wizard - Create IP Security Rules.

- In the Tunnel Endpoint window, leave it as it is.

- In the "Network Type" section, select "All Connections".

- In the "List of IP Filters" (they are just to be created) click "Add". Next - give your list a name and click "Add" again. The third Master - IP Filters will start.

- First of all, give the new filter a description (the most convenient way is to specify the URL of the site to be blocked).

- Specify "My IP address" as a traffic source.

- Destination - "A specific IP or subnet". Write down the address of the blocked site or subnet below.

- In the "Protocol Type" section, check "Any".

- The final step is to click on "Change Properties" and "Finish". There is very little left.

- Confirm the parameters of the new filter.

- If you want to create another one, click the Add button in the next window. Otherwise - click "OK". This will launch the Filter Action Configuration Wizard.
 In the "List of IP Filters" mark the one you just created and click "Next".
- Give a name and description of what it will do (block the site).

- Specify "Block" in the action parameters.

- The final step of the stage is "Modifying properties" and completing the wizard.

- Now check and confirm the setting again.

- The final push is to create safety rules. This will be the responsibility of the fifth Master.

- At the end of its work, change the properties again and click "Finish".

- Check and confirm the parameters of the new rule.

- And finally - all the properties of politics. It has been created and is displayed in the section list.

- All that remains is to put the policy into action. Click on it with the right mouse button and select "Assign".
 In the "Properties" section, you can change any policy settings in the future, and through the context menu you can disable, rename, and delete.
As parents first teach a child to speak, and then to be silent, so computer users first look for the possibility of free access to the Internet, and then - the opportunity to close access to it. What are the reasons forcing to abandon the Internet, and what simple methods can be used to achieve this, we will try to consider in this article.
The desire to “cut off the oxygen” to your computer may arise if you do not want to pay for the traffic that will be spent in your absence, or if you are worried about uncontrolled access to the network of your children, relatives, employees at work. Also, the fear of information leakage while working with specialized programs and confidential information is quite understandable. Alternatively, it is sometimes necessary to block access to the network for gaming or other programs, without restricting access to the network separately, but completely blocking access to the Internet.
We dare to offer you some more or less radical ways to block the Internet on a computer running Windows 7:
- Disable the network adapter in the system
- Setting the wrong proxy in system settings
- Blocking outbound connections with built-in firewall
- Blocking connections with third-party firewalls
- Installing parental controls in specialized programs and antiviruses
- Contact the experts to set up blocking access to the Internet
1. Disconnecting the network adapter in the system
This radical method completely deprives the computer of communication with the outside world, be it the Internet or a local area network. You need to open “Device Manager” (by following the path Control Panel / System and Security / System),

where, having found your network card, right-click on its name and select "Disable":

The network card will be disabled for all computer accounts and it will be possible to return it to work only for a user with administrator rights, having gone all the way from the beginning and selecting the "Enable" item.
2. Setting the wrong proxy in system settings
This method forces programs to use false proxy server settings (for example, you can specify the address of your own computer, 127.0.0.1) and the good thing is that you can install it for each account separately. However, one of the drawbacks is the ability to easily disable it if the user knows where to do it - there are no user restrictions on the rights for this setting.
Launching Internet Explorer, and opening “Internet Options” on the “Connections” tab, click the “Network Settings” button:

In the window that opens, set the proxy server address to 127.0.0.1 - and if a proxy server is not installed on your computer, programs using the system proxy will be severely deceived.

Unfortunately, not every program uses the system proxy address, so maybe this method is not applicable for every case.
3. Blocking outgoing connections through the built-in firewall
Using this method, you can deny outgoing TCP connections by blocking access to the Internet for programs trying to access it.
Open firewall settings (Control Panel / System and Security / Windows Firewall) and select “Advanced options”:

Next, you need to create a new rule in the “Rules for outgoing connection”:
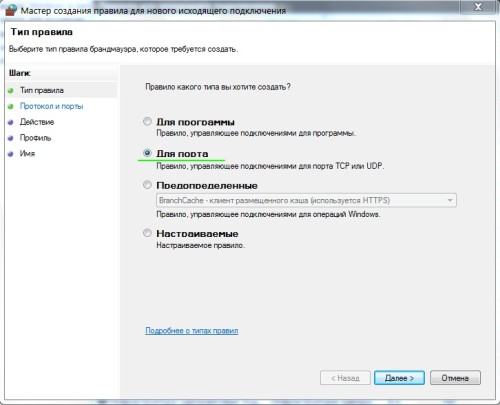
The rule must be created “for the port”:

Specify that the rule for all remote ports is:

Select “block connection”:

Enter the name of the rule that you understand:

After creating the rule, you can make sure that the Internet connection is blocked. Now, at any time, you can either disable it or enable it again.
Please note that only users with administrative privileges can change firewall settings.
Is it necessary? Surely there is some data on your computer that you do not want to lose. Important documents, records for unplayed games, gigabytes of music, distributions of useful programs, addresses of friends - all this should be stored safely
Gambling addiction https: //www.site/ https: //www.site/
Anti-hacker

Is it necessary
Surely there is some data on your computer that you do not want to lose. Important documents, notes for unplayed games, gigabytes of music, distributions of useful programs, addresses of friends - all this must be kept safe. But the reality is that all this vital information can be lost in a matter of seconds, especially if you are not the only one using the computer. Mom / girlfriend / little brother may also need your “car” - for example, for typing in Word. Overly curious guests may also become interested in your computer, and worst of all, if a “specialist” (in his opinion) approaches the car and starts proving and showing something to someone. In your absence, almost anyone can use a computer, the consequences of which are often very sad. Viruses, trojans, format c: launched “by accident” and many other things fall on your head at the most inopportune moment.
In order to avoid all sorts of troubles, it will be useful to cover access to the computer (or some settings) to unnecessarily curious people. How this can be done will be discussed in this article.
| If you forgot your BIOS password |
There are several ways to solve this problem. The easiest one is to use standard passwords made by developers for their needs. Here are some of them (which one is right for you depends on the BIOS manufacturer, the name of which can be viewed at the time of loading): AWARD BIOS: lkwpeter, AWARD_SW, TIPHA, wodj, aPAf, j262, Syxz, HLT, 01322222, KDD, ZBAAACA, ZAAADA, ZJAAADC,? award. AMI BIOS: AMI, AMI_SW, SER. Other: SKY_FOX or 9 spaces. If this does not help, you can use special utilities, which you can take from our disk. True, to run them, you still need to somehow turn on the computer. But if you forgot the password for changing the BIOS, this is what the doctor ordered. Finally, I will mention the ability to reset the BIOS by removing the battery (it does not always work) or using a special jumper on the motherboard. I will not explain in more detail - whoever understood what I mean, he himself will guess what to do. For those who did not understand my idea, it is better not to touch anything. It will be more complete ;-). |
Power-on password
The simplest and most reliable "amulet" will completely exclude the possibility of turning on your computer by an unauthorized person. To do this, go to BIOS(click Delete shortly after turning on the power, when the memory check test digits run) and in the menu Bios Features Setup select an option User Password... Enter the password you want and no problem. In the same menu there is a setting Supervisor Password(password for making changes to BIOS). If you want others to be able to use the computer, but not have access to the bios setting, choose this password. Attention! Forgetting your password is a matter of two minutes. Necessarily write the characters you entered into reliable place, because if the password is forgotten, you will no longer turn on your car. If you still lost your "password" - pay attention to the sidebar.
Other means of restricting access
In some cases, it is impractical to prohibit others from turning on the computer; it will be much more convenient to simply restrict their rights while working. So that they, as they say, do not climb where they should not. Unfortunately, in operating systems Windows 95/98 / ME there is no way to configure everything accordingly, so you either have to install Windows 2000 / NT or use special software. Windows NT is a topic for a separate discussion, so we will go the other way - consider a number of programs designed to share access to the machine.
Homesoft KEY 1.0 b.7
Developer: Homesoft
License: Shareware
Interface language: Russian English
Combines a lot of useful functions, allowing you to fully control the rights of all computer users. First, there are settings that determine access to system resources (control panel, remote access, trash can, registry editor, etc.). Secondly, you can prevent the launch of any program (of your choice). Thirdly, here it is possible to completely block the computer, prohibit its restart, and also restrict work with the machine at a certain time (for example, set a limit for using the computer for each day of the week). You can also lock your desktop (say, if you are away somewhere), control the automatic on / off of the system, and many other things. With all the richness of possibilities, the program interface is very simple and it will not be difficult to deal with it.
NVD Monitor 3.0
Developer: Nikolay V. Dudkin
License: Freeware
Interface language: Russian
The utility is a resident monitor that allows you to monitor and prohibit certain file operations (rename, delete). Very convenient is the ability to monitor files located in various directories of your computer (for example, in the Windows system directory). The only thing that is required of you is to configure the application correctly. By default, the program monitors the \ Windows \ Temp \ directory (the temporary directory of the operating system), which is not very convenient - after all, all active software places its temporary files there. But on the other hand, by approaching the setting of the program wisely, you will receive excellent protection from inept users, viruses, Trojans and other misfortunes.
Outpost 2.2D
Developer:"Outpost"
The size: 3826 Kb
License: Shareware
Interface language: Russian
Outpost is, without a doubt, the most sophisticated program of all presented in this review. According to the assurances of the developers, this product will completely protect your computer / network from any troubles - viruses, hostile users, etc. After assurances of such coolness, there is a desire to immediately try the program in action, which I did. The only thing I didn't like was that the distribution kit was split into floppy disks. It is unlikely that now you can find at least one organization in which there is not a single CD-ROM drive (I generally keep quiet about home computers) - after all, we do not live in the Stone Age. After copying the data (during installation), the program rebooted my computer without any questions, while destroying all unsaved files. Then, instead of the usual boot screen saver, the developers' logo appeared, which also made us happy (after all, changing such things without the user's consent is not very good). But then the most interesting thing began ... The system completely refused to boot, except in safe mode. Here it is necessary to mention one interesting "trick" - only the network administrator can boot into Safe Mode after installing the described software, whose password the developers did not bother to provide. The situation was almost hopeless ... However, after booting under DOS and tinkering with the system files, I was able to “nail down” this “masterpiece” and restore almost everything that was damaged. I only wonder what a not very advanced user will do in such a situation? So I do not recommend using this program - after all, you may encounter the same problems. Nerve cells are not known to be regenerated; better look after something else.
 |
Desktop-Lok 6.0.0
Developer: Coqui SoftDev Vic Vega
License: Shareware
Interface language: English
With this program you can protect your computer from unwanted intrusions. When launched, the program displays a picture of the desktop, but to access any functions, the user must enter his name and password. Quite a good utility that reliably saves your system from the raids of "dummies".
Limited Access 2.0
Developer: Rutshtein Alexander Vadimovich
License: Shareware
Interface language: Russian English
This product resembles the previous one in its capabilities, differing from it in that here you can make not just a desktop picture, but a full-fledged desktop with valid shortcuts for “allowed” programs. This application is best suited for the case when other users of your computer only need a couple of programs, but they'd better not touch the rest.
DeviceLock ME 1.0 Beta 2
Developer: Smartline Inc.
License: Shareware
Interface language: Russian
This utility is used to restrict access to various disks (both hard drives and cd, zip and floppy drives). The main purpose of the program is to protect important data, for example, software distributions, documents, etc. In addition, it can be extremely useful to be able to disable the standard drive. After all, viruses and Trojans in most cases enter the system from infected floppy disks brought in by “caring” comrades. Overly gullible and inexperienced people are unlikely to think of checking a floppy disk with an antivirus, which can result in a pristine screw or a stolen password for Internet access.
* * *
In addition to those considered, there are many different utilities that protect your system from intruders (however, the programs mentioned in the article are, in our opinion, the best), many of which are very useful. The only thing that should be warned about is possible problems with incorrect operation of applications. Therefore, do not overuse such things - remember that this is a double-edged sword. What will you do if you yourself fall into your own trap? Be careful and try not to use particularly "cool" protections, it is better to limit yourself to simpler programs.


