The proposed information is designed for a novice user and is intended for self-study of the Word word processor.
A set of software tools designed to create, edit and format text documents is called word processors. The main difference between word processors and text editors is that they allow not only to enter and edit text, but also to format it. Word processors provide interaction between text, graphics, tables, and other objects, as well as spell checking and document formatting automation.
The most widely used word processor is Microsoft Word, which has several versions. This paper considers the version of Microsoft Word 2003, which is part of the Microsoft Office 2003 package.
The description of the word processor Word in the proposed work corresponds to the usual sequence of work on a document
- text input, its saving, editing, formatting, special methods of document design.
In addition, additional features of the word processor Word are described - working with tables, inserting formulas, using graphics.
1. Launch Microsoft Word
There are several ways to launch Microsoft Word, just like any other application running under the Windows operating system.
You can start MS Word in one of the following ways:
- Select the appropriate command in the start menu (Start –> Programs –> Microsoft Word).
- Using the Microsoft Word shortcut located on the Desktop.
- Using the Microsoft Word button located on one of the quick launch panels of the Taskbar.
If you need to not only start Word, but also open a document, you can:
Open the folder containing the required Microsoft Word file and double-click on its icon with the left mouse button.
You can use the Start menu –> Documents (Recent Documents). The list that appears on the screen contains the names of documents that the user has worked with recently. Click on the name of the required document.
2. MS Word window structure
The program window of the word processor Word 2003 is shown in fig. 2.1.
Rice. 2.1. Microsoft Word 2003 program window
Title bar
The window title contains the name of the program (Microsoft Word) and the name of the document (Document 1 by default). After the document is saved, the title bar will display the file name. Word files are automatically assigned the .doc extension.
On the right side of the title bar are the usual window control buttons (Minimize, Maximize, Close).
Menu bar
Like other Windows applications, the Word menu bar is a control that provides access to all of the program's functionality. The advanced features of Word 2003 are reflected in many menu commands. For convenience of orientation in the menu, the commands of the drop-down menu are opened in two steps. First, a shortened menu opens, and if the required command is not in it, then by hovering the mouse pointer over the disclosure icon, you can open the extended menu View(Fig. 2.2).

Rice. 2.2. Menu commands View- abbreviated and extended versions
The shortcut menu expands automatically if you keep it open for a while without selecting any command (i.e. just looking at it). Advanced menu commands that have already been used in the current session are included in the reduced menu.
Toolbars
In MS Word 2003, the toolbars are not presented on the screen in their entirety, but only with the most necessary buttons. A list of all toolbars available in Word can be called up by the menu command View -> Toolbars or by right-clicking (context menu) on the panels presented on the screen.
Panels are displayed by default - Standard, Formatting and Painting(panel Painting located below the margin of the document).
To show or hide a panel, click on its name in the list of panels. Panels Standard and Formatting it is desirable to always leave on the screen.
In Word 2003, toolbars are context sensitive - when you select an object in a document, a toolbar is automatically opened for editing it. Each toolbar button has a tooltip.
Panel Standard contains tools for managing file operations, editing, screen display of the document.
Panel Formatting contains document formatting controls.
Customizing toolbars
Word 2003 allows you to customize existing toolbars by adding or removing individual buttons. To do this, you can use one of two methods:
1. Click the arrow icon at the end of the panel. An addition to the presented part will open, in the lower section of which there is a command Add or remove buttons. Clicking the arrow next to this command will open the entire list of panel buttons. You can select the desired button by checking the box to the left of it.
2. In the list of panels, click on the command Setting. In the opened dialog box Setting(Fig. 2.3) on the tab Teams select the desired category and view the buttons for that category.

Rice. 2.3. Toolbar docker window
To add a button, you need to drag the selected command from the right side of the window to the toolbar. The mouse button is released when a marker - | (vertical bar) appears on the toolbar. To remove a button, drag it with the mouse from the toolbar to the settings window.
Word 2003 allows you to create your own toolbar. for this in the dialog box Setting tab Toolbars click the button Create(Fig. 2.4).

Rice. 2.4. Toolbar docker window
Coordinate rulers
At the top and left of the document area there are coordinate rulers that allow you to see the page dimensions (ruler length), document margin sizes (shaded parts of the ruler), the position of any paragraph and its first line (ruler sliders). The purpose of the elements of the horizontal ruler is shown in fig. 2.5.

Rice. 2.5. Coordinate ruler
The mouse pointer on the border between the shaded and light parts of the ruler becomes a double-sided arrow. Moving this border with the mouse will change the size of the margins of the document. Dragging the sliders with the mouse changes the parameters of the current paragraph.
Status bar
The status bar is located at the bottom of the window. The left side of the status bar displays information about the current document (Fig. 2.6).
Rice. 2.6. Status bar
Description of status bar elements
Element |
Description |
Current page number |
|
Current section number. The information displayed by this element is meaningful only for documents that are divided into sections. |
|
Number of pages from the beginning of the document to the current page (4) and the total number of pages in the document (19) |
|
Vertical distance between the cursor and the top of the page |
|
Number of lines from the beginning of the page to the cursor |
|
Number of characters from left margin to cursor, including spaces and tabs |
In addition, the status bar contains operation mode indicators that inform which mode the editor is currently in. The black color of the indicators corresponds to the switched on state of the mode, the gray color corresponds to the switched off state.
Purpose of Status Bar Indicators
Indicator |
Purpose |
displays a dialog box for recording a macro (macro - programmed commands) |
|
turns on markup mode. Revision markers show what changes have been made to the document since its last version. The context menu of this button (or corrected text) allows you to change the correction settings. |
|
when this button is active, clicking in the text or moving the cursor with the arrow keys selects a piece of text. Each keystroke F8 will expand the selection of a piece of text. To narrow the selection, use the keyboard shortcut Shift+F8 |
|
activating this button switches the character insertion mode to the replacement mode. (This button can be enabled with the insert key). |
Workspace
The working area of the Word window is the area of the document. In an empty work area, the text cursor, indicating the character input position, is located at the first position of the first line. The size of the text on the screen depends on the selected scale. You can set the desired scale using the menu ( View -> Scale) or buttons Scale in the toolbar Standard. Drop down button Scale choose the desired value. If the desired scale is not in the list (for example, 90%), the value is entered directly into the text field (you can not type the "%" sign, just enter numbers) and press the Enter key.
Document display modes on the screen
Word supports several modes of presentation of documents on the screen. Display modes are switched in the menu View or buttons at the bottom of the workspace (to the left of the bottom scroll bar) .
normal mode
V normal mode only text is displayed without decorations. Document formatting is presented in a simplified form, there is no vertical ruler, page margins are not visible. This mode is useful in cases where the content of the document is more important than the external presentation.
Web page mode
V web page mode The screen representation does not match the printed one. The process of reading the document is simplified - the text is larger, the length of the line is set equal to the size of the window. A document outline area can be displayed that can be used to quickly navigate through the document (especially if heading styles are defined in the document) by clicking on the desired heading. In this mode, electronic documents are developed in which the concept of a printed page does not make sense, since the electronic publication arrives on another computer.
Page Layout Mode
V page layout mode The screen representation of the document is fully consistent with the printed one. This mode shows the actual location of all document objects, including figures, tables, and so on. You can see the coordinate rulers, the size of the fields. This mode is useful for most jobs that involve preparing documents for printing.
Structure Mode
V structure mode the structure of the document is displayed. An additional toolbar allows you to display headings of different levels and change the structure of the document.
Preview Mode
To preview printed documents, use the command File -> Preview or button Preview on the toolbar Standard. In this mode, the document is presented in a special window and displayed as pages of reduced size. Clicking on a page zooms in on it. In this mode, only one toolbar remains on the screen. Return to normal mode button "Close" on the toolbar.
3. Exit MS Word
After the end of the current session, you must exit MS Word. To do this, you can use one of the following methods:
- Select menu File –> Exit.
- Select item close in the system menu of the main window of MS Word.
- Place the mouse pointer on the system menu icon in the main MS Word window and double-click the left mouse button.
- Push button close in the title bar of the main window.
- Click Alt+F4 on keyboard.
If any of the open windows contains unsaved information, MS Word will prompt you to choose what to do with it. To do this, a dialog box similar to the following one will appear on the screen (Fig. 3.1).

Rice. 3.1. Message when closing a document
To continue the operation, select one of the options.
Has the toolbar disappeared in Microsoft Word? What to do and how to get access to all those tools without which working with documents is simply impossible? The main thing is not to panic, as it disappeared, it will return, especially since finding this loss is quite simple.
As they say, everything that is not done is for the best, so thanks to the mysterious disappearance of the quick access bar, you can learn not only how to return it, but also how to customize the elements that appear on it. So let's get started.
If you are using Word 2012 and higher, you only need to press one button to return the toolbar. It is located in the upper right part of the program window and looks like an upward arrow located in a rectangle.

Press this button once, the disappeared toolbar returns, press again - it disappears again. By the way, sometimes it really needs to be hidden, for example, when you need to completely and completely concentrate on the content of the document, and so that nothing extra is distracting.

This button has three display modes, you can choose the appropriate one just by clicking on it:
- Automatically hide the ribbon;
- Show only tabs;
- Show tabs and commands.

The name of each of these display modes speaks for itself. Choose the one that is most convenient for you while you work.
If you are using MS Word 2003 - 2010, you must perform the following manipulations to enable the toolbar.
1. Open the tab menu "View" and select the item "Toolbars".
2. Check the boxes next to the items that you need to work.
3. Now all of them will be displayed on the Quick Access Toolbar as separate tabs and/or groups of tools.
Enabling Individual Toolbar Items
It also happens that “disappears” (is hidden, as we have already figured out) not the entire toolbar, but its individual elements. Or, for example, the user simply cannot find any tool, or even an entire tab. In this case, you need to enable (configure) the display of these same tabs on the Quick Access Toolbar. You can do this in the section "Parameters".
1. Open a tab "File" on the Quick Access Toolbar and navigate to "Parameters".

Note: In earlier versions of Word, instead of a button "File" there is a button "MS office".
2. In the window that appears, go to the section "Customize Ribbon".

3. In the Main Tabs window, check the boxes next to the tabs you need.

- Advice: By clicking on the plus sign next to the tab name, you will see lists of tool groups that these tabs contain. Expanding the "pluses" of these items, you will see a list of tools presented in groups.
4. Now go to the section "Quick Access Toolbar".

5. Section "Select commands from" select item "All Teams".

6. Go through the list below, finding the necessary tool there, click on it and click the button "Add" between windows.

7. Repeat the same step for all other tools that you want to add to the Quick Access Toolbar.
Note: You can also delete unwanted tools by clicking the button "Delete", and sort their order using the arrows located to the right of the second window.
- Advice: In chapter "Customizing the Quick Access Toolbar", located above the second window, you can choose whether your changes will be applied to all documents or only to the current one.
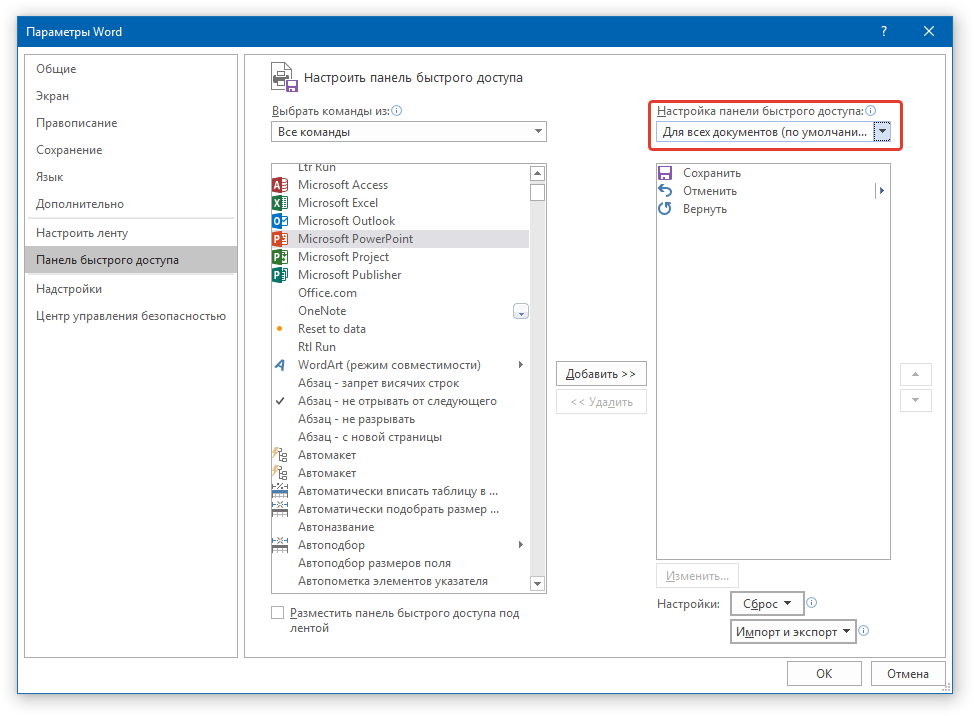
8. To close the window "Parameters" and save your changes, click the button "OK".
Now on the quick access panel (toolbar), only the tabs you need, tool groups and, in fact, the tools themselves will be displayed. By properly configuring this panel, you can noticeably optimize your working time, increasing your productivity as a result.
Under the menu bar there can be one or more lines consisting of buttons - toolbars, with which you can quickly (click on the appropriate button) access many Word commands and tools. The purpose of the button is shown in a yellow frame if you move the mouse cursor over it. If the button is highlighted with a light background, then its function is active at the moment.
MS Word offers such panels as: Standard, Formatting, Drawing, Tables and Borders, Forms, etc. for work.
Each button on this panel has a unique name. To find out the name of a button, place the mouse pointer on it without pressing the manipulator button. The name of the button appears next to the mouse pointer. A short description is in the status bar. The following table lists and describes the buttons on the standard toolbars.
Showing (Hiding) the Toolbar
To show or hide a panel, you can move the mouse pointer to any position in the panel area and press the right button, and then select the desired command. You can also open the View menu, set the Toolbars command, and enable or disable the corresponding toolbar title.
Create Opening a new document based on a standard template.
Open Opening an existing document. After clicking on this
The button opens a standard dialog box for opening documents, in which you need to specify the name and location of the document that you want to open.
Seal Starts the print operation of the active document. Opens the standard print window for setting print options.
Preview Displays the document on the screen as it will be printed. You can view one or more pages of a document in an enlarged or reduced scale.
Spelling Starting the spell check process. You can check the entire document or just a selection.
Delete to buffer Deleting and placing a selected fragment of a document (text, graphics, tables, etc.) on the clipboard
Paste from clipboard Paste information from the clipboard, starting at the position of the input cursor.
copy format Assigns the parameters of characters selected before the button was pressed to characters selected after the button was pressed.
Cancel Cancel the last command executed. This feature may not be available for all commands.
Repeat Re-execution of the last canceled command. This feature may not be available for all commands.
Painting Controls the display of the Drawing toolbar.
Scale Sets the degree to which the image is enlarged or reduced. When set to 100%, the size of the image on the screen corresponds to the actual size of the document.
reference Controlling the display of the Hint Wizard. The Hint Wizard provides tips on how to best use the application in a given situation. Calling the help subsystem.
Almost all users who have ever opened the Word editor remember the program workspace: in the upper part there is a control panel with various sections and functions. After analyzing the sequence of user actions, the developers grouped the commands into separate blocks, thereby facilitating the search for the required option. In this article, we will tell you how to pin the toolbar in Word if it is "hidden" under the document.
Hidden tape mode is especially convenient to use on netbooks, laptops with a small screen. It allows you to increase the overview of the page and not be distracted by unnecessary details.
Proven ways:
- Method number 1: you can fix the toolbar in Word by double-clicking on the panel, in the same way you can display it again.
- Method number 2: near the quick access panel responsible for saving the document and undoing actions, you will see an arrow, by clicking on which you will open the context list. By checking the box next to the Collapse Ribbon command, you hide the panel, and by removing it, you will display it again.
- Method number 3: right-clicking on any empty field will bring up a short list of commands, among which there will be “Minimize the Ribbon”.
The state of the ribbon is retained even after the document is closed, regardless of which of the methods listed above you used. In the minimized position, the menu will open commands when you hover the mouse over the required tab, and then “hide” the commands again.
The ribbon is a collection of toolbars at the top of an Office program window. It helps you quickly find the commands you need to complete tasks. Some features that used to be on the ribbon (including commands Save and Parameters) are now available in the menu File.
If the ribbon is hidden, it can be hard to find. The fastest way to show the ribbon is to click on any visible tab, like home, Insert or Constructor. The ribbon can be hidden to increase available screen space.
The following describes how you can show or hide the ribbon.
In this article
Permanent display of the tape
You can set your Office programs to show all tabs and ribbon commands at all times.
Showing only a row of tabs
In Office programs, you can display only ribbon tabs in order to, on the one hand, free up space for the document, and on the other hand, to preserve the ability to quickly switch between tabs.

If you click a tab, the commands will be displayed and you can perform the necessary actions. When you return to the document, all commands will be hidden again.
Collapse or expand the ribbon
If necessary, you can collapse the ribbon to make room for the document you are creating. To hide the ribbon, double-click any tab on the ribbon, or press CTRL+1.
To show the ribbon again, double-click any tab, or press CTRL+F1.
If the ribbon does not appear at all
If the ribbon is completely hidden and no tabs are showing, it is probably set to auto-hide. click the "More" icon in the upper right corner of the screen. This will temporarily restore the tape.
When you click on a document sheet, the ribbon will be hidden again. If you want to always display the feed, follow the steps above to pin it.
additional information
Ribbon roll
If necessary, you can collapse the ribbon to make room for the document you are creating. To do this, click the arrow collapse arrow in the upper right corner.

To show the ribbon again, click the arrow again.
additional information
Ribbon roll
The ribbon cannot be removed or replaced with the toolbars and menus that were available in previous versions of Office. However, you can minimize it to free up screen space.
Continuous tape roll
Temporary tape folding
To quickly collapse the ribbon, double-click the name of the active tab. To restore the ribbon, double-click the tab again.
Keyboard shortcut: To collapse or expand the ribbon, press CTRL+F1.
Ribbon Recovery