Good day, dear friends. Today we will talk about setting up the BIOS of the Toshiba Satellite L775-A1W laptop.
At the very beginning of booting the laptop, we can see such a splash screen, from which it is clear that when you press the F2 key, you go to the BIOS ( Press
The boot menu is used to quick selection the media from which the laptop will be booted. It could be USB flash drive, optical or HDD etc. Use the "up" or "down" keys to move to desired position, and the "Enter" key - selection. The menu is very simple and it is simply impossible to get confused in it

Toshiba's BIOS looks familiar to laptops; there aren't very many settings in it. At the bottom of the screen, as usual, there are tips on English language. On the tab Main we can see brief information about the laptop hardware and BIOS version. Available from settings: Time, date and language (no Russian)

Use the right arrow to go to the tab Security. There are two sections here BIOS Password And HDD/SSD Password, thanks to which you can password-protect the BIOS and hard drive, respectively.

Chapter Power Management
serves to manage the power supply of the laptop: you can enable wake-up on a signal from the network ( Wake-up on LAN); Wake up by pressing the keyboard ( Wake on Keyboard).
Parameter Critical Battery Wake-up serves to configure one or another action in the event of a critical drop in battery charge while the computer is in sleep mode. Position Enabled will force the laptop in sleep mode to automatically switch to work mode and immediately enter hibernation mode.
Panel Open - Power On is responsible for turning on the computer when the lid is opened.
Dynamic CPU Frequency Mode- this item is responsible for the operating mode of the processor. Pregnant Dynamic Switch- the processor mode will change dynamically, that is, when idle, the clock frequency will decrease and reduced power consumption will be enabled. Always Low will enable constant low power consumption, which will save battery power, but will also reduce CPU performance.
Core Multi-Processing- When this option is enabled, the processor will try to parallelize old single-threaded programs across all cores, and if this does not work, it will automatically turn off all cores except one, which also helps save precious electricity))
Intel Turbo Boost Technology
- Technology for automatic zoom clock frequency processor above the rated one, if the power, current consumption and temperature do not exceed the maximum values.
SATA Interface Setting- Default value ( Performance) causes the hard drive to operate in maximum performance, A Battery Life will turn on battery saving mode.

Tab Advanced in my opinion, it does not contain “tasty” settings and therefore I will not dwell on it in detail.


Boot responsible for priority boot devices. Positions are moved using the F5/F6 keys. The point is similar boot menu called by F12, but unlike Boot Menu remains “up to date” every time the laptop is booted.
To enter BIOS different manufacturers laptops use different buttons on the keyboard. Why they do this and why is difficult to say. In my opinion, it would be more correct to meet the user and use the same key everywhere, as is implemented on regular desktop computers. There, to do this, you need to click on “Del” when starting the system. On laptops, netbooks and ultrabooks, the user will be exhausted until he can get into the holy of holies of the device. In this post I will tell you how enter the BIOS on Toshiba Satellite laptops and netbooks. There, by default, the function is activated fast loading « Quick Boot Function". Accordingly, immediately after turning on the computer, the operating system loads.
On most Toshiba Satellite models, such as C660, C850, to enter the BIOS you need to press the button when the laptop is turned off F2. Then, without releasing it, turn on the laptop with the power button. As soon as you see the inscription “Toshiba leading innovation”, you can release the F2 button. Only after this you will be able to enter the BIOS.

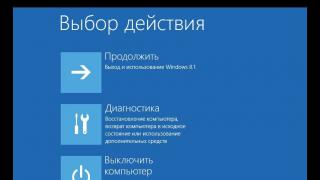
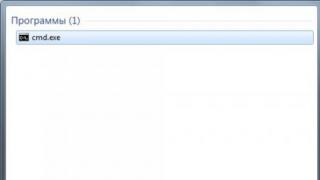
On some Toshiba laptop models (mainly those that come with SSD drives and use UEFI) it’s more difficult to get into the BIOS. Needed already in the operating room Windows system In the Start menu, find the programs preinstalled by the manufacturer. They should have Bios utility System, HW Setup or System Setting.

It actually provides access to all parameters Basic System I/O is already from the operating system.
If you really need it when logging into the system, then you can also configure a button for this action in this program.
To print text vertically or at any desired angle in word. There are several things to do simple steps. Let's look at one of the options using a table. Go to the “insert” section, then “table”, select the required number of columns and rows. Click right click mouse over the cell, select the “text direction” item. Select the direction of the text. To make the table borders invisible, click on...
To include in excel writing text vertically or text in excel at any angle (applicable to excel 2003, 2007, 2010, 2013, 2016), you need to follow a few simple steps. Select the cells in which we will set the direction of the text. Right-click on the selected cells, context menu Click on the “cell format” item, then in the window that opens, select...
In today's article we'll talk about how to start the PSU (Power Supply) of your computer without the participation of the system (motherboard), i.e. the start will occur autonomously. All currently produced power supplies can be started using a regular paper clip or a piece of wire! To do this we will need: A power supply unit (PSU), there is no need to remove it from the computer, just pull out the largest one...
So, after turning on the computer/laptop we have the message “BOOTMGR is missing Press Ctrl+Alt+Del to restart“. Typically, this error occurs after experiments with sections of hard disk. The solution to the problem will be considered at Windows example 7. To resolve this error, you must insert a disc from your operating system and boot from it. Next, select the language and other parameters, click...
In this article we will familiarize ourselves with the instructions for flashing BIOS firmware in Toshiba laptops.
Flashing the BIOS 750 rub.
BIOS firmware most often leads to an update software motherboard, it even happens that the BIOS firmware resurrects the laptop from an inoperative state. Also, if you notice errors on your computer or laptop, the system freezes and all factors indicate that the BIOS has crashed or broken, then in this case, after updating the firmware or updating it, errors are corrected and the operation of the computer is improved. We recommend that you use only factory firmware downloaded from the manufacturer's official website. The use of custom firmware or those made by craftsmen may lead to a malfunction of the laptop after the update, as well as it not turning on and not responding to the power button.

To get started you need: Insyde Flash program, flash drive or external hard disk, internet access.
1. In order to simplify the process of flashing BIOS, it is best to use special program, which flashes the BIOS chip directly from Windows. If you have a Toshiba laptop, then you will need to download the Insyde Flash program, the version of this program must be at least 3.5.
2. Next, download the firmware from the official Toshiba website; for this you need to visit the manufacturer’s website. By following this link, you will need to select your laptop model in the table in order to download exactly the firmware that is specifically for your model.
3. Prepare your laptop for firmware, the first thing you need is to disconnect the laptop from the Internet, to do this, turn off Wi-Fi receiver and pull out network cable. It is also necessary to close unnecessary programs and be sure to disable your antivirus or make it inactive for a while.
4. If your laptop works exclusively without a battery, then you need to insert the battery into the laptop and charge it by 40-50%. If your laptop turns off during BIOS flashing, it will lead to a failure motherboard your laptop.
Now we launch the Insyde Flash program and in the window that opens, select search, then indicate the path to the BIOS firmware itself. Then click on the Start button and wait for the program to finish. During the process, under no circumstances should you close the program or turn off the computer.
5. If you were unable to update using this method, then you need to copy the downloaded firmware to a flash drive, after renaming it bios.fd, and first format your drive in Fat32.
6. After downloading the firmware to the USB flash drive, you need to turn off the computer and remove the battery by connecting the power adapter. Next you need to insert your flash drive into USB port your laptop. On your keyboard, hold down the FN+F key combination. Sometimes the keyboard shortcut different models Toshiba are different, so if this combination does not work for you, then you need to read the instructions for your laptop. Now you need to press the power button. If there are indicators on your drive, then wait until it turns on and then release the holding buttons.
7. Wait until the laptop reboots and check your laptop for stability.
BIOS flashing by our specialists.

Also, if you have any difficulties with BIOS firmware yourself, then our specialists will be happy to do this work, fix and reflash your BIOS.
Expert visit and diagnostics0 rub.