Need to highlight duplicate values in a column? Need to select the first 5 maximum cells? Do you need to make a thermal scale for clarity (the color changes depending on the increase / decrease in the value of the cells)? V Excel highlighting the color of the cells according to the conditions can be done very quickly. In Excel, color highlighting of cells is responsible special function"Conditional Formatting". Highly recommend! Read more below:
To begin with, on the task ribbon in the main menu, find the Styles section and click on the Conditional formatting button,

When pressed, a menu will open, with different options this edit. As you can see, there are really many opportunities here.

Now more about the most useful ones:
Excel color highlighting of cells by conditions. Simple conditions
To do this, go to the Cell Selection Rules item. If, for example, you need to select all cells larger than 100, click the More button. In the window:
By default, conditions are suggested to be highlighted in red, but you can set the desired cell formatting by clicking in the right window and selecting the option you need.
Highlighting duplicate values, incl. on multiple columns
To select all duplicate values, select the appropriate menu (see the picture at the beginning of the article). Next, a window with formatting will appear again. Customize as you like.
What to do if you need to find repetitions in two or more columns, for example, when the full name is in different columns? Make another column and concatenate the values with the formula =, i.e. in a separate cell you will have IvanovIvanIvanych written, then you can select duplicate values for this column. It is important to understand that if the word order is different, Excel will consider such lines to be non-repeating.
Highlighting the first / last values in color. Again conditional formatting

To do this, go to the Rules for selecting the first and last cells and select desired item... In addition to the fact that you can highlight the first / last values (including by percentage), you can use the ability to highlight data above and below the average (I use it even more often). Very handy for viewing results other than normal or average!
Building a thermal chart and histogram
Cool feature for data visualization is thermal / temperature chart. The bottom line is that, depending on the magnitude of the value in a column or row, the cell is highlighted with a certain shade of color. Tables are much better perceived by eye, and decision making becomes easier. After all, one of the best analyzers- this is our eye and, accordingly, the brain, not a machine!
The histogram in a cell (figure below) is also an extremely useful function for detecting changes in values and comparing them.
Highlighting cells containing specific text
Very often you need to find cells that contain a certain set of characters, you can of course use the = function, but it is easier and faster to apply in conditional formatting, go through - Cell selection rules - Text contains (see picture 2).
Very useful when working with text. An example, when in a column you have the full names of employees, and you need to select all of the Ivanovs' colleagues. Select the cells, go to the menu item and select the containing text Ivanov, then filter the table by color:
Excel highlighting with color. Filter by color
In addition to the above possibilities, you can filter the selected cells by color with a regular filter. To my surprise, very few people know about this - apparently there are echoes of the 2003 version - this possibility was not there.
In this tutorial we will learn how to take a photo with partial coloring. This technique helps to focus on a separate site, convey the mood of the work and makes the images bright and compelling. And we will highlight the color when Photoshop help CS6.
We have an image with a red booth and we need to select the booth. How to do it quickly and efficiently? There are several ways, but today we will use the function Color Range, which is in the "Selection" menu (Select).

This feature allows you to select specific colors in your image, either by choosing a base color from the drop-down list, or by sampling a color of your choice. But in most cases, just choosing a color from the drop-down list is not enough. As you can see in the image below, just picking the red colors won't make our booth completely white and the selection won't be accurate.

In addition, if in the Selection Demo list (Selection Preview) select below Black Matte our selection will fade a little.

Therefore, we will use a different method - color selection (Sampled Colors)... This will allow you to select several shades of the base color. Click on the phone booth and change the value Fuzziness... The higher the value, the more the selection will include shades.

Hold the key Shift and click on the shades of red on the booth to add them to the selection.

When you select multiple shades of red, you may notice that the area outside our booth also stands out. There are several ways to avoid this. First, as mentioned above, Fuzzines can help increase or decrease the number of similar tones that are currently included in highlighting.

You can also activate the function Localized color clusters and change the value Range slider... This can help focus your selection around the area of your chosen colors. The range value will decrease the selection around the object.

Even after you've adjusted these sliders, you can go back and hold Shift + click on areas that you may have forgotten to add. Your result will not be 100% perfect, but we will work on that later.
When you are completely satisfied with the result, click "OK" and invert the selection.

Best to add an adjustment layer (Adjustment Layer) to be able to revert to the original result.
It also gives us the ability to tweak the effect if needed. You can add a layer mask to the adjustment layer, and remove or add red colors using a white and black brush.

That's it, our image is ready! We hope this tutorial was useful to you, I would like to see your results,
Translation: Duty
Good day, dear readers of my blog. More and more stylish pictures are needed for the popularity of the site. Give everyone quality work. If you are doing a one-page or blogging, then learning to process photos is necessary.
Today I will show you how to make a trendy illustration out of a mediocre image.
So, now you will learn how to select one color in Photoshop and what interesting opportunities unlocks this skill. I will show you how to leave only a certain shade in the picture, and remove all others, and vice versa. You will also learn how to recolor red roses white in just a few seconds.
How to replace one color with another
First, let's talk about how to recolor an object in a different color. Several centuries have passed and unlike the order of the queen from "Alice in Wonderland", now there is nothing crazy about such a task. Everything will be very simple.
So, we open the program, and then the photo. When choosing an illustration, keep in mind that one color will change throughout the picture.
If initially, in the example that I give, there was a green car, then nothing would have happened. The grass and forest would also take on a different hue.

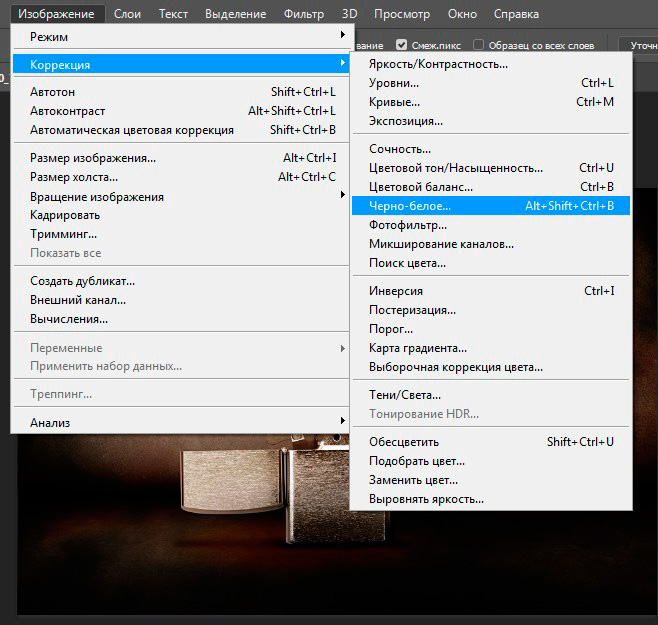
So, go to the "Image" section, which is located in the top panel. Find "Correction" and then "Replace Color".

The familiar cursor changes to the one you are using when you select the Eyedropper tool. Now you only need to click on the color you want to get rid of. Pay attention to what is highlighted on the sketch in the opened additional menu to make sure the selection is correct.
What is "scatter". In Photoshop, and in modern images, an incredible number of shades are used. The higher the value set when adjusting the spread, the more colors you capture. This can be done from the very beginning or at the end of processing.

Now you can drag the "Color Tone" slider to change the color, or click on the color plate. I prefer the second option.

Here is the result I got. The car seemed to have always been gold.

I chose a good photo and correctly identified the color. As they say, all the stars converged, and therefore the result looks very cool. In fact, this does not always happen, sometimes you have to poke around for a long time. I'll show you very soon.

Play around with the scatter after you're done to better adjust the color. I have already spoken about this.

Leave only one color in the photo, and change all the others
Show you one interesting effect, which is often used in film and advertising. Let's choose one color and the rest will be black and white. Find the Magic Wand tool.

Now, anywhere in the photo, right-click and select "Color Range ...".

The magic wand turned into an eyedropper, and almost the same window appeared as in the first method I showed for changing colors. However, there are still significant changes when using this method.

We agree.

The whole color stood out and now you can work with it, but more on that later. For starters, here's something interesting. V top menu find "Selection" and then "Inversion". You can activate the function by simultaneously holding Shift + Ctrl + I.
What will happen? Now you will not be working with the selected color, it will remain intact, but all the others can be deleted without any problems.

Go to the "Image" - "Adjustments" panel and remove all the colors, making the photo black and white.

It remains only to press Ctrl + D to deselect the entire selection.

Ready. This is how the picture looks now.

Removing a specific color
The first method I showed you, with color swap, is very good, but it will be incredibly difficult for you to make one object black and white and leave the rest in color. It is better to use the previous method with some modifications.
First, select the "Magic Wand" tool, then right-click on the "Color Range", and then use the eyedropper to determine the color. There is no need to do “inversion”. You immediately go to top panel"Image".

Find the "Correction" function here and you can remove it completely by applying the "Desaturate" or "Black and White" function.
In some cases, when many colors are used to display one object, you will have to repeat the operation several times.

V this example I removed the color by highlighting two colors.

But for another picture I had to work hard and activate the "Desaturate" option as many as 3 times.

As a result, I have achieved this effect.

Compare with the source.

For such objects, I think it's better to use a different technique. Removing colors, if there are many of them, can be a little faster and better. This is helped by the ability to create a quick mask.
Watch the 5-minute video to see how to get the job done and achieve beautiful effect... Everything is very simple and for some objects it is simply irreplaceable.
OK it's all over Now. If you liked this tutorial, then I recommend subscribing to the newsletter and getting more interesting articles not only about photoshop, but also. Such a hobby as.
If you are interested, but you absolutely do not understand anything in this profession, I can suggest free set mini courses that will clarify. In just a week, you can firmly decide on your choice and understand whether you want to get involved in web design - go over

Well, for those who still understand little about Photoshop, but are very interested in tools and want to discover all the possibilities of this program, I recommend the course of Zinaida Lukyanova "Photoshop from scratch in video format" , the founder of the largest portal about this program.
You've probably stumbled across a lot of boring tutorials that talk about photoshop as if it's not a fun program in which you can create incredible projects, but Newton's third law.
Such training can completely kill all desire. Meanwhile, without knowledge of the basics, you will not be able to make a profit. Thanks to the courses of Zinaida Lukyanova this will not happen, study and work in the future will not cause negative emotions and be associated with mockery of their own strength.
OK it's all over Now. I wish you success in your endeavors and see you soon!
For paperwork in Microsoft Word you need to know all the rules for using certain functions. And one of the most popular questions newbies is to create a red line in different versions programs.
How to make a red line in Word 2010
Word 2010 has smooth lines, volumetric horizontal menu, new modern design... Therefore, some items are a little more difficult to find if you are used to working exclusively in a different version.
There are several ways to indent a red line.
The first way
The first of these is manual dragging of the slider, which should only be performed for the group of text that is paragraphs.
To see this slider, you first need to turn on the ruler (View ›Show› Ruler).

So, to drag the slider, just select the volume that you need to format and drag the top slider on the left to horizontal stripe markup. Do not forget that this action cannot be applied to the entire document, since you will change the appearance of headings and section titles.
Second way
The next option is also to select all the necessary paragraphs and format them using the paragraph "Paragraph". To do this, select a piece of text, right-click on it and select "Paragraph". Then, in the "First line" field, select the required value and confirm the change.
The third way
One of the most effective steps is to create a certain style. Here you can choose not only the location of the text, indents, but also the size and type of font, its main characteristics. Then you can apply the style to any part of the text.
A style can be created by editing a section of text by clicking then right button mouse over it and select there the item "Styles" ›" Save selection as a new express style ". After that you can apply the created style by going to the "Styles" tab.
How to make a red line in Word 2007
The 2007 Word is one of the most popular currently used because a large number of users are accustomed to this outward appearance programs.
The first way
So, the first way to create a red line is to move the horizontal markup slider to the required distance.

To see this slider, you first need to turn on the ruler (View ›Show or hide› Ruler).

Use this method possible only for parts of text, not for the whole document.
Second way
Using the dropdown menu. Select the part of the text that needs formatting, right-click and select the item called "Paragraph". Then define the "First Line" indentation distance and confirm your choice.
The third way
Creating a new style is an equally effective option. Here you can specify formatting rules for all text, right down to working with headings and their selection. Useful function which will format similar documents in the same style.
A style can be created by editing a piece of text, then right-clicking on it and choosing there the item "Styles" ›" Save selection as a new express style ". The created style can be used by going to "Home" ›" Styles "(scroll down).
How to make a red line in Word 2003
Word 2003 is not that popular Lately, but at the same time it has a simple menu, which is somewhat easier to understand than in other versions of the program.
The first way
So, in order to make a red line in a paragraph, you need to: select a part of the text to be formatted, in the menu, after pressing the right button, select the "Paragraph" item and in the "Indents" section define the required spacing in the "First line" field.
Second way
You can also format a paragraph or a group of paragraphs one at a time by dragging the top slider on the horizontal markup at the top of the page.

This way you will automatically indent on the first line. But to use this method, you need to enable the ruler (View ›Ruler)

Using the above rules, you will learn how to format documents efficiently and correctly and do everything necessary actions for a minimum period of time.
Greetings Friends.
After another long break, I remembered that I had not written a single line for a long time. Of course, there are reasons for this, because there is always some reason to come up with an excuse for yourself, right? In fact, every day I study the Video Course, which I have already mentioned a couple of times, but for now I will not say anything more about this, you will soon find out everything.
So, since nothing came to my mind, what can I write about. I decided to look at the statistics, what interests Runet users about HTML, WordPress, DLE and so similar topics... And you know what? There is still something to write about. There seem to be answers to all the questions that I have found, but not always in an understandable form. And in general it became interesting to write something like that.
Today we'll talk about HTML. Namely, how to make text bold and italicized, and also talk about highlighting with color.
Make text bold.
To highlight text bold no need to trick anything with CSS styles or come up with any other difficulties. HTML already has this capability. At the same time, we can not only make the text bold, but also make some emphasis on it with the help of selection. Emphasis can be placed on search engines or any special browsers or programs. The main thing is not to overdo it with the accentuation of the text in the article or on the page with some information, as this can have a detrimental effect at least on the promotion of this HTML page.
So, to just make the text bold, we can use the tag . This tag refers to the elements of physical markup, while setting the text to bold without placing any emphasis on it. This tag is paired, which means that it has both an opening tag and an end tag. Also, since the element is inline, it must be in some kind of block element, for example
Sample code:
thumbnail
Result:
thumbnail
In this case, we just made the text bold and that's it.
But it happens, so that we need not just to highlight the text, but to emphasize it. For this we can use the boolean markup tag ... Not only does the text highlighted with this tag carry more weight to search engines. But in theory, it should be different from the tag in speech browsers, for example intonation. However, I can neither confirm nor deny this information, Is it so?
In this case, everything is absolutely the same as in the case with simple selection bold, only we focus, not just highlight.
Sample code:
Result:
It's pretty simple, isn't it?
Italicizing text.
In this case, everything is not more complicated than in the first one. And our situation is absolutely the same. We can highlight text with two options in HTML. Again, using either the physical markup tag or the logical tag, with which we again focus on the selected text.
To make the text italic, we will use the tag ... This element is paired and inline, which tells us what we should use, both the opening tag and the closing tag. And also have to use it inside a block element. And in in this case best-matched block element - paragraph tag
Sample code:
italic text
Result:
italic text
And of course, we can emphasize the text at the same time by highlighting it in italics using the tag . This item such as , except that the text is italicized rather than bold.
Sample code:
the text on which we have emphasized
Result:
the text on which we have emphasized
And the last thing I would like to talk about today is highlighting the text with color.
Unfortunately, we do not have a tag for highlighting text with color in HTML. But still, there is nothing difficult in this method.
So to highlight a certain part text in color, we can wrap the desired part of the text with a tag , which is a generic tag and is used inside a block element. In our case block element is the tag But add not enough. You also need to specify the style parameter, which will allow you to add CSS properties the necessary text, specify the property itself (color), which will help to set a specific color. Finally, provide a value for color properties... But the question may arise: "What should I indicate?" It is necessary to indicate the HTML-code of the color in which we want to "paint" the text. HTML color codes can be found. Now, to make it clearer, consider an example. Sample code.
text to highlight color
In this case, we highlight one word: with color. I also want to note that the tag is paired, and we have to close it where the property should end.
Result:
the text to be highlighted
In such simple ways, we can manipulate the text on our page. I would also like to note that everything that we just talked about works on both WordPress and DLE, because any engine uses HTML to render pages. That is why HTML can be called the basis of the foundations of any site, no matter what CMS you have.
I hope I have explained everything clearly.
Good luck Friends. Coming soon ... There will be interesting news ...


