In the last article we talked about. And now I will tell you how to configure the BIOS of a computer to install Windows from a disk or flash drive.
1. What is BIOS and UEFI
Each motherboard has a special program to boot the computer and configure the parameters of various devices. This program is stitched (programmed) into a special microcircuit on the motherboard and is therefore called firmware.
Previously, all motherboards had a firmware called BIOS, which had a simple graphical interface with white letters on a blue background and was limited in functionality. For example, in the BIOS it was impossible to use a mouse, choose a language, and there were no graphic elements (pictures) due to the limited size of the BIOS memory chip. Also, motherboards with BIOS did not support drives larger than 2TB due to limitations of the old disk partitioning system (MBR).
Now many motherboards have a new type of firmware called UEFI, which features an improved graphical interface with a beautiful background, hand-drawn buttons, the ability to select a language (including Russian) and some improvements. For example, support for a new type of disk partitions (GPT), which allows the use of hard drives larger than 2 TB.
You can find out what type of firmware your motherboard has in the manual for it, on the website of the manufacturer of the motherboard or laptop, and also visually when entering the Setup program. The Setup program is also programmed into the motherboard and is used to change BIOS or UEFI settings.
2. How to enter BIOS Setup
To enter the Setup program, immediately after turning on the computer, hold down the "Delete" button on the keyboard. On some motherboards and laptops, this is done using the F2, F10, or Esc keys. Which button to press can be read in the messages that appear immediately after turning on the computer.
In text form

Graphically

If you do not have time to read, then press the "Pause" button on the keyboard to pause the download. You can continue downloading by pressing any key. If you press the key intended to enter Setup, you will immediately be taken to the motherboard setup program.
Classic BIOS

UEFI interface

3. Basic Setup
3.1. Control keys
The Setup program is a collection of different parameters, grouped on separate tabs, depending on the purpose. On the right or below there will be a description of the keys with which all actions are performed.

To navigate between tabs, the arrows "right", "left" on the keyboard are usually used. To navigate between lines within one tab, use the arrows "down", "up".

To change the values, use the arrows to move to the required field, press the "Enter" key, and then use the arrows to select a new value from the drop-down menu. For this, the keys "+", "-" or "Page Up", "Page Down" can also be used.
Press the Esc key to return one level up or to the previous page. The "Esc" key on one of the main tabs will mean exiting the BIOS without saving the settings, which will need to be confirmed or canceled.
In the UEFI Setup program, you can do everything with the mouse.
3.2. Saving settings
This is a very important point. After completing all the necessary settings, go to the “Exit” tab, select the “Exit and Save Changes” with the arrows, press “Enter” and confirm the saving of the settings by selecting “OK” or "Yes" and again "Enter".
You can save the settings much easier and faster by pressing the "F10" key on the keyboard and confirming your decision. This key works in many versions of BIOS, UEFI, and is often indicated in tooltips (bottom or right).
3.3. Cancel settings
If you accidentally change something or are not sure about the correctness of the settings, then go to the "Exit" tab and select "Exit and Discard Changes" or press the "Esc" key until the message about exiting without change the settings and confirm the action ("OK" or "Yes").
3.4. Restore settings
To restore all settings to their optimal default values, go to the Exit tab and select Load Setup Default. After that, you can immediately change other settings or simply exit the BIOS with saving the parameters ("Exit and Save Changes" or "F10").
4. Boot options
Insert a bootable disk or USB flash drive into the computer on which you plan to install Windows. Now, in order to start installing Windows, you need to configure the BIOS (or UEFI) using the Setup program to boot from a disk or flash drive. You can also use the special boot menu of the motherboard (Boot Menu) for this. The latter option is simpler and more convenient, but we will consider both methods.
5. BIOS setup
5.1. Change boot priority
Click on the Boot or Boot tab.

Install your DVD drive or USB stick first in the order of boot devices.

If you are going to install Windows from a disk, then the first item is to select a device such as "ATAPI CD-ROM", a name indicating the manufacturer or model of the drive. For example, "CDROM: PM-HL-DT-STDVD-RAM GH22NP" (this is an "LG" DVD drive).
If you plan to install Windows from a USB flash drive, be the first to choose something like "Removable Dev." or the name of the flash drive with the manufacturer. For example, "USB: Patriot Memory" (this is a "PATRIOT" flash drive).
Transcend JetFlash 790 8Gb
The second should be the hard disk, which is designated as "Hard Drive", "HDD" or the interface to which it is connected, the manufacturer and model of the disk. For example, "SATA: 3M-SAMSUNG HD502HJ" (this is a 500 GB Samsung hard drive with a SATA interface).
Please note that in the "Boot" section there may be other items responsible for boot priority, such as "Hard Disk Drives" or "Removable Device Priority".

They also need to check that the DVD drive or flash drive comes first.

If you have two hard drives, then the one on which you are installing the system should be higher. But in this case, I recommend unplugging one of the disks to avoid confusion and possible errors in the installation of the system. It can be connected after installation.
The UEFI Setup program does the same thing. Look for the "Boot" or "Download" section, find your DVD drive or USB flash drive there and raise them to the very top of the boot priority. Plus, you can use the mouse for this, which is easier and more convenient.

5.2. SATA controller operating mode
In principle, this is not so important, but many are interested in this question, so I decided to clarify it a little. SATA drives can work in compatibility mode with older IDE drives and in the more modern AHCI mode. AHCI gives a small increase in hard disk performance when multiple concurrent access to it. This mode of disk operation occurs mainly on servers and is practically useless for an ordinary home computer.
When setting up the BIOS, it is possible to select the operating mode of the SATA controller.

These settings can be in different places and differ slightly in names, but the principle is the same everywhere. You are offered IDE compatibility mode or the new AHCI mode.

In general, it is recommended to use the IDE compatibility mode for Windows XP, since initially it does not have SATA drivers and simply will not see the hard drive, which will prevent Windows from installing. Drivers can be built into the Windows installation distribution, but this does not make sense, since it will not affect the speed of work, but it can add problems.
There is an easier and more convenient way to boot from a DVD or USB flash drive for both BIOS and UEFI - booting using the "Boot Menu".
The keys "F8", "F10", "F11", "F12" or "Esc" can be used to call the boot menu. They can often be seen in prompts on the computer's startup screen. You can also find out this information from the instructions, on the website of the manufacturer of the motherboard or laptop, by searching the Internet or by typing.

Immediately after turning on the computer, hold down the "Boot Menu" call key until the boot device selection menu appears.

Use the "down" and "up" arrows to navigate to the DVD drive or USB flash drive and press "Enter".
Sandisk cruzer
The advantages of this method are obvious - you do not need to dig into the BIOS, you do not need to return the BIOS settings back later (although this is not always necessary), and it is enough to call this menu just once, since after the installation of Windows it is no longer required. Also, using the Boot Menu does not change the BIOS or UEFI settings.
7. Problems with loading
Friends, due to the fact that many had problems with booting when installing Windows and some wrote about this in the comments, I decided to make a separate section where I collected the ways I know how to solve these problems.
- If the computer stops loading at the very beginning and asks to press F1, after which it enters the BIOS, then you most likely either have a dead battery on the motherboard (time may get lost), problems with the processor cooler (it is out of order, it is not connected there) or the hard drive (errors in SMART).
- If the message "Reboot and Select proper Boot device or Insert Boot Media in selected Boot device and press a key" appears when you turn on the PC, this means that the boot area on the disk or flash drive was not found or is damaged. Try booting from the installation disc or USB flash drive using the Boot Menu (section 6 of the article), if it does not help, make the bootable media again using the Windows USB / DVD Download Tool.
- If, after restarting the computer, the Windows installation starts from the beginning, then remove the boot disk or USB flash drive and restart the computer, the installation should continue from the hard disk.
- Disconnect all unnecessary USB devices from the computer (USB flash drive, 3G modem, smartphone, printer). You only need to leave the mouse, keyboard, DVD-disk or USB flash drive from which you are installing Windows.
- If you have several hard drives, then disconnect all drives from the motherboard, except for the one on which Windows will be installed.
- Reset BIOS to default settings (described in this article).
- If the installer does not see the drive or the error 0x0000007B appears at the end, change the SATA controller mode in the BIOS from AHCI to IDE or vice versa.
- If at each boot the computer or laptop enters the BIOS or opens the boot menu, then set the Boot Pop Menu option in the BIOS to Disable (if any).
- Disable Fast Boot in the Advanced section of the BIOS, and in the Boot section, set the Launch CSM option to Enable (if any).
- In the Boot section of the BIOS, change the Boot Mode from EFI (UEFI) to Legacy (if available).
- Set the BIOS to the Secure Boot option to Disable (if any).
- Select the version of Windows you are installing in the BIOS (if any).
- If you have a laptop, one version of Windows is installed, and the other is not, and advice on setting up the BIOS did not help you, then contact the support or the manufacturer's forum. Updating the BIOS can also help, after which additional options may appear in it (clauses 8-12).
- If possible, from a DVD, since there are many different problems with flash drives.
- Make of.
- Insert the USB stick into the USB 2.0 connector on the back of your computer (motherboard) or the USB 2.0 connector on your laptop. Booting from USB 3.0 does not always work.
- Try using the Boot Menu, as described in section 6 of this article. This method is simpler, more reliable than setting the boot priority in the BIOS, and you can determine whether the computer sees your USB flash drive.
- An underscore on a black screen indicates that the computer freezes when accessing a USB flash drive or hard drive. If the download goes on without a flash drive, then the point is definitely in it.
- If the computer does not see the USB flash drive or does not want to boot from it, use a DVD or another USB flash drive for installation.
- If this is not possible, then change the type of flash drive from "removable media" to "hard disk" using the "BootIt Next Generation" utility, format it with the "HP USB Disk Storage Format Tool" utility and make it bootable again using "Windows USB / DVD Download Tool ". All these utilities you can download below in the "Links" section.
- If the problem occurs after selecting the Windows installation partition, then use the tips for setting up the BIOS (paragraphs 7-12). Remove old partitions from the disk during installation, or do it using the Acronis Disk Director bootable disk.
- If the installer reports that it cannot install Windows to the disk, then try to execute or vice versa.
Let me remind you that the F10 key is used to exit the BIOS while saving the settings.
8. Links
In the following articles, we will look at how to install, and.
Sandisk cruzer
Transcend JetFlash 790 8Gb
Sandisk cruzer
Good day everyone!
Why memorize what you don't need every day? It is enough to open and read the information when you need it - the main thing is to be able to use it! I usually do this myself, and these hotkey labels are no exception ...
This article is a reference, it contains buttons to enter the BIOS, to call the boot menu (also called the Boot Menu). Often they are simply "vital" when reinstalling Windows, restoring the computer, configuring the BIOS, etc. I hope the information will be relevant and you will find the coveted key to call the desired menu.
Note:
- The information on the page will be updated and expanded from time to time;
- You can see the buttons for entering the BIOS in this article (as well as how to enter the BIOS at all :)):
- At the end of the article there are examples and explanations of abbreviations in the table, and a description of functions.
LAPTOP
| Manufacturer | BIOS (model) | Hotkey | Function |
| Acer | Phoenix | F2 | Enter Setup |
| F12 | Boot Menu (Change Boot Device, Multi Boot Selection Menu) |
||
| Alt + F10 | D2D Recovery (disk-to-disk system recovery) |
||
| Asus | AMI | F2 | Enter Setup |
| ESC | Popup Menu | ||
| F4 | Easy Flash | ||
| Phoenix-Award | DEL | BIOS Setup | |
| F8 | Boot Menu | ||
| F9 | D2D Recovery | ||
| Benq | Phoenix | F2 | BIOS Setup |
| Dell | Phoenix, Aptio | F2 | Setup |
| F12 | Boot Menu | ||
| Ctrl + F11 | D2D Recovery | ||
| eMachines (Acer) | Phoenix | F12 | Boot Menu |
| Fujitsu Siemens | AMI | F2 | BIOS Setup |
| F12 | Boot Menu | ||
| Gateway (Acer) | Phoenix | Click mouse or Enter | Menu |
| F2 | BIOS Settings | ||
| F10 | Boot Menu | ||
| F12 | PXE Boot | ||
| HP (Hewlett-Packard) / Compaq | Insyde | ESC | Startup Menu |
| F1 | System Information | ||
| F2 | System Diagnostics | ||
| F9 | Boot Device Options | ||
| F10 | BIOS Setup | ||
| F11 | System Recovery | ||
| Enter | Continue Startup | ||
| Lenovo (IBM) | Phoenix SecureCore Tiano | F2 | Setup |
| F12 | MultiBoot Menu | ||
| MSI (Micro Star) | * | DEL | Setup |
| F11 | Boot Menu | ||
| TAB | Show POST screen | ||
| F3 | Recovery | ||
| Packard Bell (Acer) | Phoenix | F2 | Setup |
| F12 | Boot Menu | ||
| Samsung | * | ESC | Boot Menu |
| Toshiba | Phoenix | Esc, F1, F2 | Enter Setup |
| Toshiba Satellite A300 | F12 | Bios |
PERSONAL COMPUTERS
| Motherboard | BIOS | Hotkey | Function |
| Acer | Del | Enter Setup | |
| F12 | Boot Menu | ||
| ASRock | AMI | F2 or DEL | Run Setup |
| F6 | Instant Flash | ||
| F11 | Boot Menu | ||
| TAB | Switch screen | ||
| Asus | Phoenix-Award | DEL | BIOS Setup |
| TAB | Display BIOS POST Message | ||
| F8 | Boot Menu | ||
| Alt + F2 | Asus EZ Flash 2 | ||
| F4 | Asus Core Unlocker | ||
| BioStar | Phoenix-Award | F8 | Enable System Configuration |
| F9 | Select Booting Device after POST | ||
| DEL | Enter SETUP | ||
| ChainTech | Award | DEL | Enter SETUP |
| ALT + F2 | Enter AWDFLASH | ||
| ECS (EliteGrour) | AMI | DEL | Enter SETUP |
| F11 | BBS POPUP | ||
| FoxConn (WinFast) | TAB | POST Screen | |
| DEL | SETUP | ||
| ESC | Boot Menu | ||
| GigaByte | Award | ESC | Skip memory test |
| DEL | Enter SETUP / Q-Flash | ||
| F9 | Xpress Recovery Xpress Recovery 2 |
||
| F12 | Boot Menu | ||
| Intel | AMI | F2 | Enter SETUP |
| MSI (MicroStar) | Enter SETUP |
REFERENCE (according to the above tables)
BIOS Setup (also Enter Setup, BIOS Settings, or just BIOS)- this is the button for entering the BIOS settings. You need to press it after turning on the computer (laptop), moreover, it is better several times until the screen appears. Depending on the manufacturer of the equipment, the name may vary slightly.

Boot Menu (also Change Boot Device, Popup Menu)- a very useful menu that allows you to select the device from which the device will boot. Moreover, to select a device, you do not need to enter the BIOS and change the boot queue. That is, for example, you need to install Windows OS - pressed the Boot Menu entry button, selected the installation USB flash drive, and after rebooting, the computer will automatically boot from the hard drive (and no unnecessary BIOS settings).
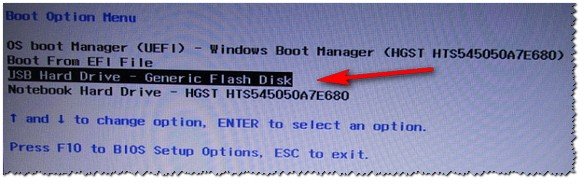
An example of a Boot Menu is an HP laptop (Boot Option Menu).
D2D Recovery (also Recovery)- Windows recovery function on laptops. Allows you to quickly restore the device from a hidden partition on the hard drive. To be honest, I personally do not like to use this function, because recovery in laptops, often, "crooked", works clumsy and it is not always possible to select detailed settings for "how and what" ... I prefer installing and restoring Windows from a bootable USB flash drive.

Easy Flash - used to update the BIOS (not recommended for beginners ...).
System Information - system information about the laptop and its components (for example, this option is available on HP laptops).
PS
For additions on the topic of the article - thanks in advance. Your information (for example, the buttons to enter the BIOS on your laptop model) will be added to the article. All the best!
CD-ROM... Insert the bootable disc into your CD-ROM optical drive. Reboot your computer. At the beginning of the download, immediately press the Delete key, or F2 in the case of a laptop. The main BIOS menu will open. The mouse does not work in it, all actions are performed with the arrow keys, Enter and Escape. Select the Boot menu using the arrows and press Enter. Then select Boot Device Priority. A submenu with a boot list will open, select CD-ROM in the 1st Boot Device line using the arrows and press Enter. To save the settings and exit the BIOS, press the F10 key and confirm the exit by pressing Enter.
Step 2
Flash drive... If you need to select a USB flash drive as a boot device, then do the following. Go to BIOS, select the Hard Disc Drives menu item, install the USB flash drive in the first place. In some cases, the flash drive is identified by the BIOS as a hard drive. If you have this option, then open the Boot Device Priority menu and install the hard disk (with the name of your flash drive) as the first boot device.
Step 3
Quick way... There is another way to select bootable media. Press (hold) the F8 key while turning on the computer. As a result, a small window will pop up with a list of boot devices, select the one you need with the arrows and press Enter. You need to press F8 until the Windows boot screen appears, otherwise you will be taken to the OS boot options menu.
Previous articles have detailed how you can get into. But for what purpose is it necessary? In most situations, entering the BIOS is required to change the default boot disk. This text explains how to boot from a disk or flash drive on several versions of computers. The same principle works on different devices. Moreover, its observance requires only a minimum of logic and care.
Two methods to boot from disk or flash drive
In the first option, it is proposed to put in SETUP(aka BIOS) the desired device to boot by default. In practice, it will look like this: any time the computer is turned on, it will start from the specified hardware. If the device is not available or is not suitable for loading, the system will try to do it from the next one in the list, which can also be designated. If that doesn't work, the computer will go to the third device, and so on.The next method is supported by almost all modern laptops or stationary solutions. It is enough to turn on the menu to select the boot during the start of the computer. Thus, the device is determined from which the system will start only once. This is a more convenient method in a situation where you need to boot the system from a USB flash drive one time.
When using the first method to select a boot device in BIOS, you should go into it and see the available interface. If you are met by blue windows, then in front of you - Award, grayish differs AMI, and the graphic design indicates UEFI... There are others. To determine, you just need to study the screenshots and compare with your interface.
If you have an Award
Enter SETUP, go to " Advanced BIOS Features". As a standard, this item is placed second or third, starting from the top.
Further, several options are possible. In one case, you need to find an item that is called similar to " Boot Seq & Floppy Setup».

In another situation, the required sections can be seen immediately.

Now let's decide on the necessary items in the menu.

First Boot Device means the hardware from which the computer will first start to start.
Second Boot Device is used by the system in the event that the first device is not suitable for loading.
TO Third Boot Device the computer will switch if there are problems with the second equipment in the list.
Any item from such "X Boot Device" corresponds to a hard disk, USB flash drive, CD / DVD or other boot device.
If none of the options came up and Boot Other Device is set to Enabled, then the operating system will be searched for on other drives.
When choosing opposite to any "X Boot Device" Hard Drive, ie. hard disk, the item Hard Disk Boot Priority allows you to specify in more detail which disk to use. This point also applies to flash drives, since this type of boot device is defined by the computer as an external hard drive.
Therefore, to start from a DVD or CD, you need to assign "ATAPI CD" or "CDROM" in the "First Boot Device" item and do not select anything else. However, to boot from a USB flash drive, you need not only to click on "Hard Drive", but also go to the "Hard Disk Boot Priority" section. There, using the buttons "PageUp" and "PageDown" or "+" and "-", move the flash drive up to the very beginning of the list.

Please note! The flash drive is connected to the computer before rebooting or turning on. Otherwise, it is far from the fact that the BIOS will see it.
The name of the flash drive can look different. Usually it starts with "USB ...", "Generic USB ...", and sometimes "External Device". The result of all the actions performed must be saved. It is enough just to press the button " F10"(For clarification, look down the screen at the prompts: there should be the words" Save "and" Exit ") or even return to the main menu and there already select" Save and Exit Setup". In the red window that appears, use the "Y" button to agree with "Yes" and press "Enter".

The reboot will start. When starting from a disk, for a couple of seconds the inscription “ Press any key to boot from CD or DVD ...».

Literal translation of the phrase: "Press any key to load a CD or DVD ...". This means that you can press any button and the computer will start from the disks. If you do nothing, it will boot from the next equipment in the list.
Boot selection process in AMI BIOS
Such BIOSes have a completely different look compared to the Award version. First, we get into SETUP and look for the section " Boot»Button to the right. There are two necessary items here, they can be clearly seen in the screenshot.
To install a boot from a hard disk or flash drive, you need a tab Hard Disk Drives... Select it and in the line "First Drive" (sometimes called "1st Drive") put our flash drive (USB device). After that, you should return to the previous section. Let's press the "ESC" button.

Then go to Boot Device Priority. We select 1st Boot Device and again from the list - a USB flash drive.

Be careful, the selected devices must match! If a hard disk is assigned in the first step, then in the list you need to put not a USB flash drive, but it.
When you need to boot from a CD / DVD, select "CDROM" (sometimes "ATAPI CD-ROM") in the same menu. And in this case, the "Hard Disk Drives" section is no longer needed. Save the settings with the " F10"Or you can just go to the" Exit "item and click" Exit Saving Changes».

A request will appear, we answer "OK".
On different models of laptops and computers, everything is pretty similar. For example, on a standard laptop from Lenovo, the "Boot" section includes all the equipment at once, which is very convenient for users. Eliminated confusion with additional subsections and priority. To set the order of loading the equipment, you just need to use the keys " F5 / F6". Therefore, to start from a flash drive, simply push it all the way to the top.

For some users, a detailed transcript will be useful.
- USB HDD means an external hard drive or USB flash drive.
- How ATAPI CD is defined by CD or DVD-ROM.
- HDD (sometimes ATA HDD) is a hard drive.
- USB FDD - External floppy disk drive.
- USB CD - drive for external disc type.
- PCI LAN stands for LAN Boot.
Below you can clearly see the BIOS EFI (UEFI), which differs not only in the graphical interface, but also in the working mouse. If you have a computer with EFI, then when you enter the BIOS, you will be greeted with such an image.

There is a menu at the bottom of the screen Boot Priority... Here you can use the drag-and-drop method to make the required loading order with the mouse. In addition, by pressing the "Exit / Advanced mode" button located in the upper right, you can go to the advanced version. To do this, select Advanced mode in the window that appears. Then find the "Boot" section and in the Boot Option Priorities tab on the "Boot Option # 1" field, put the required boot device: DVD-ROM, USB flash drive, hard drive or other available equipment.

But computer owners Hewlett-Packard usually the following picture awaits when switching to BIOS.

Find the required device in the "Storage -> Boot order" menu and press "Enter". Move it up and when it is at the beginning press "Enter" too. Select "File -> Save and Exit" to save the settings.
Ways to boot from a disk or flash drive without going into BIOS
It was already mentioned above that almost any modern laptops and computers are designed for a one-time boot from the required device and for this you do not need to contact the BIOS. It is only necessary to press a certain button when starting your computer. For example, in this BIOS Award it is proposed to select “ F12»And call the boot menu.
Usually it is written something like "Press F12 Boot Menu". This means: press "F12" to select the boot equipment. We do this and see the image as in the screenshot below.

The list contains the found devices. Select a CD / DVD disc, USB flash drive or something else and press "Enter". However, other options are possible in AMI BIOS.

The inscription "Press F8 for BBS POPUP" requires pressing "F8" for a menu with a choice to appear. On laptops, sometimes you need the "F12" button to call it. The boot menu looks like the screenshot.

It is enough to select the required one and wait for loading from a CD or USB flash drive.
Potential Difficulties When Booting from USB Devices
Problems sometimes arise and the computer does not boot. Let's dwell on common difficulties. First, make sure that the USB controller in the BIOS is not disabled. In the Award, this information is verified in the “Integrated Peripherals” or “Advanced Chipset Features” section. You need to see the function "USB Controller" and "USB Controller 2" their status should be "Enabled".
In the case of AMI, you need to find "USB 2.0 Controller" in the "Advanced" menu. The position should be "Enabled". The "USB 2.0 Controller Mode" option requires the "HiSpeed" status.

In addition, the reason may lie in the slots located in front of the system unit panel. It is worth trying to connect a USB flash drive to the rear inputs of the computer.
If your SETUP resembles this photo, then in the "Startup" section, change the "UEFI / Legacy Boot" parameter to the "Legacy Only" position.

In addition, the problem may be a disk or flash drive. Bootstrap is required! You can check this on another working computer.
For fairly old computers in general. If there is no newer version of BIOS, then the PLOP solution can help. Download the last option, unpack the archive. You will see the files, of which plpbt.iso is the image for the CD, and plpbt.img is for the floppy disk.
It is clear that if there is a floppy disk, then the corresponding image is written to it, and the image for the disk is placed on the CD-R / RW disc. It will not work just to write the file to the media: there is special software for the image. This topic was described in the instructions for installing the OS. Then you start from a CD or floppy disk, select the device in the window. The method helps to boot from flash drives on the most ancient computers.
Summarize
You have studied a detailed guide on booting from a disk or flash drive in a variety of cases. If you need this only for one time, then it is better to use the menu, which does not require switching to BIOS. With constant downloads or if there is simply no such selection menu, then just configure the BIOS well. Do not forget to bring everything back later.Today I will tell you how to enable booting from a USB flash drive in the BIOS of various manufacturers. It doesn't matter what version you have, the order of body movements will be as follows:
1. We insert our bootable USB flash drive into the usb connector of our computer. I recommend plugging it into the port located directly on the motherboard, i.e. from the back of the system unit.
2. Turn on the computer and press the key Delete(or F2) to get into the BIOS. Depending on the manufacturer and BIOS version, other keys (Esc, F1, Tab) can also be used, so you need to carefully read the prompts on the screen.
In BIOS, we can navigate through the tabs only using the keyboard.
Below I will describe this process in detail using the example of the most used BIOS versions.
Attention! Remember that if you install an operating system from a USB flash drive or CD and select the boot device in the BIOS, and not in the boot menu, then after the first automatic restart of Windows, you must enter the BIOS again and return to boot from the hard disk. If this is not done, autoload from a USB flash drive or CD will work again, and Windows will start the first stage of the procedure again. installation.
Setting up Award Bios to boot from a USB flash drive
Award Bios:
First, let's check if the USB controller is turned on. Go to “Integrated Peripherals”. We go down with the arrow on the keyboard to the item “USB Controller”. Press the “Enter” key and select “Enable” in the window that appears (also using “Enter”). Opposite “USB Controller 2.0” should also be “Enable”.
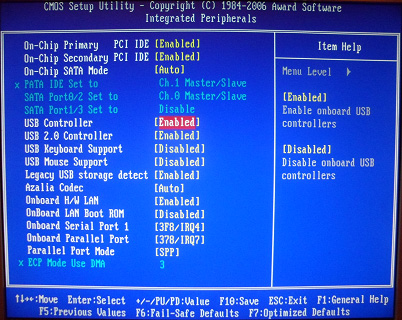 We leave this tab by pressing "Esc".
Then we go to “Advanced BIOS Features” - “Hard Disk Boot Priority”.Now, in my example, the hard drive is in the first place, and the flash drive should be.
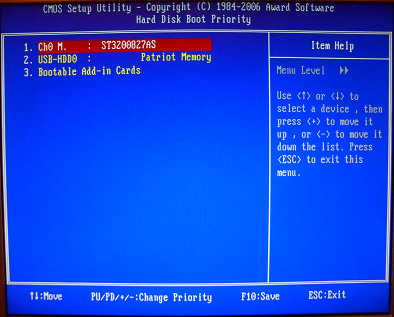 We stand on the line with the name of our flash drive (Patriot Memory) and raise it to the very top using the “+” key on the keyboard.
 We leave from here by pressing "Esc".
Configuring AMI Bios to boot from a USB flash drive
If, after entering BIOS, you see such a screen, then you have AMI Bios:
 First, let's check if the USB controller is turned on. Go to the “Advanced” - “USB Configuration” tab.
 Opposite the items “USB Function” and “USB 2.0 Controller” should be “Enabled”.
 If this is not the case, we stand on this line and press the “Enter” key. From the list that appears, select “Enabled” (also using “Enter”).
Then we exit this tab by pressing “Esc”.
Go to the tab “Boot” - “Hard Disk Drives”.
 Now my hard drive is in the first place, but I need to put a USB flash drive here. We stand on the first line, press “Enter” and in the window that appears, select our Patriot Memory flash drive.
 It should be like this:
 We leave from here through "Esc".
We select “Boot Device Priority”. Here, the first boot device must be a USB flash drive.
 Press Esc.
Then we exit Bios, saving all the settings made. To do this, go to “Exit” - “Exit & Save Changes” - “OK”.

Configuring Phoenix-Award Bios to Boot from a USB Flash Drive
If, after entering BIOS, you see such a screen, then you have Phoenix-Award BIOS :
 First, let's check if the USB controller is turned on. We go to the “Peripherals” tab - opposite the “USB Controller” and “USB 2.0 Controller” items there should be “Enabled”.
 Then go to the “Advanced” tab and set “USB-HDD” opposite the “First Boot Device”.
 After that, we exit Bios, saving the changes. To do this, go to “Exit” - “Save & Exit Setup” - press the “Y” key - “Enter”
 This is practically everything you need to know in order to boot from a USB flash drive. In my article, I described the process of configuring BIOS for the most popular versions: Award and AMI... The third example presents Phoenix-Award Bios, which is much less common.
This procedure may differ slightly in different BIOS versions. But the main thing is that you understand the very principle of setting.
By the way, I would also like to add: in order to choose which device your computer will boot from, it is not necessary to change the settings in the BIOS. You can immediately call up a special menu after turning on the computer to select boot devices (this can be done with the F8, F10, F11, F12 or Esc key). In order not to guess with the keys, we look closely at the monitor immediately after switching on. We need to have time to see an inscription like this: “Press Esc to selest boot device”. In my case, it was necessary to press "Esc".


