We present to your attention a new course from the team The Codeby- "Web Application Penetration Testing from Scratch". General Theory, Working Environment Preparation, Passive Fuzzing and Fingerprinting, Active Fuzzing, Vulnerabilities, Post-Exploitation, Tools, Social Engineering and more.
Domains have at least two DNS servers, one is called the primary name server (ns1) and the other is called the secondary name server (ns2). Secondary servers are usually used in case of problems with the primary DNS server: if one server is unavailable, then the second one becomes active. More complex schemes are also possible using load balancing, firewalls and clusters.
All DNS records for a particular domain are added to the primary nameserver. The secondary server simply synchronizes all information, receiving it from the primary, based on the parameters set on the primary server.
This manual will describe how to create primary dns server running on centos. Please note that the DNS server provided in this manual will be a public DNS, which means that the server will respond to requests from any IP address. How to restrict access to the server is described in this manual.
Before we start, I would like to mention that DNS can be installed with or without a chroot jail environment. The chroot jail environment restricts the DNS server to a specific directory on the system, as opposed to full system access on the server. Thus, any DNS server vulnerability will not compromise the entire system. Restricting the DNS server to a specific directory (a process called chrooting) is also useful in test environments.
Target
We will set up a DNS server under test conditions for the example.tst domain, which is a hypothetical (non-existent) domain. This way we won't randomly tamper with any real domains.
There are three following servers in this domain.
| Server | IP address | Hosted Services | FQDN |
| Server A | 172.16.1.1 | mail.example.tst | |
| Server B | 172.16.1.2 | Web, FTP | www.example.tst ftp.example.tst |
| Server C | 172.16.1.3 | Primary DNS server | ns1.example.tst |
We will set up a primary DNS server and add the required domain and DNS records as shown in the table.
Setting up hostnames
All hosts must be correctly identified in terms of FQDN . This can be done using the following method.
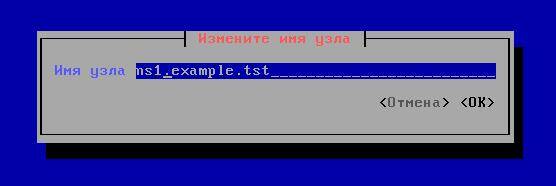
Those who like the graphical interface can take advantage of the NetworkManaget tools. To do this, type the command nmtui. The following pseudo-graphical interface will open:
Select "Change hostname" and enter ns1.example.tst
When done, click and OK.
Another way, in just one command:
Hostnamectl set-hostname ns1.example.tst
Once installed, the hostname can be checked with the following command.
# hostname ns1.example.tst
hostnamectl status

Before proceeding to the next step, make sure that the hostname for all servers is set properly.
Installing packages
We will use bind for DNS, which can be easily installed with the yum command.
Installing DNS without chroot:
# yum install bind
Installing DNS with chroot:
# yum install bind bind-chroot
Preparing Configuration Files
As mentioned earlier, bind can be configured with or without a chroot. The paths are slightly different depending on whether the chroot has been installed.
| Path to the configuration file | Path to zone files | |
| without chroot | /etc/ | /var/named/ |
| with chroot | /var/named/chroot/etc/ | /var/named/chroot/var/named/ |
You can use the named.conf configuration file that comes by default. However, we will use a different example configuration file for ease of use.
Making a backup of the /etc/named.conf file
cp /etc/named.conf /etc/named.conf.bak
# cp /usr/share/doc/bind-9.9.4/sample/etc/named.rfc1912.zones /etc/named.conf
# cp /usr/share/doc/bind-9.9.4/sample/etc/named.rfc1912.zones /var/named/chroot/etc/named.conf
Now that we have a backup copy of the configuration file, and the original file itself has been modified, let's move on.
# vim /etc/named.conf
# vim /var/named/chroot/etc/named.conf
The following lines have been added/changed.
Options ( ## path to zone files ## directory "/var/named"; ## redirect queries to Google's public DNS server for non-local domains ## forwarders ( 8.8.8.8; ); ); ## direct zone declaration for example.tst ## zone "example.tst" IN ( type master; file "example-fz"; ## direct zone file located in /var/named ## allow-update ( none; ) ; ); ## reverse zone declaration for network 172.16.1.0 ## zone "1.16.172.in-addr.arpa" IN ( type master; file "rz-172-16-1"; ## file for reverse zone located in /var /named ## allow-update ( none; ); );
Preparing Zone Files
Default zone files are automatically created in /var/named or /var/named/chroot/var/named (for chroot).
Assuming no default zone files are present, we can copy the sample files from /usr.
# cp /usr/share/doc/bind-9.9.4/sample/var/named/named.* /var/named/
# cp /usr/share/doc/bind-9.9.4/sample/var/named/named.* /var/named/chroot/var/named
Excellent. Now that the default zone files are ready, we create our own zone files for example.tst and the 172.16.1.0 network. While we are creating the zone files, there are a few things to keep in mind.
- The '@' symbol means NULL in zone files.
- Each fully qualified domain name (FQDN) entry ends with a dot '.' e.g. mail.example.tst. Without a dot, there will be problems.
1. Direct zone
The forward zone contains a mapping from names to IP addresses. For public domains, the DNS of hosted domains is contained in the forward zone file.
# vim /var/named/example-fz
# vim /var/named/chroot/var/named/example-fz $TTL 1D @ IN SOA ns1.example.tst. mial.example.tst. (0 ; serial 1D ; refresh 1H ; retry 1W ; expire 3H) ; minimum IN NS ns1.example.tst. IN A 172.16.1.3 mail IN A 172.16.1.1 IN MX 10 mail.example.tst. www IN A 172.16.1.2 ns1 IN A 172.16.1.3 ftp IN CNAME www.example.tst.
Explanation: Inside the zone file, SOA means start of authorization. This is the fully qualified domain name of the authoritative nameserver. After the fully qualified domain name, comes the contact email address. Since we cannot use '@' in [email protected], we rewrite the email address as mial.example.tst.
- NS: Server name
- A: A entry or address entry is an IP address
- MX: Mail Exchanger entry. Here we use only one MX with priority 10. In the case of multiple MXs, we can use different digital priorities. The bottom number wins. For example, MX 0 is better than MX 1.
- CNAME: name in canonical form. If a server hosts many services, it is very likely that many names will resolve to the same server. CNAME signals that other names the server may have and refers to the name contained in the A record.
2. Return zone
The reverse zone contains a mapping from IP addresses to names. Here we create a reverse zone for the 172.16.1.0 network. In a real domain, the DNS server of the owner of the public IP block is contained in the reverse zone file.
# vim /var/named/rz-172-16-1
# vim /var/named/chroot/var/named/rz-172-16-1 $TTL 1D @ IN SOA ns1.example.tst. sarmed.example.tst. (0 ; serial 1D ; refresh 1H ; retry 1W ; expire 3H) ; minimum IN NS ns1.example.tst. 1 IN PTR mail.example.tst. 2 IN PTR www.example.tst. 3 IN PTR ns1.example.tst.
Explanation: Most of the parameters used in the return zone are identical to the direct zone, except for one.
- PTR: PTR or pointer record, it points to a fully qualified domain name
Completion
Now that the zone files are ready, we will set up the resolution of the zone files.
# chgrp named /var/named/*
# chgrp named /var/named/chroot/var/named/*
Now we will set the IP address of the DNS server.
# vim /etc/resolv.conf nameserver 172.16.1.3
Finally, we can start the DNS service and make sure it's added to autostart.
# service named restart # chkconfig named on
DNS testing
We can use dig or nslookup to test DNS. First, we will install the required packages.
# yum install bind-utils
1. Direct zone testing using dig
# dig example.tst ;; ->>HEADER<<- opcode: QUERY, status: NOERROR, id: 31184 ;; QUESTION SECTION: ;example.com. IN A ;; ANSWER SECTION: example.com. 86400 IN A 172.16.1.3 ;; AUTHORITY SECTION: example.com. 86400 IN NS ns1.example.com. ;; ADDITIONAL SECTION: ns1.example.com. 86400 IN A 172.16.1.3
2. Check PTR with dig
When you use dig to test, you should always look for the "NOERROR" status. Any other state means that something is wrong.
# dig -x 172.16.1.1 ;; ->>HEADER<<- opcode: QUERY, status: NOERROR, id: 27415 ;; QUESTION SECTION: ;1.1.17.172.in-addr.arpa. IN PTR ;; ANSWER SECTION: 1.1.16.172.in-addr.arpa. 86400 IN PTR mail.example.tst. ;; AUTHORITY SECTION: 1.16.172.in-addr.arpa. 86400 IN NS ns1.example.tst. ;; ADDITIONAL SECTION: ns1.example.tst. 86400 IN A 172.16.1.3
3. Checking MX with dig
# dig example.tst mx ;; ->>HEADER<<- opcode: QUERY, status: NOERROR, id: 35405
;; QUESTION SECTION:
;example.tst. IN MX
;; ANSWER SECTION:
example.tst. 14366 IN MX 10 mail.example.tst.
Troubleshooting Tips
- I have SELinux disabled.
- Make sure your firewall is not blocking UDP port 53
- /var/log/messages should contain useful information in case something goes wrong
- Make sure the zone files are owned by user 'named'
- Make sure the DNS server IP address comes first in /etc/resolv.conf
- If you are using example.tst in a lab, be sure to disconnect the server from the Internet because example.tst is a non-existent domain.
To recap, this tutorial focuses on hosting the example.tst domain in a lab setting for demonstration purposes. Please remember that this is not an instruction to create a public DNS server, such as a DNS server that responds to queries from any IP address. If you are setting up a production DNS server, be sure to check which policies apply to public DNS. Another lesson covers creating a secondary DNS, restricting access to a DNS server, and implementing DNSSEC.
The Guarantor is a trusted intermediary between the Participants in the transaction.
Most Internet users know that the DNS server provides translation of site names into IP addresses. And usually this is where the knowledge about the DNS server ends. This article is designed for a more in-depth consideration of its functions.
So, let's imagine that you have to debug a network for which the provider has allocated a block of "honest" addresses, or set up your own DNS server on the local network. This is where all sorts of terrible words will immediately pop up, such as “zone”, “transfer”, “forwarder”, “in-addr.arpa” and so on. Let's take it all in step by step.
In a very abstract way, every computer on the Internet has two main identifiers - a domain name (for example, www..0.0.1). But the abstraction lies in the fact that a computer can have several IP addresses (moreover, each interface can have its own address, in addition, several addresses can belong to one interface), and there can also be several names. Moreover, they can communicate with both one and several IP addresses. And thirdly, a computer may not have a domain name at all.
As mentioned earlier, the main task of a DNS server is to translate domain names into IP addresses and vice versa. In the early days of the Internet, when it was still the ARPANET, this was solved by maintaining long lists of all computer networks. At the same time, a copy of such a list should have been located on each computer. Naturally, with the growth of the network, this technology has already become inconvenient for users, because these files were large in size, and besides, they also needed to be synchronized. By the way, some of these "echoes of the past" of this method can still be found today. This is how you can enter the addresses of servers that you regularly work with in the HOSTS file (on both UNIX and Windows).
So, the inconvenient "single-file" system was replaced by DNS - a hierarchical name structure invented by Dr. Paul Mokapetris.
So, there is a "root of the tree" - "." (dot). Considering that this root is the same for all domains, the dot at the end of the name is usually not put. But it is used in DNS descriptions and it needs to be remembered. Below this "root" are the first-level domains. There are few of them - com, net, edu, org, mil, int, biz, info, gov (etc.) and state domains, for example, ua. Even lower are the second-level domains, and even lower - the third, and so on.
What is ascending hierarchy
When configuring, the address of at least one DNS server is specified, but as a rule, there are two of them. Next, the client sends a request to this server. The server that received the request either responds if the answer is known to it, or forwards the request to the “upstream” server (if it is known), or immediately to the root, since each DNS server knows the addresses of the root DNS servers.
Then the request starts to go down - the root server forwards the request to the first level server, the root server to the second level server, and so on.
In addition to such a "vertical connection", there are also "horizontal" ones, according to the "primary - secondary" principle. And if we assume that the server that serves the domain and works “without safety net” suddenly becomes inaccessible, then the computers that are located in this domain will also become inaccessible! That is why, when registering a second-level domain, it is required to specify at least two DNS servers that will serve this domain.
As the Internet continued to grow, all top-level domains were divided into subdomains or zones. Each zone is an independent domain, but queries the parent domain when accessing the name database. The parent zone guarantees the child zone the right to exist and is responsible for its behavior on the network (just like in real life). Each zone must have at least two DNS servers that maintain the DNS database for that zone.
The main conditions for the operation of DNS servers in one zone are the presence of a separate connection to the Internet and their placement in different networks to ensure fault tolerance. Therefore, many organizations rely on ISPs to maintain secondary and tertiary DNS servers on their behalf.
Recursive and non-recursive servers
DNS servers can be recursive or non-recursive. The difference in them is that recursive ones always return a response to the client, since they independently monitor referrals to other DNS servers and query them, while non-recursive ones return these referrals to the client, and the client must independently query the specified server.
Recursive servers are usually used at low levels, for example, in local networks, since they cache all intermediate responses, and so subsequent requests to it will return responses faster. And non-recursive servers are often at the top of the hierarchy, because they receive so many requests that there simply aren’t enough resources to cache responses.
Forwarders - Request Forwarders and Name Resolution Accelerators
DNS servers have a rather useful property - the ability to use the so-called "forwarders" (forwarders). An "honest" DNS server independently polls other servers and finds the right answer. But if your network is connected to the Internet via a slow line (for example, dial-up), then this process can take a long time. Therefore, you can redirect these requests, for example, to the provider's server, and then simply accept his response.
The use of such "forwarders" can be useful for large companies that have several networks. So in each network you can install a relatively weak DNS server, and specify as a "forwarder" a more powerful machine with a faster line. So it turns out that all responses will be cached by this more powerful server, which will lead to faster name resolution for the entire network.
Each domain maintains its own DNS database, which looks like a set of simple text files. They are located on the primary (primary) DNS server, and secondary servers copy them from time to time. And the server configuration indicates which file contains zone descriptions, as well as whether the server is primary or secondary for this zone.
Unique address
A unique address on the Internet is formed by adding a domain name to a host name. Thus, a computer, for example, "fred" in a domain, for example, "smallorg.org" would be named fred.smallorg.org. By the way, a domain can contain both hosts and zones. For example, the smallorg.org domain might contain the host fred.smallorg.org and at the same time host the acctg.smallorg.org zone, which is a subdomain and might contain another host, barney.acctg.smallorg.org. While this simplifies the name database, it makes finding hosts on the Internet more difficult.
The DNS system implements three scenarios for looking up an IP address in a database.
- A computer that needs to connect to another computer in the same zone queries the zone's local DNS server to find the remote computer's IP address. The local DNS server, which has this address in the local name database, returns the requested IP address to the computer that sent the request.
* A computer that needs to connect to a computer in another zone queries the local DNS server in its zone. The local DNS server detects that the target computer is in a different zone and queries the root DNS server. The root DNS server descends the DNS server tree and finds the corresponding local DNS server. From it, he gets the IP address of the requested computer. The root DNS server then passes this address on to the local DNS server that sent the request. The local DNS server returns an IP address to the computer from which the request was made. Together with the IP address, a special value is transmitted - the time to live TTL (time to live). This value tells the local DNS server how long it can keep the IP address of the remote computer in its cache. This increases the processing speed of subsequent requests.
* A computer that needs to reconnect to a computer in a different zone queries the local DNS server in its zone. The local DNS server checks if the name is in its cache and if the TTL value has expired. If the address is still in the cache and the TTL value has not expired, then the IP address is sent to the requesting computer. This is considered an unauthorized response because the local DNS server believes that the remote computer's IP address has not changed since the last query.
In all three cases, the computer only needs the IP address of the local DNS server to find a computer on the Internet. The local DNS server does the rest of the work to find the IP address that matches the requested name. As you can see, things are now much easier for the local computer.
As the DNS tree grew, new requirements were placed on Domain Name System servers. As mentioned earlier, parent DNS servers must have the IP addresses of their child DNS servers in order to correctly process DNS name-to-IP address resolution requests. In order for DNS requests to be processed correctly, lookups in the DNS tree must start from some specific point. During the infancy of the Internet, most name lookup requests were for local hostnames. Most of the DNS traffic passed within the local zone and only in the worst case reached the parent DNS servers. However, as the popularity of the Internet and, in particular, the Web grew, more and more DNS requests were made to remote hosts outside the local zone. When the DNS server did not find the hostname in its database, it was forced to query the remote DNS server. The most suitable candidates for remote DNS servers, of course, are top-level DNS servers that have full knowledge of the domain tree and are able to find the correct DNS server responsible for the zone to which the requested host belongs. They then return the IP address of the desired host to the local DNS server. All this leads to enormous overloads of the root servers of the DNS system. Fortunately, there are not so many of them and they all evenly distribute the load among themselves. Local DNS servers communicate with top-level domain DNS servers using the DNS protocol, which is discussed later in this chapter.
The DNS system is a two-way street. DNS not only looks up an IP address from a given hostname, but it can also perform the reverse operation, i.e. determine the hostname on the network by IP address. Many Web and FTP servers on the Internet restrict access based on the domain to which the client accessing them belongs. Upon receiving a connection request from the client, the server passes the client's IP address to the DNS server as a reverse DNS query. If the DNS client zone is configured correctly, then the request will return the name of the client host, based on which it is then decided whether to allow this client to the server or not.
Manual configuration. Windows.
In MS Windows, the DNS server address, domain name and host name are set in the network settings (select the TCP/IP protocol, go to its properties and select the DNS tab).
There are at least two servers responsible for each DNS zone. the rest are secondary, secondary. The primary server contains the original DNS database files for its zone. Secondary servers receive this data over the network from the primary server and periodically request the primary server to update the data (an indication of data update is an increase in the serial number in the SOA record - see below). In case the data on the primary server is up to date, the secondary server requests a "zone transfer" - i.e. database of the required zone. Zone transfers occur over TCP port 53 (as opposed to requests that are sent over UDP/53).
Changes to the DNS database can only be made on the primary server. From the point of view of serving client requests, the primary and secondary servers are identical, they all issue authoritative answers. It is recommended that the primary and secondary servers be located on different networks - to increase the reliability of request processing in case the network of one of the servers becomes unavailable. DNS servers do not have to be in the domain they are responsible for.
Note. The secondary server does not necessarily receive data directly from the primary server; another secondary server can serve as the data source. In either case, the data source server for a given secondary server is referred to as the "master". For the remainder of this section, the secondary server is considered to receive zone data directly from the primary server.
23.2. SNiP requirement for computer network equipment
Requirements for SCS
The documents:
Designed and/or operated SCS must be made in accordance with the provisions of the following regulatory documents:
– GOST R 53245‑2008 Information technologies. Structured cable systems. Installation of the main components of the system. Test methods;
– GOST R 53246‑2008 Information technologies. Structured cable systems. Design of the main components of the system;
– ISO/IEC 11801:2010 Information technology – Generic cabling for customer premises – Amendment 2
– ISO/IEC 14763-1:1999 Information technology – Implementation and operation of customer premises cabling – Part 1: Administration
– ISO/IEC 14763-2:2000 Information technology. Implementation and operation of customer premises cabling - Part 2: Planning and installation
– ISO/IEC 14763-3:2006 Information technology. Implementation and operation of customer premises cabling – Part 3: Testing of optical fiber cabling.
Requirements for the SCS structure:
the structure of the SCS should include the main (vertical) and distribution (horizontal) cable components. At the same time, it is recommended to carry out the main telephone cable component of the SCS with a multi-pair cable of category not lower than 5e. The main characteristics of the category 5e cable must be no worse than:
– signal bandwidth - 100 MHz;
– wave impedance at 100 MHz - 100 ± 15 Ohm;
– signal propagation velocity (NVP) - 68%;
– DC resistance - ≤ 10 Ohm/100 m;
– twisted pair capacitance - ≤ 56 nF/km;
– delay skew at 100 MHz - 45 ns/100 m;
– signal propagation delay (propagation delay) at 100 MHz - 536 ns/100 m.
The backbone cable component of the SCS for active LAN equipment is recommended to be performed with a multimode or single-mode optical cable, respectively:
– no worse than OM3 with a bandwidth of 2000 MHz×km for effective mode throughput (EMB) at 850 nm, with a cable structure of 50/125 µm for light waves of 850 nm, 1300 nm;
– no worse than OS1 with cable structure 9(8)/125 µm for light waves of 1310 nm, 1550 nm.
For small networks (up to 120 ports, see clause 6.4.2) with the placement of LAN switches at the facility and compliance with the length of the trunks between their ports of no more than 90 m, it is allowed to use a copper UTP cable of a category that provides the required bandwidth of the backbone section of the network.
Optical backbones should preferably be implemented with redundancy according to the scheme that takes into account the organizational structure of the LAN and excludes a single point of failure of the backbone network. The number of optical fibers in the main cables must be at least 4.
When designing the optical backbone component of the SCS, compatibility with the LAN system of the facility should be ensured in terms of optical modules of active equipment, optical connectors used in them, such as optical fiber
When laying trunk cables between buildings of the same facility, the corresponding channel-forming sewers for low-voltage systems existing at the facility should be used to the maximum. In the absence of the latter, the laying of trunk cables must be carried out in the ground. The organization of overhead communication lines is not allowed.
In general, the structure of the SCS should include the main cross, preferably installed on the first floors of the facility, and storey switching centers (hereinafter - ECC), installed on the floors of the building or places where a large number of users are concentrated. The main cross can be combined with the EKC.
The main SCS cross must be installed in the control room (hereinafter referred to as the PA), the ECC - in separately allocated rooms on the floors. If it is not possible to allocate separate premises for the ECC, it is permissible to place them in the corridors, technological or office premises of the facility. In this case, the telecommunication cabinet must be equipped with a lock. The equipment of the main cross-country, EKC should be installed in standard 19-inch floor-standing or wall-mounted cabinets, the height of which should be determined by the project.
At workplaces, two RJ-45 information sockets (unless otherwise specified in the terms of reference) should be installed in a box in one block with electrical sockets. It is permissible, upon agreement with the end user, to install information outlets in separate places hidden in the wall, overhead, in hatches or in service racks, both together with electrical outlets, and separately.
The number of installed SCS ports at the facilities should take into account the prospects for the development of institutions in terms of increasing the number of employees, while the total number of ports should be determined in agreement with the end user.
The laying of the SCS main cables should be carried out in separate metal trays, where possible, with the maximum use of the space behind the false ceiling, risers of the building. Within the PA, the cable structure must be carried out in the space of raised floors or, in the absence of the latter, in metal trays above telecommunication cabinets. The trays must be grounded to the protective ground bus in accordance with the requirements of the PUE and the requirements of the working documentation.
Laying cables of the horizontal component of the SCS should be carried out in wall boxes. Part of the horizontal cable component, similarly to the main one, can be laid in trays, including those existing at the facility, if there is enough free space in them. It is permissible in certain places of objects to lay cables of the horizontal component of the SCS, in agreement with the end user, hidden in the wall, floor, using channel-forming plastic pipes. When combining the horizontal component of the SCS and the electric cable in one box, the box must contain two sections separated by a partition.
Location of information outlets must be in accordance with the seating plans provided by the end user. Placement of information outlets intended for connection to a wireless access system (Wi-Fi), engineering systems, security systems (dispatching, video surveillance, access control system (hereinafter referred to as ACS), etc.) using SCS as a transmission medium , must be carried out in accordance with the specifications issued by the designers of these systems.
23.3. SNiP requirement for the equipment of premises for the design of computer networks
Requirements for equipping equipment rooms
The equipment of the PA must be carried out in accordance with the requirements of building codes CH512.
PA should be located in a capital building on floors above the basement, away from rooms with wet and dusty technological processes (toilets, kitchens) and locations of powerful electrical installations (elevators, generator sets). When choosing a room below the basement, measures must be taken to waterproof the PA. In the PA, the presence of transit pipe (water supply, heating mains) and cable wiring is not allowed.
The dimensions of the PA should be determined by the design requirements for the placement of equipment, technological passages for installation, repair and maintenance work, as well as the requirements of the air conditioning system regarding the necessary conditions for the placement of equipment in order to more effectively maintain the required climatic standards.
PA must be equipped with air conditioning systems to maintain the following climatic parameters:
In order to preserve the equipment in the event of a fire, automatic gas fire extinguishing installations must be installed in the PA
The floor of the PA must be covered with an antistatic material - linoleum or other material that does not accumulate static electricity, with a resistance of at least 106 Ohm. Permissible distributed and concentrated loads on the floor of the emergency vehicle must be selected in accordance with SNiP 2.01.07, taking into account the weight of the equipment installed in the emergency vehicle.
If the temperature and humidity conditions of the equipment operation are observed, it is permissible, in agreement with the end user, to use natural ventilation to remove excess heat from the equipment to the PA.
In the PA for all consumers of the specified room, an electrical panel with a common switch for the input power supply should be installed. The dimensions of the input shield, its mounting DIN rail must allow the installation of circuit breakers for connecting all consumers, determined by the power supply project for the PA equipment.
The laying of power cables in the PA should be carried out in the space of the raised floor or (in its absence) in separate metal trays installed above the TS. Descents of power cables, installation of household sockets in the PA must be carried out in wall boxes.
When forming the ITS of objects with a small (up to 60) number of users, where it is not required or inappropriate to ensure guaranteed uninterrupted operation of the equipment, simplified requirements for equipping the PA can be applied, in agreement with the end user. At the same time, the requirements of all necessary standards, norms, rules and recommendations regarding power supply, fire safety and life safety must be observed.
In the premises of the EKC, hand-held wall-mounted gas fire extinguishers with a sufficient volume of fire extinguishing agent corresponding to the volume of the protected premises in accordance with SP 9.13130.2009 must be installed, as well as other fire safety standards must be observed in accordance with the Rules for the fire regime in the Russian Federation (approved by the resolution "Technical fire safety regulations.
An electrical panel with a common input power switch and circuit breakers for connecting active LAN equipment should be installed in the ECC.
When choosing the locations of the ECC, preference should be given to premises near the locations of low-current risers of the building or near places where a large number of users are concentrated. The dimensions of the premises for the ECC should be determined by the design requirements for the placement of equipment, technological passages for installation, repair and maintenance work. The ECC must provide the necessary climatic parameters for the operation of the equipment.
The DNS protocols are part of the core Internet standards. They define a process by which one computer can find another computer based on its name. The implementation of the DNS protocols means that the server contains all the software needed to create DNS queries and responses.
The minimum data retention requirements require for each domain zone at least two DNS servers. The first DNS server is called primary, it is also primary, and in a new way master. The rest of the servers, and there can be at least one, and a maximum of 12, are called secondary DNS servers, or otherwise secondary, in a new way, slave. In a new way, this is from DNS Bind version 8.
Note: BIND is a program for implementing Domain Name System (DNS) protocols. The name BIND stands for "Berkeley Internet Name Domain" since the software originated in the early 1980s at the University of California at Berkeley. In recent years, the word BIND has become more than an acronym.
- Primary and secondary DNS do not have to be on the domain they are responsible for.
- Primary and secondary DNS are both authoritative servers.
Primary and Secondary DNS
Primary (primary, master) DNS server
Master DNS server stores the complete, original database of its domain zone. Data is stored in files.
When querying the primary DNS server, it gives an authoritative response, thanks to which the IP of the resource is located on the domain.
It is important to understand that only the master server can make changes to the DNS database. I repeat, only on the primary DNS server, a database of domain names is stored attached to the domain zone server of this DNS.
Secondary (secondary, slave) DNS servers
As I already mentioned, at least two DNS servers must be created or attached for each domain zone. That's the minimum. The number of secondary servers can be up to 12. For the most part, this number of secondary servers is too much. As a rule, with a margin, three secondary DNS are sufficient. Yes, you yourself saw that any domain name registrar has no more than four fields for entering DNS server addresses. One for the primary server, three for secondary servers.
The name database is not stored on secondary DNS servers, it is periodically read from the primary server, naturally over the network. The frequency of reading is defined in the DNS record of the SOA type (Refresh parameter, in seconds). Usually, 3600 seconds, that is, the information on the secondary server is updated every hour.
I would like to draw your attention to the fact that any secondary server can read data not only from the primary server, but also from any secondary one. In this case, this server from which information is read will be the master server for the secondary server.
How best to host primary and secondary DNS
You need to understand that if the DNS server "falls", then all sites located in the domain zone of this DNS fall too. If the primary server goes down, successive secondary DNS servers start responding. And here is the problem, if all DNS servers are on the same network, then when this network falls, all DNS fall. Hence the simple conclusion, “you don’t need to store all your eggs in one basket,” or in our case, you need to spread the DNS servers to different hosts, and even better, to different territorial zones.

For example, a hosting provider has provided you with two DNS servers for your domain. More correctly, on the contrary, he included your domain in the domain zone of his DNS servers. Search the Internet for a secondary DNS server (free or paid) and supplement your primary and secondary servers with third-party DNS servers. Thus, you will secure your resource in case the provider's DNS servers fall.
With hosting, there may be problems with adding third-party DNS servers. Each provider has its own sandbox and sets its own rules. Some hostings limit clients to only their DNS. Another thing is if you have a VPS / VDS server. Here you are the full owner and can create DNS servers on your domain yourself. And again, create two of your own DNS servers on the VPS and supplement them with two third-party, and preferably different, DNS servers.
Where to register DNS servers
DNS servers must be registered (registered) on your hosting or server and at the domain name registrar. On the secondary domain name server, you only register your domain and take their secondary DNS. Regardless of the place of attachment, your domain and your DNS servers must be registered, and therefore associated:
- At the name registrar;
- On your hosting or server (DNS server section, DNS management);
- On the secondary DNS server (if using).

conclusions
- For the site to work, its domain must fall into the domain zones that serve the primary and secondary DNS servers;
- There must be at least two DNS servers. One primary and one secondary DNS. For more reliable operation of the site, supplement two DNS servers with two additional secondary servers. It is advisable to take the third and fourth DNS servers on different hostings.
Secondary DNS servers
Here are a few servers where you can get secondary DNS.
- 2DNSinfo.ru (free);
- www.mgnhost.ru/DNS-hosting.php (600 rubles per year for 100 zones);
- http://toobit.ru/hosting/secondary_name_server.php (100 Slave DNS for $1 per month);
When renting third-party primary and secondary DNS servers, be wary of import DNS hosting. Try to check their response time to a request, there are a lot of online services for this. Normal DNS query response time should be between 20 and 120 ms. Although import hostings and servers are scattered all over the world, but, unfortunately, this world can be so far away from you that the response time reaches 800-4000 ms. And that's not good.

How to check the DNS server of a website
To check your own and other people's DNS, use any Whois service - a domain name verification service. When checking, do not forget that when changing DNS, the caching server is cleared every 24-72 hours.


