Disks with an unset file system are indicated by RAW(translated from English " raw», « raw"). This means that the data standard unknown, the stored information does not have a clear specification. If in Windows one of the disks or partitions is recognized as RAW, it means that the installed drivers was not recognized file system name. In normal mode, this name should be FAT or NTFS.
When you try to enter such a section, next error.
Or a message stating that disk is not formatted.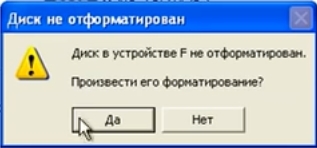
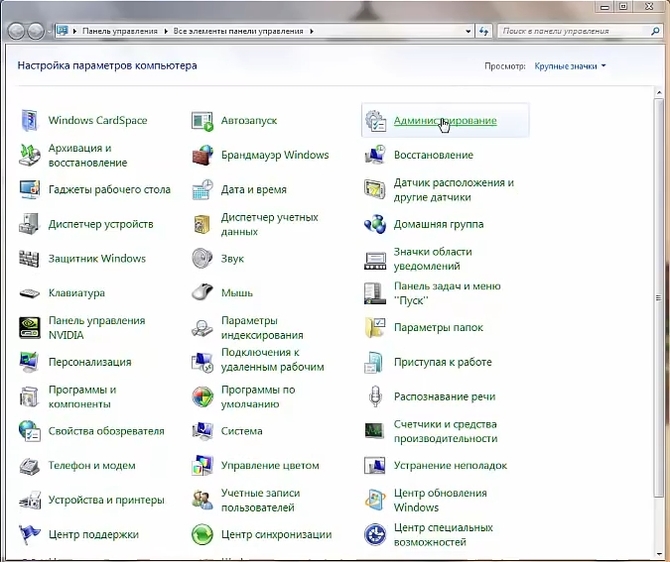
If you go to Administration Control panels, select Computer management, can see condition this disk.


In this case, the system reports that the logical drive serviceable, but unknown format.
Reasons the occurrence of an unknown RAW format can be several:
- filesystem structure violated(partial destruction of boot sectors);
- disk not formatted(file system not installed);
- No access.
This may be the result of such actions:
- incorrect installation(reinstallation), OS recovery;
- malfunctioning sectors of the hard drive (perhaps you have recently noticed a long response time when trying to open a particular directory);
- unstable work PSU or drops in mains voltage;
- poor contact of cables and cables connecting the hard drive with the power supply unit and the motherboard;
- viruses.
Checking for errors
In the event that the disk has not undergone serious damage, and most of the file system structures have survived, you can fix the error using standard system facilities... In this case, the section should not be systemic.
Launch command interpreter with rights administrator.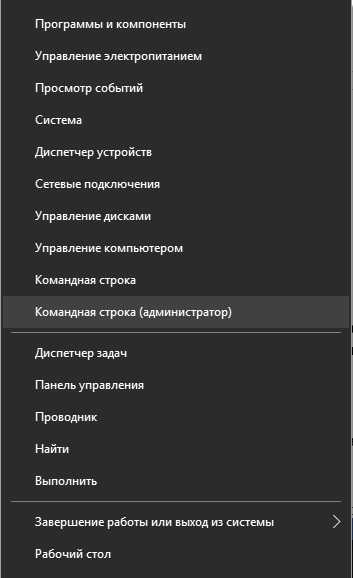
There is a system utility Checkingdisk, designed specifically for checking the hard drive.
To call it in the console, enter chkdsk (drive letter): / f
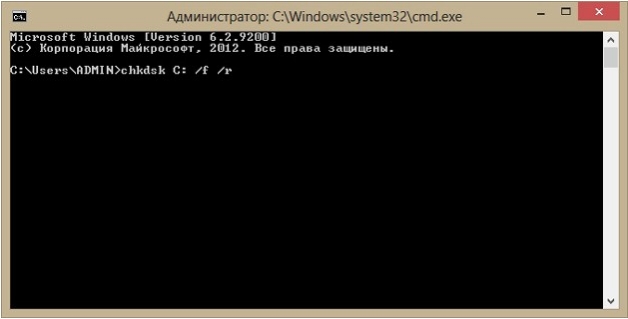

Confirm checking the specified volume by typing a character Y- the search and elimination of errors will begin. Upon completion reboot... Scanning time can take a lot, it depends on the size of the disk that needs to be repaired. Wait for it to complete, because there is a high probability of a successful recovery in this way.
Using formatting
Carrying out the procedure formatting, it should be borne in mind that in this case all data will be lost... If the information stored on it was not important to you, to start reformatting, go to, as shown earlier. 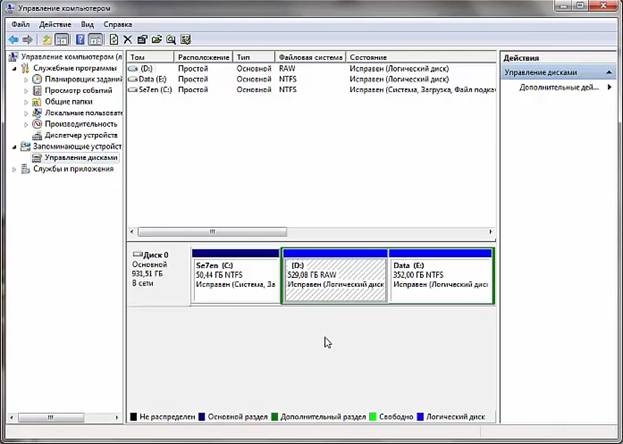
Right click on the disk and select. 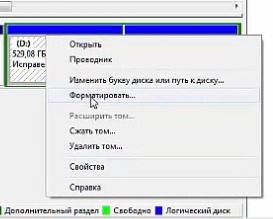
If a lot of necessary data is stored there, then proceed to formatting should be the last thing, trying to restore them by other available means.
Using DMDE to recover without data loss
One of the tools is a free program DMDE... Download it on the official website. After installation and launch choose physical device that contains the RAW section, at the bottom, check the box Show Sections and press OK.
The required drive can be found under crossed out icon or by type RAW, select it and click Open volume.
Review content, if it opens, make sure the selection was correct.
Then press the button Restore and Yes to confirm recovery of the boot sector from the copy. 
Using the TestDisk utility
Another free program that can recover partitions in case of data corruption is TestDisk... She works more efficiently than the previous one, but you will have to tinker with it a little more.
After clicking " Create"(Creating a new log file) select disk with ROW format.


The drive is selected with cursor keyboard.
Select Analyze and the button Enter to confirm. 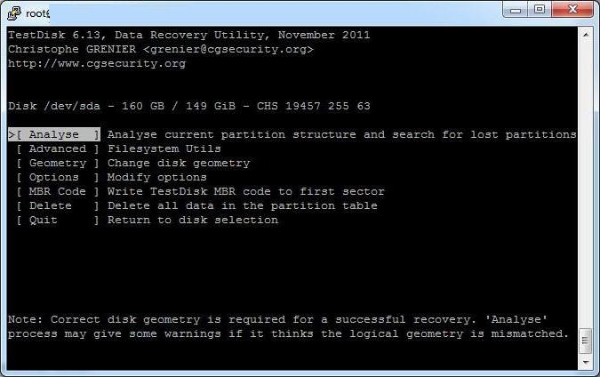
Wait until the analysis is complete - the program will find several disks, including the one that contains information in RAW format. To identify it is possible, knowing the volume. 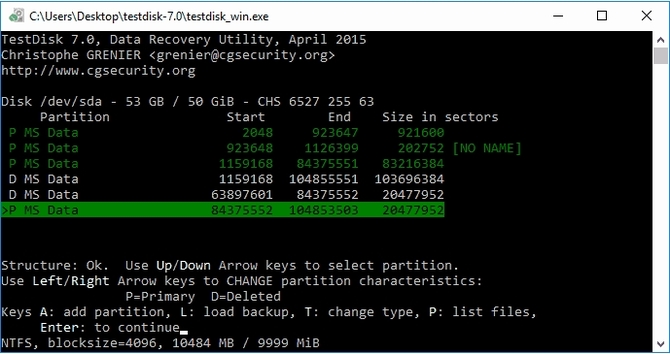
Please select P to enter the mode viewing... After making sure that this is the correct drive, press Write to restore and Y to confirm this action. 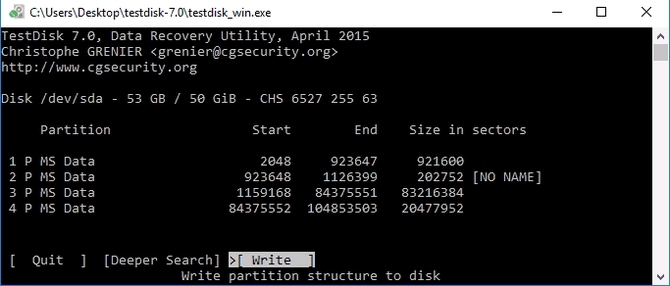
Upon completion of recovery reboot and check if the recovery was successful.
Raw format on the system partition
 If you are restoring a system partition, then it should be borne in mind that after returning the disk to the original format of the OS file system stop loading- would need restore loader.
For recovery, you can use the same utilities that were discussed above. Recommended for these purposes, connect the hard drive to another device and perform this procedure from it, or use a special boot disk containing, for example, Minitool Partition Wizard, Active Partition Recovery Boot Disk or similar specialized funds.
The problem with the appearance of the RAW file system can befall not only removable media, but also a hard drive with data or a separate partition of the hard drive. If the malfunction is of a software nature, then it can be corrected using formatting. However, changing the format using standard Windows tools is fraught with the appearance of deleted data.
If the file system of your hard disk is detected as RAW, and the system persistently prompts you to format it, then it is better to skip this procedure. Disconnect the hard drive, do not carry out any more operations with it, in order to avoid accidental overwriting.
Important: if the hard drive is physically damaged, then you should not try to repair it yourself.
If, upon examination, you find that the hard drive is physically sound, then first try to restore the file system using the CHKDSK utility. This will help to avoid the subsequent time-consuming recovery of deleted files.
Using the CHKDSK utility
The CHKDSK utility is a built-in hard drive diagnostics and repair tool. The problem is that if the file system is damaged, then you will not be able to start the system. Therefore, the CHKDSK utility will have to be launched using the installation disk:
A parameter in the command syntax means to start searching and fixing errors. The letter "d:" designates the disk to be scanned. If the operation is successful, errors are found and eliminated, then you will again get a scratch disk with a normal file system and without deleted important data.
Extracting files with R-Studio
If the TestDisk program did not help to get rid of the RAW format, and you did not return the NTFS or FAT32 file system, then you will have to go the other way. You will need:
- Another computer with a scratch disk and system installed.
- R-Studio program.
Remove the RAW file system HDD and connect it to another computer. To avoid the appearance of deleted files, start R-Studio. Here you need:

You need to save the files to a different drive than the one from which they were just extracted. The hard drive format will not change - it will remain RAW. To recover the HDD, format it as suggested by the system. The format will change, but there will be no problems with the deleted files, since you previously "pulled" them from the damaged media.
Formatting to NTFS
If you need to format your hard drive to the NTFS file system, without losing information, you can try to do this through the command line. This will not solve the RAW issue; you cannot use this method to change to FAT32 either. But if you need to change the format of a disk or partition from FAT32 to NTFS, then try the following steps:

Enter the command "convert G: / FS: NTFS / X". Instead of "G" there should be the letter of the hard disk you connected, the partition format of which you want to change from FAT32 to NTFS. Executing this command will help you avoid data loss, that is, you will not have to recover deleted files, since formatting is not required.
What is RAW file system and how to recover NTFS format without data loss - in this article we will take a closer look at these issues, as well as recovery methods.
It often happens that after an incorrect shutdown of your computer, for example, if you unplugged the power cord or the lights in your house are unexpectedly turned off, or your computer has survived a virus attack, an unpleasant situation may occur. The file system of the disk on your computer or laptop changes its format to RAW and for the device to work properly (as a rule, you want to do this as quickly as possible), you need to return it to NTFS format.
What is a RAW disc
So, the RAW file system type, let's figure out what it is. The RAW system is a non-existent system. If the computer indicates that the storage medium has this format, then the drivers cannot determine the type of its file system (FAT, FAT32 OR NTFS).
If the media received the RAW format, Windows 10, although it will display it among the partitions of the hard drive, but any actions with it will be impossible, and defragmentation, and checking for errors, and, of course, viewing the data lying on the disk. The computer will constantly give an error, and offer to format the disk, and in the line “properties of the logical disk” will appear “RAW”. So how do you recover a file system from RAW to NTFS on your hard drive?
Recover file system from RAW to NTFS
The system will offer you the easiest way - to format the disk. But do not rush to do this, because your data has not been lost, now there is simply no access to it. If you format a RAW disk to convert the file system back to NTFS, you will have to recover data from the media for a long time using special programs. We offer several ways to recover a disk from RAW to NTFS without data loss.
Recover file system in NTFS from RAW without formatting
Method 1: Windows Tools
Mainly, to change the file system from RAW to NTFS, the standard utility from the operating system chkdsk helps. Follow the procedure below:
- Right-click on "Start" and select "Command Prompt"
- Type chkdsk drive_letter: / f
- The computer will start a check, after which it will repair the damage and the NTFS system in the problem area

Shkdsk will also help if the system disk is damaged. To do this, you need a USB flash drive or boot disk.
Here are your steps:
- Start the computer from a flash drive or disk, and then select "Recovery"
- Then open "advanced options", followed by "command line". There enter chkdsk drive_letter: / f
Important!
During recovery, the letters of the partitions may differ from the names of the disks. In order to avoid an error in the work, open the list of computer partitions in the command line, then enter diskpart, after listvolume and you will see which disk is the system one. This will be listed.
Alternatively, you can try from previously saved backups.
Method 2: Using special programs
And here's how to make NTFS from the RAW file system using third-party programs.
First of all, we recommend using the free Testdisk program. It is a utility that interacts with hard disk partitions. She will help fix the situation. The disadvantage of working with the Testdisk program is that it does not work with Russian names and they may be displayed incorrectly.
Here's how to convert RAW to NTFS using Testdisk:

RAW format on your flash drive
Reasons for conversion:
- When a USB flash drive is connected, the computer is not turned off properly or there is a voltage drop
- Windows crash
- Banal viruses
- External damage to the flash drive, from impact or fall
How to change the wrong format of the system to the correct one:
Converter MiniTool Power Data Recovery gives a good result. The principle of its operation is that the program does not convert RAW into the required format, but makes all the files on your flash drive visible, which makes it possible to work with them. The disadvantage of the program is that only a trial version is free, which works with files no more than 1 GB.
How to work with the program:

Also on our website you can familiarize yourself with the following topics:
- Merging hard drive partitions on Windows 10
- How to change hard disk partitions
- How to change the paging file in Windows 10
Hard disks (hard disk drives - HDD), which for various reasons are not detected by the operating system, receive the RAW status, and access to them is terminated. When you try to open such a disk, Windows advises you to format it, but if you follow this recommendation, then all the recorded information will disappear. It is desirable to restore an acceptable format: NTFS or FAT32.
Sources of problems with HDD can be different, and, before doing anything to restore the format, it is worth identifying them. Here are the most common ones:
- Connection failures. For example, the user disconnected the disk incorrectly, or the power supply was cut off and the file system was disrupted.
- Broken cable that connects the drive to the board.
- Malicious software that violates the data structure.
- Errors that occurred when reinstalling or updating the OS.
- In the case of a flash drive, the reason for changing the format to RAW may also be a malfunction of the USB connectors.
- Malfunctions of the PC motherboard.
- Errors when working with Acronis Disk Director.
Format recovery
To recover NTFS format from RAW, try the following:

Format recovery using special programs
If, when you try to check the HDD using the above method, a message appears: "CHKDSK is not valid for RAW drives", you can use programs that allow you to recover NTFS format from RAW. Let's consider the most popular ones.
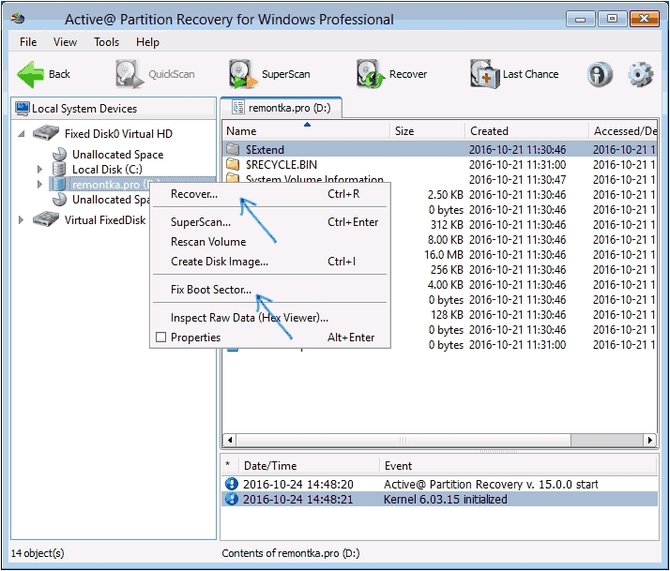
DMDE
DMDE is a utility that looks for damaged partitions in the file system and helps restore the disk to NTFS status. After downloading and installing the program, you need to do the following:
- Run the application.
- On the left, check the box next to Physical Devices and Show Sections.
- Select the damaged disk and click OK. After that, the utility will find the RAW section and mark it with a crossed-out icon. If this does not happen, perform a full scan (the corresponding button is located at the bottom of the window).
- Now try to open the RAW volume and click "Recover" and then "Apply Settings".
- After that, as a rule, the HDD format is changed to NTFS.

DMDE window
IMPORTANT. If you are trying to return the NTFS status to the system disk and do it from another PC, then after the operation is completed and the HDD is returned to its place, the previous computer will still display it in RAW format, so it is advisable to first restore the Windows bootloader.
Recuva
Simple and straightforward to use program that can fix RAW disks and flash drives. The procedure is as follows:
- Launch the application, select "Recover all files", mark the damaged disk and click "Start".
- The utility will detect files with broken structure and fix the format to NTFS.
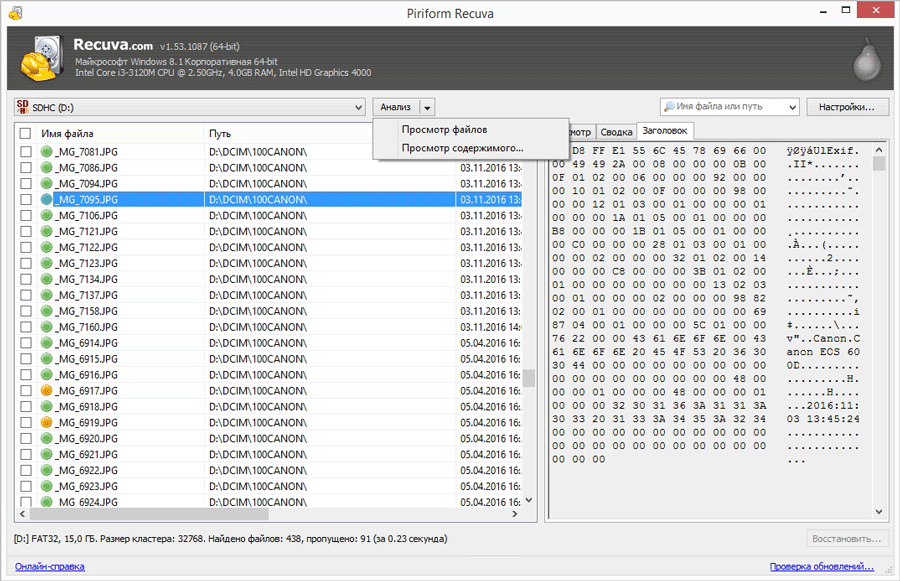
Piriform Recuva program window
TestDisk
The third utility that recovers the disk format. Just download and run it, then:
- Select "Create", press Enter.
- Then click on the problem HDD, then Enter again and the Analyze and Quick Search items.
- After executing the command, select Write to restore the information structure.

All users encounter bad situations when working at a computer, whoever says what, sooner or later it happens. One of the problems is a malfunction of the hard disk. In the Windows system, you can find the disk file system - RAW... In fact, this designation is not a file system, as it indicates a disk error. The system tries to recognize the specified disk structure, and if it fails, the disk is marked as RAW.
Before using the disk, you need to format it;
- The disk properties are specified as the RAW file system;
- The appearance of a window about the absence of a sector;
- Other error messages.
Reasons for the appearance of RAW
- Incorrect shutdown of the computer;
- Unstable voltage;
- Weak SATA connection to the hard drive;
- The presence of so-called "bad" blocks;
- Damage to the cable;
- Damage to system files;
- The presence of virus software in the system;
- Hard drive failure.
The danger of this problem is that if you format or do some other wrong action, you will completely clear the partition. By doing this, of course, you will restore the disk to operability, but this method is almost always not useful. Now let's try to figure out how to convert the RAW system to NTFS without losing data.
At first, you need to use the simplest methods of solving the problem. As practice shows, many problems are solved by restarting the computer. If the failure turned out to be serious and this procedure did not help, read the following points.
# 2 - Checking the cable connections
If you have a desktop computer, then completely de-energize it, open the system unit and check the connection of the wires to the hard drive and the system board. Try disconnecting and reconnecting them.
Carefully examine each wire, make sure that they are all complete and not able to damage.
If you don't have a computer, but a laptop, you can also open it and check the internal components. In the absence of repair skills and proper prevention, you should contact a professional.
If you have a USB hard drive, the easiest method is to plug into a different USB port.
Try the above methods and then move on to programmatic solutions.
# 3 - Using the CHKDSK Utility
In Windows, as a utility for checking the drive, there is one that fixes file system problems. This is just what we need.
Run the command line as administrator (you can right-click on the Start menu and select the appropriate item);
Enter the command "Chkdsk D: / f"(the / f attribute allows the utility to fix errors on the D drive);
As a result, you will get a fixed partition with NTFS and saved data, or this method will not give a positive result.
# 4 - Checking the integrity of system files
As I said above, the problem can be hidden on the system side, that is, the system files are damaged. Sometimes their integrity can be restored. We read:
- We start the command line;
- We enter a simple command - sfc / scannow
- We wait.
As a result, one of two answers is displayed: the check did not reveal any integrity violations, or some files could not be restored.
# 5 If the system won't boot
If the system disk is hit, or Windows for some reason refuses to work properly due to RAW partitioning, all of the above actions with the command line are performed using a boot disk or flash drive, or safe mode.
The first option is as follows: you create a bootable USB flash drive with the version of Windows that you have, for example, "ten". Having booted, reach the moment where you need to select a partition for installing the system. In this window, you press the keys Shift + F10... A window with a command line appears. Follow all the above commands.
What if you don't know the drive letter?
In this case, we will use the diskpart utility:
- In the command line, enter the command diskpart ;
- Then we enter list disk to display disks;
- Now we prescribe list volume- display of disk partitions;
- In the window you will see all your partitions, then look at the volume file system type. We are interested in RAW and the drive letter (Name).
Now you can run commands to check the disk and restore integrity. So far, the only options are to recover the drive without deleting the data.
# 6 Use antivirus utilities
The RAW procedure in NTFS without data loss can be realized thanks to antivirus programs. Of course, you can scan your computer with installed antivirus such as Avast, Windows Defender and others. It won't be effective. You need to download the following utilities and check your PC with everyone:
# 7 Normal hard disk formatting
So we come to the method where you have to clean up the section. This is done only if there is nothing important on the disk, or all the options described at the beginning of the article did not help. Let's try converting RAW to NTFS.
Press the keyboard shortcut Win + R and write the following:
diskmgmt.msc
The disk management utility will immediately start, which will indicate the volume in the RAW system. Click on it with the right mouse button and select from the context menu "Format".
# 8 Using the Recuva utility
Download the program from the Internet, install and run. At the top in the drop-down section, select the problematic section that you want to fix.
Push the button "Analysis" and we are waiting.
Depending on the number of files on the disk and its size, over time, a large list of files that you can recover will appear in the window. Simply check the boxes for the required volumes (everything is possible) and by right-clicking on any object, select the option "Restore Selected".
This way you can recover files deleted after formatting.
# 9 Using MiniTool Power Data Recovery
There is a good utility for working with disks. It is easy to find it on the Internet, download and install, so I will not dwell on such things.
By running the program, go to the section Lost Partition Recovery.
Select the section with the RAW file system and press the button "Full Scan"... We are waiting for the end of the file search process.
Select the files you want to save and click "Save".

Specify the location to save the data.
When the files are recovered from the disk, you can safely format it.
# 10 Advanced Option: TestDisk Utility
Let's consider the last option as one of the most difficult ones. You need to download the TestDisk utility.
Find the file in the archive with the tool testdisk_win.exe which you run with elevated privileges. A semblance of a command line opens.
- Use the arrows to select the option "Create" and confirm with the Enter key.
- Use the arrows to select the disk with the RAW file system, and confirm the action with the ENTER key.
- At the next stage, immediately press Enter.
- Choose an option "Analyze" .
- Click on the option "Quick Search" .
- After displaying damaged volumes (in our case, RAW). Then press the key "R" to display the data for that section or sections.
- Use the arrows to select the option "Write"- press Enter.
- If the volume is unsuccessfully found, select the option Deeper Search and we repeat all the commands again.