If the folder is not visible and is not displayed, this means that the “hidden” attribute is set for it. As a rule, hidden folders are not visible in Explorer, aka “my computer”. Don’t worry about making hidden folders visible, you just need to tweak Windows 7 a little and everything will be fine.
As usual, knowing our modern people, so as not to languish, I suggest watching the video:
If this video did not help you, I suggest you watch another one.
How to show hidden files
If for some reason you are not satisfied with the videos, or you simply do not want to watch them, I suggest using these step-by-step instructions:
- Open any folder on your hard drive and press the Alt key. After which you will see an additional menu in which you should click on “Tools” and then select “folder options...”
- Folder management has opened in front of you, in which you can configure whatever your heart desires.

- If you were unable to open this window using the Alt key, do the following. Open the start menu and enter “folder options” in the search. That's it, we sorted it out.

- To display hidden files and folders, open the “View” tab and check the boxes as in the screenshot:

- After you have done everything, you need to click “OK”.
- Now, if necessary, click “properties” on any folder and uncheck the “hidden” checkbox.

As you can see, nothing complicated. To solve this problem, it took us only 3 minutes and for this, you did not install any additional programs.
By default, the ability to see hidden files is disabled in any version of Windows. This is necessary so that inexperienced “dummies” do not accidentally delete anything and disrupt the operation of the OS. The solution is quite logical, since these folders are rarely needed. And even then - only to a few users. But sometimes there is a need to look at hidden files.
For example, during Windows optimization and garbage cleaning. Many programs (Microsoft Word, Skype) create hidden files during operation. Over time, they become unnecessary, but are stored on disk and take up extra space.
Very often gamers need to enable hidden folders and files. After all, they are where saves from many games are stored.
Also, displaying hidden files is required by users who want to hide documents on a flash drive, but do not yet know how to find them later. In general, there are a lot of reasons.
I should immediately note that this setting is carried out differently in different versions of Windows. Although some methods may be the same. Therefore, below are several instructions on how to enable hidden files in all Windows - “seven”, “eight”, “ten” and XP. Plus, there is a universal method that works on all operating systems.
How to open hidden files on Windows 7?

If you need to disable their display, then in the same window, check the box “Do not show...”.
Second way:
- Go to Start, open Control Panel and click on the Folder Options shortcut.
- Select the “View” section, scroll the slider down and activate the “Show...” item.
- Save your changes by clicking Apply.
And the third way:
- Open any folder you like.
- Click the Alt button and a menu like this will appear.
- Click Tools – Folder Options.
- A familiar window will open: to enable showing hidden files, go to the “View” tab and check the “Show...” checkbox.
As you can see, there is nothing complicated here. Choose any method that suits you best and use it at the right time.
When you enable viewing of hidden files in Windows 7 using any of the methods described above, they will be visible everywhere. Including on a flash drive. You just need to connect it to your PC or laptop - and you will see the hidden folders (provided that they are there). The same applies to an external HDD.
We've sorted out the "seven", now let's move on to the "eight".
How to enable hidden files in Windows 8?
There are also 3 options to choose from. The first two are described above in the instructions for Windows 7. That is, you can enable hidden files in Windows 8 by entering the control folders command. Or by selecting the “Folder Options” shortcut in the Control Panel.
But there is another way to show hidden files in Windows 8:
- Open any folder you like.
- Select the "View" section.
- Click on “Show or hide”, and then check the “Hidden elements” checkbox.

Ready. And not only in the current folder, but also in others. The same methods will help you display hidden files on a flash drive or external HDD – you just need to connect them to your computer or laptop.
The last method, which works on Windows 8, is also suitable for the “ten”
To enable hidden files in Windows 10:
- Open any folder.
- Select the "View" section.
- Check the "Hidden Elements" box.

After this, you will be able to see hidden folders and documents in any partition of your hard drive or on a flash drive (it must be connected to the PC).
If you want to hide the folders again, uncheck this box.
There is also another way to enable the display of hidden files in Windows 10:


Ready. Now you can open any hidden files on Windows 10. As you can see, the methods on different versions of the OS are quite similar, but differ in minor nuances.
Not many users use Piggy today, but we’ll still consider it. You can view hidden files in XP like this:


That's it - now you can open or delete hidden folders and documents.
If you don’t want to understand the differences between different versions of Windows, you can use the universal method
In this case, you just need to install the Total Commander file manager (download link). The program sees hidden documents and works on all Windows.
How to see hidden files in Total Commander? To do this you need to do the following:


Now all folders and documents in Total Commander will be visible. And to do this, you don’t even have to go into Windows settings and change folder display settings.
Need to see hidden documents? Launch Total Commander and go to the desired hard drive partition. Or connect the USB flash drive and then open it through this file manager.
As you can see, all ingenious is simple. Now you know how to show hidden files and make them visible. And if necessary, you can easily find them. My only advice: if you find any unfamiliar folders, do not delete them. After all, they may contain important system files, the removal of which will disrupt the operation of Windows.
In the Windows operating system there is such a thing as “ Hidden file"and now we will find out what it is, why hidden files are needed, how to create them, and also how you can display or show these same hidden files.
So, let's get started, the only thing I want to say right away is that when I create and display hidden files, as an example, I will have the version Windows 7, in other versions, for example, in Windows 8, this process is almost the same.
What is a hidden file in Windows?
Hidden file– this is a regular file, but it is not displayed. Hidden files can be displayed and also made normal, i.e. not hidden. In other words, hidden files are files that are marked as hidden. Hidden files, just like regular ones, take up space on your hard drive, so you shouldn’t hope that by hiding files you will free up disk space.
What are hidden files for in Windows?
Hidden files in the Windows operating system are mainly needed to make it possible not to display rarely used files. Those. for example, you have files that you rarely use ( but sometimes you use it), while they are displayed and take up space on the screen, thereby making it difficult to visually search for the file or folder you need at one time or another.
You can also use the ability to hide files to avoid showing any confidential information to other computer users, but this, as you understand, is unreliable, since another user can, just like you, display these files and view them. But in cases where you want some files and folders simply not to be seen by other users, then, of course, you can use the ability to hide files.
Hidden files are also used by the Windows system itself to hide from the user some system files that users do not need and are better off not seeing.
How to create a hidden file in Windows 7?
In Windows, you can hide both files and folders, so we will learn how to hide both files and folders.
To create a hidden file, right-click on the desired file and select “ Properties»
The window “ File properties", where we mark the attribute " Hidden" and click " Apply»

After this, this file will be hidden.
In order to hide a folder, we also right-click, but on the folder and select “ Properties" Then we also mark the attribute “ Hidden" and click " Apply»

Then you need to confirm your action, and we can specify that this attribute will be applied to all attached files and folders or only to this folder. Click " OK»

If later you need to make these files or folders back to normal, i.e. not hidden, then the procedure is exactly the same, but with one difference: a tick next to the attribute “ Hidden"will need to be removed ( and not put). First, of course, you need to display these hidden files in order to go into their properties, and I will now show you how this is done.
How to show hidden files in Windows 7?
In order to display hidden files, open " Control Panel" It can be opened from the desktop

If the control panel icon is not displayed on your desktop, you can read the material “ How to display Computer, Control Panel, Recycle Bin icons on desktop in Windows?" in which I tell you how to display this and other icons or you can use the menu " Start", where there is also a shortcut to launch the Control Panel.
After you have opened the control panel, look for the item " Folders settings"or if you have everything grouped into categories in your control panel, then select " Design and personalization", and then click on the item " Folders settings»

Note! You can also click “Show hidden files and folders” to go directly to the desired tab.
The window “ Folders settings", where we need to go to the tab " View" and in the section " Extra options» find item « Show hidden files, folders and drives", mark it and press the button " Apply" To close the window, click " OK»

Note! In order not to show hidden files, you must select “Do not show hidden files, folders and drives” in the same window..
Now we check, our hidden files are now displayed, their icons, compared to regular files, are a little lighter.
That's all, good luck!
Welcome to my blog! Sometimes users have to work with hidden files when they have to delete or copy files, as well as open them for editing. But by default, showing hidden files is disabled in Windows. This is done because hidden files are most often system files, and deleting or editing them can harm the system. But sometimes ordinary users still have to work with them.
, I will tell you in this article.
You can enable the display of hidden files either using Windows Explorer or using third-party programs, such as the Total Commander file manager.
How to enable showing hidden files using Windows Explorer.
In order to enable showing hidden files in Windows using Explorer, open Explorer. It can be done:
1. Double-click on the “My Computer” icon;
2. Start menu – “My Computer” (“Computer” in Windows 7);
3. The hotkey combination also opens File Explorer.
Then, turning on hidden files is slightly different for different versions of Windows.
In order to enable the display of hidden files in Windows XP, in Explorer, follow the menu:
“Tools – Folder Options – View – Additional Options”
Here we find the “Hidden files and folders” folder almost at the very bottom and check the “Show hidden files and folders” checkbox.
In order to enable showing hidden files in Windows 7 Explorer, follow the path:
“Organize – Folder and Search Options – View – Advanced Options”
And check the “Show hidden files, folders and drives” checkbox.
Click “Apply” or “OK”.
You can also view hidden files using other programs, such as file managers. Let's look at how to enable viewing of hidden files in Windows using the Total Commander file manager.
How to enable showing hidden files using the Total Commander file manager.
We launch the program, at the top of Total Commander there is a menu. We go through this menu along the path:
“Configuration – Settings: Panel Contents”
These are folders that have the Hidden attribute set. Typically, folders with this attribute are not displayed in Explorer. In order for hidden folders to begin to appear, you need to make changes to the operating system settings. In this material you will learn how to show hidden folders in Windows 7.
In order to force the Windows 7 operating system to show hidden folders, we need to open any folder and press the ALT button on the keyboard.
After pressing the ALT key, a series of drop-down menus will appear below the address bar: File, Edit, View, Tools and Help. Here we need to open the “Tools” drop-down menu and select “Folder Options”.

After this, a small window called “Folder Options” will open in front of you. In this window, you can configure all the basic settings that relate to the display of folders, files and drives in Windows 7 Explorer.
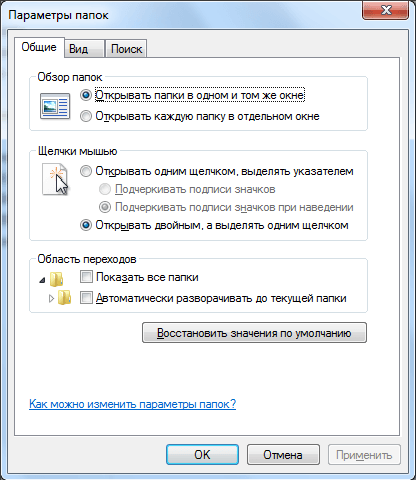
It should be noted that if you are unable to open the “Folder Options” window through the drop-down menu, then you can use the search in. To do this, open the Start menu and type “Folder Options.” After this, the Windows 7 operating system will find the desired program and offer to open it.

So, you have opened the “Folder Options” window, in order to show hidden folders in Windows 7 you need to go to the “View” tab and find the options that are responsible for displaying hidden folders.

You need two parameters:
- “Hide protected system files” – you need to disable it;
- “Show hidden files, folders and drives” – you need to enable it.
After making changes, close the window by clicking on the “OK” button to save the changes. After this, you will be able to see hidden folders and files. Now, if there is such a need, you can remove the “Hidden” attribute and the folder will become normal. To do this, right-click on the folder and select “Properties”. After that, disable the “Hidden” function and close the window.