In the modern world of the Internet, where you can watch movies and listen to music online, as well as download any program you need from the Internet, the need for disks is gradually disappearing. But at the same time, users from time to time have a question about how to run a disk on a laptop. Before answering this question, it is worth noting that, in addition to DVD and CD-ROM disks, there are Windows boot disks and a laptop hard drive.
Launching the disk on a laptop
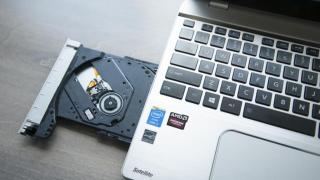
So, before launching a disk on a laptop, you should find out whether the drive reads this format. To do this, look at the marked value on the drive: if the required format is not in the list, it means that it will not be read by the laptop equipment. To run the disk on a laptop, you must follow the following instructions:
- Press the Eject button of the drive to open it.
- We fix the disk in the spindle for fixation. It is important to install the disk with the correct side, otherwise it will not be readable. If the disk has an image, it cannot be installed face down. If it is double-sided, then its side is written closer to the hole of the disk (immediately taking into account that the bottom side will be read).
- We close the drive tray; on some models, you must first unscrew the disc.
- We wait until the disk is found by the laptop.
- Ready!
Now the user knows how to run the disk on a laptop. But if the disk is not readable and the user did everything correctly, this may be a sign of a device malfunction or damage to the disk surface. To check one of the problems, we launch another disk in the drive: if it is readable, then the problem is in the disk, if not, then it is in the equipment, in which case you should contact a technician.
How to run a Windows disk on a laptop?

To perform this action, you must perform the following steps:
- Insert the boot disk into the drive.
- Restart the device and enter the BIOS system. To do this, when booting the device, press the "Del" key (if the user does not know which button is responsible for starting the BIOS on his device, it is necessary to look at the bottom of the screen when starting the equipment; as a rule, the required key is indicated opposite the inscription "to enter setup").
- Next, the user is taken to the BIOS menu. To perform actions in this window, you must use a laptop keyboard.
- Then select "Advanced BIOS Features".
- In the window that appears, select launch using CD-ROM.
- Then save the settings by pressing the F10 key.
- Next, the laptop will begin to reboot, and a window will appear with the inscription “Press any key to boot from cd or dvd”, press any key.
- In the installation window that appears, click “continue” and carry out the Windows installation procedure.
How to start a hard drive on a laptop?
If the laptop stops seeing the hard drive, then most often it’s all about the drivers. To update the driver, use the following instructions:
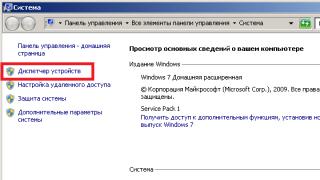
- Open the device manager: to perform this action, write “device manager” in the search bar in the start menu.
- In the window that appears, select disk devices.
- We right-click on the equipment we need.
- Select “update drivers”.
- In the window that appears, click on the option in which the system itself will find the necessary driver and install it.

Finally
Practice shows that serious problems with launching disks on a laptop cannot arise. This article not only answers the question of how to start a disk on a laptop, but also how to start Windows and a hard drive.
DVD is a multi-purpose disc that is designed for recording multimedia and playing files. There are many virtual players with which you can watch DVDs.
You will need
- - Media Player Classic;
- - Windows Media Player;
- - PowerDVD;
Instructions
You will need
- - a program for viewing Blue-Ray discs.
Instructions
In the section on the question How to listen to an mp3 CD on a computer? what is needed for this? It's my first time. given by the author Wake up the best answer is You're all evil here. Baby, listen.
Press the tray button of the CD or DVD drive (whatever you have on the system unit), carefully place the CD disc on the “cup” of the tray with the mirror surface down, make sure that the disc does not warp, press the tray button again (the disc will slide in). If you have XP or at least Windows 2000, then after the disk is initialized (it will spin up to amazing speed) a window will pop up. Select "Play". If the window does not pop up, then simply open the CD/DVD drive in Explorer and then double-click on any MP3 file. Everything will be revealed, everything will be listened to. Because, even if there is no Winamp, the MP3 files are compared with the standard Mazda Media Player. Use it!
Answer from pickle[guru]
Insert it into the drive and listen!
Answer from YesJoke[guru]
insert the disc into the drive
Wait
a menu will appear on the screen
select "play"
Answer from Alexei[newbie]
Head, hands and computer!!
Answer from Caucasian[guru]
Computer, CD, disk, mouse, speakers, ears and brain to perceive what is happening. 😎
Answer from Teacher_IKT[guru]
You may need a media player - there is a standard one in Windows
Answer from Galina Zaichikova[guru]
insert into the drive and listen
Answer from User deleted[active]
Wow))
you can listen through any player, for example winamp
if no one is installed, then there is a standard one
how to find: Start - Programs - Accessories - Entertainment - Windows Media Player
and you can enjoy the music
Good luck!!
Answer from Alexey Melnikov[guru]
for this you need at least to have speakers, then you insert the disc into the CDROM, when the disc is initialized, a sign with possible options will pop up for you, choose to play the disc and listen to your health. You don’t need special programs for this because The player is built into Windows
Answer from Alfiya[guru]
twirl it on your finger
 Hello everyone Today we will look at the hard drive on a laptop, although this method will work if you have a simple regular computer. So I have Windows 7, I hope you do too, and if not, then it’s okay, because in Windows 10 everything is almost the same, no complications!
Now a little about the hard drive itself. You know, many people say, well, sometimes they say that the laptop slows down. Well, yes, this happens. Do you know why it slows down? Well, the hard drive takes it and slows it down! It is in most cases that the hard drive slows down the laptop! But not all users know about this, so if the laptop slows down, then some simply buy a new laptop... Well, this is of course a solution, but not entirely correct.. It was worth just installing an SSD drive and the laptop would come to life, and at the same time it would come to life decently... Okay guys, this is a bit of lyrical shmirik, not exactly what I wanted to write about here
This means again, all things will happen in Windows 7, for other Windows everything is almost the same. Well, the truth is, if you have Windows XP, then I won’t lie, I don’t remember exactly how to look at the hard drive, well, that is, what you need to click, but it seems that this information can be viewed in the device manager.
So, the first thing you need to do is open the My Computer window, to do this, hold down Win + R and write the following command there:

You'll probably think, what nonsense, why use such jokes to open the My Computer window? And I’ll tell you why, in Windows 10 I personally didn’t immediately understand how to open this window and therefore, just in case, I showed you this universal method!
The My Computer window has opened, great, now here you need to right-click on any drive and select Properties there:

The properties window for the selected disk will appear, there you need to go to the Hardware tab, and it is on this tab that you will have the MODELS of your hard drives indicated. Please note that you may have several local partitions, but you may only have one physical disk. In general, this tab is where the models are written:

If anything, then this Name column, well, where the disk models are written, then you can expand it and you will see the full name of the model
Well, is it approximately clear? Now you know how to view the hard drive in a laptop? If this is not enough for you, then I understand, in which case I advise you to download the AIDA64 program, this program shows absolutely all the information about the laptop’s hardware! It’s easy to download on the Internet, it’s on every corner. You launch the program, go to Data Storage and select ATA and there there is not only the hard drive model, but also other information.
This seems obvious, but not to everyone. Many new laptop owners don't find it as easy to play DVDs on their new Acer laptops as it seems. In connection with my work, I am often asked this question. Here are some simple solutions to help you play DVD on your Acer laptop.
Instructions
- 1 Make sure your laptop has the ability to play DVDs. The laptop should have a picture of the familiar white logo on the DVD drive slide-out cover. If this image is not present, then you will only be able to play CDs.
- 2 If you find the DVD logo, press the button on your Acer to pop out the DVD drive cover.
- 3 Place a DVD face up and gently push the lid back in place, then wait until playback starts automatically or a menu appears.
- 4 If your DVD doesn't start playing automatically (or when you see a selection menu), you'll need to set it to autoplay. In Microsoft Windows, click on the "Start" button -> "Control Panel" -> "AutoPlay" and select automatic DVD playback.
- 5 If you are running Windows Vista Home Basic Edition, Windows Media and Real Player may not play DVDs correctly. You might want to download a free player from download.com. Then you will have to launch the player manually each time.
- 6 Select what action you want the Windows operating system to take every time you launch a DVD on your Acer laptop (from the drop-down menu). You'll have at least two media players to choose from, or you can select "Take no action" if you're not using the player via the pop-up menu.
- 7 Remove the DVD and reinsert it into your Acer laptop. Now all your DVDs will play successfully every time using your chosen player.
- 8 Find the control buttons at the bottom of the screen. These are standard DVD controls, such as the volume control or pause button. You can press F11 for full screen view if you are happy with the settings.