Instructions for working with the SBiS ++ program
for clients - Accounting
Edition: 01/11/2014.
Latest version of this file available on our website: http: // assistentbuh .ru - Technical support - Download - Documents
Instructions | P. |
|
Connecting new subscribers | ||
Connection of a new company | ||
We create an application for a new EDS | ||
EDS replacement | ||
Procedure for replacing a previously issued digital signature | ||
Renewal of licenses | ||
How to update license information | ||
Personal Areaonline.sbis.ru | ||
How to register in personal account on online. sbis. ru | ||
How to enter your personal account online. sbis. ru | ||
Connecting a new subscriber in your personal account | ||
We create an application for a new EDS | ||
How to create a container for EDS | ||
How to install a certificate into a container | ||
How to connect / change the direction of change | ||
Installation, reinstallation, transfer of the SBiS program | ||
How to enter serial number CryptoPRO licenses | ||
How to install (connect) an EDS to a taxpayer | ||
SBS Updates | ||
How to update the SBS program from the update distribution kit | ||
EDS, crypto-pro | ||
How to view EDS parameters | ||
How to make backup EDS | ||
How to install (connect) an EDS to a taxpayer | ||
We create an application for a new EDS | ||
How to install CryptoPRO | ||
Other | ||
How to install / update CheckXML and CheckXML-UFA |
Where to contact in case of questions and problems
1. (3, - technical support - Accounting "
2. sbis 54.ru - you can send a request to technical support - Accounting "
3.forum .sbis .ru - forum of the SBS program, administered by the developer
4. (3rd federal technical support from the SBS developer (Yaroslavl)
How to enter the serial number of the CryptoPro license
2. In the left window, open the "License Management" item and right-click on CryptoPro CSP - All tasks - Enter serial number
3. Enter the serial number. The user and organization can be omitted.
Where to see the validity period of the CryptoPRO license
1. Go to the Start menu and run the CryptoPro PKI program
2. In the left window, open the "License Management" item and look at the number:

How to make a backup copy of the EDS
2. Go to the Service tab and click Copy container.
3. Click Browse and select the key (container) you want to copy, then go to the next window (Next button). You may not be able to understand from the name of the key which company it belongs to, in this case, first determine which container you need using the instruction How to view the EDS parameters.
4. Enter a name for the key copy ( with Latin letters) and go to the next window, where you need to select the medium on which a copy of the key will be created:

5. After that you will be prompted to enter a password - you do not need to enter a password, just click OK.

6. After that, you will return to the main CryptoPRO window, which means that the copying procedure is over.
7. Make sure that the copy has been successfully created (see the instruction How to view the EDS parameters).
How to view EDS parameters
1. Go to the Start menu and open the program CryptoPRO CSP
3. Click Browse, select the container of interest from the list, and then go to Next:

4. Basic information about the certificate is recorded in the Subject field (in more convenient form it can be viewed by clicking Properties - Composition - Subject)
How to see which EDS are present on the computer
1. Go to the Start menu and open the CryptoPRO CSP program
2. Go to the Service tab, click View certificates in container.
1. Click Browse, after which you will be presented with a list of all digital signatures detected on your computer.
How to install / update CheckXML and CheckXML -UFA
1. Download the CheckXML distribution kit
a. Go to http: //ereport.sbis.ru, go to the section Support / download(With right side site), look for the distribution kit at the bottom of the page and download it.
2. Install the distribution
a. Run the downloaded file. During the installation process, the path will be offered where to install the program - we remember it.
b. You may need administrator rights for installation - ask your admin.
3. Register the path to the installed program in the SBiS
a. Open the SBiS, go to the menu Service / Task Configuration- bookmark PFR parameters.
b. We see the field “ Checker location", On the right we press the button with the ellipsis and select the directory where CheckXML was installed. We save.
4. That's it, CheckXML is installed, you can check the reporting.
Notes:
1. If your VLSI is installed on the server, all these actions must also be carried out on the server.
2. View installed version CheckXML can be found in the CheckXML check protocol, in its first line (go to the FIU section, select a report, click Check).
How to update license information
1. Go to the Contractors / Taxpayers menu and open your company (if your tariff is Authorized Accounting, then Contractors / Senders).
2. In the window with company parameters at the bottom left, click the "New Taxpayer Wizard" button.
3. Complete the wizard to the end, in the second step by checking the box "Update license information"... If at some step the program asks you to fill up something, fill it up.
4. Upon completion of the wizard, be sure to make sure that the program has changed what you updated the information about licenses for.
How to download and run Ammy Admin(remote assistance)
1. Go to the site sbis 54.ru (a section will open Technical support Assistant - Accounting)
2. Go to the Download section, find AmmyAdminv 3 and download it to your computer (for example, by clicking on it right click mouse and selecting Save As). It is better to download the program to the desktop so that you can always find it quickly.
3. Find the downloaded file on your computer and run it.
Attention!- when downloading or at startup, a warning window from the antivirus may appear, in which case you need to allow the antivirus to download or run this file.
How to install (connect) an EDS to a taxpayer
1. If your EDS is recorded on a USB flash drive, insert it into your computer. If the EDS is in the computer (Register), then you do not need to insert anything.
2. Open the taxpayer card (menu Contractors - Taxpayers - Company), go to the Responsible persons tab and open the line with the manager (click on it 2 times).


Note ... You may already have any earlier installed certificate... If this is a certificate for electronic reporting, then it is better to delete it (using theDelete), and if for FSRAR - then leave.
3. Click on the tabular section and click the Insert button. The Certificate Installation Wizard will start, which you must go through.


Select the certificate you want to install. The list will contain all the keys that were found on the computer. Select required key you can either by the end date, or by the full name, or by the name of the container.

After selecting the key, information about the certificate to be installed will appear. We complete the master.


How to enter your personal account online. sbis. ru
You have several ways to enter your personal account
1. You can enter your personal account from the SBS program - click on the SBS Online banner, after which the browser will open and you will automatically be taken to your personal account.

2. Also, you can enter your personal account at http: // online .sbis .ru and log in with a certificate:
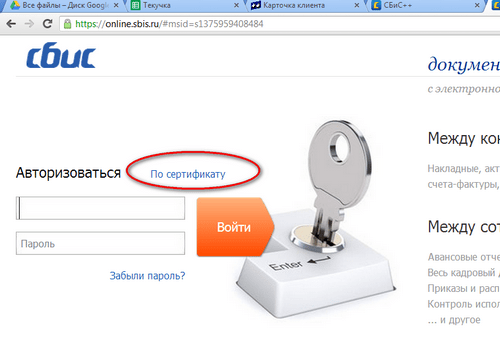
a. If at the same time the browser prompts you to install a crypto plugin, you must agree and install
b. When entering with a certificate, you will be prompted to select an EDS that you use to enter. Select a valid signature for the manager.
3. If you do not have a certificate or installed program SBS, then you can enter your personal account (online .sbis .ru) by login and password.
c. To do this, you must first go through a simple registration procedure - on home page click Connect, fill in the fields and confirm the registration by clicking on the link in the email requesting confirmation of registration.
Transferring a security system from one computer to another
Procedure for transferring an SBiC ++ program from one computer to another.
1. Prepare EDS keys. Make sure you have a copy EDS keys on the removable media... If the keys are in the registry (that is, you do not use a USB flash drive when working with the program), then copy the keys from the registry to the USB flash drive (see the instructions for copying keys).
¾ Change legal address in the company card (Contractors - Taxpayers - YourCompany - General tab - Legal address)
¾ Update the checkpoint, FSS subordination code, registration number FIU in the company card
¾ Check which government agencies are listed on the State Inspection tab. If there are no necessary ones, then add them (in the tabular section, right-click - Edit - Create Record). If there are extra ones, delete them by highlighting them with the mouse and pressing Delete on the keyboard.
¾ If you have moved under the jurisdiction of another UPFM - do not forget to renegotiate the EDF agreement with them.
If the name of the company has changed:
¾ Change the name and full name in the company card (Counterparties - Taxpayers - YourCompany - General tab)
¾ Install a new EDS according to the instructions "How to install (connect) EDS to a taxpayer"
If the name of the manager has changed:
¾ Add to the employee directory a manager with new surname(Contractors - Employees)
¾ Install a new EDS according to the instructions "How to install (connect) EDS to a taxpayer"
Step 7
Check correctness
Run the system check log (Service - System check log). He must show that there are no mistakes.
Step 8
Create a backup copy of the EDS
How to sign documents for EDI
1. Log in to your personal account on the online .sbis .ru website (how to do this - see the corresponding instructions)
2. Go to the Documents section.

3. Select required document... You can immediately approve / reject it, or first view the content (for this you need to click on it).

4. In the detailed view, you can sign, reject, save or print the document:

5. Attention !!! If the "Print" button is not active, then you can print the document either by opening it in Word / Excel, or in the following way:
a. Hover your cursor over the gray box and the printer icon appears on the right. If you click on the printer, the document will be saved as a file pdf format(Adobe Acrobat Reader) from which it can be printed.

How to install CryptoPRO
1. Go to the cryptopro .ru website, go to the Downloads section:

2. Log in to the site as user "123", password "123"
3. Scroll down the page and go to download CryptoPRO CSP R 3

4. Download and run the distribution kit. Follow the defaults until the end of the installation.
5. Attention! During the installation process, the program will ask you to enter the serial number. You don't have to enter it, the program will work for free for 3 months. During this period, you need to contact the manager, get a serial number and enter it.
Adding a new company to the SBS program
The instruction describes the procedure for adding a taxpayer to the SBS program, provided that you already have a generated EDS.
For licenses: Basic, Light, Corporate.
When adding a company, you will need to enter the following data into the program, we recommend preparing them in advance:
o INN, KPP, PSRN, legal address
o Registration numbers of PFR, FSS, FSS subordination code
o OKOPF, OKPO, OKATO, OKFS, main OKVED
o Passport data of the head, his place of birth, registration, SNILS
o Passport data of the accountant, his place of birth, registration
Begin!
If you have a digital signature for a new company on a USB flash drive, then insert it into your computer.
Open the taxpayers directory (counterparties - taxpayers) in SBS and click Add. The wizard for creating a taxpayer will start, which you must courageously go through to the end:


When you click Get Certificate, the Add Certificate Wizard will start:


Select the required certificate:

Information about the downloaded certificate will be displayed, after which we finish working with the wizard:

You are now back in the New Taxpayer Wizard:

After that, the program asks a little more about the taxation system, what taxes you pay, whether you are a small business entity, etc. You need to get to the end of this survey, after which the company will be finally added to the program.
How to register in your account online. sbis. ru
Go to the website http: // online .sbis .ru (we recommend using google browser Chrome)
Click "Connect":

If you are not sure whether you have an electronic signature, then on next step choose "NO".
After clicking the "Register" button, you will be sent an email confirming your registration.
How to install a certificate into a container
If during the formation of the application you inserted a USB flash drive and recorded the container on a USB flash drive, then insert it into your computer.
1. Go to your personal account on the website online .sbis .ru
2. Go to the Electronic Signatures section:

3. Click on the previously generated application (it will have the status "The certificate is ready. Load it into the ES key carrier"):

Click on it first, and then on OK:

If the operation was successful, then this is the process of forming digital signature finished. Now you can proceed to the actions for which you formed a new signature.
How to create a container for EDS
1. Log in to your personal account, go to the Electronic Signatures section. Your application now looks like this:

2. Click on it and follow the instructions on the screen.

Select the medium on which the key will be written (USB flash drive or registry):

The key generation process will start:

Move the mouse within this window until the green slider reaches the end.
After that, you will be prompted to enter a password - do not enter anything, just click OK:

Everything, the container is formed.
Connection of a new company
Procedure
Step 1 | Submit the completed registration card for each connected company |
Download from our website: http: // assistentbuh .ru section Technical support - Download - Documents - Registration card |
|
Step 2 | Pay the bill |
The manager will send the invoice as soon as he receives the registration card from you. The invoice will be sent within 4 hours from the moment of receiving the registration card. |
|
Step 3 | Apply for electronic signature*** |
If you paid for the work of an engineer to add a company, call and the engineer will help you do everything. If you do it yourself: ¾ Register on the website online .sbis .ru (only for new customers, according to the instructions "How to register in your personal account", page 28) ¾ Fill out an application for an EDS according to the instructions "Create an application for a new EDS", page 14 *** The application can be made without waiting for payment, i.e. immediately after receiving the invoice |
|
Step 4 | Inform the manager that you have issued an application for an EDS |
You can either write a letter to the manager or call. |
|
Step 5 | Form a container and come to our office. |
Wait for the manager to check the applications and invite you to our office. Create a container for an EDS according to the instructions "How to create a container for an EDS", page 30 After forming the container - come! Where to come: Dimitrov Ave. 7, office. 310, right entrance with columns Have with you: ¾ Passport ¾ Stamp or power of attorney |
|
Step 6 | Add the company to the SBS |
If you paid for the work of an engineer to add a company, call and say that you have returned from our office and are ready to start the installation. The engineer will call you back and do everything. If you do it yourself: ¾ Install the EDS certificate into the container (instruction "How to install the certificate into the container", page 29). ¾ Add a company to the SBS according to the instructions "Adding a new company to the SBS program", page 20 |
|
Step 7 | Check if the installation is correct |
Open SBS, open the card of your company (menu Contractors - Taxpayers - YourCompany). On the State Inspectorate tab, all UPFR and IFTS to which you surrender must be present. The FSS should not be there, by default there is always and for everyone. Send any report to the test tax office (select "Test tax" in the report) or send a letter with the subject "test" to your real tax office (they will not be upset). |
|
Step 8 | Conclude an agreement on electronic document management with the FIU |
Download the application and agreement form from our website (www .assistentbuh .ru - Technical support - Download - Documents) and take it to your UPFR. When you pick up the signed agreement - enter its date and number in the SBS program (Counterparties - taxpayers - YourCompany - the State Inspectorate tab - double click on the upfr and enter the date / number) |
|
Last changes of this file
Version 01/01/2001
In the instructions for adding the direction of change, added a way to add through the program sbis
Completely redesigned instructions for adding a new subscriber
Completely redesigned instructions on the procedure for replacing the previously issued EDS
· From the instructions "Create a request for digital signature" removed the steps for the formation of the container and further.
· The instructions "Create an application for digital signature" clarified the requirements for scans of documents in the application
QUICK GUIDE
USER
Installation, configuration and work with "SBIS ++
Electronic reporting for the taxpayer»
|
1. Installing and configuring the program | |
|
2. Creation of a taxpayer | |
|
3. Creation and selection of the reporting period | |
|
4. Formation of the report | |
|
5. Formation of a corrective report | |
|
6. Preparing to send the report | |
|
7. Sending the report | |
|
8. Formation and sending of the 2-NDFL form | |
|
9. Formation of PF information | |
|
11. Unloading reports from 1C | |
|
12. Configuring the VLSI ++ update |
Contact Information
Address:, building 1, office 101 (TPU Cybernetic Center)
Phone: (38
Website: http: // www.
E-mail: ***** @ *** ru
Those. support:
1. Installing and configuring the program
To install the program, the user must have administrator rights. The specified rights are required for installation CIPF "CryptoPro CSP"(used in SBiC ++ to work with signature and encryption keys electronic documents). Installation " CryptoPro CSP"starts automatically during configuration installation" SBiS ++ Electronic reporting + EDS". If the user does not have such rights, then you should contact system administrator... Installation is carried out in several stages:
1. Place the CD with the distribution kit into the computer's CD drive. On the disk from the folder "Sbis" run setup file"Sbis_setup_esign_2.2" The "Installation Wizard" program will appear on the monitor screen, you must click next. During the installation process, the program will prompt you to select a folder for installation and a folder in the "Start" menu. Also in the additional tasks section, you must select "Install CryptoPro v.3.0 program", "Create a shortcut on the desktop to launch SBiS ++", if one of the 1C programs is installed on your computer, then in the window for selecting additional tasks, there will be a field " Add to 1C the ability to transfer reports to SBiS ++". If the box is checked, then a module will be built into 1C for automatic uploading of generated reports to" ". For more details see the chapter" Additional features formation of reports". After that, you must click" Next ", then" Install ".
2. The "CryptoPRO CSP Installation" program will appear on the screen. After that, you must select "I accept the terms license agreement"And enter the serial number (Received during registration from the telecom operator" Information Systems security "). Then choose " Typical installation", Click" Next "and" Install ". When the installation is complete, click "Finish".
3. At the end of the installation, you need to click the "Finish" button.
4. When prompted to edit the registry, click Yes, then OK.
In the "Certificate" window, click "Install certificate". In the "Certificate Import Wizard" window that appears, click "Next". Then select "Place all certificates in the following store", click the "Browse" button and select "Trusted Certification Authorities → Local computer", "OK".
6. Open “CryptoProCSP” (Start → Control Panel → CryptoProCSP), the “Properties: CryptoProCSP” window will appear on the screen.
7. Setting up the reader. To do this, go to the "Equipment" tab and click "Configure readers". In the window that appears, click the "Add" button: the "Reader Installation Wizard" will open, in which select the "Registry" reader.
8. Copying the key container. Place the key diskette with the secret key in the FDD drive. Go to the "Service" tab and click "Copy container". In the window that appears, click on the "Browse" button and select "drive A", click "Next", enter the name of the new secret key container (for example, sbis) and select "Registry" as the storage. Now the diskette is no longer needed for work. Close the "CryptoProCSP" window by clicking "OK".
9. Installing fonts for correct display barcodes on declarations. From the "Add-ons \ Fonts" folder on the disk, use the explorer to copy the SbisEAN-13 and SbisI25 fonts to the "windows \ fonts" folder.
2. Creation of a taxpayer
The process of creating a taxpayer consists of several steps:
1. Launching the program. On your desktop, launch the sbis shortcut. exe. Or run the program from the Start menu (Start à SBS ++ Electronic reporting à SBS ++ Electronic reporting). Or open "My Computer" and go to the directory where the program is installed (by default C: \ sbis \) and run the sbis file. exe.
2. In the main window of the program, click " Payer's choice". As a result, Taxpayer Creation Wizard:

This Wizard will help you fill out a registration card for a new taxpayer and save it in the directory " Taxpayers". Next time you need choose a taxpayer, you can already have it choose from the directory... If you need to make changes to the information about the taxpayer, you just need to open his card in the taxpayers directory, correct the values in the corresponding fields.
To move from one stage to another, use the " Next>".
 |
In the next window you need to select "Type of taxpayer" and " additional characteristics", Then click" Next ". Introduce general information about the organization, the legal and actual address is entered using the KLADR, then click "Next" and enter the information about the organization specified in the constituent and registration documents.
Then enter the data on the responsible persons of the organization and indicate the tax authorities to which the declarations are submitted. To do this, click the "Add" button and select the appropriate authorities that are located in the section "TAX BODIES" → "Tomsk" or "FIU across Tomsk", respectively.
One of the screens of the Taxpayer Setup Wizard will be " Setting parameters for digital signature". EDS parameters are configured if you submit reports via communication channels.

"The address Email " – email address taxpayer to exchange letters with a specialized communication operator of the system " SBiS ++ Electronic reporting".
The email address is formed according to the template:<ИНН налогоплательщика>@nalog. ...
"Encoding"- encoding used on the mail server of the Internet provider.
Leave the value " Windows 1251".
If your ISP is another organization, check the settings with their office.
"Outgoing mail server (SMTP), SMTP port "- the address and port of the Internet provider's server. In our case, nalog., SMTP value port " 25 ".
"Input server mail (POP 3), POP3 port" – address and port mail server, which contains the taxpayer's mailbox for receiving mail from the special operator.
In our case, nalog. , SMTP port value " 25 ".
"Name account, password" - username and password to access mailbox the taxpayer, specified in the agreement Appendix 1.
After filling in basic taxpayer information using the New Taxpayer Wizard, it will launch Accounting scheme setup wizard for this taxpayer:

Follow carefully detailed instructions master and specify required settings, to move from one step to another use the " Next>".
Next, you need to select the specifics of the organization, the taxation system, financial statements, other taxes, VAT, profit.
Come in " Main menu / Service / Task configuration".
General Tab

"Telecommunications operator"- a specialized communication operator of the electronic reporting system is indicated, in our case" ISB company (Communication operator for submitting electronic reporting to NI and PF) ".
Step 2
Click the " Sign and send"

All operations for sending prepared documents are performed by the program automatically and are reflected in the message log:

For each sent report in the program, you can track the delivery history. Such an opportunity in the program is available by clicking " Delivery stories"in the reporting register window

After receiving a response from the tax office, the report acquires the status " Rented".
Writing a file with a report to the directory
Open the registry, which contains the required report

Go to the required report in the registry and press " Write down".
Recorded reports will be closed for editing and marked with the " Recorded by". Each will have the name of the generated file.
Printing a report form
If you need to get a printed version of the report generated and saved in the register, then click " Type"in the reporting register window

Attention: if you have not received confirmation from the telecom operator within 24 hours, then you need to call us back!
Formation and sending of 2-NDFLTo generate help in the main window of the program, go to the register of 2-NDFL forms.
To generate a new help in the registry window, click " New Help ". You will be prompted to select an employee or an individual.

All information for reference is taken, respectively, from the card of an employee or a private person. If the card is not in the reference book, then create it (<Ins>), fill in the details required to be reflected in the 2-NDFL certificate.
Filling out the 2-NDFL form takes place according to general rules filling out other reporting forms detailed in the chapter " Report generation".
Formation of information in the PFIn the main window of the program, go to the registry reporting by the FIU.
On the screen you will see the register of packs and registers of information ADV and SZV... Information registers contain individual information for each employee, broken down by information types (forms). The register of packs contains information grouped into packs prepared for delivery to the FIU.
Everything necessary actions to create reports can be performed in the register of packs, while the registers of individual information will be filled in automatically.
Go to the package register. Click on "New pack", select the bundle type from the list.

Set of fields in packs different types slightly different, but all packs have a similar structure. In any pack, regardless of its type, there are fields for entering a description of the pack and a table for adding individual information to the pack of documents.
Now you need to enter the individual information into the pack table. To do this, click<Ins> or the button on the table toolbar. You will be presented with a choice to add details:
From the employee directory;
Or from the information registry.
Choose this method if you have previously formed information directly in the register of individual information and you need to include them in the pack. When choosing of this paragraph a register of individual information corresponding to the type of pack opens. Select (<Enter>) information that you want to add to the package.
Use the key to change individual information.<F3>, to delete - key<Del>. If you want to delete several entries at once, mark them in advance using the key<Space>.
When filling ADV-11 you will need to include packs in it SZV-4... This information is entered in the table " Packs SZV-4-1.2" via<Ins>.

Once the packs SZV-4 added (<Enter>) in ADV-11, the indicators in the form are calculated automatically. When deleting or editing a batch SZV-4 out of shape ADV-11 the indicators in the form are automatically recalculated.
|
Checking the bundle |
After the pack is formed, it is necessary to check the correctness of its filling. To do this, click the " Check the pack".

The test results are displayed in the " The result of checking the package ...". The upper part of the window contains errors found in the description of the pack, in the lower part - errors in the individual information.
In field " Information check results"a summary of the errors made when generating information on employees is displayed. Detailed information on the errors made for each employee is given in the table below." List of erroneous information".

Description of information errors
To view erroneous information for each employee, use the button " Information errors"in the check result window
The window that appears displays detailed information, in which form field and what information is incorrect or not indicated at all:

After making changes to the information, you can use the " Recheck"to exclude the appearance of new errors.
The correctness of filling out the statements of the FIU in the program is checked by the program CheckXML... This program must be installed on your computer and properly configured to access it in " SBiS ++ Electronic reporting"(details in the chapter" First start").
Each time when generating files with reports (buttons " Prepare for shipment" and " Write down"), all reports will be checked by the program CheckXML. If no errors are found, then further processing of the reporting will continue (the report will be written to a file, or prepared for sending).

If errors are found, then the program CheckXML be sure to notify you of this and indicate the total number of errors and warnings found in the file:
The request is generated in the registry "Tax and financial statements" .
When creating a request, select from the folder " Information statement"shape" Application for grant information statement " or "Request for information when providing information services through communication channels "(check the request form with your tax office).
To generate a list of taxes, click the " Choosing taxes to be included in the application"in the window of the selected form:

Choice of taxes depending on the tax regime
The list of taxes is selected automatically, depending on the selected tax regime.

Edit the list of taxes
If necessary, the generated list can be edited: remove unnecessary and / or add missing taxes to the list. To do this, you can use the buttons " Add" and " Delete"on the toolbar of the list of selected taxes. After the list is edited, click" Save".
Upon receipt of a response from the tax office, the status of the request (in the registry) will change to " Received a response".
To view the answer, go to the registry " Tax and accounting reporting" To the desired request and in context menu registry select " Delivery history".
Open the change history entry and click "Statement".

It is convenient and quick to unload reports from 1C in the system. To do this, in the 1C program, in which the reporting is formed, it is proposed to install special additions.
As a result, in 1C, in the reporting data upload window, a setting will appear for uploading data to " SBiS ++ Electronic reporting":

Installation of the necessary add-ons is performed automatically when installing the system " SBiS ++ Electronic reporting"(details in the chapter" Installation and launch If necessary, add-ons can be installed in 1C at any time, you just need to use special team "Add-ons for 1C" ("Main menu / Service") and specify the bases for which you want to install add-ons:

Location information bases 1C installed on your computer or server is detected automatically.
SBiS ++ updatesTo update the program, just click Service → Update program. Another option is also possible. To do this, you need to download the update from our website www. , run the update installation wizard, then you need to specify the folder with the program (by default C: \ SBIS \).
Protocols
All documents on the links below are available in open sources| Extracts from the minutes of meetings of construction organizations Extracts from the minutes of the boards of non-profit partnerships Extracts from the protocols of self-regulatory organizations Extracts from the minutes Neftegazstroy Protocols Alliance Protocols Real Estate Protocols Opening protocols Procurement Commission Protocols Minutes of the meetings of the competition commissions Partnership meeting minutes Minutes of meetings for the election of contractors projects Partnership Presidium Meeting Minutes Minutes of Council Presidium Meetings Minutes of meetings of the projects "Affordable Housing" Council meeting minutes Minutes of meetings of technical councils Meeting minutes Protocols for the development of municipal settlements Protocols of applications for renovation of premises Commission protocols for placing orders Protocols of tenders for lease agreements Protocols of quotation bids for construction work Quotation Bids Protocols Protocols for placing orders in the field of construction Protocols for participation in closed auctions Protocols for participation in open auctions Nonprofit Protocols Non-profit partnership protocols General Meeting Minutes Industry Commission Minutes Evaluation protocols and bid comparisons Quotation Bids Evaluation Protocols Opening protocols Protocols on draft master plans Price Quotation Protocols Bidding Protocols Protocols of draft land use rules Public Hearing Minutes Application consideration protocols Minutes of decisions of municipalities Self-regulatory organization protocols Minutes of meetings of board members Minutes of meetings of urban districts Minutes of meetings on the development of anti-crisis proposals Builder Union Protocols Protocols of construction organizations Protocols of participation in closed competitions Protocols of participation in open competitions Protocols |
Protocols of tenders for installation works Capital Construction Auction Minutes Overhaul Auction Minutes Protocols of the auctions for technical re-equipment Protocols concerning unemployment and unemployed citizens Protocols for apartment buildings Protocols in relation to business entities Protocols in the form of a public hearing Admissions test reports Insurance contract protocols Interrogation records |
The reporting period for the 3rd quarter of 2013 is approaching. On the eve of the reporting period, we will answer common questions and give useful tips, which will help to correctly and quickly prepare reports for delivery in the SBiS ++ program Electronic reporting.
How to transfer data from a previous period report to a new report?
If in the current reporting period you form, for example, tax return, which differs from the declaration for the previous period by only a few indicators, you can simplify your work on filling out the form if you transfer data from the declaration for the previous period to the current declaration.
- In the main window of the program, go to the reporting register and create a new report.
- Use the "Copy data from another report" command on the toolbar in the report window:
- Select the source report from the previous period.
The folders will contain only those reports that can be used for import.
- After you agree with the system warnings, all cell values in the current report are replaced with the values from the source report. Go to the line you want to correct.
- Then save the report.
How do I correct the totals in the report?
All totals in the forms are highlighted in bold(and the field in gray) and by default are calculated automatically, according to the established algorithm.

If you do not agree with the totals and want to enter your data, then disable the automatic calculation of indicators based on the entered data (enabled by default) by checking the box “Disable automatic calculation”.

What if the selectable report fields are highlighted in red?
If another inspection was selected inside the reporting form, its name became highlighted in red.

Initially, when creating a report, data about the taxpayer, the tax office, and the signer are automatically inserted into the form from the organization's card. When the user manually changes one of these fields, the new data is highlighted in red.
V in this case red color does not mean that the indicated data are incorrect. This is an indicator that the user has made changes to this field. Therefore, if you are sure that the inspection you have chosen is in your delivery directions, you can ignore the red color and submit a report.
How can I view the attached file received with a letter from the tax office?
Communication operator and state. authorities have the ability to send notifications to the payers via the electronic reporting system different kinds which can contain as simple text message and the attached file. These may be notifications about the transition to new regime work of state. body, messages about the release of new updates SBS ++, in incoming letter the inspector can send a protocol for checking the reporting if there were problems with receiving the protocol as a phase of the workflow. Receiving notifications occurs in the usual way, during regular mail delivery sessions - the program will notify you with an appropriate message. All received correspondence is stored in the "Inbox" register.
- Go to the register of incoming mail.
- Open the required document (<Enter> or<F3>). As a result, the received notification window appears.
- In addition to the text of the message, the notification may contain an attached file. To view a list of attached files, go to the "Attachments" tab.
- In order to view or save an attached file, double-click on it with the left mouse button and press the corresponding button ("View" or "Save file").

How to edit a report submitted for signature?
As soon as you have submitted your report for signature, and it has passed the format-logical check (i.e. no errors were found), then a letter with your report will be generated, ready to be sent to the state. inspection. From this moment on, the report becomes unavailable for editing or accidental deletion.


