There are several methods.
First way
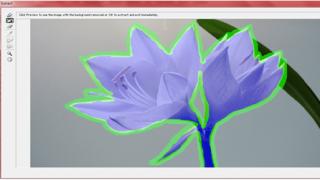
In the filter menu for this action there is a special filter “Extract”, which allows you to automate the process. Here's the image we'll be working with:
A filter window will open, where you will first need to outline the image with a marker (green is used in the screenshot, but you can choose it yourself in the settings), and then fill the area that needs to be cut out with a different color (blue in the screenshot).


To check the quality of extraction, let's fill the background on the bottom layer.

It can be seen that there are some errors on the upper petals. You can fix them manually using an eraser, a magnetic lasso, or another method convenient for you.
Cut using selection
Another quick way to cut out objects from the background is the magnetic lasso. To activate the tool, you need to press the shortcut key L, then circle a fragment of the picture, periodically placing anchor points.

The final image doesn't need much improvement:

The highest quality object extraction is done manually with a Pen Tool or pen. After creating a vector path with the Pen Tool, select “Create Selection Area” from the right-click menu and cut it out onto a new layer.
Tracing with a pen takes more time and does not always allow you to cut out detailed images like hair, fur, or water drops. But in images with clear contours, this method gives an ideal result.
The main task that designers and photographers face in Photoshop is cutting out complex objects. For many Photoshop users, this task becomes a real problem, because the more complex the object, the more difficult it is to cut it out. There are many different ways to cut out complex objects in Photoshop, one of which I demonstrated in one of my previous tutorials, namely, how to cut out a complex object in Photoshop using a layer mask. If you have not read this tutorial, I advise you to watch it; although this method is a little complicated, it is quite effective and can be used in the old version of Photoshop CS6.
In this tutorial I will demonstrate two other ways to cut out complex objects, one of which is very simple, but not applicable in all cases, the other is more complex, but can be used in most cases.
Clip out a complex object using layer blending options
This method is very simple, but I repeat that it is not applicable in all cases. For work, I took an image of a tree against the sky, which we will cut out using this method.
At first glance, it seems that it is enough to simply cut out this tree with the Magic Eraser tool, but in reality this is not the case. With a “magic eraser” we can remove the sky with clouds, but firstly, this tool will “eat” the edges of the object (tree, grass, people), and secondly, using this tool it is simply not possible to properly cut out all the gaps between the edges of the tree and the grass.
You can download this full-size image, as well as the image for another method, from the link in the “Lesson Materials” block located in the right column.
1. Open the image with Photoshop and in the layers panel, where the layer with the open image is displayed, remove the lock from it, i.e. remove the lock by clicking on it with the left mouse button.

If your layer lock cannot be removed using this method (the lock does not disappear) and you do not know how to unlock this layer, check out the lesson “How to unlock a layer in Photoshop”.
2. After unlocking the layer, right-click on it and select “Blending Options” from the menu that opens.


By selecting this option we can remove all blue tints from this image. That is why this method is not suitable in all cases, for example, if an object has a mirror surface and reflects surrounding objects, then this method will not be able to cut out this object.
3. Having selected the blue color, we adjust the scale of removing blue shades using the top slider to the desired result.

In order to make the removal of blue tones softer, you can split the slider into two parts and more precisely adjust the overlay parameters; to do this, hold down the "Alt" key and click on the slider with the left mouse button.
Having achieved the desired result, apply the obtained parameters by clicking “Ok” in the upper right corner of this settings window. As a result, you will see that the background (sky) of the image has disappeared and an icon in the form of two squares superimposed on each other will appear in the layers panel of the layer with the image.

Now, you can overlay this image on any other background, create a new layer under the image layer and fill it with a gradient, thereby making sure that the object (tree) is cut out from the sky background with all the smallest details (gaps between the branches).

4. But that's not all, although the image can be overlaid on other layers and backgrounds, it is not yet completely cut out from the sky background, but simply hides it with an overlay. In the layers window you can see that the image layer has a sky background, also if we try to select the layer with the tree, holding down the "Ctrl" key and left-clicking on it, we will see that it is not the tree that is selected, but the entire image along with the hidden one background.
In order to finally get rid of the background, you need to convert the image layer into a “smart object” by right-clicking on it and selecting “Convert to smart object” from the menu.

As a result, the icon symbolizing the overlay will disappear from the tree layer, the image of the layer itself will show that it has no background, and when this layer is selected, only the cut out object (tree, people, grass) will be selected.

This way, you can quickly cut out a complex object from the background of an image, provided that the object does not reflect the surrounding world and does not contain shades of the background being removed.
Cutting out a complex object using color channels
Let's look at the second method of cutting out a complex object, which is more difficult to use than the first, but more effective and applicable to objects with reflections, highlights and shades of the background being removed.
For work, I took an image of a city street, from which we will also remove the sky. Please note that the buildings have blue shades similar to the color of the sky, so the first method of removing the sky will not work, since all fragments of buildings of a similar (blue) shade will be deleted along with it.

To demonstrate the result, I cut out the object using the first method (using the layer blending options) and it turned out like this.

Now let's crop the object using the color channels and see the difference.
1. Open the image with Photoshop, and, as in the first case, unlock the layer with the image if it is locked.
2. In the layers panel, open the "Channels" tab, in which we select the channel with the desired color, in our case it is blue. In order to select the desired channel, you must press the key combination indicated on the right. In this case, we need the blue channel, so press "Ctrl + 5".

As a result, the selected channel will be highlighted, and the rest will be disabled, as symbolized by the eye icon on the blue channel and the absence of this icon on the other channels.

3. Now we need to create a copy of the selected blue channel, which we will continue to work with. To do this, right-click on the blue channel and select “Create a duplicate channel” in the menu that appears.

After this, select (select) this duplicate for further work by pressing the key combination, in this case “Ctrl + 6”.

As a result, we chose the duplicate of the blue channel that we would work with; the remaining channels were turned off.
4. Now in the top menu select “Image” - “Correction” - “Levels”.

In the level settings window that appears, select the “Custom” set, the “Blue Copy” channel, set the sliders approximately as in the screenshot below (you need to adjust them so that building elements do not disappear) and click “Ok”.

5. In the top menu, select “Image” - “External channel”.

In the external channel settings window that opens, select the overlay - “Linear dimmer”, set the settings as in the screenshot below and click “Ok”.

As a result of these actions we get the following result.

6. Now you need to paint the entire area of the object black, which will later be cut out. It is necessary that the entire cut out area is black, without any white fragments, otherwise these fragments will also be cut out.

First, let's use the Burn and Dodge tools to process the finer details of the object.

Take the “Dimmer” tool in the left toolbar and use it to go over all the edges of objects, especially buildings, to better reveal the image of the object. Then we take the clarifier and remove unnecessary elements, in this case the dark spot in the upper right corner.
The last thing to do is take the Brush tool, set the color to black and paint over all the elements of the cut out area.

The result should be the following:

7. Now, in order to cut out the object, you need to invert the layer. To do this, in the top menu, select “Image” - “Correction” - Inversion.”

As a result, the object became white and the background black.

8. Now select the object, to do this, hold down “Ctrl” and click on the copy of the blue channel with the left mouse button, as a result the object should be highlighted with an italic stroke. Next, go to the “Layers” tab, select the layer with the image by left-clicking on it and apply a mask to it by clicking on the icon at the bottom of the layers panel.

The result is a cut out object.

Thus, we cut out the object from the background using the color channel. This method is more complicated than the first, but allows you to cut out almost any complex object.
Previously, it was popular to take photographs in the studio, so that the photographer would then process your photos and replace the background. Now you can do all this yourself. All you need is a digital photo, a computer and Adobe Photoshop.
In this article we will look at how to cut a person out of a photo in Photoshop and then paste it onto another image. If you want, you can also make a black and white image from a color one. By clicking on the link, you can read the article on this topic.
For example, let's take two photographs. With the first one, we will cut out the sitting man and paste it onto another background; we will use the second photo for the background.
Let's start with how cut a photo in Photoshop. In order to do this, you must first correctly identify the person. There are several ways to select in Photoshop, using different tools. Read the article by following the link and choose the one that best matches the person you want to cut out of the photo.
If the photo shows a girl with flowing hair, or a guy with hair sticking out in different directions, read: how to highlight hair in Photoshop.
Open the image with the man. On the Toolbar, select “Quick Selection Tool”. Now you need to select the person in the photo. To do this, click on it with the mouse, the selected area will be marked with a dotted line, and after each click it will expand.
If you have an extra background selected, press “Alt” and click on this area to subtract it from the selection. You can also click on the minus brush in the tool settings. Also choose the appropriate size for the selection brush.
After the man in the photo is completely selected, go to the layers palette. Here you need to unlock the background layer. Click on it twice with the mouse. There is no need to change anything in the next dialog box, click OK. After this, the lock next to the “Background” layer will disappear.
If this is not done, the cut out person in the photo will appear against a white background. We need a transparent background so that we can insert the person into another photo.

Now let’s invert the selection: press the keys “Ctrl+Shift+I”. We do this so that the photo highlights not the person himself, but the background around him.

Press the keys “Ctrl+X”. Thus, we cut out the person from the photo in Photoshop. Black and white cells mean that it is on a transparent background. You can save a person on a transparent background in Photoshop, and then paste it onto any other image.

So, we moved on to the second part of the article. Let's replace the background for a photo in Photoshop.
Open a photo or image that will be used as a new background. In the example, these are mountains. On the Toolbar, select the “Move Tool” and drag it onto the photo with the cut out person.

Go to the layers palette and place the layer with the new background at the very bottom: drag it using the mouse.

Due to the fact that the two photos were of different resolutions, the size of the image of the mountains is very large in relation to the cut out person. Let's apply free transformation to the image.
In the layers palette, select with the mouse the layer on which the photograph of the mountains is located, in the example it is “Layer 1”, and press the combination “Ctrl + T”. A frame will appear with markers around the image. To reduce the photo size, drag any marker with the mouse. To maintain proportions, press and hold the Shift key.

Let's reduce the size of a man in the same way. But now in the Layers palette, select the layer on which the cut out person is located.

As a result, we got this image.

As you can see, cutting out a person from a photo in Photoshop and then replacing the background of the photo is not that difficult. Try it several times and it will get better and better.
Rate this article:Instructions
If you need to crop out a rectangular part (for example, just your face), use the Crop tool. It's in the first column of the Tools panel, third button from the top. Click on the button, then, by pressing the left mouse button, select the fragment that you want to leave. Adjust the borders of the fragment. Press “Enter”, the changes will take effect - parts of the image outside the fragment will be cropped.
If you need to cut out a more complex fragment, for example, a shape along a contour, use the Lasso tool (the second button from the top of the first column of the Tools panel). This is used when it is necessary to select a fragment of a complex image.
Press the "Lasso" button and do not release - menu for selecting selection options.
- Regular “Lasso” - selects fragments of any shape. Click the left mouse button and drag along the desired contour.
- “Polygonal” - highlights with polygons, i.e. straight lines.
- “Magnetic lasso” - used to select parts of the image with a clear outline. Click on the boundary of the outline and drag along it - the selection points will automatically snap to the outline of the object.
Select Magnetic Lasso. And, as described above, click on the edge of the outline of the selected object and drag along it.
Having selected a small fragment of the object, close with mouse clicks away from the edge of the object (not inside), return to the starting point and press “Enter”.
Clear the selected fragment by pressing the Delete key.
Proceed in the same way until only the object you need remains. You can select individual background elements by selecting them using the “Magic Wand” tool (second column, second button from the top in the “Tools” panel) and the “Delete” button.
Select the object using the Rectangular Marquee Tool. Copy it to the clipboard (menu “Edit” - “Copy”).
Place (Edit menu - Insert command) on the desired image or background.
note
Answer: The magnetic lasso selects quickly, but is of very poor quality. Another disadvantage: it selects pixel by pixel, and after removal there is a stepped edge. It’s a little better to select with a regular lasso. But it’s also inconvenient. Only the Pen Tool can highlight parts qualitatively. Press F7.
Helpful advice
To do this, you need to know the properties of some tools, with the help of which it is easy to learn and understand how to cut out part of an image in Photoshop and move it to another to obtain a better collage. The most common Photoshop tool for cutting out an object (or selecting an outline) is the lasso, which comes in three types: simple lasso, straight lasso and magnetic.
Sources:
- cutting in photoshop
If you want to cut out part of a photo and paste it into another photo, then you won’t find a better assistant than Photoshop.
After that, you select the Paint bucket tool, this is a fill, and accordingly you fill the outline that you have selected.
After that, press Ctrl+J - the selected fragment will be copied to the layer.
This is how you get a new layer, on top of which the object you need remains. At the same time, keep in mind that your outline of this object is even, so if you transfer this object to any other background, it will not look cut out.
This way you can cut out an object in Photoshop. As you can see, it's quite simple. The only difficulty you may have is when you trace the outline, but here there is the possibility of enlarging the object. If, even though you enlarge the object, you still don’t succeed, don’t despair. Try again.
This selection is better for large objects. Don't go straight to the small details in the photos. Let your hand get used to it, and only after you can trace large parts normally, can you move on to smaller ones.
There are dozens of different ways to get rid of unnecessary background in a picture or photograph. Among them there are both very simple ones and those that require the skills of an experienced Photoshop user. In this article, we will look at the easiest way to cut out a face from a photo. Even novice users can master this method in a matter of minutes.

You will need
- Adobe Photoshop
Instructions
Open the photo from which you will cut out the face. It is best if the contours of the face are sufficiently clear and contrasting with the background. Then select the Rectangular Lasso Tool - a rectangular lasso. It will allow you to carefully and accurately highlight the contour of the face and cut it out from the unnecessary background.
Then reduce the exposure to 15% and carefully remove the residue background around the person, touching the outlines and edges, and reducing the size of the brush.
Now select the brush tool (Brush), set it to a small size and sufficient hardness, and, choosing black in the palette, paint over the entire figure and face of the person in the photo, without going close to the edges.
Carefully outline the strands of hair, making them realistic and detailed. To do this, change the transparency and size of the brush. While holding down the Ctrl key, click on the copy of the blue channel, and then invert the image (Ctrl+Shift+I). After that, click on the RGB channel in the list to load a full-color image.
Video on the topic
Sources:
- How to Cut and Paste an Object in Photoshop - 4 Best Methods
It's not just designers who have to work with images. So, for example, sometimes you need to cut from photos any an object. Let's look at cutting out an element from a photo in the three most famous image editors.

You will need
- Graphics editor
Instructions
Microsoft Paint. For the selected photos With a stone, the “free-form selection” tool will work. Select it (step 1 in Fig. *insert*) and, holding down the left mouse button, circle an object. It will look like in step 2. When the line is closed, when the mouse button is released, the selection will take the form of a rectangle (step 3). Don't be alarmed - the fragment highlighted by the line will remain the same. You can then copy or cut the fragment to the clipboard or delete it. To do this, you can right-click on the selected area of the image and select the appropriate action (copy, paste). You can also click the “edit” menu section and select the desired action there. Or use the key combinations Ctrl+C (copy), Ctrl+X (cut) and Del (delete). The photo after cutting or deleting a fragment will look like the 4th example.

MS PhotoEditor. This graphic editor, which comes with MS Office, can only select a rectangular area. To do this, you need to open the image and click on the “selection” tool (highlighted in the 1st example of the picture *insert*). Next, holding down the left mouse button, you need to select the required area of the photo (step 2). After releasing the button, the selection will take the form shown in example No. 3. At this stage, you can change the size of the selected area. To do this, you need to move on the line in the desired direction. Actions with selection are the same as in Paint.

To select objects of complex shape, it is better to use the Magic Wand Tool. To call it, press the W key. In the properties panel, set the parameters by which the tool will distinguish the image from the background, and click the “magic wand” on the background next to the object. A selection area appears. On the properties panel, click the Add to selection button - now the new selection will be added to the old one. Use the magic wand to mark new areas of the background until you have selected everything. To mark the background between the petals, left-click once, then move the cursor over the selection, right-click and select the Grow option from the context menu. Repeat several times until the selection fills the entire area between the petals. Use the tool as many times as necessary until only and remain selected.
Now you have the background around the object selected. To select an object, select the Select and Inverse items in the main menu.
If you want, i.e. from the image, in the main menu select Edit and Cut or use the combination Ctrl+X. Then, instead of the deleted part of the image, it will remain empty. If you just need to copy an object to transfer the image, press Ctrl+C or select Elit and Copy from the main menu.
Video on the topic
Often, to edit a photo or create a photo collage, the author of the photo may need to transfer the image of a person to a new background. However, when the object has a complex outline, for example, if you need to cut out the figure of a person with flowing hair, conventional methods for cutting out the object from the background (for example, the Lasso Tool) may not be suitable. In this case, a simple technique for cutting out a complex object in Photoshop will help you.

Instructions
Upload the desired photo with a complex outline with many halftones, and then click on the Channels palette. Click on all the channels in the palette one by one to determine which has the highest contrast. Usually this is the blue channel.
Copy the blue channel by manually dragging it onto the blank sheet icon, then, remaining on the copy of the channel, select the Dodge option from the toolbar and set the appropriate luminosity range and exposure to 100%.
On the copy of the blue channel, carefully use the dodge tool to outline the background without touching the outline of the object you need to cut out. Reduce the exposure of the clarifier to 15-30% and, increasing the image scale, outline the contour of the object with the clarifier, especially carefully and carefully processing problematic parts of the contour (for example, hair). For these areas, reduce the dodge size to a minimum so as not to lose the desired details in the photo.
Now select the Brush Tool from the toolbar, set the hardness to maximum and select black from the palette. From the inside, completely paint over the silhouette of the object you want to cut out with a black brush, without going too close to the edges.
Change the blending mode in the brush settings from Normal to Overlay, set the brush hardness to zero, and then outline the edges, carefully following the contours of complex elements with a small translucent brush. Ctrl-click on the copy of the channel to select it.
Convert the selection by pressing Ctrl+Shift+I and then click on the RGB channel to load the photo in full color. In the Layers palette, create a duplicate of the main layer and add a layer mask to it. After this, the background around the object will disappear, and you can use the object for your own purposes.
Video on the topic
Sources:
- how to make a cut out object smaller in photoshop
For cutting, Adobe has many tools, the scope of which depends on the shape of the cut. object. For example, cutting out a TV is much easier than cutting out a human silhouette.

You will need
- - Adobe Photoshop
Instructions
Open the required photo in Adobe Photoshop: click the main menu item “File” > “Open” or use the hot keys Ctrl+O. Or you can simply drag the photo from the standard Windows Explorer into the program itself.
If the object you're cutting out has a simple ellipsoidal or regular quadrangular shape, then the Rectangular Marquee and Oval Marquee tools are best suited. To start a selection, hold down the left button on the image, drag the mouse in the desired direction, and then release.
Using the Rectangular Lasso tool, it is convenient to cut out an object whose contours consist entirely of straight lines and angles. Left-click anywhere on the contour and place points on all protrusions and corners object, close the circuit.
Magnetic Lasso is a good tool for selecting complex objects, but it has one drawback that directly follows from its own advantage. The principle of this tool is the same as the Rectangular Lasso - you go around the object point by point and eventually close the selection. But it is not at all necessary to place points in problem areas of the contour, because “Magnetic Lasso” looks for them on its own; you just need to carefully move the mouse next to this place. This search is carried out due to the existence of a color difference between the object and the background (or other object) bordering it. And if there is no difference, then the instrument becomes “demagnetized” and becomes confused - this is a drawback.
The finishing touch to cutting object- this is moving it to the required place. With the object selected using one of the tools described above, select the Move tool. Hold down the left mouse button on the object, drag where you want, and then release.
Video on the topic
Helpful advice
To reset the selection, press the hotkeys Ctrl+D.
Separating an image from its background is one of the operations that causes the most trouble for novice Photoshop users. However, there are several ways to select an object from its background, one of which is to create a selection based on one of the image's color channels.

You will need
- - Photoshop program;
- - image.
Instructions
Download picture, from which you are going to cut the object, into a graphics editor and make the layer on which the image is located accessible for editing. For this purpose, use the Layer from Background option from the context menu that appears after clicking on the layer.
If you are going to transfer the cut picture on a new background, it will be most convenient to place this background in advance. Open the background in Photoshop picture and paste it under the layer with the image being processed.
Having made the layer with the image being processed active, open the channels palette. It can be located next to the layers palette. If the desired palette is not visible in the Photoshop window, open the Channels palette by using the Channels option from the Window menu. By successively clicking on all three channels, determine in which of them the image has the most contrast. Most often, to separate an object from background use the blue channel.
Duplicate the selected channel. To do this, use the Duplicate Channel option from the context menu or drag the channel onto the Create new channel button. Invert picture, which became black and white after the operation with the channel, the Inverse option from the Adjustments group of the Image menu.
The part of the image you need to get rid of background, turned white after inversion. Adjust the contrast so that the cropped object is completely white and the background is dark. This can be done using the Brightness/Contrast, Curves or Levels filters from the Adjustments group. You can additionally tint with white those fragments of the picture that should remain after deletion background. Select the Brush Tool for this.
Switch to the layers palette by clicking on the Layers tab and create a layer mask using the Add layer mask button. If necessary, edit the mask. To remove remaining fragments background, paint them over the mask with black. If a part of the image that should be visible in the final image is hidden under the mask, paint the mask in this place with white.
Using the Save As option from the File menu, save the processed picture with a mask and both layers into a psd file.
Video on the topic
Sources:
- Two hair highlighting techniques
Thanks to its wide graphic capabilities, Photoshop is deservedly popular. One of the most common techniques for working in Photoshop is cropping an image and cutting out part of the image for later insertion.

Instructions
Launch the program, then open the image you are editing by selecting the "File" tab from the menu. If you need, select the “Crop” tool on the toolbar on the left side of the program window. Move the cursor to the image and click the mouse in the place where one of the corners of the future cropped image will be located Images– for example, the top left.
Move the cursor down and to the right to define the dimensions Images. Don't be afraid to do it inaccurately, you will have the opportunity to correct the dimensions. Click the mouse and cropping contours will appear on the edited image. You can change the size by dragging the selected outline in the desired direction with the mouse.
Having set the dimensions, move the cursor to the toolbar and select any tool. A message appears asking you to confirm the trim. Images. Click "OK" and the image will be cropped. Save it in the required format: “File – Save”. If you plan to post the image online, select Save for Web. In this case, you can choose its quality and “weight” (size in kilobytes).
Very often there is a need to cut out an element Images for further work with it. If you need a rectangular fragment, use the Rectangular Marquee Tool. Select the area you need Images, then copy the selected fragment – “Edit – Copy”. Now you can paste the copied fragment into any image. To paste it into the desired location, select the desired area with the Rectangular Marquee tool.
If the object you are cutting out has a complex shape, use the Pen tool to select it. Select it, then at the top of the window, activate the Paths option. By enlarging the fragment Images to the desired size, outline it with successive mouse clicks. Close the path, then right-click on it and select “Make selection” from the context menu. Copy the selected fragment: “Edit – Copy”. Now you can paste it into any image.
Video on the topic
Sources:
- how to cut out part of a photo in photoshop

Helpful advice
Remember, if you accidentally captured part of the desired fragment while erasing, the action can always be canceled by pressing the Ctrl+Alt+Z key combination from the keyboard, or by selecting the appropriate option in the Edit-Undo toolbar - “edit - undo action”.
Sources:
- how to cut out a fragment in photoshop
The Adobe Photoshop graphics editor contains powerful tools for selecting image fragments. Pen Tool is one of them. With sufficient skill with it with help objects of very complex shape can be processed.

Instructions
Open the image and create a copy of it using the Duplicate Layer command from the Layer menu. All changes must be made on a new layer so as not to damage the main image.
From the toolbar, select the Brush Tool and set its parameters in the properties panel: size 3 pixels, hardness 100. Press the P key to activate the Pen Tool. It will have the properties you defined for the brush.
To smoothly bend straight lines, use the Direct Selection Tool (“Arrow”). It can be activated by pressing the A key in the English layout. The white arrow changes the selected outline. The black arrow is used to move the selection.
A tangent segment passes through this point, with which you can change the shape and length of the selection area. To do this, grab the end of the control segment with the mouse and pull. Give the selection the desired bend. To delete an unnecessary anchor point, right-click on it and select Delete Anchor Point.
Once you have carefully outlined the object, right-click inside the selection and check the Make Selection command. In the new window, set the Feather Radius value. The higher this value, the blurrier the edges of the selection will be.
Helpful advice
You can create and delete control points using tools from the P group. They look like a “Pen” with “+” and “-” signs
Photoshop is a popular image editing tool that helps turn ordinary amateur photography into a spectacular, memorable photo. One of the most necessary skills for a photo editor is the ability to cut out any region Images.

Instructions
Open the image in Photoshop using Ctrl+O. Select the required region using the Marquee Tool (Rectangular region) in the toolbar. Select the desired shape to highlight the area. Select by holding down the left mouse button. A dotted frame will appear.
Highlight region image, if it has a complex shape, using one of three tools: Lasso Tool (Lasso), Magic Wand (Magic Wand) or Pen Tool (Pen), which are also located on the toolbar. To select using a lasso, outline region along the contour. To select with a magic wand, click on region.
To select, use the pen to draw a curved outline of the area, and use the Alt key to drag the curve markers (). Press Ctrl+Enter to create a selection. If necessary, switch to quick mask mode by pressing Q and paint with a brush region and press Q again.
To cut out the pixels of an area, press Ctrl+X or Del on your keyboard, or go to Edit and select Cut. The image area will be cut out (that is, deleted), leaving an empty area instead. region, filled with chess squares or a color from the color palette.
To cut region and copy it to a new layer, go to the top menu tab Layer (Layers). Select the New section and click on Layer via Copy. You can also copy to a new layer using the combination Ctrl+J.
To cut region on the document, so that instead of an area in the image there is empty space, go to Layer, then New and Layer via Cut (Cut to a new layer). The area will be copied to a new layer, but this area will not appear in the image itself. To avoid opening the top menu tab, press Shift+Ctrl+J.
To cut a certain region specific size, press the C key, highlight region, edit the cropping paths if necessary. Press Enter. The area will be cut out without saving the rest of the image.
Helpful advice
When using the Lasso, keep in mind that you can right-click inside the selection and select the desired cropping option.
Sources:
- How to cut out an object from a photo using Photoshop
To create collages or enhance the quality of an image, you often need to carefully select an element or remove the background around it. Adobe Photoshop has a rich arsenal of tools for such operations. The choice of selection method depends on the shape of the object and the background color.

Instructions
If the background is fairly uniform, it is convenient to use the Magic Wand Tool. In the properties panel, set the desired value for the Tolerance parameter. The lower this value, the more selective the instrument is. Click on the image and the “magic wand” will select adjacent areas of the background. If you have multiple areas to select, use the Add to selection button on the property bar. To cancel the selection operation, press Ctrl+Z.
If you want to select an object with blurry edges—for example, a bouffant hairstyle or fluffy fur—you can use the Background Eraser Tool. It looks like an optical sight: a circle with a cross. Move the cursor so that the cross is above the outer line of the selected object. Hold down the left mouse button and, without releasing, trace the fragment.
The tool will remove the pattern under the cross. If the background pattern changes, left-click again to give the tool a new sample of the color to remove. To enlarge the drawing, use the Zoom tool. Hand is used to move an object.
Press D to set default colors. Go to quick mask editing mode. The most convenient way to do this is to press Q. If you need to select an object with blurry boundaries, select a soft brush, and with clear ones, select a hard one. Start painting the fragment. You will see that it is covered with a transparent red film - a protective mask.
When you have completely painted the object, press Q again. A highlight will appear around that image element. Press Ctrl+Shift+I to invert the selection and press Delete or Backspace to remove the background.
If after removing the background there is still a border around the object, in the Layer menu, in the Matting group, select Remove Black Matte or Remove White Matte. The Defringe command removes any border of the specified width.
To create collages, you often have to move objects onto a different background. It will be fun to place your figure on the shore of the blue sea or in a cage with a lion, replacing the boring reality of an office or apartment.

Instructions
Before starting work, duplicate the photo so that all changes are made on a new layer - in this case, the main image will not be affected. Use the hotkey combination Ctrl+J or the Duplicate Layer command from the Layer menu.
Selecting a selection tool depends on the color background and the contour of the figure person. If color background is quite different from the selected object, it will be convenient to use the Magic Wand Tool. In the properties panel, configure the parameters - brush size and tolerance (Tolerance), i.e. the difference between shades of color, which the tool will ignore. The lower this indicator, the more selective the “Magic Wand” operates.
Click on the photo around the figure person. To add selections together, click Add selection in the properties panel. Change brush size and tolerance as needed. Once the entire background around the shape is selected, press Ctrl+I or use the Inverse command from the Select menu. To cut a shape, use the hotkey combination Ctrl+X.
When preparing documents and Internet pages, knowledge of how to cut a picture from a picture in Photoshop is often in demand. In some cases, you just need to remove the excess from the image, and then cropping is enough; in others, you need to insert part of one picture into another; in others, you need to create a complex photo collage. This article is devoted to several ways to cut out part of an image.
Cropping
The easiest way to cut out a picture in Photoshop is the so-called cropping. Select the Frame tool (C key). Move your cursor diagonally across the image to select a rectangle. When the rectangle is ready, press Enter. The image is "cropped" - it will represent only part of the original file. Often this is quite enough.

Don't forget to duplicate the original file before cropping and save a copy just in case.
Move a rectangular or oval area
The second way to cut out a picture is to select a rectangular or oval area and move it. Select the Rectangular Marquee Tool or the Oval Marquee Tool. The M (Latin) key selects the selection tool itself; pressing it and Shift at the same time will allow you to switch between different shapes. Move the cursor diagonally to highlight the desired area.
Switch to the Move Tool (V) and the selection can be dragged either within the original image or into another image.
This method is similar to how to cut out a picture in Paint, but Photoshop, of course, involves more fine-tuning of the tools and greater possibilities.

If you want the selection to both stay in place and be moved (that is, copied as you drag) while dragging within the same picture, press the Alt key as you move.
Equilateral rectangle and circle
Very often, the requirements for how to cut a picture from a picture involve selecting a square or circle. Of course, achieving this by eye, using guides or other auxiliary elements is very troublesome and time-consuming.
To do this, when using the selection tool, just press the Shift key.
Moreover, you can construct a circle or square with a known middle. To construct a figure with a center at a certain point, place the cursor there and start moving diagonally while holding down the Alt key. If both the Alt key and the Shift key are pressed, an equilateral rectangle or circle will be constructed with the center at the given point.
Copy and move
Another way to cut a picture from a picture in Photoshop is to copy the selected area and then move it to another place in the same document or to another document. This is especially necessary when copying must be repeated.
Select a fragment of the shape you need and copy it, then paste it. This can be done using the mouse and the menu: "Editing - Copy/Paste". The second way, more rational, is using the keyboard. Press the Ctrl and C keys simultaneously to copy and the Ctrl and V keys to paste.
This method can often be used to insert a cut out picture from Photoshop into another program.
Selecting an object of complex shape
Of course, Photoshop allows you not only to copy and transfer images of the correct shape, but also to cut the picture along the contour. This is what the Lasso Tool (L) is for. Pressing the L and Shift keys at the same time will allow you to switch between different types of lasso.
A regular lasso is necessary for arbitrary selection. Doing this with the mouse is quite problematic, since you need to actually outline a complex shape. A regular lasso is used either in cases where the exact shape is not important, or if a graphics tablet is connected to the computer.

The Rectangular Lasso tool involves drawing from point to point. Select this tool and start tracing the desired shape: place the first point and, without releasing the mouse button, place points along the contour until the selection line lines up around the fragment of the image that needs to be cut out. When this line is drawn, release the mouse button.
Finally, Photoshop provides the ability to create a selection line along a clear boundary between images. To do this you will need the Magnetic Lasso tool. Select it, place the cursor on the border of the image fragments, press and release the mouse, and then trace the outline of the image as accurately as possible, setting the direction of the tool - your misses will be corrected by the lasso, “magnetizing” to the outline. The more precise and contrasting the contour, the better the instrument will see it. To complete the selection, double-click the mouse button.

Magic wand
Finally, another way to cut out a picture in Photoshop is to use the Magic Wand (W). This tool allows you to quickly select an area of one color or tone and is very useful when you need to crop a background or cut out a solid color shape.
Select the tool by pressing the "W" key, place the cursor on the area you want to select, and click the mouse. The accuracy of the magic wand can be adjusted by entering a certain number in the “Tolerance” field on the toolbar. The larger this number, the more the “Magic Wand” understands the color that it needs to highlight, and vice versa. That is, if you need to select a fragment of an exact shade, you should enter the minimum value.

Thus, Photoshop provides many options on how to cut a picture from a picture. Further processing of the cut out fragments using an eraser or a mask layer will allow you to create neat photo collages.