How to make a frame in word? It often happens that you need to quickly create some kind of greeting card or simply write something in a beautiful frame. You can create a beautiful card in Photoshop or Gimp, but many have not even heard of these programs and do not have them at hand. And then they still need to be studied, and you need a postcard or frame for text right now. This is where the Microsoft Word text editor will come to our aid again. It is perfectly possible to create any postcard no worse than a typographic one. A good place to start would be to make a nice frame. This is what we will talk about now, and you will see that it is easy to do using Word.
We have already looked at some techniques for working in Word, such as changing page color, how to create a brochure, how to create a template, how to place a picture, how to work with dividing lines.
All this will be useful to you when creating graphics and postcards. Today we will learn how to make beautiful frames. For this we don’t need anything other than the Word text editor. It has everything we need.
How to make a frame inWord
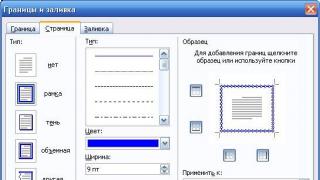
In order to create a beautiful frame in Word 2003, open a new document. Enter the menu – Format – Borders and Shading… .
The window “ Borders and Shading ».

Go to the " Page" Select the frame type on the left. In the center of the window, select the color of the future frame and the design. On the sample you will see the appearance of your frame.
Experiment and find what you like. After selecting, click the button OK"and your frame is ready. Don't forget to save it.
To create a beautiful frame in Word 2007/2010 you need to open the menu Page layout and in the block Page background choose Page Borders .

When preparing creative works, we try to decorate our documents with frames.
In various versions of Word, it is possible to create frames in the form of a picture for one or several pages.
If you don’t know how to make beautiful frames in Word, then today we will look at this issue so that there are no unknown points left.
Ready? Then let's read.
Inserting frames
1. Open the “Page Borders” window.
1.1. In Word 2013, go to the Design tab and click the Page Borders button.

By clicking on the tab - Design, click the button - Page Layout
(picture 1)
1.2. In Word 2010, go to the “Page Layout” tab and click the “Page Borders” button.

Here, instead of the tab - Design, click the tab - Page Layout
(Figure 2)
1.3. In word 2003, open a Word document, either blank or with text already printed.
Click “Format” - “Borders and Fill”, if this inscription is not there, then click on the double quotes to expand the entire list.

(Figure 3)
2. Let's move on to choosing boundaries
2.1. In the “Borders and Shading” window, switch to the “Page” tab, this is necessary to make a frame around the page, and not around the text.
2.2. Click on the black triangle and select the design you like from the drop-down list.

(Figure 4)
2.3. You can also choose on which pages your frame will be displayed, on all or only on the first.

(Figure 5)
2.4. On inkjet printers, the bottom border of the frame is not printed completely.
By clicking on the “Options” button (number 5), you can make indents from the edge of the page, which will allow you to print the bottom border of the frame more than usual.

(Figure 6)

(Figure 7)
conclusions
If you want to make a frame not entirely, but only on three sides of the sheet, then you can click on the corresponding buttons in the “Borders and Fill” window.

(Figure 8)
This is how you can quickly and easily decorate any document.
Please note that business documents should be drawn up within a more strict framework.
During my time working with the Microsoft Word word processor, I had to study it so much that, if necessary, I consult by phone without looking at the monitor screen.
I assume that you, too, will easily master the ability to insert frames and will already be contacted for help.
Thank you for your attention.
Good day, dear readers of my blog. Photos in beautiful frames can be not only a spectacular gift that you wouldn’t be ashamed to send to friends for a holiday via the Internet, but also a stylish element of your website design. They can be used as part of the content or as an independent element. For example, placing it in the header, next to the logo.

Therefore, today I will tell you how to make a frame in Photoshop. All the methods that I will give in this article are quite simple, even a beginner can do it. If you are not too sure or don’t trust your own taste, then even in this case, I will tell you what to do. Well, shall we get started?
A way to quickly make a frame of one color

If you just follow the photo, you will end up with an oval frame.

If you simultaneously hold down the Shift button on the keyboard, it will be round. By the way, this button can also turn a rectangle into a square.

You can click on the eye next to the layer's thumbnail to toggle the visibility of the fill on and off. It’s naturally easier to select from the background by turning off the top layer.

But further actions will have to be done by turning on the top layer. And making it active. Watch the backlight.

When you're ready, press Del.

You can trim the edges.

Unusual frame edges
Now let's make a frame with unusual inner edges. First, create a new layer. You already know how to do this.

Now find Q on the keyboard and press to switch to quick mask mode.

Apply free transform using CTRL+T and reduce the size.

In the top menu we find “Filters” - “Distortion”. You can apply Wave, distortion, curvature, polar coordinates, spherization. I like the ripples.

We pull the slider to increase or decrease the effect, and then save.

That's not all yet. Click on Q.

We have highlighted the edges. By the way, use your imagination when working in Photoshop. This selection does not resemble the same as when working with circles, ellipses or themes. Think about how to use Photoshop's capabilities differently than the authors of such articles show you. Do not treat the acquired knowledge as a guide for action.

For now, these crawling ants won't help much. Select Invert from the Selection menu to fill the area you want.

This is how it should work out for you. Be careful, further work should take place on the top layer, and not on the bottom.

You can apply a gradient.

Or one color.

Press CTRL+D to get rid of crawling ants.

Very beautiful frames for beginners
I already showed you the site photoshop-master. You may have noticed that there is a section with free and very beautiful frames. Even a beginner can use them. All of them are free.

Using them is quite simple if you look at these wonderful instructions.
You can find other free video lessons from the founders of Photoshop Master at this link: www.photoshop-master.ru/lessons .
However, if you want to achieve greater heights, then you do not need a specific solution to problems. There are no professionals who can draw a frame from a gradient, but will go to Google to create a transparent one.
They delve into their own heads and knowledge of the tools helps them figure out how to achieve this themselves. If you are interested in this, I can recommend Zinaida Lukyanova’s course “Photoshop from scratch in video format” .

If you liked this article, subscribe to the newsletter, VKontakte group and get more useful information about making money on the Internet.
Good luck in your endeavors and see you again!
Microsoft Word creates various frames.
Types of frames in a Word document:
- full page;
- around text;
- around the paragraph.
Creating any frame begins with selecting the Borders and Shading tool. In Microsoft Word 2007 and 2010 versions, you can find this tool in two ways.
Method 1. Tab on the “Page Layout” toolbar, “Page Borders” module.

Method 2.“Home” tab, “Paragraph” module, “Borders and Shading” item.

Let's describe in more detail how to draw a frame in MS Word (2010).
Step 1. Launch the Borders and Shading tool using any of the methods above.
Step 2. In the dialog box that appears, go to the “Page” tab.

Step 3. Customize the appearance of the frame.

Step 4. Click the “OK” button. Ready!


Frame around text
To draw a frame around a single letter, word, sentence, or any text in Word, you need to use the same tool: Borders and Shading.
Step 1. Select the text around which you want to draw a frame.

Step 2.

Step 3. Go to the “Border” tab, on the right “Apply to”, select “text” from the drop-down list.

Step 4. Select frame appearance:

Step 5. Click "OK". Ready!


A quick way to draw a frame around text
There is also a quick way to draw a frame around the text. The “Borders” tool on the “Home” tab of the toolbar in the “Paragraph” tool group will help with this.
Step 1. Select text to draw a frame.

Step 2. Select “All Boundaries” or “External Boundaries” from the drop-down list of the “Borders” tool.


Frame around paragraph
In order to create a frame around a paragraph, you need to follow the same steps as for a frame around text.
Step 1. Select the desired paragraph or place the cursor anywhere in the paragraph by clicking the mouse.

Step 2. Launch the Borders and Shading tool.

Step 3. Go to the “Border” tab, in the lower right corner “Apply to” select “paragraph” from the drop-down list.

Step 4. Select the appearance of the frame: type, color and width.

Step 5. Click the “OK” button. Ready!


Frame with stamp
You can create a frame with a stamp in Word using the algorithm below.
Step 1: Setting Page Margins
You need to adjust the page margins so that the text is inside the frame. For this:

Step 2. Select the Borders and Shading tool

Step 3. Insert stamp
- On the Insert tab, in the Header and Footer section, click on Footer.
- Open the footer by double-clicking at the bottom of the page.

- Change footer position from 1.25 to 0.

- Insert a 9x8 table in the footer.


- Enter dimensions: cell height 0.5 cm; column width: 0.7; 1; 2.3; 1.5; 1; 6.77; 1.5; 1.5; 2.


- Merge cells where necessary.


There is an easier way to create a frame with a stamp - download ready-made frames! We find templates on the Internet and insert frames! Before using them, it would be a good idea to make sure that they comply with GOST.
Video - How to make a frame in Word 2016
Ready-made frames with a stamp
As an example, we will show how to download ready-made frames from the student file archive StudFiles.

Step 2. Click "Download".

Diploma frame
Some coursework and dissertations must be framed with a stamp. The difficulty arises in the fact that some pages should not have a border or it is different. How to make a frame for a diploma?
First you need to break it down into sections, and only then insert frames where necessary.
Step 1. Place the cursor at the end of the page, after which the frame changes (appears, disappears).
Step 2. On the Page Layout tab, in the Page Setup tool group, click the Breaks icon.

Step 3. In the drop-down list, select “Section Breaks”, click on the “Next Page” option.

Step 4. Insert frames (see instructions “Frame with stamp”).
Video - How to insert a frame with a stamp in Word
The Word text editor is so flexible that, if desired, you can create in it, and an advertising booklet, and, and even a beautiful one. And with the help of the tool and drawing, you can make greeting cards and simple collages. If you have the desire and imagination, you can create business cards, certificates, and even colorful electronic ones in the same Word. Many people use Word only as a text editor and nothing more, but just add a frame and the same simple text document will become much more interesting and attractive.
I will show you how to add a frame to a document using the example of the Microsoft Word 2010 text editor. For those who still have the old Word version 2003 installed on their computer, you can read this. And starting from version 2007, you can follow this article.
Go to the tab Page layout, and select the tool called Page Borders.
If you want to make a frame only for a specific paragraph or block of text, then it is better to go to the tab Border.

If you need a frame for the entire sheet or even a document, then stay on the tab Page. The process of creating a frame for a specific paragraph, block, or entire page is exactly the same.
Choose Type lines of the future frame, Color, Width and how to apply it (to the entire sheet or just to a paragraph).

In the field where a sample of your future frame is shown, there are squares on the left and bottom, by clicking on which you can add or remove side, top and bottom borders.
On the tab Page there is another interesting function Drawing. If you click on the small black arrow on the side, a drop-down list will appear with small drawings of Christmas trees, hearts, apples, etc. Choose a drawing and see what you can come up with.

There is also an interesting button at the bottom left Horizontal line, with which you can make a beautiful dividing line in the right place in the document. The main thing before creating it is to place the cursor in the place where it should be.

Well, we looked at another tool for our creativity. I hope that the framework will be useful to you more than once in your work.