Many owners of smartphones and tablets very often wonder how to increase system memory on Android. The problem is that you need to clearly distinguish between the concepts of memory types. Let's consider several options.
Lack of system memory on Android. What to do in the simplest case?
The saddest thing is that the user does not always understand the difference between system and operational memory.
System memory, as it is already clear, is an internal drive where the OS is installed, without which the device simply will not work. RAM is responsible for the performance of the system if it does not access the drive at the time of performing certain actions.
Thus, we can draw a double conclusion on how to clear system memory on Android. There are only two options: either delete files from the built-in drive, or terminate processes that consume too many system resources. As a rule, most users usually save graphics and videos without thinking at all about where the system throws files. But by default, it is the internal disk that is used, and not the SD card. And this is not about overflowing the cache and browsing history in the browser (temporary files for fast page loading also take up a lot of space). Therefore, the very question of how to clear system memory on Android initially boils down to deleting garbage. But not every owner of a smartphone or tablet knows where to look for them.
Where are the files to be deleted located?
Typically, applications create their own directories on the internal partition. This mostly applies to social networks like VK or programs like Viber. On the internal media, they are viewed elementarily (it is enough to install some kind of file manager or use the system tools).

Worse, when saving occurs in a different folder. Usually this is DCIM. That's where you need to dig. There will be plenty of rubbish. The question of how to increase system memory on Android can be solved by just this method. But that's not all.
Remaining programs
How to add system memory on Android? Yes, you just need to remove the residual files from the programs that were uninstalled. As far as you can guess, this is not so easy to do. Some elements are able to boot with the system even in the residual version.
And here you can not do without removing these unnecessary software products. This can be done in two proven ways: use manual removal using the system tools or seek help from special utilities. The first option is more difficult, because the user does not always accurately imagine the location of the installed program. The second method is much better, because some applications are able to clean the system automatically without user intervention.
Run out of system memory on Android: system tools
Now let's touch on optimization issues directly. The very first thing to do when talking about solving the problem of how to increase system memory on Android is to delete junk files.

First you need to enter the settings, select the desired application and completely clear the cache. As already clear, such objects can take up a lot of space on the internal drive.

Further, in the question of how to increase system memory on Android, one more solution can be proposed, which is to transfer some files to a memory card. Usually, when there is not enough space, the system itself offers to transfer pictures, music and videos to a removable device. If such a process needs to be done manually, it is best to install some kind of file manager and use it (it will be much easier this way).

Another technique that allows is to transfer installed user applications to the memory card (provided, of course, that the device supports this mode). You can do this directly using the system tools in the applications section, but an easier way is to install applications like App2SD (AppMgr II). In addition, do not forget that the application cache also needs to be transferred to a removable device (usually the obb folder in the Android directory).
If you don’t want to use a program to transfer applications to an external device, you will have to get root rights. Only in this case can we talk about the successful completion of the transfer operations.
Optimizer Applications
Finally, in order not to do many things manually, it is desirable to have an optimizer application on board. There are a lot of them even on Google Play.

The most famous are programs like CCleaner, AVG TuneUp, DU Speed Booster, Advanced Task Killer and others. Their advantage is that they are able not only to clean the system memory, but also to optimize the “RAM”, unloading unnecessary processes from it. In other words, in one click you can make a full-fledged
And the most radical method of increasing memory can be called the uninstallation of unnecessary programs that are included in the standard set of the system. True, this will require the presence of root-rights. For example, if a user is not using the Google+ app, why keep it dead weight on a smartphone or tablet? And there are quite a lot of such programs in the standard set.
Outcome
That, in general terms, is all that concerns some of the possibilities for increasing the amount of memory of the internal drive, and at the same time comprehensive system care. Which method to use is decided by the owner of the gadget. But from a practical point of view, it can be advised to install the appropriate optimizer utilities so as not to deal with all the procedures yourself. In addition, the system's own resources in these matters are quite limited. Therefore, the conclusion about the advisability of installing special automated programs suggests itself.
![]()
A catastrophic lack of RAM is a matter of questions for owners of tablet computers. No matter how powerful and productive the device is, at some time the question will arise whether it is possible to increase the memory of the tablet. Industry experts and advanced users will be able to answer this question.
Can I increase the memory of the tablet?
The physical amount of memory is a constant, a constant indicator. It is physically impossible to increase it. And if the technical specifications indicate 2 GB of memory, then the user will have just such a volume at his disposal. And if the device is overloaded, starts to work incorrectly or freezes, responds slowly to user commands, it's time to optimize workflows. You can complete the task in several ways:
- Garbage removal. These may be unnecessary applications that slow down the entire system.
- Optimization of those software that are installed on the tablet.
- Installing specialized programs that will allow you to pump up RAM.
Removing unnecessary applications
In this case, it becomes possible to eliminate only those programs that the user installed independently. But the system software that is launched by Android cannot be deleted just like that, even if the user tries. However, in this case, there is a way out - to get root rights, that is, to become a super administrator. Having access to such options, you can delete literally anything you want from your tablet.
Application optimization
It is necessary to determine which programs are real garbage and require immediate elimination. To decide, follow these steps:
- Open settings.
- Select a category with applications from the menu.
- Open the memory usage option.
It is here that you can see exactly how many applications are installed on the computer, how much memory they occupy. It is important to find the memory cards installed on the memory card and analyze their volume and operation. To increase the amount of memory, you can temporarily stop the work of one of the processes. To do this, just click on the application and click the appropriate button in the menu that opens.
Special programs
Once installed, they will create a swap file on the Micro SD card or place it on ROM. Among the proven options are SWAPit RAM EXPANDER, RAM Manager or Swapper.
Greetings, dear readers, in today's material, useful for Android users, I will tell you about memory on Android: what types of memory exist, as well as several ways to increase memory. So, to begin with, so that the material is as useful as possible for you, let's understand the terminology.
Types of memory
There are several types of memory in the Android operating system:
- RAM or RAM (Random Access Memory). This type of memory is used for temporary storage of information and fast, online access to this memory. For example, when you play a game on your Android, it is from the RAM that various elements of the game are loaded. Thus, we can conclude that RAM affects the PERFORMANCE of your device. There is one answer to the question of how to increase RAM on an android: it will not work to install a new RAM board in the device, then we can only clear the RAM from unnecessary garbage, I will tell you how to do this below;
- Internal memory (ROM). The memory, which is preinstalled in the phone and is used to store various data, cannot be resized or increased. But, you can expand and increase external memory through SD cards;
- external memory. This mash that connects to your Android device from the outside. For example, by installing an SD card. SD card capacities may vary depending on the price of the card.
Ways to increase various types of memory
There are two ways to increase different types of storage on your mobile device:
- Software - this method consists in installing and using third-party applications. For example, an application for cleaning RAM, etc.
- Hardware - this method consists in the physical replacement of various components of the device to improve its performance.
Software ways to increase memory
First of all, let's look at the issue of increasing and cleaning RAM. You can optimize the RAM using various utilities, for example, the RAM Manager utility (you can find a screenshot and a link to the program below). I also recommend creating a RAM swap file on your phone - this process consists in reserving some amount of physical memory for the needs of the RAM.

Program features:
- Free up space on your device with just one click. Clear Android memory;
- Ability to control running applications;
- Get a timely and complete picture of the operation and performance of the device.
Hardware way
At the end of this material, I want to tell you how to increase the phone's memory by replacing its components. You need to purchase a special SD card that will serve you for storing various files. Cards differ in the amount of available memory, the larger the amount, the higher the price, and cards from branded manufacturers are much more expensive than, for example, their Chinese counterparts. Also, cards (flash drives) with a very large volume (32GB) will not work on older devices.
That's all for me, now you know how you can increase the memory on Android.
Many smartphone / tablet users sometimes have the question “How to increase RAM on Android?”.
The fact is that in some cases a device with this operating system starts to slow down very much.
This usually starts after a fairly long time of use.
Applications and files accumulate and this leads to the fact that the gadget's RAM simply does not have time to process all this. Therefore, there is a need to increase its volume.
There are three ways to complete this task.
The first one is the simplest and consists in properly managing the already available smartphone / tablet resources.
The meaning of the second is almost the same, but in this case we will deal with the removal of applications.
Finally, the third way is to use certain specialized programs. Those create a paging file and due to this they have the opportunity to increase the RAM.
Content:Method 1: Optimizing Existing Applications
Everything is quite simple here - you need to take and disable those applications that you do not need at the moment.
Yes, it would be nice to remove them, but the problem is that not every program can be simply removed from the device.
But you can turn off almost everything except the system ones. With the latter, unfortunately, nothing can be done. But even without them, the operating system will not work.
Therefore, you just need to stop the execution of unnecessary applications.
To do this, follow a few simple steps:
- Go to settings and select there "Applications". In OS Android0 and above, you additionally need to go to "Application Manager". But you, in any case, do not get confused.
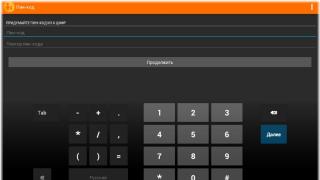
- next you need to go to "Memory Usage". In others, it is enough to open the aforementioned manager or just a list of applications. Next, you will see the picture shown in Figure 1. The open window will display all installed programs and the amount of memory that each of them occupies. Below you will see how much memory is used and how much is free.
- Then click on the application that you do not use and open its menu. It will have several buttons. If it can be deleted, there will be a corresponding button in the menu. If it's not, there will only be "Stop" and "Disable" buttons.
- First stop and then disable the selected application. Do the same with other programs that you do not use.
Then the RAM will be slightly unloaded and the device will be ready for further loads.
After such a procedure, the smartphone / tablet will immediately start working faster and be able to process large amounts of information.
Method 2: Remove programs
As we said above, in some cases it will be better to simply remove the applications. Then they will definitely not be able to create a load on the system.
But some programs cannot be uninstalled. They are called systems.
These include a standard flashlight, programs from and the like. Of course, some of them are really better left uninstalled.
But there are some that you can do without.
This is one of the most popular rooting apps. To use it, do this:
- download KingRoot from the official website of this program and install it;
- start the application;
- if everything is fine, the "Try to root" button will become available, click on it;
- wait while the device is granted superuser rights.

Rice. 2. Using KingRoot on a smartphone
If you were unable to follow the instructions above, try using the same KingRoot, but on a computer. To do this, follow a series of simple steps:
- Go to the official KingRoot website again and download the program for your computer there. Install it.
- Connect your smartphone or tablet to your computer via a USB cable. Run . The program will automatically find the connected device. The search process looks as shown in Figure 3.

Rice. 3. Search for connected devices in KingRoot on the computer
- When the device is found, a window will appear on it, prompting you to allow USB debugging. Click OK to complete this action. Without it, all further operations will be impossible.

Rice. 4. Allow USB debugging on your phone
- Now in the program on the computer, press the "ROOT" button to give the connected device root rights.

Rice. 5. Button for assigning root rights to the connected device
- Some devices will require a reboot. If this is the case in your case, a notification will appear on it. Click "OK" to reboot. If not, go to the next step.
- At the end, the “Finish” button will appear in the program window on the computer. Click on it to complete the process.

Rice. 6. The end of the assignment of root rights in KingRoot on the computer
After that, you will be able to work with superuser rights. Go back to the list of applications, open any and there will be a button "Delete".
Click on it to complete the removal.
In addition to KingRoot, also pay attention to the following applications that will help you complete the task of assigning root rights:
Most of them help to complete the task in one click.
Just. Is not it?
It is even easier to install special programs that allow you to uninstall other applications. For example, there is Super Cleaner.
The application was created in 2017 by the Hawk App Studio development team. To use it, do the following:
- Download the app on Google Play (here is the link).
- Go to the "App Uninstall" menu.
- You will see a list of installed apps that you can remove. It will also display those that cannot be uninstalled using the standard list of Android applications.
- Click on an application to remove it from your smartphone / tablet.

Rice. 7. List of applications to uninstall in Super Cleaner
All such programs have the same usage algorithm - you need to go to the list of applications and click on the one you want to delete.
Here is a list of other application uninstallers:
Removing unnecessary programs will significantly increase the amount of available RAM. The use of paging files will also help with this.
Method 3: Using special programs
The principle here is the same as on computers. There is a swap file that takes on the load that the main memory of the device cannot take.
So, there are many programs that allow you to create such files and add them to / . Consider the most convenient and popular of them.
SWAPit RAM EXPANDER
Quite an interesting program created by ordinary geeks. It allows you to create swap files up to 2.5 GB.
If you have, for example, 1 GB of standard RAM, then even 1 GB will be just a treasure. To use SWAPit RAM EXPANDER, do the following:
- Download the app. You can do this, for example, on the w3bsit3-dns.com forum (here is the link).
- Run it. From the very beginning, you will need to select a language. Unfortunately, there is no Russian here. In principle, it doesn’t matter here what language this product will work in, so you can leave the option “English” or put a checkmark next to the inscription “Deutsch” and click “OK”.

Rice. 8. Language selection in SWAPit RAM EXPANDER
- The program needs the superuser rights mentioned above. But you don't need to get them separately. SWAPit RAM EXPANDER will root your device on its own. To do this, you just need to click on the "Allow" button in the window that appears.

- Then you will be taken to the main menu of the program in question. In it, click the "Optimal" button. This will make it possible to go to the menu of functions responsible for achieving optimal parameters for the smartphone / tablet.

Rice. 10. "Optimal" button in the main menu of the program
- Next, check the box next to the inscription "Swap Aktiv". This will trigger a scan of the device's existing settings.

Rice. 11.Scan function
- The scan itself will start. It looks as shown in Figure 12. This process can be interrupted at any time by clicking on the "Bitte warten" button (if the German interface language is selected).

Rice. 12. The process of scanning the device in SWAPit RAM EXPANDER
- When the scan is over, the program will already know how much to add to the existing amount of RAM for optimal device performance. To be precise, SWAPit RAM EXPANDER will determine the optimal operating speed. Accordingly, from this it will be possible to understand how much the device lacks at the moment.

Rice. 13. Scan result in SWAPit RAM EXPANDER
- Press the "schliessen" or "close" button (depending on the language) to activate paging.
This means that this program is not suitable for you. Then you need to use another one.
ROEHSOFT RAM EXPANDER
This program is paid and you will have to pay to download it to. If you're ready to take that step, do the following:
- Download ROEHSOFT RAMEXPANDER (here is the link). Run this program.
- In the field where it says "Swap file = [size]" there is a slider that allows you to set the size of the swap file. Use one.
- Click on the button "Activate Swap".

Rice. 14. ROEHSOFT RAMEXPANDER window
- Wait until the program finishes its work.
Now, every time the system starts, the paging file will also be launched. As you can see, everything is very simple in ROEHSOFT RAMEXPANDER. But this program is paid.
You can use the free SWAPit RAM EXPANDER option. Choose what is more convenient for you.
Good luck in job!
The video below shows another way to create a swap file on Android OS.
How to create a swap file correctly, and what is it
In the video I will talk about how to properly make a paging file on an android phone. P.S. In the video, I forgot to say that in the Swapit Ram Expander (Ram Expander) program, you do not need to disable and delete the swap file! The program will disable the swap file itself when you connect USB!
How to increase RAM on Android. The best ways
5 (100%) 1 vote[s]How to increase memory on Android is the most common question asked by all OSA users. It is not surprising, since, no matter how much space there is initially, in the future it is always small. Solving the issue of increasing internal memory on a tablet or phone is not a big problem, but if the question is about how to increase RAM on Android, then you have to try a little more.
And so, if during installation, an application pops up a message about insufficient space, this will be the first signal that it is time to take action to increase or expand the RAM on Android. The next push may be the freezing of existing programs.
By going into the phone settings, you can see how much RAM or RAM is loaded.
Ways to increase memory
First, let's deal with the question of how to increase . To solve the problem of how to increase the memory of the phone, there are several options.
- Removing all unnecessary programs;
- Transferring all possible programs to a USB flash drive;
- Zoom using sd card;
- Software solution.
And so we will consider each item separately in order to completely remove the question of how to increase the internal memory of Android. The most elementary and simple method can be considered the destruction of everything that is not needed, for which you need to go to the "applications" select those that are not used and simply remove them from the device. Disabling animated pictures can also help, they also consume a lot of internal memory.
It is common for applications to be installed on internal memory, which causes the device to slow down, but most of them can be transferred to a flash drive. After selecting the desired program, click on it, after which you will see the characteristics, and below the button with the inscription move to the sd card.

Unfortunately, not all utilities can be freely moved, so sometimes the problem of how to expand memory with a memory card is not easy to solve at first glance, although it is quite possible. The main thing is to follow the advice and remember that the memory of the drive for storing photos, music and other items will decrease.
- To begin with, everything that is on the memory card needs to be moved to another place, of course, this applies to those who do not need to run to the store to get it.
- If you need to purchase a drive, choose a card of a higher class, and not a super large one, if there is very little RAM, as the device may simply start to slow down.
- Next, insert the drive into the PC using a card reader.
- Download to the computer and run the MiniTool Partition Wizard Home program.
- By pressing the right mouse button, select our SD card / Create. Next, in the list that opens, we find Primary, and below Fat32.
- We increase the size of the Size And Location section intended for files, the gray color of the selected remains for applications, press the "yes" button.
- We again go to Create, make the first position in the list that opens the same as in paragraph 4, and change the second position to Ext3. We save the changes.
- We find the Apply button, by clicking it, we agree with all the changes made.
- Everything is ready, you can return the card to your phone and enjoy the increased volume.
A software solution to the question of how to increase memory on Android involves installing additional utilities on a smartphone. You can install Total Commander CCleaner, or other programs that clean up garbage and all files remaining after normal deletion, thus helping to increase the built-in memory.
Another program is called FolderMount, thanks to it, all applications can be moved to where you want, this also applies to those for which such an action was impossible. However, the program requires permission from the superuser and Ruth is right.
How to increase RAM
As it was said initially, increasing the RAM is a more time-consuming process, most often this requires installing an upgrade that allows you to open Root access. But first, consider the option of how to increase the amount of RAM without much intervention. To do this, go to the task manager, select an application that is running, but at this time you don’t need to, find the “stop” button, thus increasing the RAM.
You need to talk about how to increase RAM with programs that require superuser rights when there are such rights, and to obtain them, you need to install some utilities. For example, you need to download the program on a PC. After starting, we connect the phone via a cable, we find the item for developers / USB DEBUGING, after which the drivers are automatically installed, then, to obtain ROOT rights, you need to click on the button with the name root, you may need to confirm any actions, after a complete installation you need to reboot Android.
And so after gaining access, you can install utilities to expand the amount of RAM. For example, you can download SWAPit RAM EXPANDER, for it to work, you still need to have support for the swap kernel, and it is also desirable to have access to system recovery. After starting the program:
- select the desired language;
- we give permission for the rights of the superuser;
- We select the optimal functions, the “optimal” button;
- Select the desired swap volume;
- We start scanning by clicking on the swap active;
- Next, close the program and reboot the device.
You can use other gadgets to help make more volume, but in my opinion SWAPit RAM EXPANDER is the easiest to use.