The instructions from this article should be used in the case when the user has already written the Windows 7 image to a USB flash drive using specialized programs. There is more than one way to write an operating system image to optical or flash media:
Now we will take a closer look at how installing Windows 7 from a USB flash drive... Let's change a few parameters in the BIOS or Boot Menu, boot from the media and start the installation.
Installing Windows 7 from a USB flash drive is quick and easy, the main steps
Before installing any system, be it Linux, Android or various editions of Windows, it is worth remembering that this process is not complicated and anyone can handle it, the main thing is to follow the instructions that have already been done for you, beginners, and use it correctly.
Steps to be followed below:
- setting up the computer BIOS (setting the priority of loading the drive);
- installation of the system with the setting of the required parameters;
- installing drivers and configuring the system for the user.
BIOS settings
Each computer has a built-in chip that stores the basic I / O system, which has a set of firmware that allows you to customize the hardware. There is an older version of the system called the Legacy BIOS and the one used in modern computers called the UEFI BIOS. The setting in both cases may be different.
Now you need to find out the model of your motherboard or laptop, and then the keys that you need to press to enter the BIOS. I advise you to read an article about how many models of motherboards and laptops are described. Usually these are DEL, F8, F12, F2, F9, F11, and others. In some cases, you need to go to a special menu using the ESC key, and then press F10 or F9.
After getting into BIOS, you need to find boot options that differ in different types of basic I / O system. After that, you need to boot from the media and the installation of Windows 7 from the USB flash drive will begin.
AMI
In the AMI-BIOS, use the arrows to switch to the "Boot" tab and find the "Boot Device Priority" option there. Here we will set the priority of the download. In some cases, the name of the device will appear in the first place, for example, the name of the hard disk. To move these devices in places, you need to press the F5-F6 keys. Otherwise, the user will see the lines "1st Boot Device", "2nd Boot Device" and so on. Here in the first place you need to choose a bootable USB flash drive.
Phoenix-Award
In this type, the required boot priority options are found in the Advanced BIOS Features section. The first device is the First Boot Device. Here we expose the USB stick. The second device is designated as Second Boot Device, and the third as Third Boot Device.
To save the parameters, as in the previous case, press the F10 key.
BIOS UEFI ()
The parameters of this type of BIOS do not particularly differ from the previous options. It's just that there is a beautiful and convenient graphical interface, and in some cases all the parameters are translated into Russian, which increases the ease of use.
On the main screen below there is a section called "Boot Priority". All carriers are marked there. In order to put the flash drive in the first place, it is enough to drag the icon to the first place with the left mouse button. Remember to save your changes before exiting.
Boot Menu
Using (read), you can immediately boot from the USB flash drive, bypassing the BIOS. Usually, the entrance is carried out using the ESC key, or another. You need to find out about this in the passport for the motherboard or on the Internet according to the laptop / motherboard model.
Installing Windows 7 from a USB flash drive
After booting from the bootable USB flash drive, copying the system files will begin. An installation window will appear, where it is proposed to select the system language, time and currency format, keyboard layout. Usually the parameters are already set by default, so click "Next".
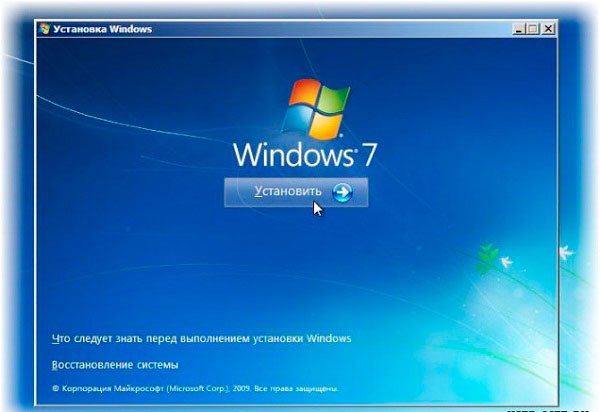
The next window brings us directly to the installation. To do this, use the button "Install"... In addition, there is another parameter that will come in handy more than once in operating the OS - System Restore (located at the bottom left). If the system suddenly refused to boot, you can use this option during recovery. And there is also help information - "What you need to know before performing a Windows installation."
Here we come to the beginning of the installation. The next step is to accept the terms of the license agreement. Check the box and click "Next".
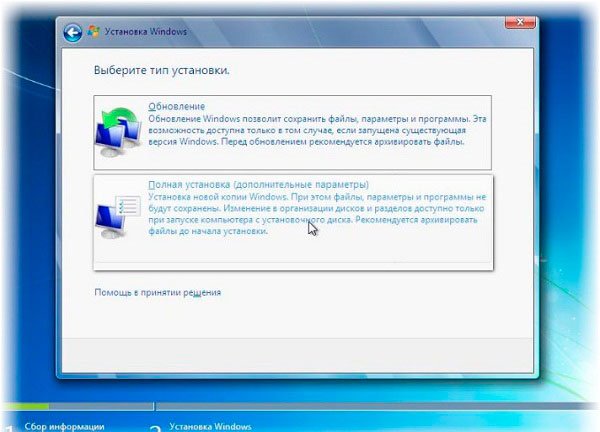
The next step brings us closer to choosing a partition for installing the OS. You can select the "Update" item, which only updates the system files without affecting other data. It is possible to use it to restore and upgrade to a newer version.
In this case, a clean install is performed, so the Full Install option is selected.
A window appears, which implies the selection of the partition where the installation of Windows 7 from a USB flash drive will be performed. If the section has unallocated space (unallocated), then select this section with the mouse and press the button below "Disk setup".
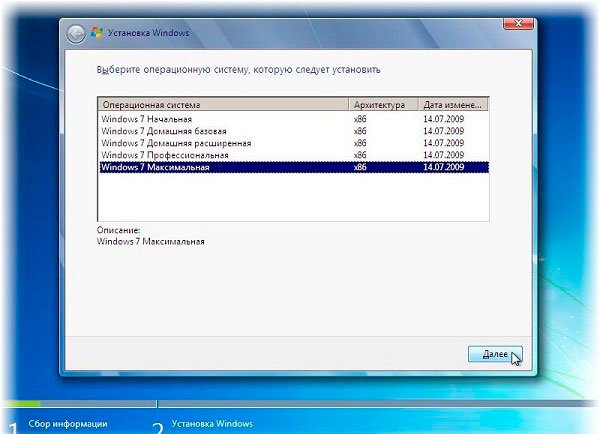
We select the volume required for the system. For Windows 7 Maximum, you will need at least 20 GB, and if you install various programs on the system disk, you will need 100 GB or more. After entering the value in MB, click Apply.
A notification appears that additional partitions will be created for system files. These are usually recovery partitions. Click OK.
After creating a partition, it will be called, for example, "Disk 0 Partition 2" or otherwise. To install Windows 7 on it, select this volume and click "Next".
So the process of installing Windows 7 from a USB flash drive began. In this case, the system files are copied to disk, then unpacking, installation of components and completion. You need to wait a while. It all depends on the configuration of the computer, how powerful its components are.
Settings
After installation, a window will appear where you must enter a username. An example has already been specified. You can enter whatever name you want for the PC. Click "Next".
The next step is to enter a password. Although not required, it is recommended for safety reasons. We enter the password and a hint twice, in case the user forgets it.
We come to the finish line. You must enter the product key from the box with the disc, or obtained from the Internet. In some cases, you do not need to enter the key (if you are installing an OEM assembly for one language, and the key is embedded in the BIOS). If there is a key, enter, and if not, click "Skip".
Now, if you select the "Use recommended settings" option, the system will connect to the Internet and start installing updates. You can choose the second item, or you can postpone the decision for a while, which is recommended. If necessary, the user will install them himself.
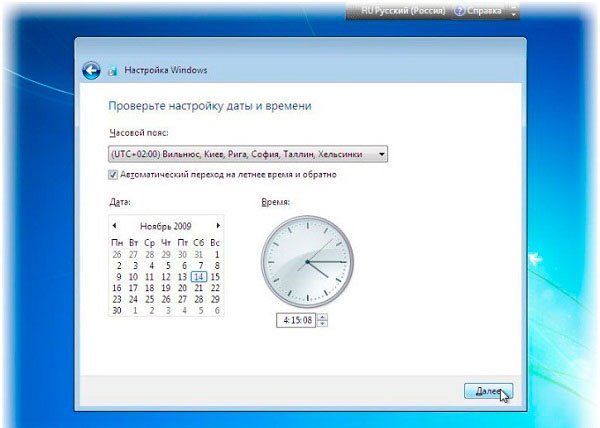
We set the correct time and date, although this is usually done automatically. If the time zone is incorrect, choose the correct one.
We set the network parameters. For example, for the network located in your home, select "Home network". Descriptions for each option have already been given.
Once selected, the settings will begin to apply and connect to the network.
The penultimate steps are the preparation of the desktop and the appearance of the inscription: "Welcome".
And here is the Windows 7 desktop, which is still empty. There is only the trash can in the upper left corner, the good old "Start Menu" and the taskbar.
Installing Windows 7 Drivers and Configuring the System
Once you have installed the system, the basic drivers are already built into the system. Others will be automatically installed, for example, when devices are connected. You can make it easier to work with the system by downloading and installing the necessary software.
So, at first, if you don't want to manually search for drivers for your PC, download the utility. I will not say that it is so effective, since the database does not contain drivers for all devices. There have been cases when a driver from a different hardware was installed, a failure occurred and the system had to be reinstalled again. The use of such programs is only at your own risk.
After downloading and running this tool, it will start checking the configuration of the computer and setting the order for loading drivers. It is recommended to choose Expert Mode to choose what to install and what not.
What to choose from the programs? I think you need a browser, one of the popular Google Chrome, Opera, Mozilla Firefox, Yandex Browser and others. You will definitely need an archiver, video codecs and a K-Lite Codec Pack player (you can also choose something else), to listen to music, a player like AIMP or whatever you like, an antivirus. It further depends on your preferences.
Watch the video below on installing Windows 7 from a USB flash drive.
Outcomes
Now you know how to install Windows 7 from a USB flash drive to any computer. As you can see, it is very simple and fast. Quite a lot of words have been written, but this is done in almost a couple of mouse clicks. Let's summarize what we did today and what needs to be done next:
- To get started, create a bootable USB image of the Windows OS or any other system. For this, programs such as UltraISO, Rufus, WinSetupFromUSB, WinToHDD, Windows USB / DVD Download Tool and many others are commonly used.
- Install Windows and configure settings.
- We install drivers, programs and use the system.
There is nothing complicated here. Problems can arise if the system image files are damaged, then recording or installing the system will not work and errors will appear, for example, the wrong partition style (), insufficient disk space, and many other problems, which are mostly solved quickly. Now you know what installing Windows 7 from a USB flash drive is. As for the questions in the comments.
It is best to learn how to install the OS yourself, and there are a number of reasons for this: economy, the ability to do it at any time and not depend on anyone, anonymity and security (no one except you will touch your computer), etc. In this article, you will learn how to install windows 7 from a USB flash drive on a computer and laptop.
Recording windows to a USB flash drive
In order to write an iso image of windows 7 to a USB flash drive, I use and recommend the rufus program to everyone. It is the most simple, free, fast and accurate recording of any system. I have already written about all the advantages of the utility. It is so simple that you don't have to follow the link and study, but download it right away - https://yadi.sk/d/DUW30yh93RLmZq
Preparing for installation
The correct setting is considered if you format the "C" drive. This is extremely necessary for the correct operation of the new system, as well as with the help of formatting, all viruses and useless and unnecessary files are removed. As you already understood, before starting the installation, you need to move all the information you need to another drive so that you can erase everything from the C drive. If you have only one section, and there is nowhere to move, or save important information to a USB flash drive.
Installing windows 7 OS
All manuals on the Internet have a BIOS setup step, and we can do without it. Why touch it once more, if there is an opportunity to do it.
- After you have written Windows 7 to a USB flash drive and saved all the important information, insert the USB drive and restart your laptop / computer. During PC startup, you need to call the BOOT menu to select a USB flash drive to boot, not a hard drive.
How to callBOOT menu:
Understood? Now, while turning on the PC, call the boot menu and select the USB flash drive with the system.
- If all of the above was done correctly, and after choosing to download a USB flash drive, you have a window like this:

This means that everything is fine, and you need to press any button 1 time.
- Choose your native language and click "next".

- A simple point where you need to click "install" and go to the next step of the installation.


It is best to set the maximum.
- Check the box that you agree.

- Full install or upgrade. We need to click "full".

- Select the required HDD partition i.e. drive "C" and press the drive setting.

- We press "format". (all information on it will be destroyed). We talked about this above.

- We confirm the formatting, and click next.

- The installation is running. Now it takes time (3-15 minutes) while the operating system is copied from the flash drive to your computer and installed.

12. Enter your name (nickname) and computer name and move on.

13. Set a password (if necessary), this is optional.

14. You must enter your product license key. Click next, we'll talk about this below.


16. Set the date and time. So that the clock does not get lost after each reboot, set your time zone.

17. Set up your internet connection. If the computer is home, select 1 item.

- Everything! Congratulations, you did it. Windows 7 has been successfully installed.
Installation completed. What's next?
The installation of the operating system took you about 20 minutes, it would seem that is everything, but I have to upset you because now you need to install everything else:
- Drivers. If you still have the disks that came with your computer / laptop, use them. If not, I recommend downloading the DriverPack Solution program and it will select all the necessary drivers and install them.
- Download and install all the programs you need, including: browsers, flash player, directx, microsoft visual c ++ and microsoft net framework.
- Customize your computer for yourself. Create the necessary shortcuts on the desktop, change their scale (size) by holding ctrl and scrolling the mouse wheel, adjust the video card (if necessary), and everything else.
Also, more than likely you have installed non-licensed Windows, and of course you do not have an activation key. It's not scary, and you can activate it in 2 minutes. I wrote how to do this.
How to Install OS from USB: Video
Results of the work done
Most of the above was optional, but it is recommended to do so for proper installation. As a result, you got a fully working computer that works like new and without spending your savings on it. Now you are able to independently reinstall the OS and configure it in less than an hour (this time is equal to that which you would have spent on transportation to the service center).
Sadly as it sounds, today there is a misconception that the problem of how to install Windows 7 on a laptop is quite complex and almost insoluble for an ordinary user. This is partly true, but often such myths are baseless.
Windows 7: first acquaintance
Windows 7 is one of the most popular and demanded systems among computer users. Very often it is installed not so much on stationary computer terminals as on laptops.
Among the versions available for installation, you can find several basic assemblies: initial, home basic, home extended, professional and maximum. Actually, which version the user chooses for installation depends only on him. In any case, the problem of how to install Windows 7 from a disk onto a laptop has a general solution for almost all models of any manufacturer. The same goes for installing operating systems from USB devices, popularly referred to as flash drives.
General concepts of installing Windows 7 on laptops
As for the answer to the question of how to install Windows 7 from disk to a laptop, usually there are no special problems here. This is understandable, because laptops are usually equipped with optical CD / DVD-ROM drives. So to install the system, it is enough to have the original disk or a copy of it.

In the future, of course, some specific situations may arise, but the same problems, for example, how to install Windows 7 on an HP laptop or on a model from another manufacturer, mostly appear only at the final stages of the installation process and most often come down to the correct installation of device drivers. This will be discussed a little later.
Installing Windows 7 on Netbooks
Another thing is when a user tries to install an operating system on a netbook. This is where, in most cases, problems begin. This is due to the fact that there are no optical drives in netbooks, and the installation of the system must be done from a flash drive. However, here, as practice shows, the problem of how to install Windows 7 on a Lenovo laptop or some other model also has a general solution.

Here, the fundamental link in the installation process will be the correct recording of the image of the installation distribution to a removable USB-drive, and this must be done in such a way that the flash drive is bootable, and the launch must be carried out before the start of the already present system, if there is one on board.
Preparing the disc
Now let's look at some preliminary steps, without which the question of how to install Windows 7 on a laptop cannot be resolved. It is good if the user has an original disk with a specific version of the operating system. But what to do when he is absent?
In this case, you need to either make a copy of it, or burn the installation disc from a previously created image. You can create such an image using any program such as UltraISO or Daemon Tools. In addition, you can use the standard tools of the OS itself and create a bootable disk.
The first option looks preferable, since this is how you can create an exact copy of the distribution kit, which will practically not differ from the original in anything. It seems that there is no need to explain exactly how this is done, since the very process of writing an image to disk in all programs is very similar. Sometimes only menus and corresponding commands differ. It boils down to using the image recording functions, after which a blank optical medium is inserted into the drive, and then the path to the previously created image file is indicated. The image itself is created using the same programs using the appropriate function and saving the image file on the hard drive or in a logical partition.
Creating a bootable USB drive
In some cases, for example, the answer to the question of how to install Windows 7 on an Asus laptop (or any other) may directly depend on the device model itself. As it is already clear, we are talking about netbooks, although they are referred to as laptops. Here you will initially need to create a bootable USB flash drive.
This is done using the above software packages, with the only difference that the image is recorded not on an optical disk, but on a removable USB drive. The pre-imaging remains unchanged. Below will be shown how to install Windows 7 from a USB flash drive on an Asus laptop. And this does not apply to any particular model or manufacturer.
Mandatory BIOS settings
In the preparatory process, an understanding of how to install Windows 7 on a laptop through BIOS is of no small importance. The fact is that when using the default BIOS settings, the already installed OS (for example, Windows XP) will simply ignore the media with the "seven" distribution kit. Here you need to take a responsible approach to setting the order of priority of boot devices.
To enter the BIOS, depending on the laptop model and the manufacturer of the BIOS itself, the Del, F2, F12 keys can be used, etc. Now you need to find the Boot (Boot Sequence) section or something similar, where the Boot Device Priority line will be indicated ... By default, the first device is the HDD.

If you intend to install the system from an optical disc, you must specify the CD / DVD drive as the first device. If the question is being decided, say, about how to install Windows 7 from BIOS on a laptop when a USB flash drive is used, of course, it is this drive that needs to be specified as the first priority device. However, sometimes there may be problems with the fact that the USB drive in the settings may not be displayed. The main reason why this happens is only that the flash drive must be inserted into the corresponding USB port before turning on the laptop (netbook) and calling the BIOS settings.
After all the settings have been made, it is necessary to save the changes before exiting (Save and Exit Setup), after which a reboot will take place. If everything is done correctly, the Windows 7 installation should start from the selected media.
Start installation and formatting partitions
So, the start is made. Don't be in a hurry to rejoice. Of course, the installation process is automated. First, as usual, you need to select the system language, time and date format, and then specify the keyboard layout. Note right away that entering the activation key and license has been postponed until the end of the process. The fact is that the "seven" can work in normal mode for up to 30 days as an ordinary shareware program.
Now, in the question of how to install Windows 7 on an HP laptop (or other models), you should correctly choose which version of Windows 7 should be installed. This is due to the fact that the license key is designed specifically for a specific assembly and, after installing any other key, will not lead to system activation simply because of its discrepancy.

Now it remains to accept the terms of the agreement for installation and use. Next, a window will appear in which there are two types of installation: update and full installation. Almost all experts and users recommend making a complete installation from scratch (before starting the process, you need to copy the files and folders necessary for the user, since formatting will destroy the data). Another advantage of such an installation is the fact that the new system will not "pick up" from the old system errors or, even worse, viruses.
Problems arising at the initial stage of installation
The installation wizard will prompt you to select a partition where the fresh OS will be installed. Its formatting will need to be done. And as it turns out, it is at this stage that the question of how to install Windows 7 from a USB flash drive to a laptop (or from an optical disk) may seem insoluble, since the system flatly refuses to perform the formatting operation, and sometimes also indicates that formatting is necessary hard drive driver.

We must say right away that you should not be intimidated by such messages. In fact, this is only due to the fact that some hard disks may contain incorrect MBR boot records or errors in disk layout. In some cases, the problem may be related to the presence of different file systems on disks and their partitions.
You can get out of this problematic situation by running the command line directly during the installation process. To do this, use the keyboard shortcut Shift + F10. In the window that appears, enter the bootrec / fixmbr command to restore the bootloader.

Sometimes in solving the problem of how to install Windows 7 on a Lenovo laptop (or something else), re-entering the BIOS can help, where in the SATA controller settings you need to change the access mode to the hard drive from AHCI to IDE.
After that, you need to return to the installation. In this case, the problem of how to install Windows 7 on an Asus laptop (as an example) when the above error occurs should disappear, and you can proceed to directly format the disk or partition (you need to click on the "Formatting" hyperlink below). It remains to wait until the end of the process, after which a window will appear indicating the main steps that will be applied during the installation process.
Initial system settings
At the end of the installation process, the user will need to enter the laptop name, username (if prompted), and then the product serial number.

After the above steps, the same answer to the question of how to install Windows 7 from a USB flash drive to an Asus laptop or Acer netbook (or even from a disk to other device models) comes down to setting the time zone, time and date. Then, if you wish, you can make and configure the network. If there is no clear confidence in the choice of the type of network, you can postpone this process until later.
When everything is done, the first start of the system will take place, after which the familiar "Desktop" will appear.
Installing device drivers
But that's not all. It should be understood that some versions of the "seven" (especially unofficial ones) are supplied without the necessary driver package. For example, the problem of how to install Windows 7 on an Acer laptop with a full set of drivers can be solved quite simply if, when purchasing the device itself, there was a special disk with drivers among the additional software. This applies to any laptop model.

As a rule, this issue is solved quite simply. True, the drivers will have to be installed manually if there is no special "Wizard" on the disk, which, upon startup, will install absolutely all device drivers that are present in the laptop itself as components. As you can see, the problem of how to install Windows 7 on a laptop is not as bad as some users tend to describe. Yes, of course, you will have to pay attention to some specific settings and solving problems during the installation of the "seven", but this can be solved by a user of any skill level. As they say, there would be a desire and a little patience.
Installing additional utilities
As for additional software, the problem of how to install Windows 7 on a laptop with all the system's capabilities is also solved quite simply. It will be necessary to additionally install an antivirus, archiver, codecs, office programs, etc. However, if all this is on the original disk, there is nothing to think about, it is worth installing applications from such a disk (usually Acronis is present as a shell).
It goes without saying that during the installation of the system itself or at the end of the work of the "Wizard", you can split the hard drive into logical partitions. There are a lot of utilities for this today. Even some discs have their own tools like Partition Magic, etc.
Compatibility issues with Windows 8
Finally, about one more problem. Let's say we need to decide how to install Windows 7 from a flash drive on an Asus laptop with a preinstalled figure eight. 7 and 8 systems have different file systems. Although the G7 is believed to support G8 file systems, it is actually a conditional statement. In practice, this creates a lot of embarrassment. A way out of this situation can be the inclusion of Legacy compatibility mode in the BIOS and the subsequent conversion of the "eight" partitions from GPT or UEFI to the standard "seven" MBR format.
Conclusion
Probably, many have already noticed that the question of how to install Windows 7 on a laptop, although it has several specific points that will have to be paid special attention, is nevertheless not too difficult. Depending on the laptop model, you may need to tinker at times. But if all the settings are made correctly, and even in the kit there is an original CD with drivers, you don't need to strain too much.
If you are the owner of a compact netbook and sincerely think that CD and DVD discs will soon take pride of place in the museum of storage media (next to cassettes and floppy disks), you definitely need to know the answer to the question “how to install windows 7 from a USB flash drive? " And not only because of this! There are more than enough motivations for learning this computer wisdom.
An installation distribution kit on a USB drive is, at the very least, convenient and compact. And most importantly, it is reliable: no need to worry that due to some kind of scratch or speck of dust, a few bits will be lost, and the OS installer will fail (again, as it often happens with disks).
This article describes in detail all the steps of installing windows 7 from a USB flash drive: from choosing a media to setting up a distribution kit.
Preparing a bootable USB media
The volume of the installation flash drive must exceed 4GB. Since some assemblies of the "seven", in contrast to the standard distribution, include many updates, patches, applets, integrated components (Framework, WinRAR, DirectX, etc.), and accordingly have large sizes.
1. Connect the USB flash drive to your PC.
2. Open the Start menu (the first icon on the taskbar).
3. On the right side of the menu, click Computer.
4. In the "Devices with removable media" section, click on the flash drive shortcut.
5. Select the "Format ..." command from the contextual submenu.
6. In the formatting settings window in the "File system:" option, set "NTFS". Necessarily! Installing windows 7 from a flash drive is most stable and correct in this system.
7. Click the Get Started button.
8. Wait for the formatting to finish.
Selecting and downloading a Windows 7 distribution
To create an installation flash drive, you need an ISO image of the distribution. It can be downloaded from specialized sites or popular torrent trackers (nnm-club.me, torrent-windows.net, etc.)
Advice! Installing windows from a USB flash drive is a responsible and extremely serious business. The success of this event guarantees a comfortable and safe work on the PC. Therefore, before you download any ISO-image of the system, or, simply put, an assembly, on your computer, find out what other users think about it. Better yet, check with your IT specialists (if you can, of course).
Creating a bootable USB drive
In addition to a formatted 6-8 GB flash drive and a Windows 7 ISO distribution kit, you will also need the UltraISO program to burn the USB installation media. And do not be confused that this digital product is paid - you do not need to buy it. The demo version of UltraISO is also suitable for making bootable media. Download it on the developer's official website - ezbsystems.com/ultraiso/.
After downloading and installing the utility, do the following:
1. Launch UltraISO.
2. In the "File" menu, activate the "Open ..." function.
3. Specify the path to the OS image:
- go to the section / folder where it is stored;
- select it with a mouse click;
- click the "Open" button.
4. Open "Bootstrapping" (the third section of the UltraISO main menu) and click "Burn hard disk image ...".
5. In the settings window, in the "Recording method:" option, set the value to "USB-HDD +", and then click the "Burn" button.
6. When finished recording, close the program. Make sure that the distribution kit is installed on the USB flash drive (visually inspect its contents; do not edit or change anything!)
Installing Windows 7 from a USB flash drive
Before installing windows from a flash drive , transfer data of value to you (photos, videos, game saves) from the system partition (drive C, on which the OS is installed) to a logical partition (to drive D or E). Otherwise, they will be destroyed during the installation process.
So, to install windows 7 from a flash drive:
1. Restart your PC and hold the F8 key until the display shows Select boot device.
Attention! On your PC, this function can be activated by another key (for example, F12, F2). Check this characteristic in the manufacturer's data sheet.
2. Using the cursor keys, highlight the menu item "USB" (boot from a USB flash drive). Press the "ENTER" key.
4. In the "Windows Setup" window, select the system partition (on which the OS will be installed) by clicking the mouse. In its column, in the "Type" column, there should be a value "System".
5. Check the settings again! And only then run the "Format" function.
At the end of the installation - after the PC will automatically reboot - you can start installing the software.
That's the whole instruction, dear reader! As a result of little effort, you have a self-made bootable USB flash drive and a "fresh" Windows 7 on your PC. What's bad ?!
Good health, my dear readers and computer enthusiasts!
Yesterday I dealt with a friend's laptop, who asked to demolish the tenth Windows and return the seventh to him. I didn’t have a free disc, and I decided to resort to such a step as installing Windows 7 from a USB flash drive. Well, by tradition, I installed it myself - I shared it with friends! Today I will tell you all the secrets of installing this operating system from a USB drive.
When do I need to reinstall the OS?
Imagine you have installed an operating system, work, install various programs, a month, the second, the third. And in the end, you understand that the visual shell starts to slow down a lot, especially in demanding toys or software like Photoshop. It is virtually impossible to fix the problem automatically. Constant cleaning of the registry will not endlessly save the situation either.
Professional system administrators are advised to reinstall the OS once a year. They argue that even with the right skin care practices from Microsoft, someday it will still be littered with bugs, reports, and other nonsense.
And all of this will greatly reduce performance. Believe me, even the updates that the graphics platform downloads from the official sites can also fill the general registry with bugs, for example, with a crooked installation or a bit of a package of files.
What do you need to prepare before taking action?

First, you need to take care of the files you need. You don't want to lose them, do you? Therefore, I offer you several options. If your hard drive is partitioned into logical disks, then transfer everything you need to a hard drive that does not have a system. Typically, these discs are designated by the letters " D" and " H". Just copy all archives, photos and music with movies to them. Of course, if there is enough space.
If it is not enough, or the hard is not divided - do not worry, it will come to the rescue storage from Yandex... Come here, register and either click here and load the info.
Or download the client.


After installation, you will have a shortcut like this.

Open it and work as with a laptop and a network drive. Please note that the software has become, as it were, a part of your computer.

And if you like Google more, then that way.

Everything is very simple, just like above, you either download the client, or load it through the drop form on the site itself.

Well, if this option did not suit you, well, then you can rewrite everything on a disc.
By the way, on the hp laptop I was working on, I generally used both virtual storages. There is an unmeasured amount of files.
Now take the USB stick and insert it into the port. Now you need to format it. This is how it is done. Open my computer and right click on your flash drive.

And you click the word " format».

And now you will have a photo of such a window.
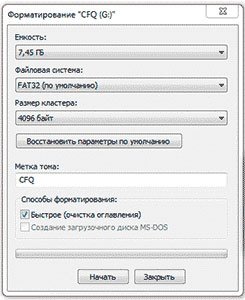
You need to change the file system to NTFS and to start the process click on the button of the same name.

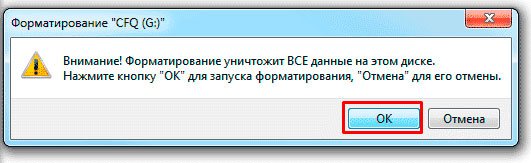
In this plate, click " Yes».
As soon as everything is over, such a sign will automatically pop up.
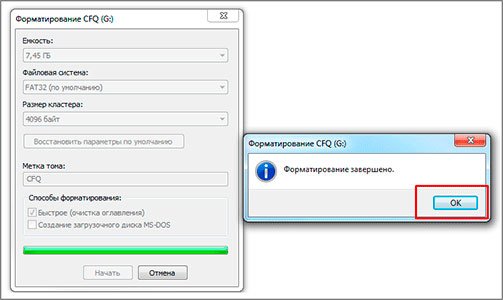
That's it, now you can leave the device unattended and go to the software.
From here we swing torrent program... A from here system distribution kit. Then here you take Ultraiso program - and put it on.
Now let's move on to the preparatory work on recording the system.
Burning an operating system to a USB flash drive
So, the time has come for the most important aspect. Open the Ultra ISO program. Then open the system image.


A new window will pop up. I advise you to format the flash again.

Now you write it down.

BIOS setup
Another important aspect. BIOS is a set of firmware that is responsible for the hardware in your laptop. If you do something wrong, you will create problems, or even burn your laptop altogether. Read the article carefully and do as I show.
We need to build a boot e from the hard drive and from our flash drive. It is not difficult, you do not need to be careful. BIOS can be of various configurations. Let's take a look at the different versions and and setup principles.
Award BIOS
The simplest and old enough. It features a bright blue screen background. To get into it, you need to press DEL or F2 on the keyboard immediately after restarting the computer. You will have this image.

Now goes to the First Boot Device tab. And in this line, put the USB HDD indicator in the first place from the column. That is, the computer will initially load external devices, and only then hard, which is what we need.
AMI BIOS
Now the same, but in a different edition of the BIOS. Let's go here first.

Then select the third line and move it to the very top. Like this

Everything. Now press Form 10 and we leave. We have configured everything we need through the BIOS.
Installing the system
Well, now it's time to start the installation itself. As soon as the laptop turns on, you will see this image.

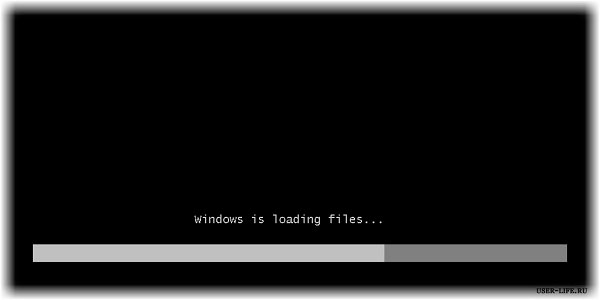
As soon as the scale reaches the end, the interface itself will open.

You need to select the Russian language everywhere (if you are not a foreigner) and click on.
And now " install". There is only one button, so you can't go wrong.
If you have the assembly that I offered you. Then you will be prompted to select the edition of the operating system. Choose the one that suits you. If you have a computer with two or more cores, then the bit depth is 64 bits, if not, then 32.
Now you need to select the bottom line. The top one is the update. Automatically it will just restore the system, but we want to rebuild it from scratch? So we need a complete installation.
The hard disk interface will now open. If you don't have it separated, just format it. If there are several, completely erase the one where the system was. In general, you can divide it later, for example, the acronis program will help with this. But more on that later. Once everything is ready, select a new blank section and press Further.


The installation process will now begin. The files will be copied first, then unpacked. Next is the installation. You will have enough time to have a hearty lunch or at least drink tea, as it takes quite a long time. Wait for the first reboot.

As soon as the computer is rebooted, immediately remove the USB flash drive. It will boot from the hard drive and you will see this interface.

Fill in the stitches and go to the next step.
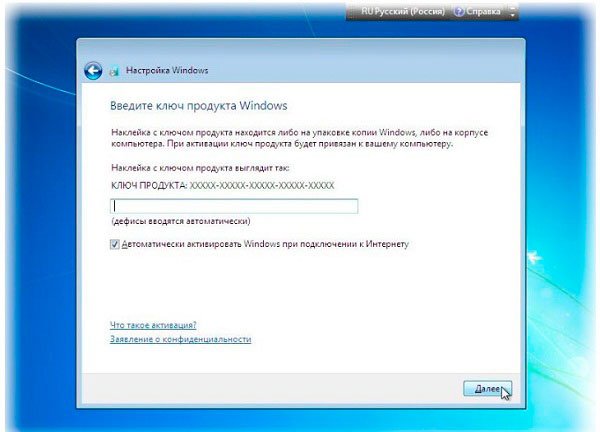
Here you can skip everything while installing the OS without activation. Click Further.
Now security settings. If you are not a secret agent and your personal computer, then choose the first line.

Configure your time zone.
Select your home network.

That's it, you just installed Windows yourself. Congratulations, but that's not all.
Final measures
So, we already have Windows, we have the Internet. But we cannot do without drivers. We climb over here- and download the booster driver.

Install and press the scan button.

Once everything is found, click " update all". Then everything will be done automatically.
Now restart your computer. Everything should get better, faster, brighter, juicier.
Since you will most likely have to deal with ISO images, you will need the Alcohol 120% program. Take her can be here.
Division of the hard drive
Above, I said that it is best to always divide your hard drive into several parts. Just so as not to lose files, and it is more convenient to work. The section for Windows remains exactly for it, so there will be no garbage on it (well, except for system errors). We need a program Akronis Disk Director... The software is very useful and really cool. Not free, but there is a trial period, so you need to do everything quickly and immediately.
Run the software.

Now select your hard and click on resize the volume.

Either drag the slider and indicate how much space should be on each hard drive, or write down how much should be on the local HDD that you are creating.
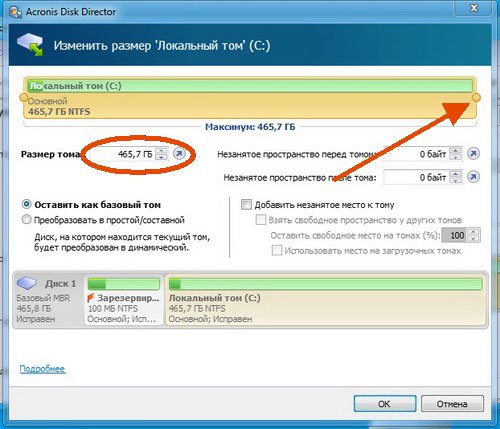
I advise you to leave the operating system water a hundred gigs. This is not a little, but also a little. Quite enough for normal work.

Now click on the section that has just been displayed and click on the tab “ create volume».

Now choose “ base"And go on.


Now we put the file system, the letters of the volume and the name and click on the pip " complete.

Go to the top of the interface and click here.

We click to continue.

And now OK.

That's it, the computer will reboot, and then you will have your new hard drive. By the way, here is a video that will help you.
Conclusion
That's all, my dear readers! Now you can do all this on your own, and even teach your friends. By the way, share this article with them on social networks and messengers, it will be useful to everyone.
I want to remind you that all programs must be run as administrator. You can install anti-virus programs, they will help you avoid infecting your machine. On this I say goodbye to you! Subscribe to my blog to keep abreast of new useful materials that I write especially for you. All the best and see you soon!


