In the App Store and you can download it absolutely free right now. The new operating system will install right on top of OS X Mavericks, and all your data and applications will remain in the same place. Alas, the performance of some of them is not guaranteed and this is due to the need to release updates from the application developers. Removing and reinstalling the application may solve the problem, but the stability of the work will remain in question.
If your OS X has already gone through several stages of updating, and the thought creeps into your head about a clean reinstallation of the entire system- boldly into battle!
A clean install means a complete format of the hard drive / SSD. All data, programs, applications and everything that has ever been installed on the Mac will be lost forever (contacts and accounts attached to iCloud will remain after you re-enter into an already reinstalled system). If after these lines in your heart nothing has jumped, but your soul is still calm - we proceed to a clean reinstallation.
1. Connect a removable hard drive, USB flash drive or any storage device that will be enough to save all your data (photos, music, documents) and copy them. (To take full advantage of recovery via Time machine follow).
2. After making sure that everything you need has already been transferred to the external drive, go to the App Store and download the OS X Yosemite image.
You will have to complete this stage in mandatory because for a clean install, your account must first upgrade to OS X Yosemite. Only in this case, the Mac will offer to reinstall OS X Yosemite (not OS X Mavericks if it skips an update from the App Store).

without an App Store update, you will be offered OS X Mavericks as a "clean system".
Thus, you first update the existing OS X Mavericks up to OS X Yosemite through the App Store, and then perform a clean install of the system.
After updating to OS X Yosemite via the App Store and successfully logging in, we reboot.
3. As soon as a white screen appears in front of your eyes and the Mac emits a characteristic boot start sound - hold down the key combination Command + R... We are patiently waiting for the passage of the loading lane.

4. We are greeted by a window OS X utilities... We choose Disk Utility and press Continue.
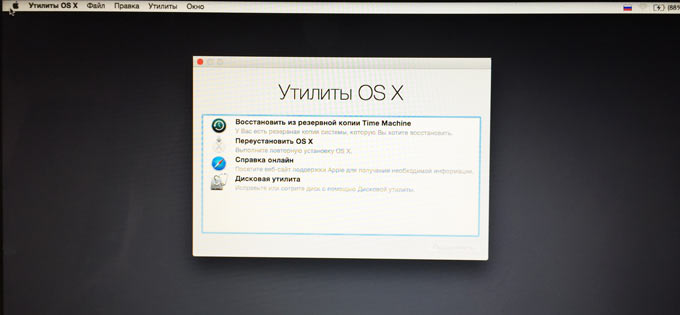
5. Choosing Main drive, on which the system was installed, give it a name and select Erase... After a few seconds, you will see a completely blank disk.

6. Close the disk utility and go to step Reinstall OS X(from the OS X Utilities menu). Select the newly formatted one as the target disk for installation. The installation will start immediately.
When reinstalling a system from scratch, keep in mind what you should know the password for the account used in Mac App Store... Otherwise, installation will not be possible.
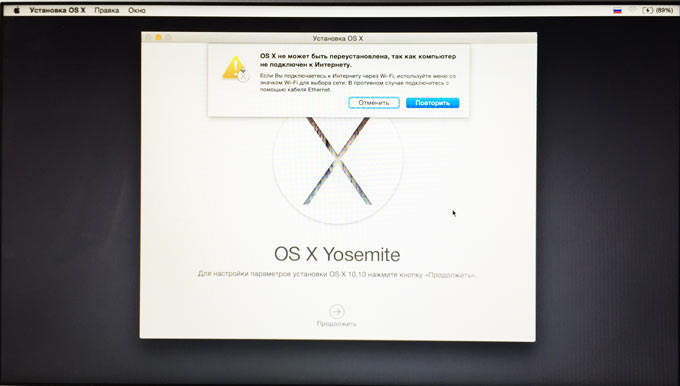
7. Pay attention to the status WiFi connections(upper right corner) - Internet presence is required, since the system will be loaded from Apple servers. Otherwise, you risk getting an error.
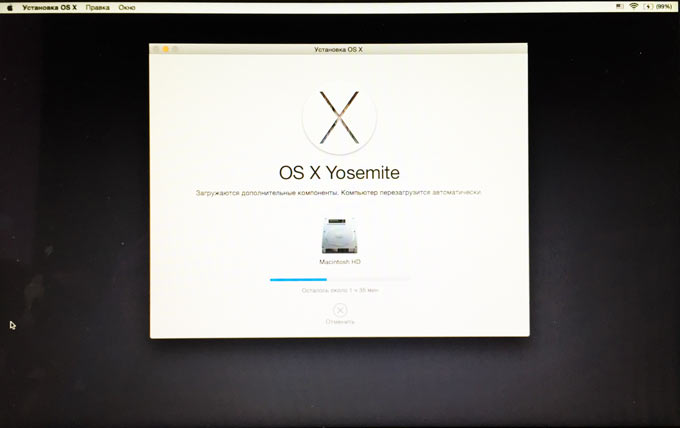
Depending on the workload of the servers at a particular moment in time, the installation may take from 20-30 minutes before a few hours... If you have the ability to connect using a power cord Twisted pair- it can speed up loading significantly.
Upon reboot, you will be greeted by the new OS X Yosemite startup screen and will prompt you through the familiar “first login” steps.

Happy installation and testing of the new OS X Yosemite.
![]()
Or not necessary. Computers from Apple have always stood apart from everyone else, cost much more with comparable performance and, in general, did not offer anything special for standard users. Moreover, programming in them was the lot of experienced craftsmen, many operations were performed unambiguously, not allowing several options ( like in PC), and gamers were enraged by the lack of the latest games on them and the lack of a second button on the mouse.
But those who understood a lot about true values idolized Mac: "sound people", artists, designers, typographers, writers and, in general, people of art. All hardware in computers was focused on end-to-end color calibration, so that the picture on the printer, in the editor and on the screen completely coincided, which solved many issues of the quality of printing products. And the native PDF format, which was output by any application, is no joke either.
In one miserable year, Apple did not fall out with its PowerPC processor supplier or move to Intel.
Here the hands of the greedy comrades began to shake. Apple, of course, assumed that people would try to install the OS on a PC, and prepared preventive measures in the form of a special blocking bootloader, a rigid configuration of the supported hardware all are the same).
In a word, a fight ensued, and Apple lost.
New loyal bootloaders were replaced by newer ones, and now the system can be installed practically “normally”. Of course, many of the rarities of iron or the latest devices will not go to OS X, there may also be problems with sound, network and peripheral recognition. But a lot also works, which increases the status and importance of the owner.
To explain the full process of how to install an OS, a dozen of such articles are not enough, but remember the main thing: the easiest way is to search for a modified assembly of the desired iATKOS distribution kit, which can be found on the Web.
After that, you need to turn off all disks with Windows (out of harm's way), remove all excess memory above 4 GB, turn off the optimizing items in the BIOS. The OS works better on multi-core Intel processors, so AMD owners will feel a little worse. After that, you can proceed with the installation, for which there are many video instructions. And still something can go wrong, not now, so in the future, when the system is updated.
The main question is - what are all these sacrifices for?- will remain unanswered for now.
Preparing "Hackintosh"
So, if a small offense does not bother you, and technical difficulties only cause healthy excitement, let's try together install Mac OS X on PC... In this article, we will describe two easy ways to install the previous but still popular version of the OS, Snow Leopard (10.6). If you like the result, then these instructions will be the starting point for self-mastering "Hackintosh".
The second reason: Mac OS X has a kernel extension called Dont Steal Mac OS X.
It is required to decrypt applications that make up what the user sees as an operating system (Dock, Finder, loginwindow, SystemUIServer and others), based on the keys from the SMC chip, which is only on real Macs. Well, if "there are no legs, then there are no cartoons." The FakeSMC cache comes to the rescue, which successfully emulates the SMC Device, for which, again, thanks to Netkas. A special bootloader and FakeSMC.kext are all you need to boot Mac OS X, if your computer is not much different from a real Mac in terms of hardware.
And this is precisely the third reason. For unsupported hardware, there are no drivers for Mac OS X, or there are built-in drivers, but the system cannot use them because it does not recognize hardware with unfamiliar identifiers.
Hardware requirements for Hackintosh are the same - you need a processor with support for SSE2 instructions, best of all - Intel Core 2 Duo or later. AMD users will have to replace the OS kernel with a "hacked" version, as a result, there will be problems with updating the system from the Apple server. The same goes for Atom netbooks. It is highly desirable to support the AHCI mode from the SATA controller. Mac OS X Lion requires 2GB of RAM, Snow Leopard only needs one. The first rule of hardware selection: the more the computer looks like a real "Mac", the less problems. The second rule: the newest and most advanced devices may not work no matter what the efforts. hardware support depends primarily on the Mac OS itself (drivers of "heavy" hardware for the "Hackintosh" are not written), and Apple has nowhere to rush. The site wiki.osx86project.org, which contains HLC (Hardware Compatibility Lists) for different versions of Mac OS X, will help to assess the chances of success.
For installation, it is best to use a separate SATA drive, and turn off the Windows disk, out of harm's way. If you are not afraid to experiment on one HDD with a working operating system, you will have to create a new partition on it using some disk utility (10 GB is enough for a clean Mac OS X). Just keep in mind that during the installation process, the "Hackintosh" loader will be written to the HDD, and then you can only get into Windows through it. Nothing threatens the available data, but backup won't hurt either... The disk must be connected to the port of the south bridge of the motherboard, the SATA controller in the BIOS must be switched to AHCI mode. It is recommended to remove overclocking, remove all expansion cards except for the graphics adapter in the upper PCI-E slot, disconnect peripherals, in addition to the keyboard and mouse, reduce the amount of RAM to 4 GB (if more installed). If the installation with minimal functionality is successful, then all this can be returned step by step. Too many conditions? Then you can practice in a virtual machine. There are even ready-made images for various hypervisors on the Web, although their use will not bring experience in creating "Hackintosh".
We warn readers: although "Hackintosh" is a completely harmless entertainment that will not break your computer and is unlikely to spoil any data, all the manipulations described in the article are done at your own peril and risk ... In addition, you need to be familiar with the computer and know what the bootloader, the OS kernel and the hard disk partitioning scheme are.
Installing Snow Leopard from iATKOS 10.6.3 v2 build
The easiest and most versatile option is to install Mac OS X from a specially modified distribution kit. Since the release of Snow Leopard, such hacker assemblies have given way to a more elegant solution - installation from a copy of a branded disk using a separate bootable CD, and this is described below. But the assembly is indispensable for users of CPUs from AMD or Intel Atom, tk. the original Mac OS X kernel (which our English-speaking friends call vanilla kernel) supports only Intel processors with Core architecture and older, and the assembly allows you to immediately select the "patched" version during the installation process. And after you get into the world of "Hackintosh" with the help of assembly and gain knowledge, you can do a clean install, the components of which you have complete control.
iATKOS 10.6.3 v2 is one of the last released assemblies, and despite the rather old OS version (Snow Leopard has already been updated to 10.6.8), all the "hacker" software on it is quite modern. After downloading the image (we will not tell you where it came from), write it to a disc. Boot from the iATKOS disk and wait for the "hacker" bootloader to run and the OS to start.
To be continued...
) only thanks to their "native" innovative and user-friendly operating system. Not everyone is ready to overpay for the design, but many would like to try the "apple" operating system on their PC. Well, there is a way out. Hackintosh is the solution to this dilemma. And I'll help you figure out the intricacies of setting up OS X Yosemite on your Mac. And how to assemble a powerful hackintosh, I already told a few days ago.
Previously, to install Mac OS on a "foreign" PC had to work hard, now the process of building and configuring "Hackintosh" has become faster, but this makes it no less tricky. It is necessary to take into account many nuances, ignorance of which can lead to an unsuccessful attempt to install Mac OS on your "non-apple" PC.
What is Hackintosh?
It is not hard to guess that "Hackintosh" is a hacked Macintosh, and this term is used both for custom builds of PCs that mimic the Apple MacBook or Apple Mac Pro, and is applicable in relation to installing a "native" operating system from Apple on a regular PC or laptop.
Can I make a Hackintosh from my laptop?
Those who do not take risks do not use Hackintosh. There is always a risk that you will lose all important data if MacOS is unsuccessfully installed, or install it "crookedly", earning a bunch of bugs. The best approach is to first build a custom build for a PC or laptop out of hardware that mimics the architecture of the original Apple device as much as possible. But you can try and just install Mac OS on your PC or laptop if you are sure that it is powerful enough for this operating system.
How to choose the best hardware for Hackintosh?
I will not dwell on this issue in detail, because quite recently I talked about how to assemble "Hackintosh", moreover, I offered a choice of 3 systems for different budgets and with different needs.
Now I would like to discuss with you all the nuances of setting up Mac OS on a regular PC or custom "Hackintosh", that is, literally "take" you from point A to B so that you can install Mac OS correctly.
For this guide, I chose to install and configure Mac OS X Yosemite (OSX 10.10). With other versions of Mac OS, success is not guaranteed even if all the setup steps are followed correctly.
How to install OSX on a PC or "Hackintosh": step by step instructions
Installing OS X on a PC requires a little more than burning the OS image to DVD, choosing a boot partition, and clicking a few buttons to start and continue the process. So get ready to take your time.
The licensed version of OS X Yosemite is only available for free if you already own a MacBook or MacPro with official versions of Mac OS X SnowLeopard, Lion or MountainLion, or any Mac Mavericks. Therefore, borrow an original Apple PC or laptop to download the OS X Yosemite installer files. Using the official Apple ID on any MAC or PC with a licensed version of Mac OS X 10.6.8 (or later), download OS X Yosemite from the official OS page in the AppStore.
Step 1: BIOS setup
Before installing the operating system, you need to configure several parameters in the BIOS of your PC. If the installation is carried out on the recommended custom "Hackintosh" with AMIUEFI BIOS, then the preliminary settings will be easier. For other systems, you need to drop the BIOS to the initial optimized settings (OptimizedDefaults), and the hard drive to the parameters in AHCI mode.
Here are the default AMIUEFI BIOS settings for Gigabyte AMIUEFI BIOS, Gigabyte AWARD BIOS, ASUS AMIU EFI BIOS, and MSIAMIU EFI BIOS:
- To exit to the BIOS / UEFI setup menu, press and hold Delete on your keyboard while the PC boots up.
- Reset the settings to the original (OptimizedDefaults) before doing anything.
- If the CPU on your PC supports VT-d, find this feature and disable it;
- If CFG-Lock is activated, disable.
- If the system is in Secure Boot Mode, disable it.
- If available in the settings (depends on the BIOS), then in the OS Type parameters select Other OS.
- Save settings and exit BIOS menu. The PC should restart.
Step 2:Installing OS X Yosemite
Now is the time to install OS X Yosemite. There are several installation methods - for beginners (Un
iBeast) and for experienced users (Clover) who already understand the intricacies of installing OS on Hackintosh.
In the case of installing using UniBeast, you must have access to the original Mac (laptop or PC), for example, borrow from a friend for a while. If this is not possible, then you will need to additionally install Snow Leopard from a licensed DVD from scratch.
UniBeast is a tool for creating a download installer capable of installing your OSX version previously downloaded from the AppStore. To successfully install OS X Yosemite using this method, you will need:
- A copy of OS X Yosemite from the official page in the Mac App Store (keep the latest version)
- 8 GB flash drive (or more).
- UniBeast, which you can download.
- MultiBeast, which you can download.
If all of the above is available, then you need to create a USB flash drive with OS X Yosemite installation files. For this:
- Open the Mac App Store on the original Mac (the one you borrowed for the time being) and download from the OS X Yosemite site. Make sure the file is downloaded and added to Applications.
- Connect your Mac to your USB flash drive and open the folder at / Applications / Utilities / Disk Utility.
- Select the USB stick in the left column and click on the Partition table. Select "Current" and then "1 partition".
- Select Options, then Master Boot Record.
- From the Format submenu, select Mac OS Extended (Journaled).
- When finished, close DiskUtility and start UniBeast.
- Following the prompts of the program installation wizard, specify the connected flash drive when the choice appears where to install UniBeast, then select Yosemite, which version of OS X you want to install.
- Complete the installation of UniBeast on the flash drive, following the wizard's prompts. The whole process should take 10-15 minutes.
- Drag the downloaded MultiBeast file onto the same flash drive, you will need this program later.
Now connect the flash drive with all the necessary files to your "Hackintosh". Start the PC and press the "hot" key to enter the OS installation menu (usually F12 or F8). Select the flash drive when the system asks you to specify the source of the installer.
On the welcome screen, select a language, then select Utilities> DiskUtility.
In the left column, select the hard drive where you want to save OSX, click on the Partition tab, then on "1 partition" in the drop-down menu.
Then click on the "Options" button and select the GUID Partition Method.
Name the hard drive, then select Mac OS Extended (Journaled) from the Format drop-down menu, then click Apply and Partition. Close DiskUtility when the process is complete.
Continue following the installation wizard to complete the installation.
This is a concise guide that I regularly use to install OS X Yosemite on Hackintoshes. There are many more detailed instructions on the net, but if you have experience in setting up software for a PC, then this information will be quite enough.
Step 3: Installing Drivers
Anyway, OS
You have installed X Yosemite, now you need the system to work correctly, that is, you need to install the drivers.
This is where MultiBeast comes in handy, which is able to immediately install all the necessary drivers (graphics, network and sound) right from a flash drive to Hackintosh. The program also contains System Utilities to bypass installation permissions and collection of drivers ns various configuration options.
Launch MultiBeast from a USB stick and follow these instructions:
- If this initial driver installation is via MultiBeast, select QuickStart, then EasyBeast, UserDSDT or DSDT-Free. Most likely, you will need to select DSDT-free, but if you have an old Hackintosh build at your disposal, then DSDT.
- Click Drivers to select options under the Audio, Graphics and Network categories. Depending on the Hackintosh build, you may or may not find the required audio driver (the second most likely). Find out the chipset of your motherboard and select the appropriate Apple HDA driver for it. You may also need additional network drivers (Ethernet). The rest will be prompted to install the program, you just need to select the appropriate GPU. Some GPUs require special drivers, but most work with the ones that the program offers by default.
- Next select Customize. To set the "hibernation" mode on a PC (this cannot be done on a laptop), select Generate CPU States, and then Use Kernel Cache. See for yourself further on the settings, you are not sure what and how to configure - leave everything as it is.
- Then click on Print or Save to make a backup of the selected configuration.
- Then click Build, then Install. Now wait while MultiBeast installs all selected drivers.
- Restart your PC to complete the installation process.
MultiBeast should only be selected for post-installation of drivers after using UniBeast to install macOS. If you used the Clover bootloader to install OS X Yosemite, you will need to manually install kexts in the / EFI / Clover / kexts folder and configure /EFI/Clover/config.plist according to your Hackintosh's hardware settings.
Alternative graphics drivers from NVIDIA
For each version of OS X, NVIDIA releases new graphics drivers. They are different from the standard Apple drivers and install them on Hackintosh. Previously, installing NVIDIA drivers solved the OpenCL issue in some applications, and also made it possible to use a more powerful GPU configuration on some builds. These drivers also allow you to use the latest Maxwell graphics cards with full acceleration, including NVIDIA GeForce GTX 750, GTX 750 Ti, GTX 970 and GTX 980. You can download them.
Step 4: Update Hackintosh
In my experience with previous versions of OS X, every OS X update requires reinstalling all graphics, network, and sound drivers via MultiBeast (which you installed in step 3). Stay tuned for updates on this site (Updateposts), where new instructions for installing updates and drivers on Hackintoshes with OS X Yosemite will be published according to Apple's update protocols.
The main problems in the work of "Hackintosh":
For obvious reasons, "Hackintosh" rarely works perfectly, then the video card burns out, then the sound drivers do not fit and other nuances. Get ready for the fact that the full functionality will not be available to you, especially if you have the cheapest version - for many users hardware graphics acceleration will not work, the network is falling off.
My Hackintosh had trouble sleeping. Some problems can only be identified and fixed by trial and error. But it is better to immediately contact the Hackintosh specialists online or in your city. Friends help me in this matter, without their support I would not have dared to create "Hackintosh" at all.
One final tip: remember to back up data from your internal hard drive in case something goes wrong (trust in my experience, there is a high risk of losing important data). So, make a backup before every attempt, change something drastically.
Additionally, I suggest looking at video instructions for installing OS X Yosemite on "Hackintosh":
Mac OS X ORIGINAL (Retail 10.5.0)!
Hello to all.
Many thanks to everyone who reads my blog and who finds it interesting. It is very pleasant that they read me.
Introduction.
There are judgments that if your motherboard supports the native kernel of the axis (Mac OS X), then you can install it. This is not about hackintosh. Today we will consider this using my example.
I express my deep gratitude to osikog (torrents.ru) and vlzhukov (forum.usemac.ru) for invaluable help.
What was in theory became reality. I am currently writing this note from under Mac OS X ORIGINAL (Retail 10.5.0 + Apple Software Update 10.5.5) now I have a real axis.
Let's get started.
What we need:
1 free flash drive of any size, up to 64 megs (it will be bootable)
2 a lot of free time
3 bootloader for flash drive (external)
4 downloader (internal)
5 1 HDD with GUID markup (don't install on MBR, you don't even have to try) what GUID and MBR are, you can find out here - http://en.wikipedia.org/wiki/Master_boot_record (MBR) and here - http: // en.wikipedia.org/wiki/GUID_Section_Table (GUID) paired with vents it does not work
6 the right hands and desire
7 image of a poppy wasps, preferably not on disk, but in the form of a separate image file (.dmg .toast)
8 windows installed somewhere (2000, XP, wiiiiiiista)
9 hackintoshes that are 100% installed on your computer (drivers are not required)
I did all the steps described below on my computer and all the drivers suit me, if you have other hardware you may need to download driver images for your hardware here http://forum.insanelymac.com/ (search for boot 132):
motherboard: ASUS P5K-E WiFi / AP (Intel High Definition Audio ADI1989B \ USB \ LAN Marvell Yukon 88E8056 \ Realtek RTL8187B WiFi)
CPU: Intel Core 2 Duo E6400
broom: HDD Samsung SATA2 320GB
video: nVidia GeForce 8800 GT 512Mb MSI
drive unit: ASUS DRW-2014L1T Sata
So.
Begin.
To make it clear at least how, what we will do, I will try to explain a little (I don’t understand a lot myself)
There are many factors that interfere with the installation of the axis, one of them is the preloading of drivers and system identifiers. I think I am speaking correctly. And then I understand something, but I can not say. In short, you don't need to know all this. Let's get started.
1 You will need the syslinux-3.71.zip archiver which can be downloaded here http://depositfiles.com/files/8386903. Next, we need a couple more files and an image. You can get them here http://depositfiles.com/ru/files/8387261. Further. We load into the vents, for the first and last time, insert the USB flash drive, remember its letter - this is important, you will need it later.
Press start - execute - enter - cmd - enter - further in the com window. lines we write the following commands: ( format the flash drive in FAT32 and copy the contents of syslinux-3.71.zip to the root of the C: drive and rename the syslinux-3.71 folder to syslinux)
syslinux.exe -ma K: where K: this is the letter of the flash drive (I just have such a letter, but you may be different)
This command copies one idlinux.sys file to the USB flash drive and makes the USB flash drive bootable. If everything is gut, then you will then see a line like this:
c: \ syslinux \ win32>
Next, open the archive number 2. There we see INITRD.IMG and the BOOTER.zip archive. We unpack the archive into the same folder and we have 5 files (INITRD.IMG, syslinux.cfg, boot, mboot.c32, syslinux.sys) required for normal boot. We copy them to the root of the flash drive. Voila, the flash drive is ready. You can check her work just in case.
Selecting a disk after booting from a flash drive.
This is done by entering the disk number (81, 82, 83, etc.) 80 is the flash drive itself. Exit to the menu for entering numbers through the ESC key.
So, the flash drive is ready. We have 6 files on it that are responsible for the full download. But one file differs from others in that it is very interesting to us. Namely, it contains the drivers for the subsequent installation of the axis. Its name INITRD.IMG. It contains important files. Directly in this image are the cakes for my iron.
For other hardware, they need to be collected. There is a program iDMG MAC OS X with which you can create .DMG images, and they are then renamed into .IMG. That is, you can combine your cupcakes and make your ownINITRD.IMG or surf the web in search of the desired image.
Partishen map GUIDis selected in the options button to the utility disk when the broom is split into partitions.
- 1 section for the main axis can be called Mac 60gb
- 2 section for data, namely from it the original axis will be subsequently installedData 210gb
- Section 3 for a temporary hackintosh Hack 30gb
All partitions are formatted in HFS + journaled with the erase button
The layout of the guide sections is interesting. We read the wiki and are not surprised that the workspace of the broom is less than its nominal size. After all the acclimations.
So we figured out the broom. This is all configured during hack installation. Next, we put the hack in section 3. Take our image with the original axis and expand it to the root of the 2 section. Function restore to utility disk. There, everything is done with a dragen drop. In the "what" field we drag our image, and in the "where" field we drag our Data section (on the left side of the utility disk) and click the restore button. We wait. It took me about 13 minutes. That's it. In this simple way, we made a place from where we will put the axis.
We insert the flash drive and with God
After deploying the image, we reboot the computer and boot from the flash drive. We enter the number of the disk. And then we select our section Data for download and inter. You can also enter the key -v to see the download progress. If all is well, then we saw a menu with a choice of language. It is very good.
At least I had possible difficulties at this stage.
Because of my 8800GT card, I have not seen this menu. Instead, I saw a "space" wolfaper and a mouse that was spinning. The conclusion is that I had to pull out my card and insert the 7600Gt. It turns out that the axis does not know 8800GT in version 10.5.0. And he does not want to be friends with her under any circumstances. The axis will be friends with my map at 10.5.4 and 10.5.5 exactly, but in other versions I have not tried it.
So that's it. changing the card to 7600Gt, I started further. Choosing a language. Whatever they want they are all in the distribution. We select firewood for the printer and where to put the axis. In our case, this is our section number 1 Mac. After 5-10 minutes, you will see a message that everything is up and everything is gut. Installation from a broom is much faster than from a disk. Do not be surprised. So the installer invites us to reboot, which we do, but we boot again from the flash drive. Now the flash drive is replacing the bootloader for us. This is due to the fact that in real macs the bootloader is built into the motherboard or in ROM (Read Only Memory Device like a BIOS) on the motherboard or somewhere else. In principle, everything. We got the original axis. Which works on your computer. This gives you the opportunity to update it from off. site.
Installing an internal bootloader
here you can go in 2 ways
1 if you don't boot from a flash drive, then you can leave it that way. The only thing is to reduce the time of reading the INITRD.IMG file by rebuilding it using the program iDMG MAC OS X.
2 can install internal bootloader Chameleon DFE for Hard Disk. You can get it here http://depositfiles.com/files/8388004. The archive contains a loader that needs to be installed in the section Mac, and also there is a folderINITRD... There is a folder in it EXTRA, and in it Extensions... When you start the bootloader installation, you will see 4 icons on a black background: read me, installation of the bootloader itself, the plate icon, and the blue folder. Here she interests us. BEFORE INSTALLING THE LOADER, IT IS NECESSARY TO COPY THE CONTENT OF THE EXTRA FOLDERExtensions
) INTO THE BLUE FOLDER BY THE DRAGEN-DROP METHOD. Only then we install the bootloader to our section. Then the test. That is, we take out the flash drive and reboot. If all is well, the axis will load. In the folder INITRD archive contains drivers for my mother and system.
Well, that's all. We got a working axis. Now you can download updates. Install drivers. There is an excellent program for configuring the system and installing firewood - OSX86Tools.
The hackintosh that we installed can not be deleted. It might come in handy.
It came in handy for me. Remembering the problem with the card.
I'll tell you how I solved the problem. I downloaded the update, installed it. turned off the computer, inserted the card. booted in safe mode (-x) installed the card with OSX86Tools by the method of adding strings. Voila everything works.
My guess is that the majority of people who want to switch to a Mac are hindered by the myths about the hackintosh - a computer that runs a Mac OS. Before going directly to the description Mac OS X installations on a PC, I will try to dispel some of the myths:
1. Mac OS X will be installed only on compatible processors and chipsets from intel, video cards only from NVidia. Most of the periphery will not work.
Once this was true, but progress does not stand alone in place, more and more patches and drivers are released, the amount of hardware compatible with Mac OS X is growing every day. Now Mac OS is easily installed on a computer with a processor that supports at least SSE2, but preferably SSE3, for example, AMD or Intel. Many modern video cards support hardware acceleration, namely Quartz Extreme, Quartz 2d, Core Image, GL. I think now you understand that nothing supernatural is required from your computer.
2. Installing Mac OS X is difficult.
In fact, it's not more difficult than installing Windows XP, I think it's even easier if you choose the right kexts and fixes.
3. Mac OS X will not be able to "live" on the same physical disk with Windows.
Maybe! There are 2 options:
- Windows bootloader + chain0 (for example, this is on my computer)
- Acronis OS Selector
So let's get down to business.
Step 1. Preparation.
First, you need to check your computer for compliance with the requirements of Mac OS X.
The absolute minimum is a processor that supports SSE2. This can be determined with the CPU-Z program ((1.97 Mb)).
Minimum random access memory (RAM) 256 MB, of course, the more the better.
Not that old graphics card for AGP or PCI-E, starting from GF4.
If your PC meets the requirements of Mac OS X, go ahead.
Many people advise you to download and burn the Hiren's Boot CD. If there are NTFS partitions on the same physical disk where you are going to install Mac OS, then it is better to convert them to FAT32 (), because when creating a new partition, an error may occur and the FS will become unreadable, but there is another, easier one. the way is to transfer your data to another physical disk or flash drive.
For ease of installation, I advise you to print this text so that you can see what to do next at any time.
Having finished with the preparation, we proceed to the second step.
Step 2. Download the image of the installation disk.
The first step is to decide which version of Mac OS X we need: the latest at the moment is 10.5. Since our task is to get acquainted with the system, I advise you to install versions 10.4.6 or 10.4.7, because they are usually installed without much difficulty. And then you can already update using combo-update. But you can also try OS X 10.5. Then go to torrents.ru and write something like this in the search form:
Mac OS X 10.4.6
If the downloaded file is in ISO format, then you can safely burn it to disk, and if in DMG format, you will also have to download the DMG2ISO application ((12.29 Kb)) and convert the downloaded file to an ISO image.
Step 3. Burn the image to disk.
You need a DVD-R or DVD + R disc. You can write through Nero or Alcohol 120%. I think you can handle the recording process on your own. After burning a disk with Windows, several documents of about 150 KB in size will be “visible” on the disk, or maybe nothing is “visible” at all, this is how it should be.
Step 4. Installation.
We insert the disc you just burned into the drive and restart the computer. While the message about starting installation from disk appears on the monitor, press F8 or wait a few seconds and enter the "-v" parameter (without quotes). If you press any other key or continue the installation without this action, then instead of the text mode, the graphical one will turn on - this is beautiful, but you can only find out about errors in the text mode.
There are two most common mistakes:
« system config file '/com.apple.Boot.plist ’not found"- there is a problem with the Mac OS X distribution kit (you will have to download another one)
« Still waiting for root device"- most likely there is a problem with the hardware, perhaps some kind of incompatibility.
If the initial download went through without problems, then a blue display (not BSOD) with a wait cursor will open in front of you. Next, you will be prompted to select a language. We choose Russian (or English, if not). Click on the arrow, after which a menu will appear at the top, select Utilities -> Disk Utility in it and format the partition into which we are going to install Mac OS X into Mac OS Extended journaled format.
Sometimes it happens that Disk utility cannot format this partition to HFS or mount it, then this can be corrected with an acronym. To do this, select the manual mode for changing partitions in Acronis Disk Director Suite and create a partition in FAT32 format. Next, in its context menu, select the item to change the partition type and set the value 0xAFh (Shag OS Swap). Akronis, of course, will swear that all the data on this section can be lost and become unreadable, but we have nothing there anyway. :-) Apply changes and reboot.
After the disk has been successfully formatted, click Continue, read and accept the license agreement, select the partition you have prepared for installation. Then click Continue. Next, click on the settings (Customize) and select those components that you want to install. Particular attention to patches and kexts: you need to install only those patches that are necessary specifically for your system, and nothing more. Do not install patches for SSE2 and SSE3 at the same time! Install only the one that matches your processor. Click Continue. Then preparation for installation and disk check will take place. The installation will complete by restarting the computer.
Step 5. Completing the installation.

After restarting your computer, there are two options:
1. Successful boot of the system (especially if you are using Acronis OS Selector)
2.b0 error. We boot from the Hiren’s boot CD and use Acronis Disk Director to make the Mac OS X partition active. Reboot.
The system boots up safely, and you will be prompted to enter this or that information, we enter. Exception - Mac ID - you need to leave it blank (perhaps this will provoke a hang)
P.S. The layout is switched by pressing Command + Space (ALT + Space)
If everything is done correctly, the desktop is loaded. Hooray! Working!
P.P.S. The administration of this site does not in any way force or suggest you to install hack-assemblies of Mac OS X, we are against software hacking! When installing a jailbroken Mac OS X, you yourself are responsible under the laws of your country.


