We can change the zoom level of the document by simply clicking on the zoom value in the lower left corner of the frame and entering a new value. Here I will enter instead of 50%, for example, 30% and press Enter to accept the new value. Photoshop will now render the document at 30% of its actual size. By the way, there is no need to enter a percent symbol (%) after you have entered a number. Photoshop will add it automatically. This is what the document looks like now:
Thus, you can freely set any scale for the viewed image. If for some reason you want to view the photo at 47.3% zoom, no problem! Just click on the value of the current scale in the lower left corner of the document window, enter the number "47.3" and press Enter.
The disadvantage of this method is that you need to specify the zoom level every time you want to change it, which is rather inconvenient, so other ways to zoom in and out of the image are more often used.
Resizing via menu items on the View tab
In the "View" tab, there are several options for changing the image scale, I give the interface of the English and Russian-language Photoshop:

As you can see, there are commands for standard reduction and enlargement of the image, in addition, there is the "Fit on Screen" command, which tells Photoshop to fit the image size to the window size (I must say that understanding the "window size" Photoshop is very specific, and I almost never use this command). More or less the team works in the mode of displaying documents in tabs.
The Actual Pixels command displays the image at 100% size. Instead, I use the Ctrl + Alt + 0 key combination out of old habit.
Another command, "Print Size", is supposed to show how the image will be when printed, but in reality it shows what it wants and it is better not to use it.
By the way, interestingly, in my latest version at the time of this writing Photoshop CS6 13.1.2 item "Print Size" is replaced by item "200%", and when you click on it, the scale of the working document becomes 200%.
Changing the size of the working window of the document when zooming an image
Depending on your personal preference, you can set up Photoshop so that when the image is resized, the size of the working window also changes. or, conversely, when resizing the image, the size of the working window remained unchanged (this setting is set by default).
To do this, open the Preferences dialog box by pressing Ctrl + K. Under the General section there is an option called Zoom Resizes Windows. Select this option to have Photoshop resize the document window when you zoom in on the image, or deselect it to keep the document window size unchanged:

It should be noted that even if the "Scale" tool resizes windows option is enabled, the window size does not change if you zoom in / out the image by rotating the mouse wheel while holding Alt.
Zoom Tool
By far the easiest and most popular way to zoom in / out in Photoshop is to use the Zoom Tool, which you can activate from the Toolbox. Or, an even faster way to select this tool is to simply press the key Z on keyboard.
When the tool is active, image scaling is performed by simply dragging the cursor while holding the left mouse button to the left or right over the document window.
If you want to enlarge any part of the image, for example, an eye, just move the cursor over it, hold down the left key and drag the cursor to the right.
In addition, the Scale tool supports one-time, fixed size increments. When clicking on the document, the image will increase, depending on the current state, up to 25%, 33.33%, 50%, 66.67%, 100%, 200%, etc.
Toggle between Zoom In and Zoom Out
By default, the Zoom tool is checked to enlarge the image. If you look at your mouse cursor while this tool is active, you will see a small plus sign (+) in the center of the magnifying glass, which tells us that the tool is currently in magnification mode ":

To switch the tool to the "Reduce" mode, hold down the Alt key and you will see how the icon on the cursor has changed to "minus" (-). In addition, the "decrease" icon will be highlighted at the top, in the options bar:

Now you can click on the document and its scale will be reduced.
Magnify a specific area of an image
By default, the Zoom tool is set to drag-and-drop mode; increase / decrease is performed by dragging the cursor to the right or left. But you can also enlarge a separate, selected area of the image. To do this, uncheck the "Scrubby Zoom" option on the options panel.
Then, when dragging the cursor over the document, a frame will be created. The area enclosed by this frame will be enlarged to the size of the document window immediately after you release the left mouse button.
Let's say I wanted to enlarge the woman's face:

As a result, the face was displayed on the full document:

Using the Zoom tool while working with other tools
Quite often you have to scale the image when working with other tools.
In Photoshop CS6, this feature is implemented just fine. When working with any tools, for example, when creating a selection with the "Rectangular Lasso" tool, you can not only reduce / enlarge the image, but also pan it, and all this without interrupting the selection! To temporarily activate the "Scale" when working with another tool, you must press the keys Ctrl + Space to activate the instrument in zoom mode, and Alt + Space to activate the decrease mode.
In the picture, I have shown the inclusion of "Scale" when creating a selection with "Rectangular Lasso". On click, the document will grow:

And, besides this, during the temporary activation of the "Scale" the image in the window can be moved by dragging the cursor!
Resize Windows to Fit and Zoom All Windows options
The active option "Resize Windows to Fit" resizes the window to the image scale, disabled by default. Does not work when scaling the image by rotating the mouse wheel while holding Alt.
If you zoom in one window. then, when the option "In all windows" (Zoom All Windows) is active, the scale of images in other open windows, if any, of course, is changed in the same way.
Pan tool "Hand" (Hand Tool)
When your image is greatly enlarged, and only a part of the image is displayed in the working window, it often becomes necessary to move this image in the window to work with other areas of the image. This is called "panning," and we can pan the picture with the Hand Tool, which is located in the toolbar just above the Scale and has a human hand icon. Also, you can quickly select this tool by pressing the "H" keyboard key.
But the most frequent and best way to activate this tool is to hold down the "Space" key, this temporarily switches you to the "Hand" while working with any other tool. Drag the image to the desired distance, release the "Space", and you will instantly return to the current tool.
Today we will take a look at the methods of zooming in Photoshop. Knowing them will help you optimize your program ...
The first way
On the toolbar, click on the Zoom tool or press the Z key. Move the mouse pointer over the image window. It now looks like a miniature magnifier with a plus sign. Let's click anywhere in the window - the picture will become larger. To reduce the image, on the parameter selection panel, go to the "Reduce" mode.
Second way
Another way to zoom in or out in Photoshop: select the command: View => Zoom ln (Ctrl +) or View => Zoom Out (Ctrl-).
The third way
Press and hold the Alt key. The "Increase" mode has changed to the "Decrease" mode. Let's click anywhere on the image. Let's release the Alt key.
Fourth way
Check the box on the parameter selection panel Scrubby Zoom... Let's click anywhere in the image and drag the mouse pointer to the right. The image will be enlarged. To zoom out, drag the pointer to the left.
Fifth way
The status bar is located at the bottom of the work area. The percentages on the left show the current zoom level. We enter the numerical value of the zoom level in the status bar and press the Enter key. The scale will change in the specified increments.
Sixth way
Scaling with the Navigator panel is another way to change the scale of an image. To open this panel, run the command: Window => Navigator.
On the Navigator panel, there is a slider under the thumbnail image. Moving it to the right enlarges the image, and moving it to the left shrinks it.
The red rectangular frame shows the area that is visible in the image window. Move the red box over the thumbnail to view other areas.
So, we looked at six ways that you can zoom in or out in Photoshop. I hope you found something useful for yourself. See you at
This page will show you how to resize a layer in Photoshop using the Free Transform function. The need to change the size of the layer may be when creating a collage, superimposing several images on top of each other, etc.
We're not talking about rescaling. This was written about in the article.
To better understand what is at stake, first a little theory. For example, let's take the work with applique, when smaller details are glued onto one general background. These parts have some form and are limited by its edges, they can be of different sizes. In Adobe Photoshop, all layers are always the same size in the form of a rectangle and correspond to the size of the open document, background. No matter how we reduce the layer, we reduce its visible part, and the layer itself will remain the same size. It's just that the outer part will be invisible, transparent. If you wish, you can draw a shape on this invisible part and it will lie in the same layer.
Let's say that we want to combine two images into one picture - a seascape and a ship. However, the ship is too large and does not fit harmoniously into the landscape. In practice, let's figure out how to change the size of one or several layers in Photoshop using transformations.
How to resize a layer by transforming
As you can see in the layers palette, we have two images open. In this case, the top one is on a transparent background. We need to reduce it. We activate it by clicking with the mouse in the palette so that it is highlighted in blue.
Photoshop works with an active layer.
Press the Ctrl + T keys on the keyboard or go to the Edit → Free Transform menu. Trace lines appear along the edges of the layer with square knots at the corners and in the middle of each side. If the layer is too large and extends significantly beyond the canvas, the outline lines may be out of sight.
In this case, you need to reduce the scale of the document to such an extent that there is free space between the borders of the layer and the editor window. The lines will be visible on the work area of the editor. You can change the scale in.  Move the cursor to one of the corner nodes and, when it takes the form of a double-sided arrow, drag it, thus expanding or reducing all sides of the image at once. In our case - in the direction of decreasing. To maintain the proportions, first hold down the Shift key. If you hold down Shift + Alt, the size will change relative to the center of the layer.
To stretch the picture in breadth, you need to pull on one of the side parts of the frame, and in height, respectively, on the upper or lower side of the frame.
Attention! To resize the layer in Photoshop with minimal loss of quality, convert the layer to a Smart Object before starting the transformation.
To do this, in the layers palette, right-click on it and select "Convert to Smart Object" in the list that appears. After that, you can call the transform function and feel free to work with it. After working in the same list, select "Rasterize layer", and the smart will be removed.
If you suddenly make a mistake, everything can be returned to its original position - we reset the transformation by pressing the Esc key or the icon in the top panel
When you are satisfied with the result, press Enter or the checkmark on the top panel. Here's what happened:  It remains to "lower" the keel of the ship into the water and work on the light-shadows to make the picture realistic. But that is another topic.
How to resize multiple layers
Transformation will be applied to several layers at once if:
- Select several layers at once. To do this, select the top one, hold down Shift and click on the bottom one. You can vice versa - the bottom, then the top. All layers between them will be selected.
If the required layers are not in order, select them one by one while holding down the Ctrl key.
- Combine into a group or link together. How to do it read
If you have chosen the method of merging into a group, it is more convenient to carry out the transformation with a closed group, by selecting it. Of course, you can open a group and select all the layers in it, but then what was the point in uniting?  Attention! You can resize a layer if it is not locked. This is usually the case for the lower background layer.
Every time we process or retouch pictures in Photoshop, restore old or damaged photos, add artistic effects, we need to quickly and easily move around the image, zoom in or out, zoom in on small details and immediately see the whole image. In this lesson we will look at how this can be done in the Photoshop program.
We'll start learning the basics of image scaling now and will finish this topic in the next tutorial, where you can find some helpful tips to help you save time and energy. I'll be using Photoshop CS6, but this tutorial will work for Photoshop CC as well. If you are working with earlier versions of Photoshop, I suggest you study the lesson "Scaling and Panning in Photoshop".
Below is the image that is open on my screen at the moment (a portrait of a young girl from the Shutterstock photo bank):
Photo opened in PhotoshopCS6.
Current zoom level
Before we start zooming in and out of our image, it is useful to know that there is a current zoom level, and the program displays it for us in two places. First, it's the title of the document, just above the image. You can find the zoom level on the right side of the document title. In my case, you can see that it is equal to 25%:

The current zoom level is displayed in the document header
Secondly, we can see the current zoom level in the lower left corner of the program window. Again, you can see that the image is scaled to 25% of its actual size:

The same information can be found in the lower left corner
Why place the same information in two places? The zoom level in the document header at the top is shown for reference only. In other words, we cannot change it in the title. However, we are able to resize the preview image in the lower left corner. Let's say I want to zoom in from 25% to 50%. In order to do this, I need to double-click on the current level, highlight it, and enter a new value for the scale, equal to 50%:

Double click on the current scale level and enter a new value
Press the Enter / Return key to confirm the new zoom value, and the image preview size will immediately change:

The image is now scaled to 50%
View section options
If you select View from the menu bar at the top of the screen:

Open the "View" section in the menu bar
You will see several options organized into groups that we can use to change the scale of the image. The first two parameters are the most straightforward: Zoom In and Zoom Out. As their names suggest, by choosing these parameters, we either zoom in or remove our image:

Options in the "View" section - "Enlarge" and "Reduce"
If you are saving your time, then you probably won't want to go to the "View" section every time to resize the image. Look closely at the options, and you will see that on the right-hand side after the names "Increase" and "Reduce" are written keyboard shortcuts of these commands, which you will definitely want to remember, since you will use them all the time when working in Photoshop. In order to quickly enlarge the image, press the Ctrl + / Command + key combination and the "+" icon. In order to reduce the image, press the Ctrl + / Command + key combination and the "-" icon. Each time you press these keyboard shortcuts, the program will zoom in or out the image by a certain amount.
The only drawback when working with the commands "Zoom in", "Zoom out" is that these commands do not allow us to control which part of the image we want to zoom in / out. They just zoom in / out from the center. In my case, I pressed the key combination for the "Zoom in" command several times, and as we can see, the program zoomed in to us, leaving the girl's face and hair in the center. If I had to work with the eyes of a girl, then such an approximation would not help much. In order to control which part of the image we want to zoom in, we need some other command, and we will consider it later:

Zooming in from the center using the Zoom In command
Show in full screen
Just below the Zoom in and Zoom out options is a third Fit on Screen option, and it also has a matching keyboard shortcut you'll probably want to remember - Ctrl + 0 / Command + 0:

Show Full Screen option in the View section
The Show Full Screen option instantly reduces the size of the image preview until the entire image is visible on the screen. This parameter is especially useful when we enlarge individual small details and immediately want to see the whole image in full again:

After choosing the command "Show in full screen" we can see the whole image again
100% image preview size
And finally, another useful option in the View section is 100% (known as Actual Pixels in earlier versions of the program) with the corresponding Ctrl + 1 / Command + 1 shortcut:

Selecting the parameter 100% view size
By selecting this option (or by pressing the appropriate keyboard shortcut), you go to 100% image scale - the scale that gives you a true picture of the image (when each pixel in the image occupies exactly one pixel on the screen). If your image is larger than the screen resolution, as in my case, you will only see part of the image on the screen. In order to view the remaining (invisible) part of the image, we need to scroll it somehow. We will learn how to do this in the future:

100% zoom level is the most accurate way to view image pixels
Scale tool
Until now, none of the methods we have considered for changing the scale of the image allowed us to choose the part of the image that we want to zoom in or out. To be able to do this, we need to use the Zoom Tool, which can be found at the bottom of the toolbar on the left side of the screen (it's a magnifying glass tool). Click on the tool icon to select it. Or, to quickly select this tool, simply press the Z key (from the word Zoom) on your keyboard:
Selecting the Scale tool
After selecting the "Zoom" tool, the mouse cursor turns into a magnifying glass with a "+" sign in the center. A + sign means the Zoom tool is in zoom mode (as opposed to zoom out mode). This mode is set by default:

The "+" sign in the center of the magnifier indicates magnification
To zoom in on a specific area of the image, simply click on that spot while hovering the magnifying glass cursor (using the Zoom tool). For a stronger approximation, press several times on the same place. In my case, I clicked on the model's eye a few times to zoom in on this area:

Zoom in by clicking on the mouse button several times
To reduce the size of the preview image using the Zoom tool, simply hold down the Alt / Option key on your keyboard. This action will temporarily select the zoom out mode and you will see the "+" icon in the center of the magnifier change to a "-" icon:

Press and hold the keyAlt /Option to switch to zoom out mode
Hold down the Alt / Option key and click on the image to zoom out. For a stronger reduction, click several times on the same place. When you release the Alt / Option key, the Zoom tool returns to zoom mode:

While holding down the keyAlt /Option, click on the image to zoom out using the "Scale" tool.
Temporarily enable the Zoom tool from the keyboard
To avoid having to select the Zoom tool from the toolbar each time you need to, you can do it from the keyboard. We have already learned that you can go to the "Scale" tool by pressing the Z key, but this is not the most convenient way, because then this tool remains active until we select another tool.
The best way to temporarily enable the Zoom tool is to hold down the Ctrl + spacebar / Command + spacebar keyboard shortcut. This action will cause the selection of the "Scale" tool, no matter which tool we have worked with before, and will allow us to zoom in on any area in the image. As soon as we release the key combination, the program will again make the active tool with which we worked before, and we can continue the interrupted action. If we need to zoom out the image, we need to press and hold the Alt + spacebar / Option + spacebar shortcut to enable the Zoom tool in zoom out mode, zoom out the desired area by clicking on the image, and then release the keys to return to the previous tool.
Scrolling an image with the Hand tool
When working with the "Scale" tool, there is one obvious drawback - when we zoom in on the image, we see only a separate area of it. The rest of the image is outside the document window and is not visible to us. Therefore, you need to find a way to stretch the image inside the document window so that you can see the hidden areas. This action is called scrolling the image and is performed using the Hand Tool. You can find this tool just above the Zoom tool in the toolbar (it's a hand-shaped tool). And, as with the Zoom tool, we can also select the Hand tool from the keyboard by pressing the H key:
Selecting the Hand Tool
After selecting the Hand tool, the mouse cursor turns into a hand icon:

Hand Tool Icon
To scroll through an image, simply click on it while holding down the mouse button and drag the image in the document window. Release the mouse button when you no longer need to scroll through the image:

Click on the image and scroll in the document window using the Hand Tool
Turning on the Hand tool temporarily from the keyboard
As with the Zoom tool, selecting the Hand tool from the toolbar every time we need it can be time consuming, and choosing from the keyboard is not always practical. When you press H, the Hand tool remains active until another tool is selected. The program offers us a more convenient option - to temporarily turn on the Hand tool. We can temporarily make the Hand tool active whenever we need it by simply pressing and holding the spacebar on our keyboard. While holding down the space bar, click on the image and drag it to scroll, then release the key to activate the previous tool.
And so we did it! We've covered the basics of resizing and scrolling an image using the Zoom and Hand tools and a few useful Preview options. In the next tutorial we will continue working with zoom and scrolling images and learn some simple but very useful tricks that will help us save time and improve the result!
Translation: Ksenia Rudenko
17.11.2014 27.01.2018
After completing this tutorial, you will learn in Photoshop:
- Reduce photo size
- Reduce the size of an individual object in the photo
- Transform photos and objects - twist, shrink, flip and reflect.
In this article I will tell you how to use Photoshop to reduce a picture, image, text, layer, a single object - everything that can be reduced in Photoshop. Photoshop allows you to quickly and conveniently reduce objects without losing image quality.
After all, it often happens that it is necessary to reduce a photo or picture before sending it by mail or uploading it to any website in order to show it to people. The huge original dimensions of the photos are not suitable and therefore Photoshop comes to the rescue to reduce the photo.
I will be using Photoshop CS 6 to perform the reduction operations.
How to reduce a photo
First, open the photo you want in Photoshop. Click on CTRL + O or File - Open (File - Open) and select the desired photo on disk.
The photo opened in Photoshop:
Photo of huge size 1600x1200 pixels. For example, we need 600x450 or so.
There is a way to reduce the photo proportionally, for this go to the menu Image - Image size (Image - Image size). In English Photoshop, this window looks like this:

We see values Width and Height (Width and Height), make sure the values are shown in pixels, but if you need you can look and change in centimeters and other measurements.
Enter width instead of 1600 and value 600 and you will see the height automatically adjust to 450 so that the resizing of the photo is proportional.
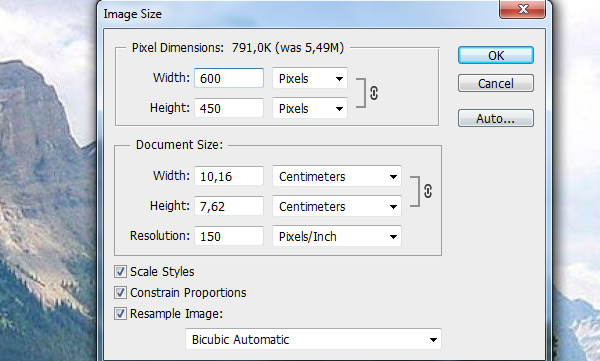
Click OK and that's it! Our photo has shrunk:

Select the desired area and reduce
But what if we do not need the whole photograph, but part of it? And we need to reduce this part, but not proportionally and in our opinion. For this, the function that we used before will not work.
Let's say we have such a picture with balloons and we opened it in Photoshop:

But we don't need all the balls, we only need the blue one and we need to reduce it a little. To do this, select the tool Crop Tool(in the Russian version it is called Cropping) - with the help of it we can select the area of the image we need and crop it. Namely, the blue ball.
The tool itself on the panel looks like this:

Select the desired area:
Click on Enter on the keyboard - we will cut out this ball and remove the rest of the image.

Fine. Now we need to make the ball smaller. You can use the function as in the previous step. Or you can do it differently, while maintaining the image size. First, let's get rid of the background, make it a solid color. To do this, we need to select the ball, cut it out and place it on a separate layer. And on another layer we will make the background.
With a tool Polygonal Lasso Tool select the ball.
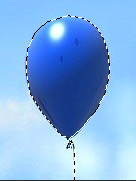
Click on CTRL + X to cut and copy it. After you click it will disappear, and there will be a transparent background behind it. Press CTRL + V at once to insert a ball. Insert the ball slightly to the side of the original place. And it will be inserted immediately automatically on a new layer:

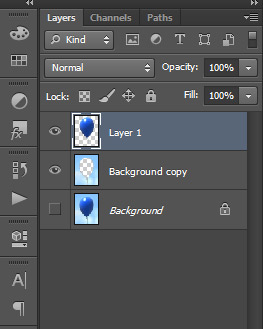
Now we will quickly make another background so that the ball does not appear to be cut out. And the old background does not fit because there is a cut out place in it because of the ball, and since we will reduce the ball even further, it will be even larger.
Create a new layer under the balloon and fill it with any color:

Of course, the ball does not look neat, but the purpose of this article is to tell you how to reduce it in Photoshop, not cut it out. Read about how to cut in Photoshop and in what ways in our other article.
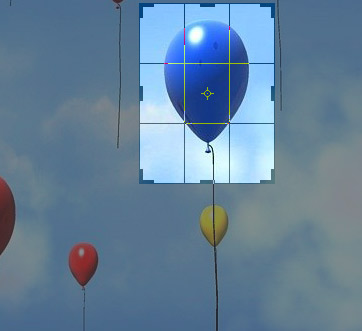
Now let's make the ball smaller. Select the balloon layer and click CTRL + T(or menu Edit - Transform - Scale(Editing - Transform - Scale)) and you will see how a frame appears around the ball to reduce:

Now drag the squares to scale the ball. You can resize the image as needed while maintaining the overall size of the document in Photoshop. You are shrinking a separate object, which is on a separate layer, not the entire image document.

You can apply all these methods as you need, in any order. Knowing these techniques, you can cope with any task in which you need to reduce something in Photoshop.


