Android comes pre-installed with many various applications, which you may not need at all - they just take up space and use up RAM devices. Any of them can be removed, and how to do this is described in this manual.
First of all, on your smartphone or tablet you need to get root rights. They make it possible not only to remove standard applications, but also to easily launch specialized applications, significantly expanding the capabilities of the device.
The method for obtaining Superuser rights varies for each device, but the most universal utilities are: , and also .
Then you need to install a file manager that supports access to system directories and editing system files. For example, ES Explorer, File Manager from Cheetah Mobile or . In this tutorial I will use ES Explorer.
How to remove default applications in Android. Method 1
1. First, you need to grant editing rights to the root directory to the file manager. How to do this for ES Explorer is described in.
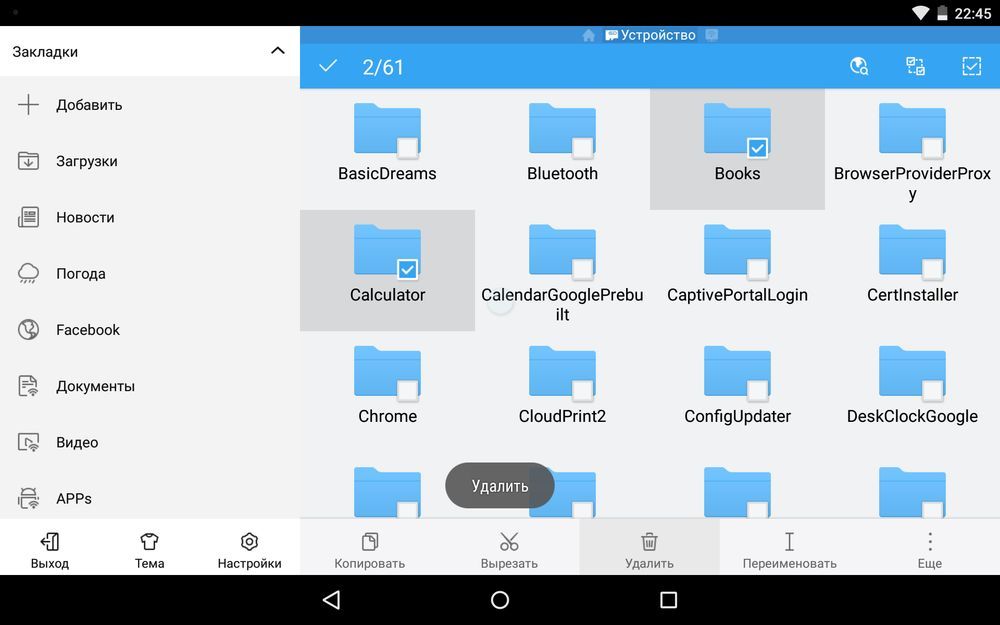
2. In the internal memory, go to the folder "/system/app".
3. Select the .apk file desired application and in the context menu that appears, click “Delete”.

4. In addition, you need to delete the .odex file with the same name, if it exists.
In Android 5.0 and higher along the way "/system/app" all built-in system applications are located in separate folders, so you need to select them and erase them.
5. Many system applications in folder "/data/app" updates are stored, from where they will also have to be deleted.
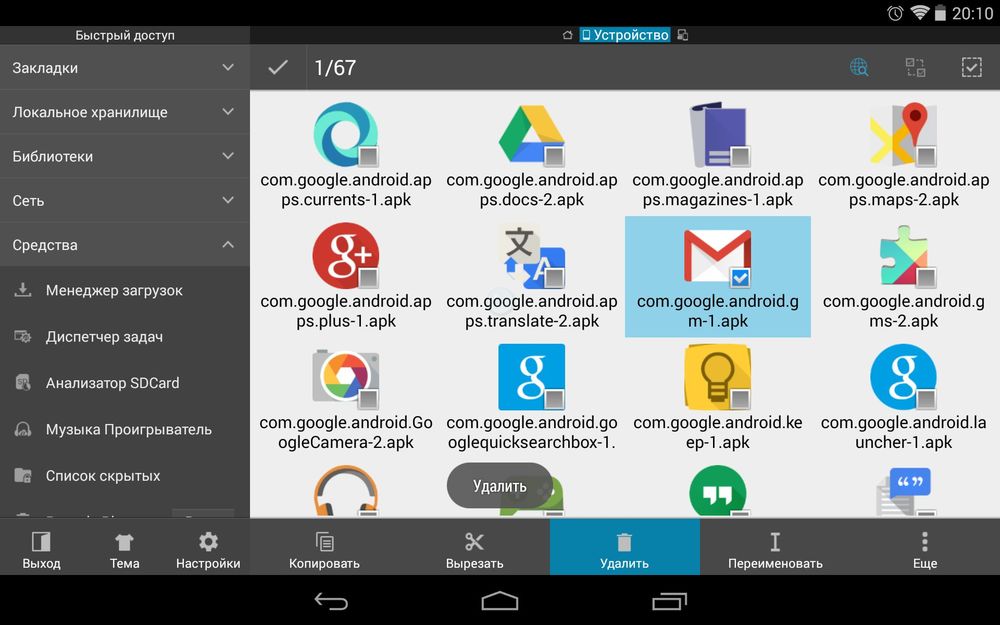
Again in Android 5.0, updates to pre-installed applications are on the way "/data/app" in separate folders. Select unnecessary ones and delete them.

6. Now all that remains is to erase the caches and databases of built-in system applications and services that are located in the folder "/data/data".

Delete pre-installed applications, like Gmail, Google Drive or Maps. System applications with icon Android is better do not touch (for example CertInstaller.apk or PackageInstaller.apk), as problems may arise in the operation of the system.
Uninstalling Android system applications using Root Uninstaller
Standard applications on Android can be removed using Root applications Uninstaller. Download the .apk from our website and install.
1. After installation, open it and grant Superuser access.
2. Select the application you want to get rid of.
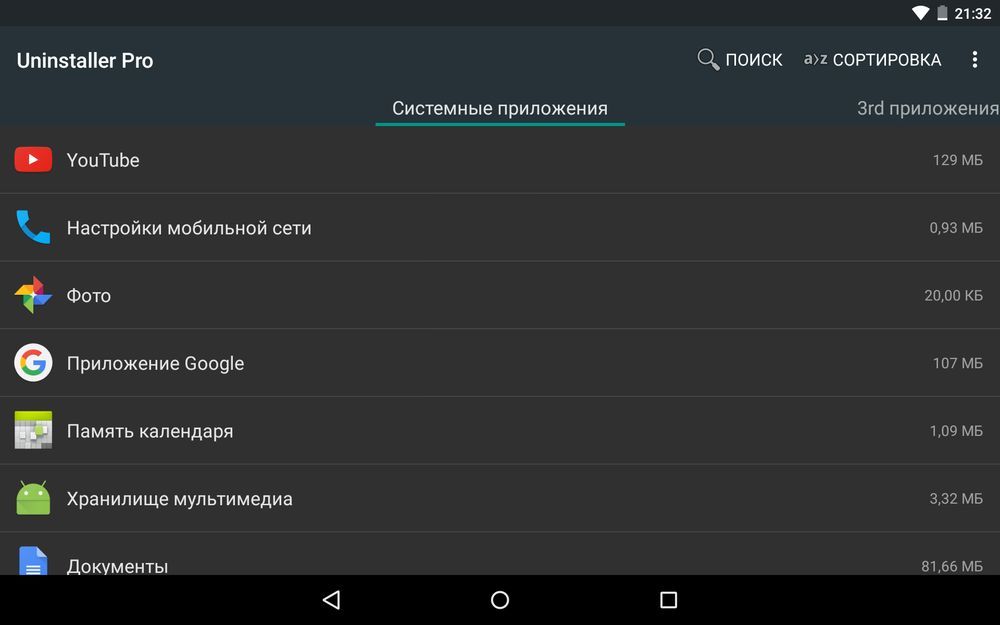
3. Click "Delete". Before deleting, you can make a backup.

In addition, applications can not be deleted, but frozen. This will stop them working and disappear from the menu, but will not be completely removed.
How to remove standard applications through ES Explorer
Some file managers have a special option for working with program files. Let's consider this function using ES Explorer as an example:
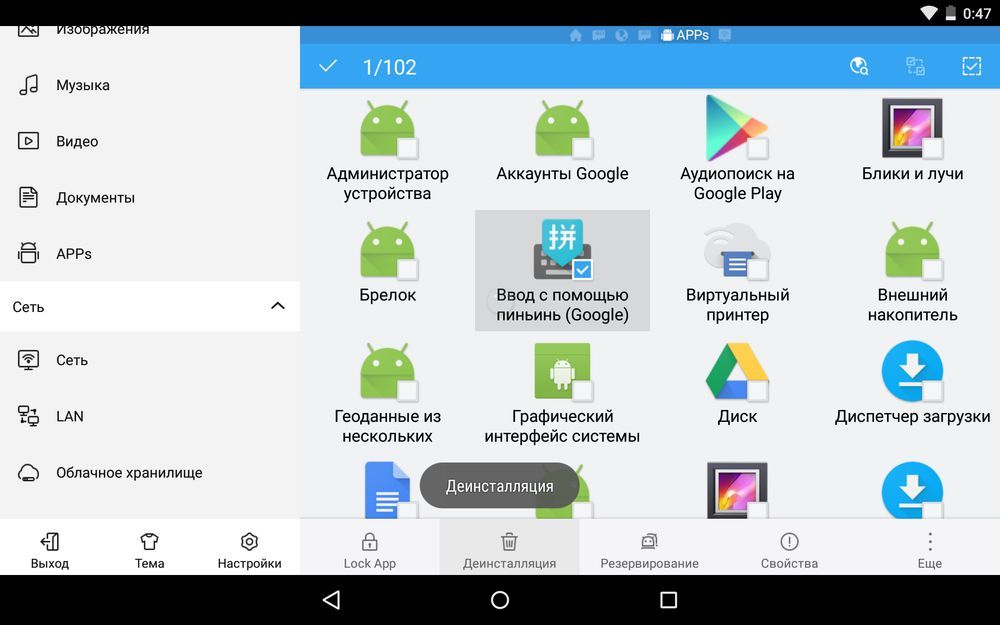
1. In the sidebar, under Libraries, select APPs.

2. At the top, click on “Custom”, thereby expanding hidden menu. Select the “System” item in it.

3. Select programs that are no longer needed. From the list of options, select Uninstall.
I think that the methods I suggested will be sufficient to remove standard applications Android. Yes, there are analogues Root Uninstaller and others file managers, having the function quick removal built-in applications. But the 3 methods I talked about are the most convenient.
Problems related to the performance of a smartphone are very relevant these days, and any owner modern device I wouldn't want to deal with them. But, unfortunately, even any top-end flagship will start to fail after months of use. We want to make you happy, because this problem has a solution. This article will help you get rid of lags on your phone. Let's look specifically at ways to completely clean an Android phone if you plan to continue using it yourself, or decide to sell your gadget.
Step-by-step instructions for cleaning an Android device
Have your eye on a brand new smartphone, but want to sell your old one before buying? Have you given your phone a proper presentation, but can’t return it to its former functionality? You need to prepare your phone for sale. How to clean your phone completely?
All current mobile devices running operating system android are tied to individual postal address. Therefore, when selling, the presence of viruses, or simply cleaning, you need to quickly clean the phone “to zero.” This goal can be achieved in several ways:
- Restore factory settings.
- Hard reset.
Reset to factory settings
How to completely clean your phone? The method is very simple, so we recommend it first:
- Go to “Settings”, find the “Backup and reset” item and select it.
- In the menu that opens, select “Reset settings”.
- The system will notify you one last time that all data and profiles will disappear from the device.
After the phone restarts, you will see pure Android.

Hard reset
Important! It is necessary to fully charge your smartphone before this procedure.
Turn off your phone. Now you need a combination of control keys. There are several most common variations:
- Volume up or down key + power key.
- Both volume keys + power key.
- Volume up or down key + home key + power key.
Important! The combination should cause Recovery menu, it is controlled by the volume keys, and selected by the power button.
Need to find an item factory reset and select it. We agree with the choice and wait for the smartphone cleaning procedure to start.
There is an opinion that standard means Device cleaning is not as effective as data removal tools that offer different companies. How to completely clean your phone in other ways?
- Encryption. Encryption will help you preserve your personal data even when all personal data is not erased. You can encrypt your device in the settings, in the “security” section.
- If you lose your device, you can remotely delete all data using Google services. Sign in account, which is linked to the smartphone and use the “delete data” button.
- Device cleaning not only allows you to clean your phone before selling it, but it can also solve various problems with smartphone operation.
- You can always create a backup copy of your device if for some reason you do not want to lose your personal data. To do this, go to “personal data” and select “Backup and reset”, in that menu you can enable the option Reserve copy data.
Important! All instructions given above are relevant for new versions of Android and may differ slightly on different devices.
If you need a “clean” phone for sale, then in order to speed up the performance of the device, you don’t always need to tear everything down. There are many programs that can keep your system clean.
Programs for android
You can get rid of lags and freezes. What is needed for this? Most often, it is enough to install special applications that will help clean and speed up the system.
There is a list of tips that will help you get rid of the “brakes”:
- Clear your cache regularly.
- Don't be afraid to do a hard reset.
- Keep the firmware up to date and update the software as needed.
- Don't clutter your phone's internal memory.
- Do not enable synchronization of services you do not need.
- Clean master. It has many functions and is ideal for clearing accumulated “garbage”. Equipped with its own antivirus (works online).
- 360 security. It has similar functionality, but is famous for its energy saving.
- D.U. speed booster. Ideal for “speeding up” work.
- Power Clean. Equipped with an excellent task manager.
- CM security. Keeps up with other applications and has a special antivirus with multi-level protection.
Getting rid of “garbage”
You won’t have to set up your phone as often as you will have to get rid of junk on it. Cache from surfing the Internet, consequences background work applications are only a small part of the sources of so-called “pollution”. Let's try to analyze the cleaning process in more detail using the example of using the program Clean Master.
Clean Master is very convenient, intuitive and functional application to clear the internal memory of the phone, which can also speed up and optimize the operation of Android devices. In order to carry out the procedure, you need to launch the application itself, select “Trash” and “Clean”.
Important! The app will prompt you to do an advanced cleanup and notify you that this partition may contain important data. Be careful!
Based on an example of use Clean programs Master you got acquainted with maintaining cleanliness on mobile devices. Nobody forbids you to use something else software. The interface on such programs will not let you get confused and will help you complete the task.
operating room Android system, according to many users, has exceptional simplicity. The good news is that when changing mobile phone there is no need to get used to the new interface and new functions - almost everything remains the same. But some questions still cause certain difficulties for users. How to delete contacts on Android and what is needed for this? Let's figure out how we can work with contacts in smartphones running the Android operating system.
Basic tools
The easiest way to delete a contact from an Android phone is to use basic functions. To do this, you need to go to the phone book and press your finger on the contact to be deleted. After a second it will be marked with a tick. At the same time, we will be asked to mark other entries. If necessary, select other contacts (check the boxes next to them), then go to the very top and click on the icon with the image of a trash can - necessary contacts will be deleted immediately.
Sometimes the trash icon is missing, and the desired item is called up using context menu– it depends on what is installed in the smartphone basic program for working with contacts and calls.
All dialer programs have this functionality, so there shouldn’t be any difficulties here. Basic Features allow you to delete contacts stored in any sources, starting from the SIM card and ending with your Goole account. To switch between sources, go to the application settings and find the contact list display settings item there (may be called “Show contacts”). By tapping on this item, you will see a list of sources:
- All contacts (the entire list is displayed at once);
- Device (implied inner memory telephone);
- SIM1 and SIM2 (for devices with two SIM cards);
- Google account (visible as [email protected]).
There may also be other items here that appear after installing various applications ( WhatsApp messengers and Viber, applications for social networks VKontakte and Odnoklassniki).
If you want to access all contacts at once, select “All contacts” - records from all sources will appear in the list at once. The process of deleting records will be the same as we described above - press one contact, mark other contacts, select the delete option.
To avoid confusion in telephone numbers in the future, copy telephone contacts into one source. The best option- copy everything to Google account so that the recordings are synchronized with the servers of the Android operating system developer.
Deleting contacts with third-party programs
Still haven't learned how to delete contacts on Android? Program for working with phone book Causes any difficulties? Then you need to remember that what you have in your hands is not antediluvian telephone set with a rotary dialer, and modern smartphone With huge opportunities. And what you don’t like here can be easily replaced.
If current program If you find it difficult to work with contacts, download another program. To do this you need to visit the store Playmarket applications and enter the word “contacts” into the search. Here is a list of good applications:
- Contacts + from the developer Contacts Plus team;
- PixelPhope by Dorado Apps;
- ExDialer – Dialer&Contacts from Modoohut.
These are proven and very powerful applications for working with the phone book and contacts, and in Russian. The largest number has settings latest program – thanks to them, the contact list can easily be adjusted to your own needs.
Removing duplicate contacts
In order to delete duplicate contacts on Android, you need to understand the display of contact sources. It is quite possible that you have the same entries in your smartphone memory and in your Google account. In this case, you just need to choose to display contacts from only one source, and not from all at once - we have already told how this is done. If necessary, select to display an unnecessary source and remove all contacts from it.
You can also help remove duplicate contacts. special applications- These are Duplicate Contacts from the developer alex accaci and Contacts Optimizer from Compelson Labs. By installing one of these applications, you can quickly get rid of unnecessary duplicates, making it difficult to find the necessary contacts.
If your phone is running out of space, I think you will be interested in learning how to delete unnecessary applications from phone to Android. Uninstalling an application is a simple task that does not require much time. However, depending on the phone model and Android version, the process may differ.
In this article I will look at everything possible ways removing applications from your Android phone, including system ones. Let's start.
So, “how to delete apps” is a simple question, right? I know three ways to remove applications from your phone. Not all of them work on older versions of Android, but on phones with new version operating room Google systems, all three should work.
Method 1: Uninstalling applications via settings
This method works on all versions of Android. The first thing to do is open the menu “ Settings" in phone. Here find and open the item “ Applications" or " Application Manager”, find the app you want to uninstall and select it, then simply click the “ button Delete”.
After this operation, in most cases the application will be deleted from the phone. After completing the operations, you will return to the “Applications” menu, from here you can repeat the process and delete following application, if it's necessary.

- Open Settings in phone.
- Click Applications or Application Manager
- Click on the application you want to remove. You may need to scroll through the list to find what you need.
- Click Delete.
Method 2: uninstall the application via Google Play Store
The second way is to remove unnecessary applications through Google Play Market. Find the Google Play Store application on your device and launch it. Click on the dropdowns Menu(3 bars in the top left corner) and select My apps and games, now just go to the section Installed, open the app you want to remove and tap Delete.
After a few seconds, the application will be removed from the phone. If you want to continue deleting apps, just click the button Back on your smartphone or tablet, go to the section again Installed and repeat the process.

Step-by-step instruction:
1. Open Play app Market on your phone.
2. Open the menu (three bars).
3. Click My apps and games.
4. Select the application you want to remove. You may have to scroll through the list until you find what you need.
5. Click Delete.
Method 3: Remove by dragging
This is probably the fastest and easiest way to remove an application on a smartphone or tablet, although it does not work on devices with old version Android. If the method below does not work for you, simply use one of the two methods listed above.
How it works? Just open the desktop where the application is located, press and hold the one you want, and when the “trash” appears, drag it to it. On last step- just click OK after the question “do you want to delete the application”.

Step-by-step instruction:
1. Touch and hold an application located on your device's home screen.
2. Drag it to the section Delete(Trash) which will appear on the screen.
3. Click OK when the pop-up window appears.
How to remove built-in applications on Android
All Android devices come with pre-installed or built-in applications. The list usually includes useful applications, such as YouTube, Maps, Odnoklassniki, VKontakte, etc. However, there is Great chance that there will be many applications on your phone that you do not use. In most cases, these applications cannot be removed using the methods listed above. As you can see in the screenshot below the button Delete simply no.

Applications that cannot be deleted are called system applications. the only way To get rid of them is to root your phone. Rooting is the process of obtaining superuser rights with access to system files and folders that are usually blocked for regular users.
Rooting will allow you to become system administrator your phone, with complete freedom of action. But a vulnerability will also appear in the phone; it will be easier for viruses and Trojans to penetrate it. If this doesn't bother you and you want to root your phone, click on the link below.
An alternative is to simply hide system apps you don't want to use if your phone allows it. This won't remove them, but at least they won't be an eyesore.
What happens if you delete an app you bought?
Many users worry that if they delete an app they purchased from Play Store, you will have to buy it again. This is of course not true. You can safely delete the application you purchased, and then download and install it an unlimited number of times.
If you deleted a purchased app, it will be marked as “Purchased.” If you want to install it again, just type the name in the search and click on the Install button. No payment will be required from you.

Conclusion
As you can see, deleting applications is quite simple, the process does not take much time and is the same on most phones. Deleting unnecessary apps is a good habit, if only because it frees up space on your phone and makes your desktop less cluttered.
I hope that with the help of my article you learned how to delete applications on your Android phone. How do you delete apps from your phone? Let me know in the comments section below. Thank you! Good luck!
For many, a tablet or smartphone is not just a means of communication, but also storage personal files and data: notepad, diary, task manager, photo album and even wallet. What kind of secrets do people not trust with their devices: from intimate photos and correspondence to confidential papers and passwords from bank accounts.
It's no surprise that Android allows you to copy personal information to the cloud for convenient transfer on new gadgets and completely erase it on old ones. Lifehacker's instructions will help you cope with these tasks. It's based on pure Android 6.0.1 Marshmallow, but if you're using a different version of the system, these tips will also work. Although some menus and options may vary slightly.
Gadgets with Android 5.0 and above latest versions The OS automatically copies most user data and settings to Google servers. These are the interface parameters and Wi-Fi networks, contacts, list installed programs and even internal data from some of these programs. This feature greatly simplifies the transition to a new device. You simply connect your account to it - and copies of old data are downloaded there from the Internet.
To use backup, you must enable it in settings. To do this, find the section responsible for recovery and reset. Open it, select a Google account to store your data and settings, and then enable backup and auto-recovery.

Next, connect to the Internet and wait 30 minutes for the backup to occur. IN Android process duplicates settings and data Google applications, synchronized with the account you selected. The system will also copy data to the cloud third party programs, whose developers have implemented support for backup via Google. You can quickly restore all this on a new gadget.
If your device has outdated system Android or you are not sure whether the reservation applies to important files, make copies of them manually.
Connect your phone to your computer in file storage and view the contents of the gadget in Explorer. Save important pictures, music, books, videos and other information from your device to your computer. As alternative option you can duplicate the information in Dropbox or another.

In the future, you will be able to manually copy information saved on your computer or in the cloud to a new device.
3. Remove SD and SIM cards
Your phone number gradually takes on the role universal identifier for the most different services, so it would be a shame to lose him. After demonstrating the capabilities of the smartphone to the buyer, do not forget to take out your SIM card. The same goes for the memory card, especially if your device was sold without it by default.
If you want to leave the memory card to the new owner as a bonus or because it was included in the standard package, be sure to erase it before selling it. To do this, open the phone settings and find the corresponding item in the storage section.
After creation backup copies important data and cleaning the memory card, you should delete all data from the device. The fastest and reliable way to do this is to return to factory settings. As a result, your phone or tablet will be the same as it was when it arrived in the store.
To perform a reset, connect the device to a power source and use the appropriate option in the device settings. For example, on pure Android 6.0.1 Marshmallow desired item is located in the “Backup and Reset” section and is called “Factory Reset”.


After the reset, your phone will reboot, and you will see that it has become pristine and immaculate.
But if you tinkered with the firmware, this will not return the factory version. In this case, you may need to flash the device with factory firmware, which can usually be found on the manufacturer's website.
When all of the above steps are completed, you can transfer the device to a new user without fear for personal data.