Without financial investments and special knowledge.
Here is a simple guide on how to create a basic iOS app and try it out on your device. Based on it, you can go further into the topic and create really useful programs.
Note for Windows users: in order to create applications for iOS, you need to install OS X on a virtual machine (VirtualBox, VMware). This process is by no means simple and a separate instruction is required for its implementation.
1. Go to the App Store and install the XCode development environment:

If you already have Xcode installed, then you need to update it.
2. Run xCode and select the menu item file -> New -> project: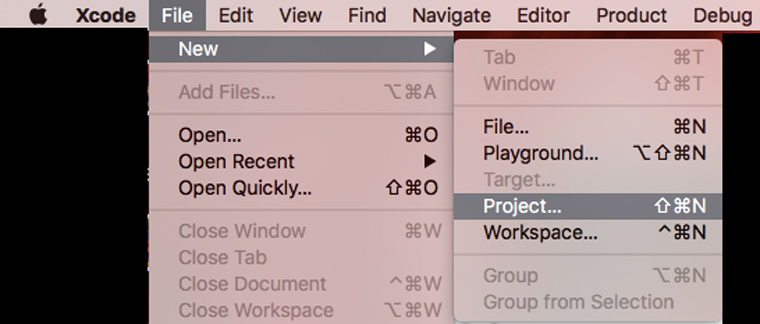
3. Select the platform and application type:

4. Specify information about the project. Please note that we have selected the application type "Universal": 
5. Click on the button New Folder and specify the name of the folder in which we will store the application files:

6. Uncheck the Create Git Repository checkbox and click the Create button. As a result, you should get to the start screen of working on the application: 
7. Click on the item Main.storyboard in the right menu, drag the element to the main field label and add text to it Hello_world:

8. Now we need to make an icon for the application. We select the image and upload it to mapappicon.com :

9. We are waiting for the web application to finish working and specify your email address to receive the archive with icons:
![]()
10. We return to XCode and select the section in the left menu Assets.xassets:
![]()
11. Open the archive from the mail and drag the icons from there to the XCode workspace:
![]()
12. Select one of the device simulators, click on the application launch button (black triangle) and turn it on on your Mac developer mode:

13. We repeat the launch attempt. We are waiting for iOS to load on the simulator:

14. We make sure that the application works:

We look at the finished application on the device
Now you can see how the application works on the device. Make sure you have the latest versions of XCode and iOS before following the instructions.
1. Go to xCode -> Preferences -> Accounts and add your Apple ID:

2. Connect the iOS device to the computer:

3. Select the desired device in the list and click on the start button. We are waiting for some time.
4. If a message about security problems has come out, then on the iOS device, go to Settings -> Main -> Device management and allow the launch of applications from the developer with your Apple ID:


5. We go to the desktop and find the icon of the new application:
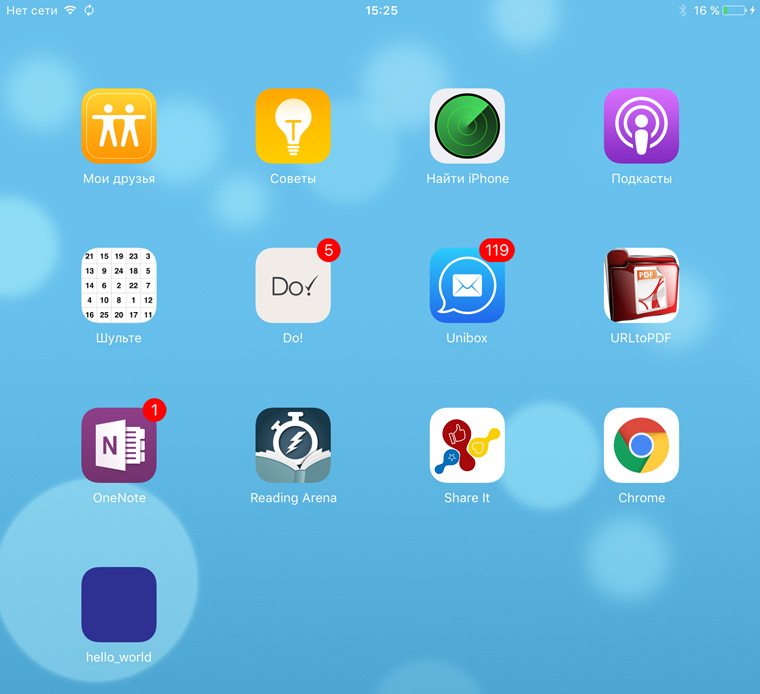
6. Run:

7. Disconnect the device from the computer. Now the application can be used.
What if you want more?
With the help of the scientific poke method and Google, you can extend the above sequence of actions and create a more functional application. But you can only use it on your devices.
After all, Apple makes very high demands on applications. The App Store Review Guidelines include 29 items and over a hundred sub-items. In order for an application to comply with them and be accepted for publishing in the store, a developer requires a large amount of technical knowledge.
If you want to create high-quality iOS applications intended for mass use,
Creating an iPhone app can be covered in hundreds of books on C++ or Objective C programming. This is not a manual, but a step-by-step list of steps you will need to take to create your first iOS app.
1. Come up with an idea and recruit a team. It all starts with a simple and innovative idea and a team that is ready to take it on. Usually, this is at least a couple of programmers with a narrow specialization in different areas, an animator, a designer, a tester, a debugger. You will also need a person who is well versed in usability.
2. Be sure to make yourself an Apple ID. Please note that if you will publish the application in the future on your own behalf, and not on behalf of a legal entity, but your first and last name will be the developer. You can go to the trick and write the name of the company instead, for example: Pupkin Development, but no one guarantees you that after some time the consequences will not come.
3. Registration in the developer community. To do this, you will have to spend $ 100 (this is the minimum subscription price for a year) and register an account in the Apple Developer Connection.
4. Install SDK. The software development kit (software development kit) allows you to develop directly the applications themselves for the iPhone or iPad. It contains a standard set to start development. The SDK includes XCode and the iPhone Simulator. The first software is for writing code, and the second is for testing it in real time. Programs are launched from the Applications folder. If you entrusted the development of the studio, then just wait and correct their work with your masterful advice.
5. Come up with a sonorous name that would also contain keywords at the same time. It is not forbidden to write the title in two languages at once, which will increase the variation for future searches of your creation in iTunes

6. Now you need to register in iTunes Connect, through which the application will be directly placed in the App Store. This will take a few seconds as the data from your Apple ID profile will be used.
7. It's time to come up with a description of the application and make colorful screenshots, which will determine whether App Store users will pay attention to your brainchild. Often, captions are also added to screenshots that stimulate action.
8. The application must be thoroughly tested before being sent for review to Apple. You can see how your program works in the iPhone Simulator from the SDK or through the TestFlight app.
9. Submit the application for approval. The check is carried out manually, so you will have to wait from 1 week to a month (especially if there are some holidays on the nose). The most annoying thing is that if the application is wrapped due to some kind of blot that you fix in a minute, then you will have to wait for a new review for the same amount.
10. When the long-awaited green light from Apple appears, everything will already be in your hands. Decide on a price (just remember that in-app purchases are a pain in the ass), an advertising campaign, and the results you want to achieve. But promotion in the App Store is a topic for another article.
Have you ever wondered how the iOS and OS X apps that millions of iPhone, iPad and Mac owners use every day are created? We know that it occurred to many people to develop programs for Apple devices, but beginners, as a rule, are afraid of the difficulties in the process of learning and studying textbooks on their own.
The iOS and Mac app developer profession itself is universal: it combines knowledge of two programming languages - Objective C and Swift. The first is the main language, built on top of the C language and has a simple syntax. Without this language, they will not be hired to work in a mobile application studio. But Swift is a relatively new language: Apple introduced it in 2014, it is integrated with C and works faster than Objective C and Python, allowing you to create any programs, both games and useful applications.
Now there are only a few specialists who know Swift, so they are in great demand in the market. It is enough to go to any HR platform to see the average salary of iOS developers - 100 thousand rubles. Experienced programmers have a salary of several hundred thousand rubles + various bonuses from the company.
To get the best result in a short time and a guaranteed internship, you can use the GeekBrains service. It includes both Objective C and Swift, which means you end up with two specialties instead of one. Intelligent iOS-programmers of the company are taken apart like hot cakes, so they do not sit even one week without work.

The learning process is an online broadcast of lessons, so you can study from anywhere in the world. A specially developed unique technology makes remote learning even more convenient than face-to-face. Do your homework, and if you couldn't be at the lesson, view it in the recording. Here's what a typical GeekBrains lesson looks like:

Why online courses? They have an obvious advantage compared to universities in terms of time spent and at the same time provide an opportunity to earn practical experience and get a guarantee of results. 7 out of 10 students of the service find a job while still studying, since GeekBrains provides a guaranteed internship. In addition, students gain invaluable experience in team development and a portfolio case. Without the latter, it is now almost impossible to get a job.

For example, this is how your resume after training might look like.
Today, the IT sector is developing quite rapidly. Each person, if he wants to try himself in it, chooses one of the directions and moves towards the goal. Many prefer applications for iOS and Android. Creating them, of course, is quite difficult, patience, knowledge and free time are needed. If you are serious about this, then you should study and go towards your goal. on one's own?
Development environment
First you need to install a program where you will work with the interface and prescribe actions for the necessary elements. The most common is Xcode. Unfortunately, this development environment is only available to users of Apple products. To date, there is no official version for Windows or Linux. Different versions of iOS require a different version of this program.

Add-ons for working with graphics
To develop an image or design for games, you need to install a graphics utility. A common application is CorelDraw, which allows you to create photos using vector graphics. Of course, for full-fledged work, you need to purchase the full version, but standard methods can be used for free.
Objective-C
The Objective-C programming language is used to create functionality for the game. As you can see, it came from the C family of languages, so if you have studied another programming language before, you can spend quite a bit of time on in-depth study and start creating your own applications. Of course, there are many books on learning Objective-C.
Create an account
In order to subsequently sell your application, you need to register in the AppStore. In it, you can also give other users public access so that they can test the program. Of course, it's not free. You will need $100 to put your app up for sale for one year.
Also in you can see test applications. Some are provided with information on how they were developed. Look at similar examples with what you want to create and try to do something similar.
Application layout
First you need to decide on the target audience for your application. The interface and functionality will depend on it. Of course, if you are developing a program, then it is worth achieving a solution that was not there before. This is the only way to achieve popularity.
It is also worth deciding how the application will be arranged. You should make the interface as simple as possible so that it attracts new people, and does not scare you by not showing its capabilities.
Each button should display its actions and show what it will do. The user should not have questions about what any key will do. Think over, and then bring to life, a high-quality interface.
Create an application
First you need to open the considered development environment and create a new project. To do this, you need to go to the "File" section and go to the "Application" item. Next, select "iOS" and go to the empty application "Empty Application".

You can create an iOS application using various templates that are designed for different tasks. To begin with, it is better to use an empty one to deal with all the subtleties. You can apply them later.
In the new window, enter the product name and your identifier, you should also specify the class prefix. If you are a novice developer, then you should specify "com.example" in the identifier field, and "XYZ" in the prefix field. Next, select from the proposed iPhone devices and confirm your actions.
Use a Storyboard
You can use the Storyboard to get started on your iOS app journey. What it is? This is a feature that allows you to visually represent all your screens in the program. It shows all windows and the transitions that are used between them. It is a good helper in creating a program. To open the Storyboard:
go to the "File" section and the item "New";
select the "File" button and go to "User Interface";
then select the desired function;
it remains only to select the iPhone device and name the file.
It should be remembered that it must be saved to the folder where data about your project is stored.
Adding a Screen
To add a screen, you need to use a view controller. It allows you to define how the user interface will look like. There are many built-in view controllers. You can look at each available option and decide which design you like best.
· To do this, go to the file "Main.storyboard" through the navigation.
· Select "Object Library" to load all the necessary objects.
· You need to click on "View Controller" and drag it to your project. This will add your first screen.
Objects
For iOS? So, you have decided on the interface and added the screen, now you can proceed to the creation of certain objects. To use standard elements, open the Objects Library list. If you have found a suitable object, then you can transfer it to your screen. It can be easily moved and scaled.
Editing elements
By laying out objects, you use a kind of constructor. You can create an iOS application this way, but these elements have an ugly, standard look. To change the design: color, font, add pictures and other parameters, you need to select an object and go to its properties. This can be done by clicking on the "Attributes Inspector" button (the label resembles a shield).
Navigation bar
Soon you will add many other screens, and the program will require you to enter navigation so that you can easily find the information you need. To add it, you need:
Find the place where this element will be located. It is better to apply it to the home screen to control other windows.
Click on the “Editor” button and go to the “Embed In” item.
It remains only to select the necessary element - "Navigation Controller".
Additional features
As you may have noticed, we haven't used a programming language yet to create an iOS app. This moment will be only for you. You have to figure out what your application should do and drink actions for it in the Objective-C language. If you do not have a good programming skill, then you should read additional literature.

Application testing
Xcode has an emulator that allows you to test. After it needs to be tested, to check the performance. To do this, go to the "Simulator and Debug" section. Select the device you want to test with.
Building the program
How to create an iOS app by yourself? For a full-fledged or game, you need to assemble a project. Go to the "Build" item and click on it. This will compile the application, and after that it will immediately run. This will take you about five minutes. You will be able to watch how the assembly will take place.

Test device
To finally make sure that your project works, you need to test it on your device. If you have an iPhone, then you can do it without problems. We connect our device to the PC. Next, we perform the actions that we have already considered. Click on the "Device and Debug" button, and then go to the "Build" item. After a few minutes, when the application is assembled, it will run on its device.
If you figured out how to create an app for Android and iOS, but you're having some problems, you need to fix them. You can see in the console what errors occurred during testing. In general, this is a rather important process, because if you test your application well, then this will bring success. You can also take the help of your friends. To do this, send them your application and wait until they find errors.
Project Publication
You need to create an assembly. To do this, select the "Distribution" item in the menu and click on the "Build" button. Next, select your project and archive it. You must understand that the application must be optimized for the required platform and be suitable for the retina display, otherwise it will not be approved.
We go to the account in the AppStore and add a new program or game. You will need to enter all the information about the application: title, description, keywords, category, copyright and contacts. We also fill in the field with the price and rights. It remains only to add an icon to your application and a few screenshots.

Examination
Once your app is uploaded, it will be reviewed. You should have an answer in a few days. At the initial stage, the program is automatically checked. If everything went well, then it is transferred to the “In review” state. If this does not happen, then in a few hours you will be able to receive an answer to the mail. You can also get information on how to eliminate defects and what is needed for this.
If the application has passed all the checks, then it will be placed in the Apple Store for sale. Your task now is to advertise a program or game. This will determine how much money you earn. You can use various advertising services.

Conclusion
Application development follows a similar principle, but in a different development environment for Windows. How to create an app for iOS? This is a rather long and complicated process. This must be approached with certain knowledge and skills. That's the only way you can achieve anything. You can realize your ideas without certain skills. Choose the right company and consider how much it costs to create an iOS app. You can also order some components if you can't do something yourself.
Let's, for starters, deal with the relevance of developing for Apple devices in general. There are more than 2 million apps in the App Store today.
Each application and its update must go through strict moderation. All apps in the store are updated every 1 month.Every self-respecting developer wants to make the highest quality application with beautiful animations, a well-designed user interface and maximum performance.
Development of applications for iOS, or how to love Apple even more
The salary of iOS developers varies from 60,000 to 250,000 rubles. The relevance of iOS development is undeniable.
In this article, we will create an application where we will display a message "Hello World" on the main screen and we won't write not a line of code.
Let's see what we need in order to develop the most primitive iOS application:
- MacOS device on board
- Downloaded Xcode
As you can see, we don't need a head. Yes, Apple has made every effort to simplify the process as much as possible and reduce the development time for mobile applications for their platforms, such as: iOS, tvOS, macOS, watchOS. Apple also introduced the Swift programming language in 2014, which is very simple for beginner developers and very functional for professionals. If you can create an application for one Apple platform, for example for iOS, then it will not be difficult for you to create an application for other platforms. Everything is unified to such an extent that you can use almost the same code, running it on different types of devices.
Go!
CREATING A PROJECT
And so, as mentioned earlier, we need a computer Apple, and installed application xcode, which is located in App Store in free access.
Let's figure out what is xcode and why we need it.
xcode is a software development environment that includes: a code editor, a graphical interface editor, a version control system, and tools for debugging and laying out applications written by us. In a word, this is a program in which 90% of all interactions in the development of applications for a family of operating systems are conducted. Apple.
And so, having launched the development software, we see a welcome window where we can open, create or clone a project. We need to create a new one by clicking on “Create a new Xcode project”. Yes, the whole interface xcode in English, so I advise you to stock up on an English-Russian dictionary.
The next step we see this window:

where we are offered to choose the platform and type of application. We need the iOS software (at the top of the dialog box) and the Single View App. Any application starts with a Single View, and then grows to 50 View App.
The next step is to enter the name of the project, the organization in which we develop it, select the language and enable/disable additional features.

Let's go in order:

After filling in the information, click Next, and select the location of the project on our computer and click Create
OVERVIEW OF THE DEVELOPMENT ENVIRONMENT
We have our main workspace open and let's see what we have here. Let's divide the whole application into several parts: top, left, right, bottom and middle.

At the top of the workspace you can see the buttons launch or stops applications, the launch settings field, which consists of two parts: what we launch, on what we launch.
We also see the status bar, in which we can observe the current task that the development environment is performing, to the right we can see the editor view settings: standard editor, editor with assistant And view changes in source control, and there are also buttons to show/hide parts of the environment, which we'll cover next: below (debug info), on right (navigation) and left (utilities)
Left we see several buttons that will switch the functionality of the left panel, namely:
- Navigating through files and folders
- Version control system
- Hierarchy of classes in the project
- Search by project
- Build Warning and Error Notifications
- Automated Tests
- Debugging
- Breakpoints
- build logs
On right we have two parts: top and bottom. The entire right panel is called Utilities. At the top we will see the settings of the selected file and/or user interface element. At the bottom of the utilities, we see the user interface elements that we can use.
IN lower part development environment, we can see debug information, application logs and other useful information to check the correct operation of the application. You can open the lower part using the penultimate button at the top of the application, and this panel opens automatically at startup.
And in main (central) part environment, we can observe the editor in which code is written and work is being done on the user interface of the application.
And in the main (central) part of the environment, we can observe the editor in which code is written and work is being done on the user interface of the application.
- Identity
- display name- the name of the application that will be displayed on the home screen of the device
- Bundle ID- Unique identifier to be used in the App Store
- version- the current version of the project, which is maintained using semantic versioning
- Build- Build number, which should be increased by one with each installation of the application on the device
- Signing
- Automatically manage signing- automatic application signature management
- team- the name of your team
- Provisioning profile- profile, for signing the application
- Signing Certificate- a certificate that allows you to sign an application with Apple
- Deployment Info
- Deployment Target- the minimum version of iOS on which the application can be installed
- devices— Device types
- iPhone
- Universal
- main interface- Storyboard file that the application will start with after
- device orientation— Possible device orientations when working with the application
- Portrait
- Upside down
- landscape counterclockwise
- Landscape clockwise
- Status Bar Style- Color bar status (upper information bar with time, operator and battery)
- Light coloured
- Dark
- Hide
- App Icons and Launch Images
- App Icons Source- application icon
- Launch Screen File- the screen that is shown while the application is running
We don't need the rest of the items.
Now that we have figured out what our development environment consists of, we can start creating our “Hello World” application.
If you are interested in ready-made templates, then you should pay attention to our review of online designers, with which you can develop an application for your phone or tablet yourself.
CREATING AN APP
First of all, we need to find the interface file, which is called Main.storyboard. It can be found on the left side of the navigation bar.Opening the file, we see the application screen. Now we need to drag the element called label to this screen. This item is on the bottom left.  Drag it anywhere on the screen. Then in the utilities panel, look for the field that says label.
  And change label on the hello world. After that, we will see that our element on the screen does not fully show our text that we entered, since it had text initially smaller, and it took on its size.
  Let's force this element to be fixed in the center of the screen and take the correct shape so that our text is fully displayed. To do this, we need to find the second button at the bottom left, which is called Align and click on it.
Here we see some options for positioning our element. We need the last two parameters. Activate them and click "Add 2 Constraints". After that, we can observe how our element is fixed in the middle of the screen and takes the form in which our text is displayed in full. 
ASSEMBLY AND STARTING
Now, we need to run our application on the device and see if everything is displayed correctly. To do this, we click at the top on the choice of application launch destination and see a drop-down list: In this list, we see devices and device simulators on which we can run our application. Choose any and click Run. The build of the application will begin and Xcode will show us the tasks that it is currently performing:
 After successfully building the project, we will see that Xcode will go into the application launch waiting mode and the simulator window will appear, which will be loaded. After the simulator has loaded, we can observe our application on the device


