The regular ability to create a Windows 10 emergency recovery disk was inherited from the "seven". They create such a disk in case there are difficulties in the operation of the OS that prevent loading and contains tools such as:
- Automatic troubleshooting that prevents system boot;
- Restoring from a previously created image (backup);
- Returning the OS to the rollback point.
How to create a rescue disk using regular Windows 10 tools and how to use it in practice in case of problems booting the system? These issues will be discussed in detail below.
When is a recovery disk needed?
A recovery disc can only be created for computer devices that have a CD/DVD drive in their assembly. Unlike bootable rescue media from third-party developers, most of which provide for recording to a USB flash drive, a rescue disk can only be burned to a CD / DVD blank. But this is by no means an infringement on the capabilities of owners of devices without a CD / DVD drive. The fact is that the recovery disk is not the only means of accessing the standard Windows resuscitation capabilities. The system recovery environment can be accessed using a Windows 10 installation disc, which can also be created using a flash drive.
To reanimate the current OS using its installation disk, no financial costs will be required. The distribution kit with Windows 10 on the Microsoft website is available for free. It is delivered through the Media Creation Tool, you need to download and run it.

The utility in a single process will download the Windows 10 distribution and immediately create a bootable USB flash drive. If you have problems booting the system, you need to boot from the USB flash drive and, at the stage of starting the installation of a new OS, select the item indicated in the screenshot below. Access to the toolkit does not require a product key.

As you can see, the emergency disk is hardly a necessary tool. However, its presence is welcome if there is no other computer in the house with which one could quickly create a bootable USB flash drive with the system installation files.
Preparing to restore Windows
An emergency recovery disk is created for a certain bitness of Windows 10. In this case, the universal rule applies, as for programs installed inside the system - 32-bit bitness is suitable for both 32-bit and 64-bit Windows 10. Whereas 64-bit the rescue disk is useful only in the case of the 64-bit version, respectively.
There will be little use from the rescue disk if a rollback point is not created inside the OS itself or a system image (backup) is not prepared.
Create a recovery drive
The emergency recovery disk is part of the standard toolkit for backing up OS files. This functionality is located in one of the sections of the control panel. You can get to the backup section not by wandering around the control panel, but in the simplest way - using an internal search. In Windows 10, the search button is located right in the taskbar, so it’s a sin not to use this convenience.
We write in the search field the key query of the desired section and directly get to the system backup parameters.

Click the "Create System Image" button. Select the CD / DVD drive in the drop-down list, if there are several. Next, click the "Create Disk" button.

We will see a notification, which, in particular, refers to the bit depth of the OS.

Creation completed.

The Windows 10 recovery disc is suitable for computer devices based on both regular BIOS firmware and UEFI BIOS.

Now the rescue disk can be put somewhere in a secluded place. His further fate is to wait for a critical failure of the system.
Boot from rescue disk
Let's say Windows 10 won't boot. Now is the time to use the emergency equipment. We take out the recovery disk and set the BIOS to boot from the CD / DVD drive. We confirm by pressing any key to boot the device from CD / DVD.

The interface is in Russian, but you can choose any other keyboard layout. In our case, just confirm Russian.

The choice of action is the "Diagnostics" section.


In the next window, we will see all the available Windows 10 recovery tools.
Boot recovery
To try to solve the problem with Windows 10 not booting, you can first use the boot troubleshooting method. This is a mode to automatically fix problems that prevent the OS from starting.

Don't put too much hope in this tool. Like the in-system automatic troubleshooting tool, the boot troubleshooter won't do much good. After a short diagnosis of the computer, in most cases it will be declared inability to solve the problem.

Rollback to a restore point
The rollback point is the most convenient toolkit that allows you to, with minimal data loss. Naturally, it is necessary that rollback points are periodically created - either manually by the user, or automated (using the task scheduler). The process of creating a rollback point takes much less time than the process of creating a system image (backup). And the rollback point saves space on the PC. However, the rollback point is more vulnerable than a backup that can be stored on an alternative hard drive and will come in handy if the main drive fails.
In order to roll back to an earlier state of the OS in the face of serious problems with the system, we boot from the emergency disk, go through the path to additional parameters and select the first option in a row.


Select the current rollback point from among the existing ones. The most complete list of them will be available after setting the option to show other points. Click "Next".

Click "Finish" in the rollback confirmation window.

We additionally confirm the launch of this process.

After the system rollback is complete, the computer must be restarted. After the reboot, we will find the system exactly in the state in which it was at the time the rollback point was created.
Restoring from a system image
If it was previously created using the regular backup functionality, and the OS suddenly stopped loading, it's time to use this image by booting from the recovery disk. Having reached, as indicated above, to the menu of additional parameters, respectively, we select the second option.

We leave the image found by the system by default or select another one using the appropriate option in the first window. Click "Next".


Click "Finish".

We confirm the decision with the "Yes" button.

As with the rollback point, the system will be returned to the state it was in when the image was created.
Have a great day!
It makes sense to use the Windows 7 recovery disc when the OS has experienced a serious failure, as a result of which neither the OS itself nor the troubleshooting menu is loaded when pressing F8 during startup. Therefore, you need to make a recovery disk in advance, using standard Windows 7 tools or third-party offers for this. The latter may have even more extensive functionality, so you should also pay attention to the recording of the rescue disk.
How to create a Windows 7 rescue disk
In the OS in question, there is already a way to create a rescue disk that has sufficient functionality to solve most problems associated with booting or abnormal operation of the system. Consider the process in stages:
After a few minutes, the recording will complete and you will have a media with which you can solve most problems with Windows 7.
How to use the rescue disk
To boot using the installation or use the boot disk, you must first configure the BIOS accordingly. In general, the procedure is as follows:

Please note that modern computers and laptops are equipped with a more secure UEFI BIOS. To enter from the rescue disk, you will have to disable Secure Boot for this system. The ways to do this in stationary PCs and laptops are different, so it is better to contact the manufacturers of a particular device for help.
Restoring Windows 7 from disk
After the restart, the recovery application will open, where the first step is for the user to select the language for working with the program and click "Next". When you enter using the installation disk, to switch to this mode in the installation window, click on the "System Restore" link. After that, you can start working directly with the program:

Using the installation disk, you can usually get rid of many problems, for example, restore the Windows 7 bootloader. If it does not repair automatically, you can use the command line:

Using breakpoints
The second item will cause the program to try to return Windows 7 to a previous stable state. Windows 7 provides for the creation of saves of important settings using restore points. The OS tries to create them before any important changes - installing large applications, drivers, etc. To roll back the OS, do the following:

You need to be prepared for the fact that previously installed applications will disappear after a rollback to an earlier configuration and they will have to be installed again. You can see which installed programs can be lost after a rollback by clicking on the search for affected programs button.
Restoring a system from an image
Not always using the installation disk can make the system work again. In this case, the standard recovery disk tools offer to apply the Windows 7 image, the creation of which is the task of the user himself:

You can also select the image yourself, for which select the very last item in the selection window.
If you are not satisfied with the set of recovery tools that the standard Windows 7 boot disk provides, you can run other utilities.
 For example, MSDaRT 6.5 offers a good set of recovery tools for this OS.
Dr.Web LiveDisk is a rescue disk for treating and restoring the Windows operating system, in the case when the computer starts up with failures, or is not possible at all. Dr.Web LiveDisk was previously called Dr.Web Live CD (Dr.Web Live DVD) or Dr.Web Live USB.After booting the Dr.Web Live boot disk from a CD/DVD disk or from a bootable USB flash drive, you can perform the necessary actions to treat and restore the system. Booting from external media, the so-called Live CD, will help solve problems, cure the system, even if Windows fails to boot.
The Dr.Web LiveDisk boot disk, in addition to treating and restoring damaged system components, can be used to delete files that cannot be deleted, to copy important information to another disk (external hard drive, USB flash drive), if there is any doubt about the possibility of restoring Windows, to delete unnecessary files etc.
The Dr.Web Live Disk disaster recovery system is based on the Linux operating system.
You can download the Dr.Web LiveDisk rescue disk from the official website of the well-known Russian anti-virus company Dr.Web.
On the download page, in the "System Administrator's First Aid Kit" section, select the type of bootable media, depending on the configuration of your computer (the absence or presence of a CD / DVD drive):
- "Download to Burn to CD/DVD"
- "Download to burn to USB"
After clicking on the appropriate item, accept the terms of the license agreement. Immediately after that, the disk image will start loading in ISO format for a CD/DVD disk, or a special Dr.Web application in EXE format to create a bootable USB drive.
After burning Dr.Web LiveDisk to a USB flash drive or CD/DVD, you will have an emergency recovery disk to treat and restore the system, or to save user data if you cannot restore normal Windows operation.
Burning Dr.Web LiveDisk to CD/DVD
To burn a Dr.Web LiveDisk disk image to a CD or DVD, you need to use the system's disc burning tool, which is available in Windows 7, Windows 8, Windows 8.1 operating systems, or any disc burning program, for example, Ashampoo Burning Studio, ImgBurn, CDBurnerXP, etc.
In the appropriate application, select the Dr.Web LiveDisk CD image, and then burn it to an optical DVD or CD by selecting the "Burn image" option.
After burning, you will have a boot disk Dr.Web LiveCD.
Creating a bootable Dr.Web LiveDisk on a USB flash drive
Connect the flash drive to the computer by inserting the flash drive into the USB port. Run the Dr.Web LiveDisk USB file on your computer.
In the "Dr.Web LiveDisk" window, select the USB drive. It is recommended to check the box “Format drive before creating Dr.Web LiveDisk” in order to delete all data from the flash drive before recording.
After the process is completed, you will see a message in the application window stating that the rescue disk on the USB drive has been created. Click on the "Exit" button.
Loading Dr.Web LiveDisk on a computer
Set BIOS boot priority from USB or from CD/DVD drive, depending on what type of Dr.Web boot disk you are using. To be able to boot Dr.Web LiveDisk on computers with UEFI, you need to enable Legacy mode.
After loading the rescue disk, a window will open with a choice of boot options:
- Web LiveDisk - download rescue disk Doctor Web Life Disk
- Test memory - memory test using the Memtest86+ utility
- Boot from first hard disk - exit Dr.Web LiveDisk, boot the operating system from the hard disk
Switching between modes is carried out using the keyboard arrow keys.
By default, the DrWeb Live Disk window has an English interface language. To switch to Russian, press the "F2" key, then press the "↓" arrow key, and then press the "Enter" key.
Dr.Web LiveDisk working environment
After loading the rescue disk, a desktop with utilities will open, which has a windowed graphical interface.
Dr.Web LiveDisk contains the necessary utilities to solve the necessary tasks: Dr.Web CureIt! anti-virus scanner, registry editing tools, file managers for copying or deleting files, etc.
Some utilities are located on the desktop, other utilities can be launched from the system menu (the green button located in the lower left corner of the boot disk window).
Virus scan in Dr.Web LiveDisk
Immediately after downloading, Dr.Web CureIt! From the "License and Update" window, you can start a virus scan of your computer by clicking the "Continue" button, or you can click the "Exit" button to perform other tasks first.
In the Dr.Web CureIt! click on the "Start scan" button, or click on the "Select objects to scan" link to select additional objects.
More about working with Dr.Web CureIt! can be read.
Utilities in Dr.Web LiveDisk
Dr.Web LiveDisk Rescue Disk includes the following utilities as main components:
- Web CureIt - antivirus scanner for checking and treating viruses
- Web Updater - to get up-to-date databases and modules of Doctor Web anti-virus
- Web Registry Editor - registry editor
Doctor Web Live Disk includes auxiliary utilities:
- Midnight Commander - console text file manager
- File manager PCManFM - graphical file manager
- Firefox - Mozilla Firefox web browser
- MATE environment terminal - a terminal emulator for working with the command console
The boot disk has tools for changing the date and time, network connection settings. The disc contains a text editor, you can take a screenshot, adjust the monitor, keyboard.
Conclusion
The Dr.Web LiveDisk is used to disinfect an infected computer and restore the Windows operating system. With the help of a "live" disk, you can save user data from a system that has failed, which cannot be restored.


When your PC stops booting from its hard drive, you may find yourself in a stalemate if you haven't created a bootable rescue disk or device.
The recovery disc doesn't just start the PC, it also includes tools to help fix what's wrong with the system. Creating a recovery drive takes minutes.
Recovery disc options for all versions of Windows
There are various ways to create offline, emergency, bootable recovery disks. In the case of Windows 7 and 8, creating good recovery discs is quick and easy. Vista and XP also provide the means to create recovery discs, but the process will take a little more effort.
There are also numerous third-party boot disks - both paid and free - that work with all versions of Windows. The best of them have recovery and return to work capabilities that are far superior to native Windows tools.
Of course, you can boot your PC using the original Windows installation CDs or DVDs, and they provide some basic recovery tools. But most PCs now ship with installation files located in a dedicated partition on the hard drive. Such files will not be available unless you take the time to create a rescue boot disk. In other words, the recovery partition will be useless for you in an emergency in which the PC cannot be booted!
Even if you've taken the trouble to back up your system image, you may still need a rescue disk on hand to restore the most recent image.
In Part 1 (of which there are two) of this article, I'll cover a long series of emergency recovery discs for XP, Vista, Windows 7, and Windows 8. I'll start with the features of Windows 8 and work my way back to XP. I'll also start with the built-in Windows tools and then mention some excellent third party products - most of them are free!
Next week, in Part 2, you'll learn how to use these discs to boot your PC and how to get to the recovery tools they contain. I will also share some advanced tips and tricks.
Windows 8: Create Recovery Drive Tool
Windows 8.0 and 8.1 both include built-in Recovery Media Creator. This tool allows you to easily make a bootable recovery disk from a flash drive or external USB device. You can also create bootable CDs or DVDs using Windows 8.0 tools.
The standard recovery device (or CD/DVD) from Windows 8 contains a bootable recovery image - a simplified custom version of Windows 8 - that will start the PC. It also includes tools to repair and restore core Windows 8. It may also include tools to reset or update the system based on a system image, such as those provided by computer manufacturers.
If your PC contains a factory-installed recovery image available for use (usually in its own dedicated partition), Recovery Media Creator (RMC) can also add the image to the recovery boot disk. If necessary, you can completely restore your system exclusively from the recovery disc. (You can even put a custom recovery image on a recovery drive. I'll cover that in Part Two.)
The Create Recovery Disc tool is very easy to use. And here's how much:
- While in an administrator account, click Win+W(Windows flag key and W) or swipe to open the Charms panel.
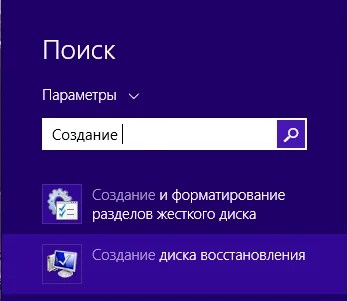
Figure 1. Enter "Creating...".
- Enter Create a recovery drive(recovery drive) in the search box (in Windows 8.0, use the Search, Settings box), then click the Create a recovery drive icon when it appears. The Recovery Drive tool opens (see Figure 2).
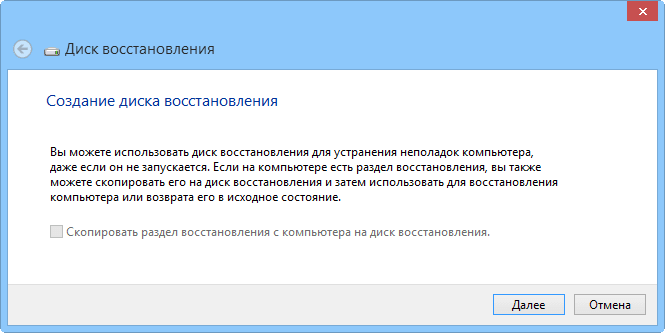
Figure 2. Creating a recovery drive in Windows 8 is a step-by-step wizard that is easy to use.
- If your system has a recovery partition, specify whether you want to include the recovery image on the boot or recovery disk you create.
If the checkbox Copy the recovery partition from the computer to the recovery drive(Copy the recovery partition from the PC to the recovery drive) is displayed in black and responds to clicks, you can burn the recovery image provided by the manufacturer of your PC to the recovery disk. Just check the box to enable this option.
If this checkbox is greyed out and doesn't respond to a click, then you obviously don't have the option to burn the factory image to a recovery drive. However, don't worry, the recovery disc you create will still contain a bootable, stripped-down Windows 8 recovery image, as well as a standard array of recovery tools.
- The Create Recovery Disk tool will then tell you how much disk space the recovery files and system image will take up, if its entry is checked. Insert a USB device into your PC that is at least the size you need. Please note that the device can be used only as a bootable recovery disk; everything else on the device will be deleted.
- If you have connected more than one USB device, RMC will show you a list of available devices. Select the one you want to make a recovery disk and click Next. The following dialog box will warn you that everything on the selected USB device will be overwritten. When you're ready, click Create.
- The recovery boot image, recovery and patch tools, and the factory system image (if selected) will be copied to the recovery drive. This may take several minutes.
- If you chose to copy the factory image, RMC will now give you the option to remove the OEM recovery partition from your hard drive to free up space. Delete or keep the section - you choose.
- Click Close.
- Remove the USB device and store it in a safe place.
For more information on the Create Recovery Disc tool included with Windows 8, visit the Microsoft support page - .
Windows 7: Create System Repair Disc tool
Windows 7 was the first Windows system to come with an automated tool for creating a bootable rescue CD or DVD. The tool doesn't do as much as the Windows 8 version - you can't add an OEM recovery image, for example - but it's just as easy to use. Just a few clicks and your recovery disc is ready!
And here's how much:

Figure 3. Backup and restore
- Insert a blank CD or DVD into your PC's optical burner.
- While in an administrator account, open the Backup and Restore application. Click Start > Control Panel > System and Security > Backup and Restore(Start > Control Panel > System and Security > Backup and Restore).
- On the left side of the window, click Create System Recovery Disc(Create a system repair disc).
- Confirm if the optical drive is selected correctly. Click Create disk(Create disc) (see Figure 4), and follow the suggested steps.
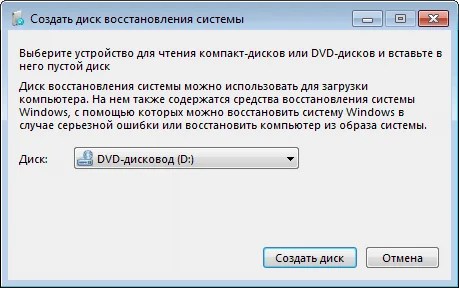
Figure 4: The Create System Repair Disc tool included with Windows 7 lets you create a bootable recovery CD or DVD with just a few clicks
Note: If Windows 7 cannot find the files it needs, it will prompt you to insert the Windows installation disc.
For more information, Microsoft offers a video tutorial on its Windows 7 page.
Vista: Enable and use Create Recovery Disk
The beta version of Vista SP1 came with a great utility Create Recovery Disk (Create a recovery disk) (recdisc.exe) (see figure 5). But for reasons known only to Microsoft, the utility was cut in all manufactured versions. File recdisc.exe still exists in Vista, but it's not functional!
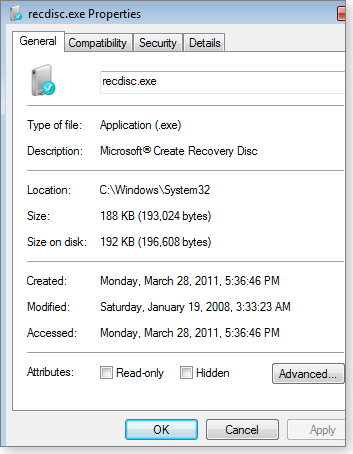
Figure 5. Remaining in Vista, recdisc.exe does not work by default, but with a little effort it can be made useful.
Nevertheless, enthusiasts liked the working version of the utility. So they cooked up the files and made them available for download - along with how-to's. This is not an officially sanctioned solution, but it has been openly discussed and recommended by Microsoft MVP on the Microsoft Answers forum. For example, see the Microsoft Answers topic " " (Creating a System Repair Disc for Windows Vista).
Receive recdisk.exe not difficult, but the steps are too long to detail here. A thread on a third party "VistaForums" forum called " " (How to create a Vista recovery disc) has the best how-to instructions that I know of. The only thing I would add to the how-to guide is a standard note: before making any system changes, make a backup.
If all this is beyond your ability, try using a third party boot disk as described below.
Windows XP: 3rd party tool required
XP does not have the built-in ability to create a bootable rescue disk.
For years, the best alternative has been UBCD4Win(stands for "Ultimate Boot CD for Windows"). But creating that boot disk is a long and complicated process that requires some technical skill and access to a full XP installation CD.
UBCD4Win is still in use, and still free, but I don't recommend it anymore. Now there is a better remedy.
Hiren's BootCD includes an amazing array of free tools - about 100 in total ().
The CD itself is based on Linux, but you don't need to know Linux; The text view application has simple menus for selecting the tools you will launch. (See figure 6.)
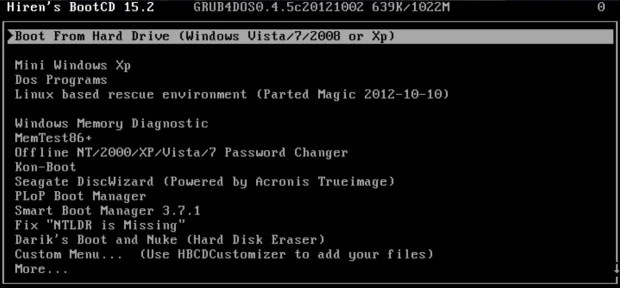
Figure 6. Hiren's BootCD includes an array of approximately 100 free repair and repair software.
Oddly enough, Hiren's BootCD also contains a stripped-down "Mini XP" based on the gray system. It is intended as a disaster recovery tool for use by owners of licensed, paid copies of XP - not as a replacement for purchasing a license or a standard installation of XP. Within its limited scope, it works great. When your regular (licensed and paid) Windows XP system won't boot, MiniXP with Hiren's BootCD can help you get it up and running again.
You can get Hiren's BootCD on his . But finding a working download link can be tricky - the page contains several distracting alternative download links for inappropriate tools.

Figure 7. Actual download link for Hiren's BootCD
All versions of Windows: free recovery discs
If the built-in Windows tools aren't available or don't work for you, there are plenty of free alternative bootable recovery discs. Like Hiren's BootCD, most of them are based on Linux and come with a wide range of preconfigured maintenance and repair tools.
Here are four of the best:
- Trinity Rescue Kit(free or voluntarily paid) - specially designed for recovery operations on Windows machines, but can also be used for Linux recovery issues. Here, a simple keyboard-text menu system is used by default, and a command line is also available in Linux.
- Ultimate Boot CD(free; ) - contains more than 100 easy-to-use repair and diagnostic tools, interface with keyboard and text menu.
- SystemRescueCd(free) - allows the use of basic recovery tools in a hybrid text-graphic Linux environment.
- Ubuntu Rescue Remix(free; , offers a range of open source data recovery and technical forensics tools. However, this product relies almost entirely on the Linux command line, which can make it difficult for people who are used to mouse interfaces .
Automated Easy Recovery Essentials
Instruments Easy Recovery Essentials from NeoSmart Technologies deserve a separate discussion. They are favorably mentioned in almost every Internet forum dedicated to restoring Windows.
This is partly because the tools are pretty good and can work on all versions of Windows - XP, Vista, Win7, Win8, Windows Server.
But the popularity of these tools grew in part because they were free. While many online discussion forums still list NeoSmart drives as free, they are now commercial products. US pricing starts at $20 for Easy Recovery Essentials home edition and ends at $75 for Server edition. You can find a list of all versions and prices for .
For a really modest price, you get a bootable iso image that you can download and burn to a CD, DVD, or USB device. Once launched, Easy Recovery Essentials enables highly automated recovery capabilities. In fact, many complex recovery operations can be launched with one simple click without requiring any further user input.
To get an idea of how easy it is to use these tools, check out the NeoSmart demo video. NeoSmart also offers a money back guarantee.
Which recovery tool is right for you?
I suggest you, if possible, start with the tools available in Windows. They handle most common tasks and maybe everything you need. They provide the performance of familiar operations, as well as a few unusual ones. Hey, you already paid for them!
If the Windows tools don't provide what you need, try free bootable Linux-based recovery discs. Although the Linux environment may be unfamiliar to most Windows users - especially the Linux command line tools - there is usually enough documentation to help you get past any rough edges.
If neither the built-in Windows tools nor the free Linux-based tools work for you, commercial tools may be ideal. NeoSmart's Easy Recovery Essentials tools in particular work well, are very easy to use, and come with a money-back guarantee.
Next week: you'll learn how to use these recovery discs to boot your computer and access the tools they contain. I will also offer some additional tips and tricks. Stay with us!
Found a typo? Select and press Ctrl + Enter
Creating a Windows rescue disk is somewhat different from writing the original image of the operating system, for example, to a USB flash drive. The rescue disk, unlike the installation disk, offers a number of options for repairing Windows without having to completely reinstall it.
Why you need a Windows 10 Rescue Disk
Windows Emergency Recovery Media performs a number of functions:
- resets the Windows system to the "factory" state (it is necessary for the OS to start);
- allows you to restore Windows from an image;
- working on system recovery using the command line (requires input and confirmation of commands by the user), including the restoration of the Windows 10 bootloader;
- performs a “rollback” of Windows to earlier recovery marks (OS startup is not required).
The ability to reinstall the system depends on whether you copied all Windows 10 system files when writing the emergency recovery flash drive. If not, forget about this option. Use a regular installation flash drive, which, apart from a clean copy of Windows (including the Windows setup.exe program), contains nothing.
Practical Methods for Creating a Windows 10 Rescue Disk
Creating a Windows 10 Rescue Disk uses third-party applications, the built-in Windows Rescue Disk Wizard, and the WBAdmin component.
Burning Windows 10 Rescue Disk Using Control Panel
You need administrator rights to create a Windows 10 rescue disk. Log out of the current user session and log in to the administrator account.
- Go to the "Control Panel", and in it - to the "Recovery" section.
Enter Windows 10 Recovery Mode to Create a Rescue Disk (System Recovery Disk)
- Click on the "Create a recovery drive" link.
Click "Create a Recovery Disk" to access the Windows 10 Recovery Disk tool
- Check the copying of Windows system files - this will simplify and speed up the procedure for resetting and restoring the OS. For the full version of Windows 10 System Recovery Disk, you need a flash drive with a capacity of 8 GB or more.
When creating a recovery drive, it is advisable to copy critical Windows 10 system files
- Make sure the flash drive is connected. When creating a rescue disk, Windows 10 will delete all your files from it - make sure that they are copied to reliable storage, for example, to an external SSD drive.
Select from the available external devices the one on which the recovery disk will be created
- Confirm the Windows 10 Rescue Disk Burn and wait for the burn to finish.
After the recovery drive is finished, press the exit key from the Windows 10 wizard
At the first failure when loading Windows 10, you can check the recorded recovery flash drive in action. If the cause of the failure is damage to Windows 10 system files, then the necessary steps will be automatically taken to restore them, after which the download will be successful.
Remember that a recovery disk without core system files will allow you to boot if the Windows bootloader is corrupted - to gain control over valuable files and folders. But a serious repair of Windows 10 without system files or a Windows 10 image is impossible.
If problems with starting the OS using the emergency recovery disk are not resolved, then you should use a regular Windows installation flash drive recorded using the Media Creation Tool or third-party programs such as Rufus.
Video: creating a Windows 10 recovery flash drive without an image
Working with Windows 10 Recovery Discs in WBAdmin
WBAdmin is a Windows component that only works in the Command Prompt application. But it does not start from the standard Command Prompt application, the shortcut of which is located in the Standard folder of the Windows main menu.
Sometimes "Windows Command Prompt" is referred to as the command console (or interpreter), which is why WBAdmin is a console (rather than a graphical, windowed) Windows application.
For the WBAdmin tool to work, you need an enhanced version of the Command Prompt, a Windows PowerShell application running as an administrator.
Without administrator rights, the WBAdmin component will not work.
In WBAdmin, it is advisable to create not just a rescue disk, but a complete copy of an already installed (not to be confused with the original, installation image) Windows 10 system in the form of an image. Do the following.
- Start the Windows PowerShell component.
Type the word PowerShell in the menu search and find the extended Windows command line option
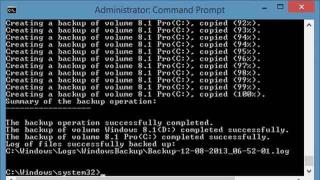
- Type wbAdmin start backup -backupTarget:D: -include:C: -allCritical -quiet. This command will create a copy of Windows 10 on the C: drive as an image file and then move it to the D: drive. This will copy all Windows 10 updates, including critical ones.
Windows 10 is not copied as source, but already installed
- Wait until Windows 10 is copied to a separate ISO file.
Wait until Windows 10 copy is 100% complete
After the Windows 10 migration is complete, the image file will be placed in the automatically created "WindowsImageBackup" folder. In this case, the folder with the ISO image will be located immediately on the D: drive.
Other ways to create a Windows 10 recovery drive
Before moving on to third-party applications, it makes sense to use the built-in Windows backup tool, which has moved into the "top ten" from the "seven".
Working with Windows 10 Rescue Disks in the Backup Wizard
- Find in the main menu of Windows 10 and launch "Backup and Restore".
Backup using standard Windows tools allows you to create a copy of drive C:
- Enter the "System Image Backup" submenu.
Select "System Image Backup"
- Run System Image Creation.
The Windows 10 Backup Wizard will help you copy all data from drive C:
- Select the option to keep a Windows 10 backup.
Save a copy of Windows 10 on your hard drive to copy it from there to another drive
- Select the disks whose contents will be "packed" into the created copy of the data.
At a minimum, the copy must contain drive C:
- Click the start archiving button. Copying takes from 20 minutes, but with a large amount of data it can take up to an hour or more.
- After creating the copy, choose whether you need a Windows Recovery Disk.
It is advisable to create a rescue disk: it will speed up the restoration of Windows 10 settings
- First of all, Windows 10 offers to burn a rescue disk to a DVD.
Select the desired drive (if there is more than one)
- Insert a blank disc and press the burn button. Wait until the Windows 10 Rescue Disk is created.
Option to write archive with Windows 10 using UltraISO
If the last three steps from the previous instructions do not suit you and you refuse to create a recovery disc on DVD, use the C: drive image recording using third-party programs, such as UltraISO.
Microsoft proprietary utilities for writing a copy of drive C: to a USB flash drive or DVDs are not suitable for this purpose. The same applies to the WinSetupFromUSB application - it works with operating system sources, and does not copy data archives.
The UltraISO application is versatile, like its counterparts Nero and Acronis, but less cumbersome, which is why many users prefer it. Its other advantage is that a large number of recording settings are collected and organized in a minimal window interface, which allows you to select several key parameters in a minute and burn the desired media without wasting time.
- Launch UltraISO and drag the C: drive to the upcoming burning area. Adding files may take 10 minutes or more, depending on how busy your C: drive is. This will create a list of files copied to the image.
Select drive C: to create an image in UltraISO
- Confirm the request to add the contents of drive C: to the image.
UltraISO asks for confirmation to add disk files to the list
- Wait while UltraISO creates a list of files to copy.
Formation of a list of files transferred to a copy of drive C:
- Select the menu command "File - Save As ..." and specify a location to save the image.
Start the process of saving files to an image
- Confirm the prompt to save the ISO file.
Wait for the ISO image to be written to the specified location
- Check that the C: drive image is written to the correct drive.
Disk image C: can be tens of gigabytes
- Open the newly created image in UltraISO.
UltraISO will display all folders and files packaged in an ISO image
- Connect a flash drive or memory card and give the command "Boot - Burn hard disk image". The size of the memory card must be larger than the size of the C: disk image.
Make sure there is no critical data on external media
- When recording an image, all data from the external media will be erased. Therefore, in order not to lose an important archive, delete work documents, etc., carefully check whether you have chosen the right flash drive for recording.
Carefully review the information about the recorded image
- Confirm writing the image to the flash drive.
If the flash drive did not contain valuable files, confirm the UltraISO write request
The UltraISO application will clean the flash drive and write the C: drive image to it.
Burning a Windows 10 Recovery Disc from a Clean Image
If a full "backup" of the C: drive does not suit you, then do the following.
- Exclude pp. 1-6 from the previous instructions.
- Open a "clean" ISO file with a Windows distribution in UltraISO using the "File - Open" command.
- Give the command "Boot - Burn Hard Disk Image".
- Select USB-HDD+ recording method and click start recording button.
The Windows 10 image will be written. However, there will be nothing to restore, except for the OS itself - there are no files on the flash drive that are not directly related to Windows. This means that you will have to reinstall programs, reconfigure the OS and copy documents from storage disks to the old folders yourself.
Saving the image may take longer if the ISO file being created is too large and the image itself is being downloaded to an external drive. It is recommended to use high-performance PCs or tablets and high-speed external drives that support USB 3.0 / 3.1 - this will significantly speed up the recording of images containing tens and hundreds of gigabytes of data. If the PC or tablet is weak, and the external drive is large (a few terabytes), then the UltraISO application may “freeze”, and Windows will block the application control until it loads information about the status and suitability of the free space of the external drive to start recording.
Now you can proceed to restore Windows 10 from a USB flash drive. This does not reinstall the OS, but fixes all sorts of problems starting and running Windows.
If necessary, a recovery disk written as a clone of the C: partition (with everything that was on this partition before the crash of Windows) completely recreates all folders and files: all installed third-party applications, system components and user settings, automatically loading any lost data, up to documents in user folders and Windows registry entries at the time of the last backup. This distinguishes such a rescue disk from a simple installation media, on which, apart from a "fresh" and "clean" copy of Windows, there is nothing.
Video: how to burn a flash drive with a "clean" image of Windows 10 on Rufus
Restoring Windows 10 using a rescue flash drive
The Windows 10 Rescue Disk will allow you to choose advanced system recovery settings when you boot your PC.
The most versatile solutions are:
- restore Windows 10 from an image;
- fix problems when loading the OS.
These decisions will be discussed. Other moves are minor:
- "Rollback" Windows on restore points;
- revert to a previous build or version of Windows.
How to set up boot from a USB flash drive in UEFI
All modern PC motherboards and tablet monoboards are mostly not equipped with a BIOS, but with an EFI program.
First of all, set the priority of booting a PC or tablet from a USB flash drive. There is no need to navigate through any additional sub-menus - EFI controls are done with the mouse and setup is faster.

Restoring Windows 10 from an image
The highest priority from the point of view of "rolling back" Windows 10 is precisely restoring from a previously made image - for example, from a full copy of the C: drive, made by the UltraISO program according to the instructions above. This restores all Windows files and settings along with the system.
In older versions of Windows, such as XP, there was a file and OS settings transfer wizard. Restoring the OS from a clone of drive C: - this is the preservation and transfer of files and settings from a PC to other PCs.
Insert your Windows 10 emergency flash drive.
- Run the Windows Setup program from the flash drive and select System Restore.

Confirm the Windows 10 recovery prompt
When restarting, a "rollback" will be performed to the system, programs and data restore point made earlier. After that, continue working with Windows 10.
Video: recovering Windows from a rescue flash drive
Mouse and/or keyboard not working after Windows 10 restore
Not only the mouse and keyboard can fail, but also USB ports, other external devices connected via USB / COM ports. Often the mouse and keyboard fail not simultaneously, but one by one.
Do the following (some steps can be omitted, depending on your ability).
- Connect a mouse and/or keyboard to another USB port, use wireless protocols - USB Nano Receiver or Bluetooth (external module or built-in Bluetooth network card). The mouse and keyboard must support the selected technologies.
- Update the chipset drivers of your PC, laptop or tablet. Use the latest driver package. It is advisable to install and try the drivers separately, rather than using the "express install", as is often the case in stationary PCs with a full-size (full-factory) motherboard.
- Run the UEFI firmware and test the keyboard and mouse in it. The BIOS checks only the keyboard.
- The mouse can be checked by running the installation disk not of Windows 10, but by getting a disk with Windows XP, which contains the Magic Partition program - naturally, you don’t need to touch disk partitions, you only need to check the mouse pointer (or the touchpad sensor if you don’t use a mouse ). If the mouse works, remove the disk or USB flash drive with Windows XP and restart the PC. This is a rather old method - but it makes sense to use it.
- If you have a detachable keyboard and mouse - modern mice and keyboards use a USB-mini/microUSB cable - replace the cable.
- Check if your antivirus (the Defender built into Windows or a third-party one, such as Kaspersky) is blocking the keyboard. Often the keyboard is temporarily blocked - in order to prevent the use of the input data by spyware and "trojans" equipped with a keylogger function ("keyboard recorder" that collects and sends data to intruders).
- Get rid of device drivers and gadgets you no longer have. Reinstall device drivers that still work for you.
- If you have a mouse and keyboard connected via PS / 2 - use PS2-USB adapters, they include an interface converter. Connect a mouse and keyboard through them.
- Use the drivers from the Windows 8 installation disk - here the "eight" is compatible with the "ten".
- Reinstall Windows 10 from scratch if all else fails. Before that, gain access to valuable files on the C: drive, for example, by moving your HDD or SSD drive to another PC or laptop and copying them to other drives.
Unlike simply burning an installation flash drive, which every newcomer who bought his first PC yesterday can handle, burning a rescue disk is a slightly more difficult task. But in the end, you will cope with it and get a good tool that allows you to fix many errors and damage to system files without completely reinstalling the OS. And this is a very useful feature!