The correct functioning of the Windows 7 OS depends on the registry files and information it contains. If they are removed or damaged, the computer will malfunction. You should also expect problems such as incorrect work desired programs or the inability to download them, slow work PC. It is possible to eliminate such a problem by returning the system to a previous state. The system restore procedure requires the use of so-called restore points. This is a snapshot of the computer's most important files for the functioning of the system.
Restoring the operating system to previous state allows you to return the computer to the state when it functioned normally. Violations can be provoked by the removal of individual system files, which are necessary for the operation of a particular program or solution specific tasks. The reasons for this may be:
Provided that a computer is used to work with accounting or games in computer games, complete procedure OS reinstallation is not acceptable. The situation can be further complicated by the fact that a particular PC is the only source of data and there are no backups. Then recovery will be optimal solution Plus, you can do it yourself.

In its essence, the procedure is protective, since it allows you to save important information. There are several types of returning the OS to its usual mode of operation:
- V automatic mode("System protection");
- by loading the last favorable settings;
- preliminary manual backup.
Typically, the Windows operating system creates restore points on a weekly basis. It also happens at the time of installing or updating the OS. The seventh version provides the "System Protection" function, which works by default. However, its use is regulated by the settings and is necessary only for local system drives. The rest is up to the user to set up.
Note! To restore the operation of the operating system, a special one is created, which is the engine of the return procedure.
It acts as a carrier of registry settings and other information used by Windows 7. The functioning of the point is similar to the game checkpoint, if the OS fails, it provokes a restart of the PC.
Video - How to create a Windows 7 restore point
Automatic mode for creating restore points
operating room Windows system 7 automatically saves working condition. In most cases, this happens before installation. critical updates, large-scale changes in the registry, driver updates, complex software update or other operations that significantly affect the functioning of the OS.
There are two ways to automatically type:
- full automatic - created without user notification;
- semi-automatic - the user enters the name of the point on his own every time the system is started.

Such activity of the computer allows you to use ready-made recovery points at any time, which have already been stored in memory for a certain period of time. But if the OS is damaged, when there are no relatively recent saves, difficulties can arise, since old saves require restoring the entire system and reinstalling all programs. It takes too much time and does not justify the effort expended. If the default is to disable OS updates, which is done by users with purpose, you will need to apply the manual setting option.
Manual mode for creating restore points: method 1
Users are given the opportunity to create their own restore points, for which standard windows tools. To perform this operation, you need to follow a few simple steps:
- Go to the Start menu on your computer and select Control Panel.

- Select "System" from the listed icons.

- After the transition, you will see information about the operating system of the computer. On the left panel, select System Protection.

- We are interested in the "Options" category, where you need to select the disk that needs to be restored. Next, let's move on to the settings.

- Select the desired recovery option. You can turn them off if necessary. Click "Apply" to save your changes.

- As soon as the parameters are configured, you can start creating a point. To do this, in the System Protection window, click on the button located at the bottom right.

- A window will pop up in front of the user, allowing you to create a restore point yourself. A name is required for identification purposes.

- When the name is entered, click on the "Create" button. Next, the user will need to wait for some time, which is necessary to create a new point.

Manual creation, method 2
The procedure is also performed according to a different method. Suitable for those users who have not disabled the automatic creation of restore points. There is even less action here.

Note! If there were no previously created restore points, the procedure will not be completed.
The computer will act on those points that were created automatically. It also provides the ability to select the point that suits the user. Typically, this is the last saved version.
If there are any problems in the operating system that prevent normal operation with a computer, most users simply reinstall Windows again. It is much easier to roll back (restore) Windows to some previous state, when everything worked correctly. It takes a maximum of 20 minutes - and you get a fully working and customized copy of the OS. This article describes how to create a point for later Windows Recovery 7.
Recovery Benefits
Reinstallation is a good option, but it is quite long. After all, you need to not only reinstall your OS, but also install all the necessary software and drivers on it. If you don't have storage media on which you can temporarily dump all the important information, this can be a big problem.
The created Windows 7 restore point avoids such problems. If your system has been damaged by viruses, if you have connected incorrect drivers or you installed some program incorrectly - you just need to start the rollback process.
In order to use this feature, users need to know how to create a system restore point. About this and will be discussed later in the guide.
Create restore points automatically
Your operating system automatically saves working Windows states. As a rule, this happens before installing critical updates, complex software With big amount libraries, major changes in the registry, updating drivers, and so on. 
You can use automatically created points at any time, which are stored for some time. However, if your operating system has been damaged, and there are no relatively recent saves, this is a rather serious nuisance. Rolling back for a whole month, and then reinstalling all the programs is a long process.
Most often similar problem occurs for those users who for some reason have disabled automatic updates systems. In this case, it is recommended that you know how to create a restore point for your OS.
Creating a cusp manually
You can easily create your own restore points using standard Windows Tools. In order to do this, follow a few steps in the presented step-by-step instructions:

Wait a while until new point recovery will be created.
What to do if there are no rollback points
If your Windows system files have been corrupted and you don't have any return points, you can try using the "sfc /scannow" command:

This command will check all system Windows files and, if any of them are damaged or missing, will replace them with working ones.
Today we will figure out how to create a windows 7 restore point, for subsequent system recovery as a result of a failure. Unfortunately, there are situations after which your computer does not boot or does not boot correctly. The fastest and least problematic option to restore work is to use the system rollback to a stable version.
You can break the system different ways, but the most common are software installation, driver installation, incorrect windows update. It is these actions, in 90% of cases, that lead, as well as to the failure of the operating system. But it's okay if you always have fresh system restore points.
In the article, we will figure out how to make restore points and how to use them to restore the system in case of a failure. If the recommendations below do not help you, you can always contact the professionals from hardmaster.info to recover your data.
Create a system restore point
To create a system restore point, open the properties of the computer
open item " System protection”
 In the window that opens, click the " Create”
 enter the name of the restore point, you can not specify the date and time in the name, they will be set automatically. After entering the name, press " Create”
 Restore point creation will start, wait for the process to complete
 if everything went well you will see a message
 after that, calmly perform experimental actions on your computer, in case of problems it will be possible to restore a working version of the system.
Restoring the system from a restore point
And now let's imagine that your system refused to work correctly. If the computer does not boot at all, you can use the disk to Windows installation 7. While loading the disc, select “ System Restore” and follow the path of choosing the operating system and the created restore point.
If Windows boots up but does not work correctly, you can use standard system recovery tools. To do this, open the “System Properties” window and go to the “System Protection” tab (windows are described above in the section on creating a system restore point).
In the window, press the button Recovery“, then press “ Further”
 select the previously created system restore point (or the latest one) and click “ Further”
 In the window that appears, click " Ready”
 and once again we agree with what we do
 after which the system restore will start. During recovery, the computer will restart without your participation. After a successful reboot, you will see a message

Ready! The system has been restored and is back in working order. I would like to add that before each system update, restore points are created automatically. So if the system update led to a breakdown, you can always use the recovery.
Today we will consider a hot topic - why the computer slows down and how to get rid of this problem quickly. We all know that viruses that are installed incorrectly or remote programs, modification of registry branches and replacement of system files. Every user is faced with this - all thanks to the features of Windows.
In order to save time, the creators of "windows" provided users with system recovery using a special backup of the main system parameters. That is, if in this moment the computer is working fine and there are absolutely no problems - it makes sense to protect yourself in the future and create a Windows 7 restore point.
Preparation
It is also important to remember that all changes made after the process of creating a restore point will be lost if you return to it. In this case, the downloaded music, films and other content will be in place, but the program settings or new installations will be canceled. So if you decide to roll back the system in the future, then you need to save them in advance.
System Restore - special module, which is present in all Windows since XP. It is specifically designed to be able to roll back the system back to a certain point. That is, it is a kind of time machine, which, however, only works in the opposite direction.
Recovery using standard Windows tools
1. Click right click on "My Computer", then in the window that appears on the left, click " Extra options systems" - "System protection".


2. Click "Settings" and moving the slider to the right, as shown in the figures above, select the amount of space on your hard drive that you do not mind spending on a backup point. I have 6 gigabytes.
3. Now repeat step 1 again and click "Create" - enter the date or name of the point - "OK". After 10-15 minutes, a notification window will pop up indicating the successful completion of the process. We click "Close". This will create a backup Windows 7 System Restore Point.
Now, when the computer will not work well, and the usual cleaning of the registry and removal of garbage can not cope with the task - do the following:
- close all programs and save the necessary changes,
- in the start menu at the bottom there is a search box where you need to enter the word "Recovery",
- a second later, at the top of the results, click "System Restore".


If control points there will be several recovery - choose the appropriate one. Click next and agree to the reboot process after the process is over:


Recovery using the MultiBoot utility
Especially for those who can not work standard means As an alternative, I suggest using free program multiboot.
To do this, just download the archive with the program and run executable file Right-click MultiBoot.exe and click "Run as administrator".
A window for managing the program will open to our attention.

Check the boxes in the same way as shown in the picture.
With the active item "Restore Windows bootloader Vista /7" command will be available on all drives to restore the main boot record MBR.
If you have Windows XP in parallel as a second operating system, check the box next to "Add an entry to the boot menu for Windows XP". Thus, this version of Windows will also be taken into account.
The last option allows you to set the delay time before starting the selected system in seconds. Choose at your discretion. After setting up the program, click Run.
The "Advanced" tab allows you to download backup points saved to a file with the extension "bcd". Before using this program, we strongly recommend that you read the instructions.
Restore points allow you to restore operating system settings and older versions files in the event of a software failure. IN this material we will talk about how to create a restore point in Windows 7 and how to use this point to restore the system.
In order to create a restore point in Windows 7, you must first open the system properties window. This can be done in several ways. For example, if you have a "Computer" icon on your desktop, you can simply right-click on it and select the "Properties" menu item.
You can also open the system properties through the Control Panel. To do this, go to the path "Start - Control Panel - System and Security - System".

Well, or you can use the most in a simple way by pressing the key combination Windows + Pause / Break.

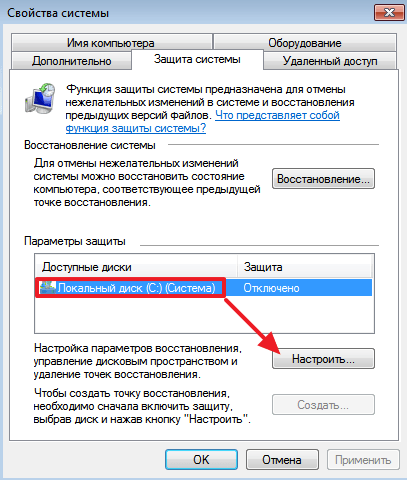
After you have opened the system properties window, you need to go to the "System Protection" section. To do this, click on the appropriate link in the left part of the window.

As a result, you will see a small window with system protection settings. There will be a list of disks, opposite which it will be indicated for which disks protection is enabled and for which not. If for your system disk(usually this is the C: drive) protection is enabled, then you need to select it and click on the "Create" button

After that, you just need to enter a name for created point recovery and click on the "Create" button again. After that, the Windows 7 operating system will begin the process of creating a restore point.

If system disk protection is disabled, you must first enable it. To do this, select the disk and click on the "Configure" button.
After that, activate the function "Restore system settings and previous versions files" and specify what percentage of the disk you want to allocate for creating Windows 7 restore points. After making these settings, close the window by clicking on the "Ok" button and you can start creating a restore point.

Please note that in the same window you can delete previously created restore points. For this there is separate button"Delete".

Restoring a Windows 7 system from a previously created point
In order to restore the Windows 7 system using a previously created restore point, you need to open the Control Panel and use the search to find the "Recovery" section.

In the "Recovery" section, you need to click on the "Start System Restore" button.


If Windows 7 does not boot, then you can start recovery using installation disk. To do this, boot from the installation Windows disk 7, select the language and go to System Restore.

After that select operating system Windows 7 and click on the "Next" button.


And follow the instructions that will appear on the screen.

In this way, you can restore your Windows 7 system from a previously created restore point even if Windows 7 refuses to start.