This article describes how to reinstall the Windows operating system.
The most effective and guaranteed way to get rid of viruses and other problems in " Windows"Is to reinstall the operating system itself.
Reinstallation procedure operating system is that the user needs to "demolish" the old " Windows XP, 7, 8, 10"And install a new one.
In fact, this is quite simple to do. And you will be convinced of this by reading our instructions below.
Remove the old Windows and install the new one
The reinstallation process is as follows:
- First we create installation disc or a USB flash drive with which we will reinstall the system.
- Across " BIOS»Enter on boot disk or a USB flash drive and remove the old system
- Then, from scratch, install a new " Windows».
So let's get started:
- To be able to freely remove the old Windows and install a new one, we need to create an installation disk or USB flash drive. From such a disk, you can boot a computer, and also install from it “ Windows».
- If you are more comfortable using the disc, prepare a blank DVD R / RW. To use a flash drive any will do external storage, whose volume must exceed 5 GB.
- To create an installation disk / flash drive, use the program " UltraISO". Download on this link.
- Next, you will need, in fact, the installation version itself " Windows". Use pirate free funds installations " Windows»We do not recommend, as this can cause a lot of problems both with the operation of the operating system and with the law. Download official versions « Windows»You can (scroll down the page).
- When you download everything you need and install the specified program, start it. In the program window go to “ Bootstrapping-Burn Image hard disk-Disk Drive". Next, enter the letter of the flash drive or installation disk. Specify " Image file", That is, the path to the downloaded installation version « Windows", Press " Format", And then - on" Start».
- When the installation disk is ready, let's proceed directly to the process of reinstalling the system " Windows».
- Now we need through " BIOS»Boot the computer and reinstall the system. Make sure the disc is inserted into the drive, or the flash drive is connected to the computer.
- We turn on the computer and immediately press the key to enter the " BIOS". For this, there are different keys depending on your motherboard model. If you do not know exactly which key it is, then use each time you turn on the computer in turn: Del, F2, F8, F1.
- After that, you will enter " BIOS". Each motherboard model may have its own version " BIOS»With its own specific design and menu. But in all cases, the principle of operation in " BIOS"Will be the same for us. We need to assign our installation disk / stick as the first boot device... To do this, opposite the item " First Boot Device »You need to select the appropriate device that your computer sees - a USB flash drive or a disk in the drive. After that, click on F10(saves settings and reboots the computer).
- Next, the process of restarting the computer and downloading the necessary drivers will follow.

Remove the old "Windows" and install the new one
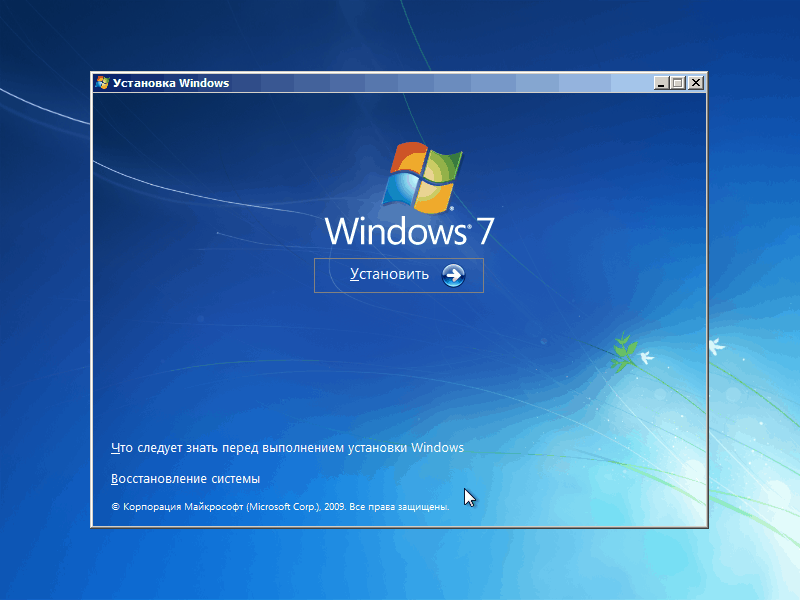
- So, now you can delete the old " Windows"And install a new one. We are waiting until the installer window appears on the screen " Windows". First, let's set up the languages as shown in the screenshot and click on “ Further».

Remove the old "Windows" and install the new one
- Next, click on " Install»

Remove the old "Windows" and install the new one
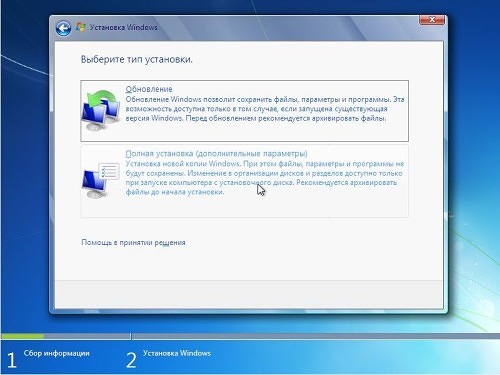
- In a new window, you need to select the installation options. Since we want to demolish the old Windows, click on the item " Complete installation».

Remove the old "Windows" and install the new one
- Now we select the partition on the computer where the " Windows". As a rule, this is the disk " C"- on the monitor it will be indicated as" Section 1". We select this section, at the bottom we click on " Settings", Then - on" Format", And then - on" Further". The old operating system will be completely removed and the installation process of the previously downloaded by us " Windows».

Remove the old "Windows" and install the new one

Remove the old "Windows" and install the new one
- Depending on the power of your computer, you will have to wait 20 minutes to 1 hour for the installation to complete. Now you need to make the final touches. In a new window, enter your name and computer name.

Remove the old "Windows" and install the new one
- Then, if you wish, you can set a password so that later in your " Windows"Only you could enter. You can skip this step, leaving the fields empty, and click on " Further».

Remove the old "Windows" and install the new one
- Now you need to enter license key since we bought Windows"And abandoned the pirated version.

Remove the old "Windows" and install the new one
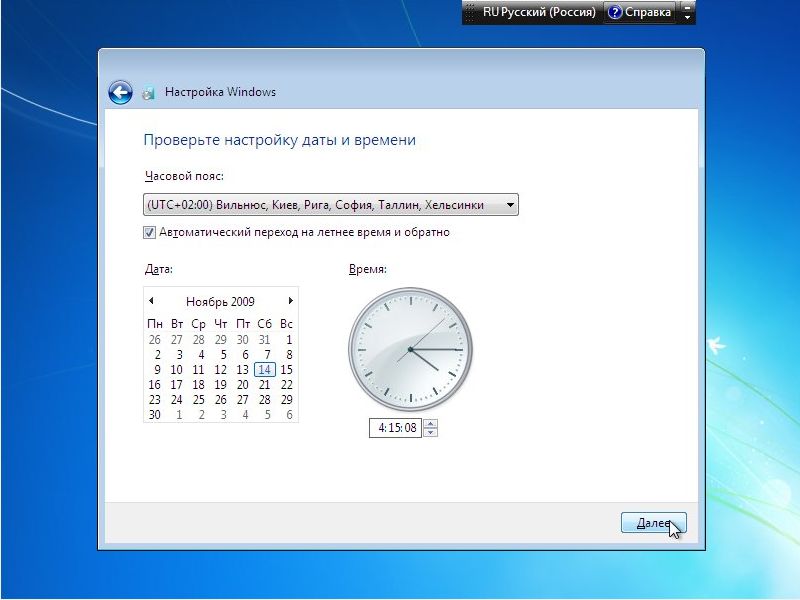
- As a result, set the time and date according to your time zone and click on " Further»

Remove the old "Windows" and install the new one
- That's all. A simple procedure for reinstalling the system " Windows»Will be completed and you will find yourself on Desktop... Next, we recommend that you immediately start installing programs and drivers. Start with antiviruses, video card drivers, and other devices.
Video: How to demolish (uninstall) "Windows 8" on a laptop and install "Windows 7"?
To remove the operating system, first of all, we need to install the BIOS boot from installation media... It is worth focusing on the fact that in the installation discs of the operating room Windows systems there is a built-in formatter, during the installation process.
How changing the boot priority may look in the BIOS is shown below in the screenshots.

First Boot Device Is the first tested boot device, Second Boot Device Is the second boot device, i.e. if the first one is not found, then it will be loaded by priority. And so on by analogy.
 BIOS flavors great amount and it is not possible to give examples for every existing BIOS. The main thing you should know about BIOS is button to enter into it. It can be F2, F8, F12, or Del. See hints on boot or reboot. She can be spied in leadership To motherboard.
In other words, your motherboard has a built-in BIOS, each individual BIOS has its own entry keys, but often they match up... When you turn on the computer, you just need to be in time before start Windows push the button(maybe even more than once) entering the BIOS, if you did not have time to reboot.
In more modern BIOSes, you can switch the boot priority by pressing a specific key, most often this is the F8, F11 key (but it is better to look at the manual for the motherboard or search the Internet). Also, when you turn on and restart, there are prompts (for example BBS POPUP). 
After changing the settings in the BIOS, remember to save settings otherwise you will have to do everything again. A prompt to save the settings appears before exiting the BIOS 
When you need to uninstall the system
First, if the operating system has stopped working adequately, cause this could be: deletion important system files, sloppy program work, focused harm operating system viruses. Secondly, it is the user's desire to change the operating system due to inconvenience or the desire to sell the computer completely empty.
How to remove windows using windows 7, 8, 10 drive
By the process of deletion we mean the replacement of another operating system, but if you need to leave the computer clean, you just need to exit after formatting and not continue installing the OS.
The deletion process for 7, 8, 10 will differ only in the formatting method, it will be a disk or flash drive with a new operating system or a special, previously prepared, drive with a formatting program.
note, before you start uninstalling the operating system, remember on which partition it is installed, and also save all important files from the desktop and documents. All data from the formatted disk will be completely removed.
After correct setting
boot priority most often this message appears after checking the hardware and instead of booting Windows. 
Push any key and the installation process will begin. Then the process of downloading the required files will begin. 
The interface will load Windows installations 7 (other versions are the same). We choose language, time format and currency, keyboard layout or input method and click next. 
We are not afraid to click install. 
Read license agreement and put a tick “I accept the terms of the license agreement”. Click on next. 
Selecting an item complete installation
Windows 7. 
Or custom installation in Windows 8 
Click on the button " Disk setup». 
We choose required disk and click " Format" or " Delete". When deleted, the section turns into unallocated area, i.e. the label is removed from the volume. After that we need to press the button create(to set a new label) and format... In most cases, it is enough to click the - format button to delete the data from the disk. 
Removing the system using the Windows XP installation disc
If you do not have a disc with a new operating system or you old computer which does not support such versions of operating systems and you have a disk with Windows XP. In that case, the following actions are necessary.
Everything previous actions are similar on any operating system. The differences start in the setup interface itself.
Wait a little and after loading you will see a greeting like this. 
We read the license agreement and if agree, click F8.
The installation program will find an already installed system and offer to restore it or install a new... We need a second option. Push ESC.
A list of sections will appear. Select using the arrows on the keyboard desired section and press the D key 
We read, we double-check ourselves. If everything is correct, everything suits you, press Enter ( Enter)
We double-check ourselves and press L for removing. 
Now if you need to leave your computer clean no operating system, press F3, if you need to install an operating system, then create a partition and then proceed to installing the operating system. 
Other ways to remove the operating system from your computer
In order to demolish Windows in this way, you need a previously prepared storage device (DVD, CD, Flash), on which there will be a formatting program. The programs are varied, but the principle of operation is the same everywhere.
Example of work Live CD AOMEI PE BUILDER 
Some Live CD they look like a regular operating system, although in fact they are loaded from a disk or flash drive. AOMEI PE Builder example. 
Selecting the built-in Live Cd formatting program in in this case it AOMEI program Partition Assistent... Different Live Cds have different formatting tools. 
We choose HDD if there are several of them, select the disk with Windows, click right key mouse on the disk and select format partition(Format Partition). 
A confirmation window will appear, indicate the label for the disk, indicate the file system (it is better to leave the same if you don’t understand this), leave the cluster size at the default.
After endings formatting can be exited, the system will be deleted.
There is another way uninstall windows... To do this, we need to enter command line ... In the case of the Live CD, go to the start and select the item " Command line».
Now it is enough to use one single command - format x:
 Instead of X write any drive letter and press Enter. After that, the operating system will kindly warn us about deleting all data from this volume. Agree by pressing the key Y and Enter... In the picture below you can see how removing a disk from the command line looks like.
Each windows user knows that the most effective method eliminate problems related to the operation of the operating system - reinstall Windows. However, if you have not yet experienced the procedure reinstall Windows then without detailed instructions not enough. In this article, you will find step-by-step instructions that will guide you to reinstall Windows 7.
Reinstallation of Windows 7 will take place in three main steps:
1. Creation bootable USB or a disk with Windows 7;
2. Entering the BIOS to select a bootable USB flash drive or disk as the main boot device;
3. Windows 7 reinstallation process.
Stage 1. Creating a bootable USB flash drive or disk with OS
To be able to install Windows on a PC or in case of serious problems, it must be written to removable media- USB flash drive or disk.
For a disc, you need a blank DVD-R or DVD-RW, and for a flash drive will do any with a volume of 4 GB or more.
To burn a USB flash drive or disk, you can use the program UltraISO , a link to which is at the end of the article.
After installing UltraISO, launch the program window and go to the item "Bootstrapping" - "Write image of the Hard disk " ... Followed in the field « Disk Drive» lead the letter of the drive or flash drive, and near "Image file" specify the path to Windows image 7 saved on your PC. Then click on the button "Format" to prepare the media for recording, and then press "Burn" .
Once completed, you can proceed to the procedure for reinstalling Windows.
Step 2. Entering the BIOS to set a bootable USB stick or disk as the primary boot device
Once the Windows media is prepared, you will need to set it as the first boot device. To do this, you need to get into the BIOS.
As a rule, the transition to the BIOS is performed as follows:
1. Click on "Start" and go to item;
2. As soon as the computer restarts, you need to press the button on the keyboard, which is responsible for switching to the BIOS. Typically, this is the key F2, but if it does not work, reboot over a new one and try the keys F1, F8 and Del.
3. If you cannot enter the BIOS, then, as a rule, at an early stage of turning on the computer, the name of the desired key may be displayed on the screen.
4. The BIOS entered successfully when you see the settings menu on the screen.
Now we go directly to the installation of the boot device. To do this, using the navigation arrows and Enter key to select, go to section « Advanced Bios Features "-" First Boot Device " and select your USB stick or CD-ROM. Click item "Save and Exit" to exit BIOS (parameter names may vary slightly).

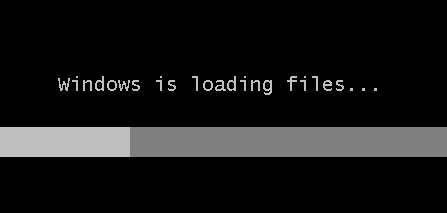
If you did everything correctly, a black screen with a Windows loading bar will appear on the screen.
Stage 3. Reinstall Windows 7
Wait a while for the window with the choice of the language for installing Windows 7 to appear on the screen. After setting the language settings, click on the button "Further" .

Select the button "Install" .
Select the drive where you want to reinstall Windows, and then select the item just below "Disk setup" .

Click the button "Format" ... Please note that the formatting procedure will delete all files and data that were previously saved on the selected drive.

After waiting for the completion of the process, a window will appear on the screen in which you must specify the name of the user and computer.

Next, you will need to provide a password to protect your account... If necessary, you can skip this procedure.


Select one of the three computer protection options and finally specify your time zone.
After waiting a couple of minutes, the screen will display a clean desktop. This completes the Windows reinstallation procedure and you can start setting up and using your computer.
If you look at the most visited topics on the forums, a pretty funny picture emerges. For example, some people buy laptops with a preinstalled one so that when they come home, they immediately remove all traces of it from the hard disk partitions.
Others, on the contrary, having acquired a computer with a well-known software product from Microsoft, begin to study how to demolish Windows. So, really, how many people - so many opinions. In this article it will be on how to demolish Windows. By the way, the name for the Windows operating system).
Erase! Can't be left!
The reasons why it becomes necessary to remove Windows can be very different. Let's list the main ones:
- a laptop was purchased with a preinstalled operating system, the version of which does not suit the user. For example, the starting 7, in comparison with the most advanced Ultimate, has a number of limitations that make it less convenient to work with;
- due to malfunction installed system its update is required;
- the license period has ended;
- other reasons.
At the crossroads…

It is known that in order for the ship to arrive at its destination, the captain needs to know his current location on the map, the destination and the route of movement. For completeness, a third point is sometimes mentioned - the source port. This principle is true for almost all situations in life, and the answer to the question of how to demolish Windows is also no exception. You don't need to graduate from academy to delete files from your hard drive. You can demolish Windows in a couple of minutes, the main thing is to choose a method. But it depends on current state and the desired end goal. For example, for some people, a complete reformat is fine. partition hard disk, but such a cardinal method is not suitable for others.
Methodology
So how to demolish Windows? Let's consider the main options.
First. Winchester is divided into several partitions, on one of which the operating system is installed. In this case next steps depend on whether there is system partition files to be saved.

Suppose all necessary information ported to other media. In this case, starting the installation new operating system(both Windows and Linux), to the installer's question about choosing a partition, you must specify the one where the system to be removed is located. Then select the "Format" option. That's all - the partition will be cleaned up, and no trace of the old files will be left. This method not suitable for using hard a disk with a single partition.
The second method assumes that the required data remains and needs to be restored later. This means that when choosing a partition for the system, formatting should not be used. All new Windows versions discovering old installation, will transfer all its files to the Windows.old folder, from where you can copy what you need in the future, and delete the excess with Explorer. Quite a convenient way.
And finally, you can use a special Live-CD (you can download it from torrents). From it you should boot into a simplified operating system and erase all files with an explorer old Windows from the hard disk partition. The required data can be saved. Since not all Live discs work with AHCI mode, then you must first switch the subsystem of the hard drive to IDE (Native) in the BIOS.
As you can see, everything is simple. The main thing is to choose the best option for yourself.
If you purchased a laptop on which the "Seven" is installed, and for some reason it does not suit you, you want to install XP, I will now tell you about how to take Windows 7 off the laptop.
What does that require?
In the case when you previously did not have experience in this matter, it is better to seek help from a professional. As for how to demolish Windows 7 yourself, you will need your laptop with the "Seven" installed; a flash drive with a USB connector, the volume of which must be at least four gigabytes; setting laser disc with the operating system that you are going to install on your computer (in our case, it's XP) and, of course, Internet access. The only thing I want to warn you against is formatting the hard drive. You will need a working computer in order to prepare the installation files new system so don't do that.
Before you demolish Windows
First, make sure that you have required drivers for your hard drive. This is necessary in order to avoid possible problems recognition by the hard drive system. Usually, necessary software is located on the disc in the kit or on the official website. Write down the downloaded firewood on the USB flash drive. Next, download the image of the required disk with the operating system, burn it to a disc. This is done with the help of Nero or Daimon. When the burning is complete, insert our USB flash drive with drivers and reboot the device.

Starting the drive and installing drivers
If you are still interested in how to demolish Windows 7, we continue. When the next launch of the laptop is carried out, press and hold the F8 button. A menu for changing boot device should appear. Select DVD-ROM and start loading from it. Based on the menu prompts, install the hard disk drivers. This is done when the system reports the absence of the device. You just need to specify the path to the flash drive. After your hard drive is identified, look for the partition where your "Seven" is installed. You have to format it to file system NTFS.

Completing the installation
Consider that you have received the answer to your question on how to demolish Windows 7. While your Piggy is being installed, the device will repeatedly perform the reboot process. Don't let this scare you or confuse you. You shouldn't pay attention to it special attention and try to prevent the computer from doing so. When everything is over, your laptop will automatically boot the new operating system from the standard hard drive. And although the system will already be installed, that's not all.
Recognition of all equipment
In order for all the devices that are in the computer to become operational, they must be determined by the system. To do this, visit the website of your device manufacturer and download drivers for each undefined object. Remember that you are now interested in the XP section. That's all. Now you know how to demolish Windows 7. But I still recommend making friends with the "Seven", since this system is more modern and functional.


