Hi all. I recently learned about one very interesting feature that allows you to completely hide a shortcut from your desktop from prying eyes, which may be useful to you if you need to hide some important document and so that only you know about its location on the desktop.
And today I want to talk about this function, showing how to make the shortcut invisible and nameless.
In one of the previous articles, I wrote as a shortcut, but did not explain how to make it invisible and I want to fill this gap.
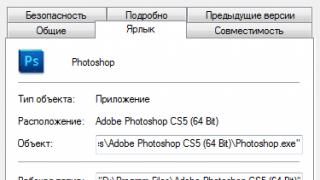
To begin with, in the context menu of the program whose icon you want to hide (let it be Photoshop), open the “properties” item and in the window that appears, click the “change icon” button.

The system will offer the native Adobe Photoshop icon, but since we want to make it invisible, we need to go to the directory where these invisible icons are stored.

To do this, click on the “Browse” button, and then go to: Local drive C → Windows → System32 → Shell32.dll. If you cannot find the last file or simply do not want to look for it, then enter its name: “Shell32.dll” into the search bar of Explorer; the article about it describes in detail how to do this.
When you find the Shell32.dll file and open it, you will see this:

On my computer, I found four colorless icons at once, but after trying all four, I still could not hide the shortcut, because instead of becoming transparent, it became black.
If everything is exactly the same for you, then I strongly recommend downloading the Blank.ico icon and clicking the “Browse” button again and specifying the path to this icon on your computer. After this, the program icon will become invisible.
How to make a shortcut nameless?
First, you need to select the shortcut itself, but I’ll show you an example of the same Photoshop, which we made invisible a little earlier.


Now, you know how to make a shortcut invisible and nameless, most importantly, do not forget where you left it, but best of all, move it to one of the corners of the desktop or create a . And that’s all for me, finally, I can recommend you to do a little magic with them, making them larger or smaller. Thank you all for your attention and see you soon.
I don’t know about anyone, but for some reason, after installing the Windows 7 operating system, I always want to get rid of the support center icon along with its annoying notifications. For those who don’t know what I’m talking about, this whole thing is located near the clock, look at the screenshot:
Let's figure out how to hide certain notification icons in the Windows 7 operating system. I will show using the help center as an example.
And so we press “Start”. A menu that is already familiar to us pops up, look for an empty space and right-click on it, select “Properties”.
In the window that opens, go to the “Taskbar” tab and click on the “Customize” button.


Let's check what happened:
I got what I wanted, the support center notifications disappeared. Now you know how to hide notification icons.
pc-knowledge.ru
How to hide or show icons in the notification area of windows 7/8.1
Good afternoon, we continue to study operating systems of the Windows family. The notification area is located on the taskbar and contains program icons that provide status information and notifications for items such as incoming email messages, updates, and network connectivity. When installing a new program, in some cases you can add its icon to the notification area; the convenience is that you do not close the application, but it is minimized there for quick, subsequent access to it, this saves a lot of time.
How to customize windows notification area icons
Today we will talk about Windows 7 and 8 notification icons. Many people ask how to remove unnecessary icons from the right side of the taskbar, since some people are frankly annoyed by them, and their number can be very large, especially in cases where you buy a laptop with Windows 7 or 8.1 already installed and my example is still very harmless.
Sometimes there are opposite questions: “I installed an antivirus, at first the icon was there and then disappeared,” a person panics, especially someone who is just getting acquainted with this operating system, and there is no need to blame him for this. Both can be easily resolved. In order to remove unnecessary icons from the system area of the taskbar, you need to click on the arrow next to the language menu and click on “Customize”.
How to hide or show icons in the windows notification area-01
After this, a window will open for us to select icons and notifications displayed on the taskbar. Next to each icon there is a drop-down menu with three options:
- Show icon and notifications
- Show notifications only
- Hide icon and notifications
We choose the desired option and enjoy life, I advise you to go through all the Windows 7 notification icons, make your own checklist, so to speak, and only add new ones in the future.

How to hide or show notification area icons windows-02
If you accidentally checked the Always display all icons and notifications on the taskbar box and don’t know how to put everything back in its place, then through the “Start” menu go to the “Control Panel” and select “Notification Area Icons”, and then proceed as written earlier diagram.

If we need to not just hide, but disable the display of a particular service, then follow the link “Turn system icons on or off.”

How to hide or show icons in the windows notification area-03
However, I will immediately note that you should not count on the ability to connect/disable icons and notifications of all services in this way. If you want to restore everything to its original state, then there is a Restore default icon behavior button for this. I would like to note that you cannot remove icons from the notification area, since this is not possible, you can only hide everything that you think you do not need and those who write that they can do this are simply deceiving you.
Although removing the Windows 7 notification icon can be considered a stretch, simply uninstalling the desired application, some utilities in their settings also have their own settings for hiding
I hope you now know how to clear the Windows 7 notification area icons and you won’t have any additional questions, but if you do, I’ll be happy to hear them in the comments.
pyatilistnik.org
How to remove icons from the windows taskbar?

For greater clarity, it occurred to you that you need to change the appearance of the folder. You can do this by going to the "Folder View" property. Just remember that these changes will affect all folders currently open on the computer.
What is the Windows 7 taskbar - this is a horizontal strip on your desktop on which shortcuts are placed to quickly open the necessary programs. When a program is placed on the taskbar, it can be seen among other shortcuts. PC users can easily configure these shortcuts, add or remove the necessary programs. The notification area also contains programs, only those that are currently running. You can always easily add, change and delete the display of these programs. How to remove icons from the windows taskbar?
1. Go to the very bottom of our screen.
2. Right-click on the shortcut with the program we need.
3. Select the “Remove a program from the taskbar” option.
How to remove icons from the notification area?
1. Right-click on the notification area and in the window that appears, select “Settings.”2. Go to the “Notification Area” tab and click on the “Customize” link.3. Here you can enable or disable the icons that will be displayed in the notification area.
4. Select the icons that we want to disable and click “Disable”. Click “OK” to save all these changes.
www.dirfreesoft.ru
How to remove unnecessary tray icons on the taskbar in Windows 7

There is a certain area on the taskbar called the notification area, but more often they say tray. Therefore, you can often hear phrases such as: “Look in the tray to see if there is a program icon there,” “Minimize to tray,” “The program hangs in the tray,” etc.
This area is located on the right side of the taskbar, we can say that it is located between the language bar and the clock. This area stores icons of programs that work “in the background”, i.e. these programs can perform their function without user intervention; these can be antiviruses, some utilities, firewalls, etc. These icons can be used to quickly launch a program or contain a minimal set of program control commands. With a large number of such programs, the tray area expands significantly; to reduce it, a button was invented in Windows 7, when clicked, a small window pops up where hidden icons are located ( icons) programs. This button has an arrow pointing up.
Hiding icons (icons) in the taskbar tray in windows 7.1. Right-click on the "Start" button and select the "Properties" menu item;2. In the "Taskbar and Start Menu Properties" window, go to the "Taskbar" tab;3. The window that opens will display all the icons that are in the taskbar tray;4. Now you need to configure the display of each of the icons; to do this, there is a drop-down list to the right of the icon;5. Select the desired value:
- "Show icon and notifications" - the icon will always be visible in the taskbar tray.
- "Hide icon and notifications" - the icon will always be hidden; - “Show notifications only” - the icon is always hidden, but if there is some message from the program for you, the icon will appear in the tray with the program’s message.
6. Click "OK" and close all windows";
For some convenience, there are 3 group operations with icons in the notification area, these operations are located at the bottom of the icon settings window: - “Turn on or off system icons” - hides all icons except the system ones: clock, network, volume, power, support center. - "Restore default icon behavior" - resets all your settings to the original ones (made by Microsoft). - checkbox "Always display all icons and notifications on the taskbar" - opens all existing icons in the notification area of the taskbar.
Some time ago, when asked what kind of wallpaper is on my desktop, I would have answered something like “I never see my wallpaper, I have shortcuts on my desktop and in general, I work on the computer.” However, now I began to catch myself thinking that the further I go, the more relevant the aesthetic side of the work becomes. Fortunately, the power of modern computers already allows you to leave the beauty of the Aero interface on without compromising functionality. As a last resort, you can use some unnecessary services.
However, my long-term habit did not allow me to give up shortcuts on my desktop, so I began to look for a way to “eat the fish and never get into the boat.” This method turned out to be the use of several desktops along with a quick access panel, as well as hiding shortcuts on a schedule.
The concept of multiple desktops has been used for quite some time in the world of Linux and Mac OS X, and with Windows 10, Microsoft has finally woken up. The Top Ten added support for multiple desktops, but the functionality turned out to be limited (you cannot use different shortcuts on different desktops; only active applications are distributed across them). For a full-fledged “multi-desktop” I have been using the Dexpot program for a long time. The utility is “portable” (does not require installation on the system), you can use it like this:

This completes the initial setup of the Dexpot utility; the system has several desktops, each with its own design. The functionality of the program is, of course, much broader, but in this article we only touch on managing shortcuts.
Winstep Nexus Dock
The second utility we are reviewing today for optimizing your workspace is called Winstep Nexus Dock. It serves to place shortcuts to frequently used applications on colorful animated dock panels. Let's take a closer look at the utility:

AutoHideDesktopIcons
Finally, the “final chord” of optimizing the workspace is the ability to temporarily hide certain program shortcuts without deleting them from the desktop. This functionality is provided by a small “portable” utility with the self-explanatory name AutoHideDesktopIcons. To use it, do the following:

As a result, by clicking the mouse on the desktop, the shortcuts are displayed, and after a period of inactivity specified in the settings, they disappear, leaving the desktop clean. 

Do you want to surprise your friend on the computer? Hide icons on the Windows desktop. The effect will be even better when, before hiding them, make a printscreen of the screen and set it as the background image.
Thus, you can get the effect of “dead icons” that cannot be clicked. Many will never understand what to do with it
Hiding icons in Windows XP
- Right-click anywhere on the Desktop.
- From the pop-up menu, select Arrange icons and then uncheck . The icons should disappear.
- To make icons visible again, do as before, but this time select the function Show desktop icons.
Hiding icons in Windows 7 - method one
- Right click anywhere Desktop.
- From the menu that appears, select View, and uncheck the box Show desktop icons. The icons will be hidden.
- To make them appear on the Windows desktop again, select the option Show desktop icons.
Hiding shortcuts in Windows 7 - the second method
If for some reason the previous method did not work, the final solution remains:
- At the Start menu command line, type gpedit.msc and press Enter.
- From the directory tree located in the left column, select User Configuration → Administrative Templates → Desktop.
- From the options located in the right column, select Hide and disable all desktop components. If you enable this option, all icons (including Recycle Bin, My Computer, Network Places), as well as other items located on it, disappear from the Windows desktop.
- Click Apply and then OK.
- Restart your computer.
- For Desktop items, change the setting to Not Configured. Confirm again and restart your computer.
Users need to hide applications on their phone or tablet for two reasons. The first is the desire to keep your personal life, secret correspondence or photo gallery secret. The second is a large number of rarely used icons on the application bar, making it difficult to find the ones you need. How can you hide icons on Android?
How to hide application icons using standard Android tools
Developers offer applications for masking unused icons, and Android versions 4.0 and higher have a built-in function for removing unnecessary icons. To hide icons, follow the instructions below.
Application panel
Application panel - a menu that contains icons of installed programs and games. The icon hiding feature is available on Android 4.0 and above. Instructions:
- Go to the application panel. On a smartphone, the icon is located in the bottom panel of the main screen and looks like a circle or square with 6-9 squares inside. When you open the panel, you will see icons of installed programs.
- At the top you will see the Apps and Widgets tabs. Go to the applications tab.
- Find the button that opens the advanced options menu on your phone. In new smartphone models it is located in the upper right corner of the screen, in previous models it is located in the lower right or left. Tap the button and select Hide Apps.
- Check the icons you want to hide. The number of selected icons is shown at the top of the display.
- Click the "Done" button at the top right of the display - the icon will disappear from the application tray.
Remember! Program icons do not fit on the display and can take up two or three pages. While hiding icons, scroll the list of icons to the right or up to see them all.
To show previously hidden icons, follow the same steps and uncheck selected applications by tapping each one.
How to hide icons using the app drawer (gallery)
Step 6 - You can hide multiple icons if needed Step 5 - Make sure apps are hidden Step 4 - Highlight unused icons
Step 3 – Select “Hide/Show apps” Step 2 – Select the options menu Step 1 – Click on the app drawer icon
Phone settings
The second way to hide applications is to use the standard settings. Suitable only for pre-installed programs that the system does not allow to remove. The function is available on Android version 4.0 and higher. Instructions:
- Go to your phone settings, go to the “General” tab and select “Applications”.
- Scroll to the All tab.
- Select the application you want to hide and tap the appropriate option.
- Click the Off button on the right side and confirm your selection in the dialog box.
- Repeat for other applications.
To return disabled applications to the list, go to the application settings again, select the “Off” tab, open the disabled applications one by one and click “Enable” for each. The icons will appear in the application drawer.
How to remove icons through settings (gallery)
Step 6 - If necessary, return the icon to the menu Step 5 - Make sure the application is hidden Step 4 - Confirm the action
Step 3 - Disable the application Step 2 - Go to the All tab Step 1 - Select Application Settings
How to hide icons through launchers
Launchers such as Apex or Nova allow you to hide icons for programs you rarely use.
A launcher is a program that visually and functionally changes the Android interface.
The method is suitable for versions of Android that support the installation of a launcher (usually starting from version 4.0).
Apex Launcher
- Install the launcher and open Apex Settings.
- Select "App Menu Settings" and then "Hidden Apps."
- Check the boxes next to the programs you want to hide and click “Save”. Checked icons will not appear in the Apex menu.
By default, the launcher icon is hidden. You can add it to the application bar by unchecking the box.
To return hidden icons, repeat the previous steps and uncheck the programs. Additionally, uninstalling Apex will automatically return the menu to its default appearance, which will cause hidden icons to start showing up.
How to hide icons through Apex Launcher (gallery)
Step 4 – Check the required apps Step 3 – Select “Hidden Apps” Step 2 – Tap on “App Menu Settings”
Step 1 - Select Apex Settings
Nova Launcher
The Nova Launcher application is available on the Play Store. By installing the paid version of Prime, you can hide app icons. Instructions:
- Open the application drawer, select Nova Settings.
- Open the “Application Menu” in the list and in the “Groups in the Application List” tab, select “Hide Applications”.
- Mark the required programs and exit the menu with the “Back” button. Changes are saved automatically.
Instructions for hiding applications through Nova Launcher (gallery)
Step 3 - Select the hide feature Step 2 - Select the applications menu Step 1- Select Nova Settings from the application drawer
How to hide icons from strangers with Hide it Pro
The Hide it Pro program allows you to protect the user’s private “mobile” life from interference by strangers. In the menu it is displayed as an Audio Manager program so that uninvited guests do not recognize the true functionality. When you open the application, you will see sound settings - alarm volume, ringer volume, notification volume. To get to the secret part of the program, press and hold the logo. The program will prompt you to choose a locking method - a numeric password or an alphabetic one. Instructions for further actions:
- Provide your email address to recover your password. You can skip this step.
- After entering your email, a menu with sound settings will open. Click on the logo again and sign in using the password you created. You will be taken to the main menu of the program.
- Select the Hide Apps icon. To the warning about the need for root rights for the program to work correctly, answer “OK”.
- Go to the “All applications” tab, select the item you want to hide, and confirm the action.
In addition to icons, using the program you can hide private pictures or videos, as well as set passwords for opening applications.
Attention! If you do not have Root rights on the system, Hide it Pro will not work.
How to Hide Apps Using Hide it Pro (Gallery)
Step 6 - Confirm that you have root rights Step 5 - Select Hide Apps Step 4 - Set a login password
Step 3 - Select Password Type